

UnrealEngine4Blueprints (6)
.pdfStep #12 From the conversion (Int to Float) that we’ve created, drag from the empty float pin (on the right) and drag to the right to open up the CBL. Once open, type in “Subtract” and select “Float Float”.
Step #13 In our “Subtract” node, notice that our Size X is connected to the top pin of the left side and the bottom pin of the right side has “0” in it This basically means “Subtract 0 from Size X”. So where it says “0”, type in “250” and connect the right hand side empty pin into our “Screen X” of our Draw Material Simple.
What did we just do? As explained, the we minused 250 from our Size X. This is the way all equation nodes like “Subtract” work. It’s the bottom number then (What kind of node it is) to the top number. So if we put 50, it would subtract 50 from our Size X.
Our coin now sits nicely on our screen, but we need to add some text to our screen. So be sure to Compile and Save our Blueprint (So we don’t lose any work!) and then go back to our “Draw Material Simple” node.
91

Step #14 From the empty righthand side pin of our “Draw Material Simple” node, drag to the right and when the “Compact Blueprint Library” pops up, simply type in “Draw Text”. But before we continue, there’s one quick thing we have to do.
If you haven’t already, go back into your Content Browser and at the bottom, there’s an icon called “View Options” with an eye just before it. Click it and set “Show Engine Content”. Once it’s set to show the Engine content, head back into your HUD_FirstBlood.
Step #15 Where it says Font, set the font to “RobotoDistanceField” (If you’re not showing Engine content, you won’t see it!)
Step #16 Just like before, set your properties to the same as I have it. If you can’t see:
Target: Leave as self
Text: Put a lowercase “x”
Text Colour: Set to White
Screen X: You can leave this as we’ll set it the same way we did it before.
Screen Y: Set to “120”
Font: You should have already changed this to “RobotoDistanceField”
Scale: 2.5
Scale Position: Leave unchecked
92

Step #17 Select our “Size X”, the “Int to Float” converter and our “Subtract” nodes by dragging a box over them (Or using [Hold] Ctrl + [Press] Click). Once they’re all selected, Copy and Paste them by pressing Ctrl + W. Drag the newly created Nodes over to our “Draw Text” node and hook up the Subtract node to our Draw Text’s Screen X.
Before we do anything else, be sure to change your newly copied subtract to “150”, so it doesn’t overlap our Coin.
So we’ve got our Coin and then an x just after to separate it from what will be our score number. Before we actually put in the Score, we’re going to have to set a few Variables first.
We’ll also set some Variables that we’ll need in the future, just to save some time.
Step #18 In the Variable Library on the left, Create four new Variables. This is what we’re going to create:
And here’s how we create them!
93
Once you’ve created four variables, click the “NewVar”’s and one by one, in their properties where it says “Variable Name” Set them to:
#1 BlueMode
#2 RedMode
#3 GreenMode
#4 Score
So now we have the four Variables named correctly, they need to be SET correctly too, otherwise they won’t work like we want them to.
Go back to BlueMode’s properties (By click it in the Variable Library), Just under “Variable Name”, there’s a part called “Variable Type”. Click the dropdown box (Which should say “Int” at the moment) and set it to Bool (Red).
Repeat this for RedMode and GreenMode.
What did we just do? We set RedMode, BlueMode and GreenMode to a Bool which means we’ve changed them to “Yes or No” variables (Meaning they can be either “Yes” or “No”. We set Screen X and Y earlier both to “Int” which is short to Integer, which is a number, So it can be 0, 1, 2, 1.5, 2.25 .etc.
I wrote a description on the variable type’s earlier, but in case you missed it:
Bool Yes or No’s that can be stored and reused
Float Number value (That can has decimals) that can be stored and reused Int Number value (That can’t have decimals) but can be used to find things in Arrays
String Text that can be stored and reused later
Array Collection of items / Ints that can be stored and reused later
All we have to do now is make sure “Score” is an Int by setting its Variable Type so. Once done, all that is left is to click the closed eye next to each Variable (See the picture just above this step) to “Open the Eye” on each four of our variables.
This means that other Blueprints can see these Variables and edit them. Why have we done this? I’ll explain when we get there but for now, head back over to our Blueprint and…
94

Step #19 Select your “Draw Text” node by clicking it and Ctrl + Click the nodes connected to the “Screen X” of our Draw Text. Once the “Draw Text”, “Subtract”, “Int to Float” and “Size X” variable are all selected, press Ctrl + W on your Keyboard to duplicate the Nodes.
Once duplicated, drag them over to just passed our original Draw Text nodes. You should now have something that looks like:
I’ve made one alteration (Which you should too), which is: I’ve changed the Subtract to 110 instead of 150 (So the X isn’t overlaying the number [Score]!)
Step #20 Drag your “Score” variable you recently created into the Blueprint and when given the option “Get” it (Not “Set” it!).
Step #21 From the empty pin to the right of our “Score” variable, drag to the right and type in “String” in the CBL. Select “To String (Int)”.
95

Step #22 Hook the empty pink pin of our “To String” to the “Text” pin of our second Draw Text.
What did we just do? You just set up a fully functioning Score counter! When we collect a coin, it will show up on our HUD so we know how many coins we have! We still need to code the coins in which we’ll do in a little while but for now pat yourself on the back! We’ve done some awesome things! If you zoom out, look how complicated the Blueprint looks yet how simple it was to create!
If Red Player, Red HUD. If Blue Player, Blue HUD!
Now that we have our Coin and Score in the HUD, we need to set the background of the HUD. We created the Materials earlier, and now we’re going to teach our HUD which HUD material to use and when!
96

Step #1 In your HUD_FirstBlood blueprint, head back to the “Sequence” near the start of our Blueprint.
Step #2 From the “Then 0” pin of our “Sequence” node, Click and drag to the right. When the “Compact Blueprint Library” pops open, type in “Branch”.
Step #3 From the Condition pin of our “Branch” node, Click the pin and drag to the left, when the CBL opens up, type in “Get Blue” and select “Get BlueMode” (The variable we created earlier).
What did we just do? As I mentioned before, a Branch is a “What if?” node. Because our “BlueMode” is a Yes or No variable (Bool), this translated to: “If BlueMode is True or False?” So we need to set what happens for each right now!
97

Step #4 If BlueMode is true, we want to set the HUD to be the Blue hud we created. So from the “True” pin of our Branch, click and drag the empty pin to the right and when the “Compact Blueprint Library” opens up, type in “Draw Material Simple”. This will become our Blue HUD.
As you can see in the image, where it says “Material” in our “Draw Material Simple”, I’ve set it to our Blue HUD (“Mat_HUD”). Do the same to your “Draw Material Simple” node.
We also need to get the Material to stretch to the screen no matter what the size of the Screen is. To do this, we’re going to use the Size X and Size Y variables which we created earlier to tell our HUD to draw the Material that size. This will also automatically rescale our HUD if the our Game’s Window size is changed at any point.
Step #5 From our “Variable Library” on the left hand side, Click and drag “SizeX” into our Blueprint (Before our Draw Material Simple) and when it asks if you’d like to “Get or Set”, select “Get”. Do the same for “SizeY”.
98

Step #6 Grab the open pin of our “SizeX” and hook it into the “Draw Material Simple”’s “Screen W” (Width of the Screen. Grab the open pin of our “SizeY” and hook that one into the “Draw Material Simple”’s “Screen H” Screen Height.
As you connect them up, the Engine will auto convert the “Ints” to “Floats” for us (How nice of it, Thanks Epic!)
That’s all we need to do for our BlueMode. It won’t show up ingame yet though (We’ll set that in a little bit!) but we now need to set up our GreenMode and RedMode!
Step #7 Ctrl + Click all of the nodes we just created after the “Sequence” (“Branch”, “Draw Material Simple”, “SizeX”, “SizeY” and their converters) but leave the “BlueMode” node. Once all have been selected (Apart from “BlueMode”), Press Ctrl + W on your Keyboard to duplicate them. Drag them above what we’ve just created.
99
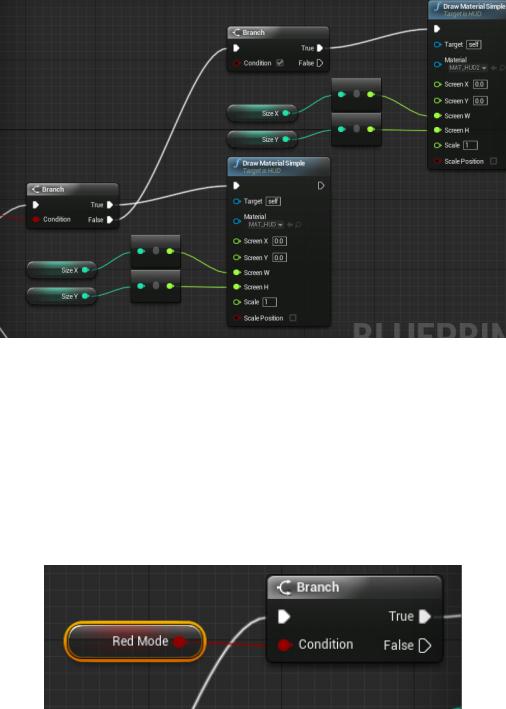
Step #8 From the “False” branch of our original “Branch”, drag it into our lefthand side input pin of the second “Branch”.
Step #9 Where we originally set the Material to “Mat_HUD”, we need to set the Duplicated version to the Second HUD image, so where it is “Material” in our Second “Draw Material Simple”, click the drop down box and search for “Mat_HUD2”.
Step #10 Our second “Branch” doesn’t have a condition yet. So we need to set one (Otherwise, the Blueprint is asking “What if…” and not thinking of anything else!) From the Variable Library on the left hand side, Click and Drag “RedMode” into the Blueprint, next to our Second “Branch” and when asked, select “Get” instead of “Set”. Once it’s in the Blueprint, simply hook it up into the “Condition” of our Second Branch.
100