

UnrealEngine4Blueprints (6)
.pdfStep #11 That’s all we’ve got to do for “RedMode”, now all we have to do is duplicate our “Branch” and everything after again for one last time.
So select your “Branch”, “Draw Material Simple”, “SizeX”, “SizeY” and their converters) by Ctrl + Clicking.
Once all are selected, Press Ctrl + W on your Keyboard to duplicate.
Once Duplicated, drag above what we’ve just created and we’ll make some final adjustments to compensate for our “Green” material.
Step #12 Just like before, Drag the “False” pin from our Second Branch to our newly created Left pin of our third “Branch”.
(Note: In the image, I forgot to copy over Size Y and this left an incomplete Int to Float. Copying any of the “SizeY” we’ve already placed down and connecting it to the open Int pin with a zero after will fix the issue!)
Step #13 Just like before, In our third “Draw Material Simple” we need to change the Material to “Mat_HUD3” (Instead of “Mat_HUD2”). We also need to addin the “GreenMode” condition.
See if you can do that without an explanation how.
It’s really simple, and it’ll help you begin your adventure in Blueprints without Tutorials. If you get really stuck, just backtrack to how we already did it a few steps ago.
101

Step #14 For the sake of keeping a HUD on our screen no matter what, Where it says “False” on our third “Branch”, drag to the right and when the “Compact Blueprint Library” opens up, type in “Set Blue” and select “Set BlueMode”.
Step #15 Click on the little box in our “Set BlueMode” node which isn’t ticked to tick it, which makes “Set BlueMode” true.
This means that if the screen isn’t Blue, it isn’t Red and it isn’t Green, it should set Blue to true so it’ll display the Blue screen.
Now let’s take a look at our Blueprint:
Look at how complicated it looks but how easy it is to follow now we understand what it does. Our HUD is now complete and now all we need to do is set up some gameplay specific events to make the HUD change about!
You’ve done a great job, well done! REMEMBER TO SAVE AND COMPILE.
102

Player meet HUD…!
Now that we have our HUD setup, we need to be able to control our HUD from the MyCharacter blueprint (Default Character blueprint from the Project Template).
If you’re not using the project template, then when I mention “MyCharacter”, I’m talking about your Character blueprint.
What we’re going to do before anything is setup the Character blueprint to give off the illusion of using Multiple characters, when in reality we’re just using one. Don’t worry, each character will have their own unique properties.
We’ll be using the default Unreal Engine 4 character for this!
First things first:
Step #1 Open up the “MyCharacter” blueprint. You can do this by clicking Game folder in the Content Browser and searching for “MyCharacter”.
If it doesn’t automatically load into the “Blueprint” section, (As always) use the topright ribbon to navigate to the “Graph” tab. If you’re in the “Component” tab or “Defaults” you’re not in the right place!
We’re about to add this to our MyCharacter Blueprint:
It looks a bit daunting but as we’ve seen time and time again, looks are very misleading with Blueprints, it’s actually rather straight forward when you understand what you have to do.
103

The first thing we need to do is tell our “MyCharacter” blueprint that the Material that is applied to the “Mesh” (The player character) can easily be changed and altered. To do this we need to venture into unexplored territory (Or rather territory we haven’t touched on in this book so far)!
Step #2 While looking at our Event graph (Blueprint) of our “MyCharacter” Blueprint, just above the Blueprint area, you should see a tab that isn’t currently open called “Construction Script”.
If you can’t see it, it is located here:
Once you’ve found the “Construction Script” tab, click it to open up our “Construction Script” Blueprint.
Just what is a “Construction Script?” Every “Class” Blueprint has a Contruction Script, to sum it up in as little words as possible, a “Construction Script” is where you can setup anything before everything else happens in the game. You can also use them for editor tasks (Procedural creation .etc) But we’ll go more into detail some other time!
For our example, we’ll be telling the game that the Material on the player can be changed, and that needs to be done as soon as possible, hence why we’re using the Construction Script.
Step #3 Once in the Construction Script, you’ll see a purple node called “Construction Script”, this is our base node and everything has to come from here.
From the empty pin of the “Construction Script” node, drag to the right and in the CBL that pops up, type in “Dynamic” and select “Create Dynamic Material Instance”.
104

Step #4 In the “Create Dynamic Material Instance” node, on the left side there is an empty “Target” pin that is coloured light blue. We need to use this to tell the Blueprint that it’s the player Mesh that we need to alter the Material for.
So click the empty pin next to “Target” and drag to the left. When the Compact Blueprint Library opens up, type in “Mesh” and select “Get Mesh” when it comes up.
What did we just do? We have told the “Construction Script” to tell the Blueprint that the Mesh (Player character)’s Material 0 (Element Index) [This is where all of the Material information is stored in the Default character] can be changed ingame.
What we need to do now is set this as a Variable, so that we can reference this action in our main Blueprint. We do this by…
Step #5 From the “Return Value” empty in of our “Create Dynamic Material Instance”, drag to the right. When the CBL shows up, click the option “Promote to Variable”. Within the Variable Library on the left hand side, click our “NewVar” and change the Variable Name to “characterMat”.
105
That’s all we have to do for the Construction Script. Now that it tells our Blueprint to let us modify the Material and given us the Variable to do so, we need to head back into our “Event Graph” and add some things to our Blueprint!
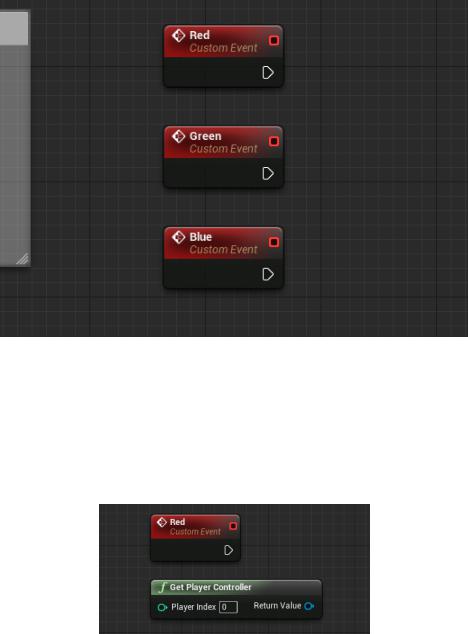
Step #1 In our Event Graph, in an empty space Right Click (Ctrl + Click) and type in: Custom Event. When given the option, select “Custom Event…” and name our Custom Event: “Red”.
Step #2 Repeat Step #1 for a Custom Event called “Green”. Once created, Repeat Step #1 again for a Custom Event called “Blue”.
This will be how we tell the HUD to activate.
Step #3 We need to cast to our HUD and the way we’re going to be able to do that is by Right Clicking (Ctrl + Click) and when the CBL opens up, type in “Player Controller” and select “Get Player Controller”.
106

Step #4 From the empty “Return Value” pin from “Get Player Controller”, click and drag to the right. When the Compact Blueprint Library pops open, type in “Get HUD” and select the “Get HUD” option.
Step #5 From the empty “Return Value” pin of our “Get HUD” which has been created, Click and drag to the right. When the CBL opens, type in “Cast” and select “Cast to HUD_FirstBlood”.
We’re now speaking to our HUD! Remember how we gave it specific variables (Yes or No’s) and various “If this variable is true do this…” branches? We’re going to put them to use now!
Step #7 Now that we’re taking to our HUD, we need to tell it that we want “RedMode” to be true but everything else to be false.
So from the “As HUD First Blood C” blue pin of our “Cast”. Click and drag to the right. When the CBL opens up, type in “GreenMode” and select “Set GreenMode”.
This will create a “Set GreenMode” which is already set to “No”. This means if “GreenMode” is already set to True, this will tell the HUD that “GreenMode” is now false.
Step #8 From the “As HUD First Blood C” blue pin (Which is now filled in, but ignore that fact), click and drag to the right again and this time type in “BlueMode”. Select “Set BlueMode”.
107

Step #9 When created, drag the “Set BlueMode” node to just after the “Set Green Mode” and connect their white pins together, leaving the righthand side pin of “Set Blue Mode” ready to be connected into our “Set RedMode” when we create it.
Step #10 By now, you should be able to guess what to do next. If not, that’s not a problem. Drag from “As HUD First Blood C” and when the CBL opens up, this time type in “RedMode” and select “Set RedMode”.
Drag the newly created node to the end of the “Set” chain (After “Set GreenMode” and “Set BlueMode”) and connect it to the Chain.
This time, RedMode needs to be set to true, so in the “Set RedMode” node, where it has the red pin then “Red Mode” and an empty box, click the empty box to set “Set RedMode” to true.
What did we just do? When you look at our Chain which we’ve created (From “Cast”) it goes: Set Green False > Set Blue False > Set Red True. This has told the HUD to turn off the Green HUD and Blue HUD but turn on the Red HUD.
108

Step #11 What we need to do now is repeat Step #3 Step #10 with GreenMode in mind and once again with BlueMode in mind. You should eventually have something that looks like this:
Here is an upclose version of the “Set” Nodes, just in case you need a hand:
So we have setup the HUD, but we haven’t setup how to trigger this event to happen. We have a Custom event connected to each one (Red Custom Event sets Red to true, Green Custom Event sets Green to true .etc) but we don’t have anything to trigger the custom events. So now is the time we’re actually going to create the event that sparks these events off.
109

Let’s Control the HUD and Player!
We have a HUD and a system within the Player to switch the HUD when we want it to, but we need to activate this change now. We also need to change the Player colour (Which we set up earlier).
This is the part where it all falls together.
Step #1 I’m going to be binding the different colours to different keys (Num 1, Num 2, Num 3). If you want to use a Controller, when I mention the keys, simply use whatever buttons you please (Such as “Gamepad Face Button Top” .etc).
So once you know the keys you’d like to use, Right click (Ctrl + Click) anywhere in your “MyCharacter” blueprint. When the Compact Blueprint Library opens up, Type in the Key of your choice, For example mine is the number “1”, so I’ll type in 1. You’ll see the key you want come up under Key Events in the CBL. So select the key you want and it’ll create an event with the name of the key as well as “Pressed” and “Released” nodes.
Step #2 We need to fire the events we created. As 1 is going to be my “Red” event, all I have to do is drag from the empty “Pressed” pin of my 1 node and when the CBL opens up, type in: “Red” and select the Red that comes up like this:
110