

UnrealEngine4Blueprints (6)
.pdfStep #5 Click the newly created “Constant” and on the left, you’ll find the properties. In this properties box, there’s a field called: “Value:” with 0.0 already inputted. For our example, type in the number of rows your Flipbook has. For me, the number is 5 (As I have ten images in two columns):
Step #6 Drag the open pin of your “Constant” to the “Number of Rows” node in your FlipBook.
Step #7 Press 1 on your keyboard again (Or search in the Library for “Constant”) to create another constant. This one is our Column number. For my texture, this is 2 (As I have 20 images split into two columns, 5 rows). Change the value and put in your amount of Columns. Once inputted, drag the open pin of your Constant into the “Number of Columns” of your flipbook.
HELPFUL TIP: On the top right of your Constant nodes, there is a little grey arrow. Pressing this will toggle the colour box to appear and disappear. For the sake of keeping your Blueprints neat and tidy, you can go ahead and toggle the colour up, so we only see the number value.
Step #8 Your Material should now look a little like this:
31

Now, underneath your Constants and the Flipbooks, Right click (Ctrl + Click) and this will bring up a compat version of the Blueprint Library. In the search field at the top type “Texture Object”, this will reveal a few options. The one we’re looking for is “Texture Object”, so click it and it will create a Texture Sample node.
Click your newly created “Texture Object” and on the left in your Properties box, there is a box named “Texture”. Just to the right of this box, there is a dark gray box with “None” written in it. Click this box and in the search box that appears type in the name of your Spritesheet. My Spritesheets name is “TEX_PortalAnim” so I’ll type that in and select it. This will set the “Texture Object” node to become the “Spokesperson” sotospeak for our Texture:
Step #8 Hook up your Texture Object’s white pin to the “Texture(T2d)” node of your Flipbook.
32

Step #9 In the “UVs” pin of your Flipbook, Click the pin and drag to the left. This will load up the “Compact Blueprint” library again. In the search box, this time type: “TextureCoordinate” and Press Enter on your keyboard.
This will create a TextureCoordinate, which the Unreal Engine documentation describes as: “The
TextureCoordinate expression outputs UV texture coordinates in the form of a twochannel vector value allowing materials to use different UV channels, specify tiling, and otherwise operate on the UVs of a mesh.”
Step #10 Remember to Save by pressing the floppy disc widget at the top of the Material Editor! You can now exit the Material editor.
If you have More than One Spritesheet:
This is not advised for beginners. We’re going to be stepping into some pretty complicated territory.
To get a glimpse on how complicated this step can get:
Step #1 Open up the Material Editor by double click your Material.
33

Step #2 Inside the Material Editor, Left Click “Texture Sample” (Connected to Base Colour) and press Delete on your keyboard or Right Click (Ctrl + Click) and press Delete.
Step #3 From the “Base Colour” pin, click the pin and drag to the left into empty space. When the prompt box comes up, write in “If”. Click the option “If” that comes up and an “If” node will be created in your Blueprint, preconnected into your Base Colour pin.
Step #4 On the If Node, Pins “A”, “A>=B” and “A<B” all NEED to be filled in for the Blueprint to compile. So in order to make our Blueprint work, we’re going to use a time system; So our Material knows which Spritesheet to play at any given time.
From Pin “A” of the “If” node, Drag to the left and the Compact Blueprint Library loads up once more. From this, select “Multiply”.
We need a Multiply node as we’re going to be going be taking the decimal number of “Time” (After it’s been divided) and multiplying it with a number (In our case, I urge you mess around with the number we’re going to create as it’ll let you alter the speed of your Flipbooks).
Your Material should now look like this:
Step #5 From the A pin of our “Multiply” node, Drag to the left again and in the search box, type in “Frac”, this will get the decimal from Time and multiply it with a number to define the speed of our Flipbooks.
34

Step #6 From the empty left side pin of “Frac” drag to the left and in Compact Blueprint Library, type in “Divide” and press enter. This will give us a Divide node, which we’ll need to divide the time with our number we set for the speed of our Flipbook animation.
Step #7 From the empty “A” pin of our “Divide”, drag to the left and in the search box that appears, type in “Time” and select the Constant “Time” that appears, this is our key “Time” component that this whole Material relies on.
Step #8 Below our “Time” node, Press 1 on your Keyboard (Or search in the Blueprint library for Constant) to create a Constant. In the properties (In the lower left of your screen) set the value of the Constant to 5.
This is the speed of your Material’s animation and might need to be changed later.
35

Step #8 From the empty “B” pin of our “Divide” node, drag to empty right pin of your Constant to connect them together.
Your blueprint should now look a little like this:
Step #9 From the filled in White pin of our Constant (Which is already connected to “Divide”), click and drag to the B of Multiply, which should currently be empty. This will establish a link from the Constant to not only Divide but to Multiply.
Currently, this means that the Material is currently:
Checking the time it’s been running for > Dividing by 5 (Or whichever the number you’ve set) to determine the speed of our animation. Then it’s getting the decimal of the equation and then multiply the answer by 5 (Or whichever number you’ve set).
For example:
Time is 32.231 seconds. 32.231 / 5 = 6.4462
Now it’s taking 0.4462 and times this by 5. This is now 2.231.
This will then ask the Flipbooks in the Material: “Hey, which one of you is higher than 2 but lower than 3”? In which metaphorically speaking, the correct Flipbook would raise it’s hand.
36

So now, your Material should look like this:
Step #10 Let's go back to our If statement. We've filled the "A" pin, but the rest of the pins remain empty. Now it's time for us to change that. Create a Constant (Press "1" on your keyboard or search in the Library on the right for "Constant") and in the properties on the right, set the value to "1".
For our If statement, A represents Time and B represents "What Flipbook is this?". Since this is the first Flipbook in the chain, we're going to set B to one and we do this by connecting the Constant (With a value of 1) to B.
37
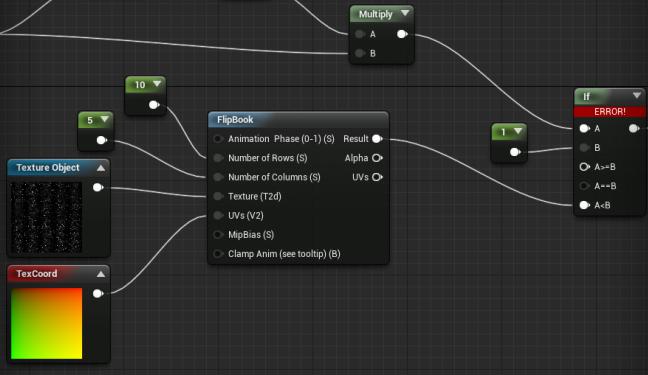
Step #11 – Grab the empty pin "A<B" (At the bottom of the If statement) and type in the search box "Flipbook". This will be the basis of our first stage of our Animation.
Step #12 – Create two constants for our Flipbook, one representing the amount of rows of our Spritesheet and the other representing our Columns (Press "1" on the keyboard or search for it from the library. The properties to alter the values are on the bottom left of your Material Blueprint).
Step #13 – Drag the empty pin of the Flipbook node ("Texture T2d") and in the search box type: "Texture Object". In the properties of this Texture Object, set the first Spritesheet.
Step #14 – Drag the empty pin "Uvs" from our Flipbook node and search for "Texturecoordinate".
Step # 15 Our first Flipbook is set up, but here is where we’ll branch once again:
38

If you have ONE more Spritesheet:
Step #1 Copy your Flipbook and the children nodes (Ctrl + Click the nodes onebyone and then press Ctrl + C on your keyboard (Alternatively, Right Click [Ctrl + Click] and select Copy).
Step #2 Press Ctrl + V (Right Click [Ctrl + Click] the empty space underneath your Flipbook to create a copy of our Flipbook.
Step #3 Click the Texture Object and in the Properties field, change the Texture to your Second Spritesheet. (Also alter the Constants for Row and Columns if need be!)
Step # 4 From the empty Result pin of our second Flipbook, Drag and connect it to “A>=B” of the If node.. Once this is done, go to the newly filled white Result pin of our second Flipbook and also drag it to “A==B” of our if node. All of the “If” pins should now be filled.
What did we just do? Let’s take a look at our If node. Here is what it’s now doing: If “A” This is the current time of the Material.
39

If “B” This is what Flipbook to play.
If “A>=B” If the time is more than or the same number as what flipbook to play, We play the SECOND Flipbook.
If “A==B” If time is the same number as what Flipbook to play, We play the SECOND Flipbook.
If “A<B” If time is LESS than the number of what Flipbook to play, we play the FIRST Flipbook.
Your Material should like this and if it does, you’ve just created your animated Material!
If you have MORE than two spritesheets, we’re going to have to do a slightly different method! Let’s rewind time to when we’d just completed our first Flipbook.
40