

UnrealEngine4Blueprints (6)
.pdfStep #3 From the “Red” calling event which has been created, the topright white pin can be used to set the colour of the character (So it will change the colour as the HUD is changing).
But even though dragging from the white pin and typing in “Set Vector” in the CBL would create a “Set Vector Parameter Value”, it wouldn’t actually create the correct Node in which we need. Even though it shares the name with the Node we want, it’s actually very different.
So how do we get the right node?
Simple!
On the left hand side of your screen, you’ll have your “Variable Library” (Which we’ve used a few times now). Inside the Variable Library, there’s a variable called “characterMat” (In which we created in the Construction Script.
Simply drag the Variable into our Blueprint space and when it asks if you’d like to “Get or Set”, select Get.
Step #4 From the blue pin of our mini”characterMat” node, click and drag to the right. When the Compact Blueprint Library opens up, type in “Set Vector” and select “Set Vector Parameter Value”.
Once the “Set Vector Parameter Value” node has been created, connect it to the “Red” event which we created a step ago.
111

Once it’s connected, Within the node, you’ll notice a “Value” property which is currently set to Black. Because this is our Red event, we want our character to be Red.
So click the Black colour and it’ll open a colour wheel. From this wheel, select a Red colour (Make sure it’s red (Check all the settings of the Colour Wheel!)
Step #5 Repeat Steps #1 #4 but for your other Key and Colour (Search for event “Green” instead of Red and set the colour Green. Once repeated, do it once more for our Blue colour. You should now have something along the lines of:
What you might notice is that in my “Set Vector Parameter Value” nodes, my ParameterName is “DiffuseColor” That’s because it is the default Parameter name for the default UE4 character’s colour.
112
The parameter we need to change is in fact called “DiffuseColor” So be sure to set your Parameter names (In “Set Vector Parameter Value” to this or it won’t work!
So now, compile and save. If you try out your game, Your character and HUD will change colours when you press the buttons in which you’ve set!
Great work!
We’re almost done but there’s still a few things left to do before we can call it a day!
Give the Player Different “Powers”!
Now that we have setup the Player’s colours and the HUD, we want to give each player a different power, so Players will want to change between them!
What we’re going to do is setup ONE of the Player colours (The red one) to be able to jump higher than the rest. The other two player powers? I’m going to leave that for you to use your power of Blueprints and your imagination to come up with.
Here’s is how we give the Red player the higher jump but keep it to the Red player.
Step #1 Within the “MyCharacter” blueprint, Find the chain in which we use the Key to set off the “Red” event. In this chain, after “Set Vector Parameter Value”, Click the empty white pin and drag to the right.
When the Compact Blueprint Library opens up, type in “Jump” and select “Set Jump Max Hold Time”.
Step #2 Now copy this “Set Jump Max Hold Time”, and paste it twice. Connect these two copied ones to the ends of the “Green” and “Blue” key chains that we made.
113

Step #3 Keep the “Blue” and “Green”’s “Set Max Jump Hold Time” at 0 but change the “Red”’s to “0.5”.
That’s all we needed to do. As long as we reset the values in the other Events, it will seem as if the selected “Character” has the power when the others don’t!
Step #4 Use what you’ve learned to create special “Powers” for the Green Character and Blue character.
And now, once you’ve done that. I will give you the task of modifying your level and creating your own level. Use your imagination to modify the level in a way which will need each power individually.
Also, when you create your level, be sure to add pits in which your Player can fall into a die.
Once created, you may proceed to the next Chapter!
114

To Kill a Player / Coins, Coins, Coins!
Now that you have modified the level and made it your own, it’s time to program in how to kill the Player.
To do this, we need to open up our “MyCharacter” blueprint once again, and this time, we’re going to create a new variable.
Step #1 Open up “MyCharacter” once again and in the “Variable Library”, create a new Variable. Set it to a Bool (Red) and call it “Allow Input”. Make sure to click the eye next to it’s name in the “Variable Library” as this is a Variable that other Blueprints will need to see!
Step #2 Save and Compile the Blueprint. Once Compiled, Click AllowInput (In the “Variable Library” and in the properties (Where we set the variable name), Scroll down until you find “Default Value” and make sure it says “Allow Input” and then has a tick at the end. This means “Start the game with this true!”
Step #3 In your MyCharacter blueprint, Find ALL the events within your Blueprint, apart from the Custom Events we created (But do count the key presses!).
115

Now for every every, you’re going to Right Click (Ctrl + Click) and select “Branch” (You can copy and paste it to save time) and hook the Event into this Branch and then the “True” to whatever the Event was originally connected to. The condition for these Branches, should be “AllowInput” (You should have figured out how to get a Variable into your Blueprint by now).
Example:
In short: Every time there is a button pressed, we want to make sure we have permission to continue. Naturally, if you’re dead, you shouldn’t be allowed to move around, so we’re going to take away input.
(Make sure to add it to your key press “Num 1, Num 2, Num 3” as well!)
Step #4 Now that we have added this “Can the player move?” condition to every input of “MyCharacter”, it’s now time to add a triggerbox into our level. Find somewhere where the player should die if they get to. Be it a pit or some spikes.
116
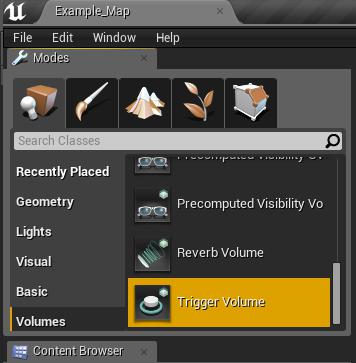
Once you’ve found a place, remember how we created a Box in the very first example? If we go back into the “Modes” panel at the topleft of our Unreal Engine, and we select the “Volumes” tab, if we scroll down we can find a box called “Trigger Volume”. Select this and move it / Scale it into position in your pit / Over your spikes.
117

Step #5 Once you’ve placed the “Trigger Volume” (And set it into the correct Position / Scale, Make sure it’s selected and in it’s properties, scroll down until you get to “Add Level Events for Trigger...”. Click this and then select “On Actor Begin Overlap”.
This will open up the Level Blueprint.
Step #6 From the “Actor Being Overlap” node, grab the empty blue pin next to “Other Actor” and click + drag to the right. When the CBL opens, type in “MyCharacter” and select “Cast to MyCharacter”.
Step #7 In the “MyCharacter” node, Grab the blue pin for “As MyCharacter C” and Click + Drag to the right. When the Compact Blueprint Library opens, type in “Allow Input” and select “Set Allow Input”. Make sure there is no tick in this node.
Step #8 From the empty right hand side white pin of “Set Allow Input”, Click and drag to the right. When the CBL appears, type in “Delay” and select “Delay”.
118

Step #9 From the “Delay” node’s righthand side White pin, Click & Drag to the right and in the CBL, type in “Open Level”.
What did we just do? Looking at the chain: If Player touches the Trigger Box, He can no longer move and after 0.2 second load level “None”. Because we haven’t set a level, it will reload the current level.
So not only did we create multiple characters with multiple different abilities, but we created a “Death trap”. All we need now is the Coins. And I’ll let you do that, without any help from me.
Yup, that’s right. I’m taking the training wheels off and letting you explore Unreal Engine on your own.
If you don’t manage to create the Coin, I’ve included it within the Content pack at http://content.kitatusstudios.co.uk but if you’ve followed this tutorial close enough, you should be able to figure out on your own what to do.
119
Project #2 WrapUp!
You did it, Champ! Not only did you create a working Portal system in Example #1, but you rocked the World of blueprints in Example #2 by modifying Materials and HUDs all within Blueprint!
Well done!
As you might have noticed, towards the end of Project #2, I was showing you less images and getting you to do a lot more without my help.
Why did I do this I hear you ask? To help you get started on Blueprints without any help! I hope it paid off, but if it didn’t Shoot me an email and I can help anyway I can!
If you’ve forgotten, here’s my email: contact@kitatusstudios.co.uk
I hope you enjoyed this example and please email me with how your final project looks, I’d like to see what powers you came up with and level layouts!
120