

Visual CSharp 2005 Recipes (2006) [eng]
.pdf
Preface
Mastering the development of Microsoft .NET Framework applications in C# is less about knowing the C# language and more about knowing how to use the functionality of the .NET Framework class library most effectively. Visual C# 2005 Recipes explores the breadth of the .NET Framework class library and provides specific solutions to common and interesting programming problems. Each solution (or recipe) is presented in a succinct problem/solution format and most are accompanied by working code samples.
Visual C# 2005 Recipes is not intended to teach you how to program, nor to teach you C#. However, if you have even the most rudimentary experience programming applications built on the .NET Framework using C#, you will find this book to be an invaluable resource.
Ideally, when you are facing a problem, this book will contain a recipe that provides the solution, or at least it will point you in the right direction. Even if you just want to broaden your knowledge of the .NET Framework class library, Visual C# 2005 Recipes is the perfect resource to assist you.
However, you cannot become proficient with C# and the classes in the .NET Framework class library merely by reading about them. Rather, you must use them and experiment with them by writing code, code, and more code. The structure and content of this book and the real-world applicability of the solutions it provides offer the perfect starting point from which to kick-start your own experimentation.
■Note This book is based on content previously published in the C# Programmer’s Cookbook (Microsoft Press, 2004). All such content has been revised and updated for inclusion in this book. Whereas the C# Programmer’s Cookbook targeted version 1.1 of the .NET Framework, Visual C# 2005 Recipes focuses on .NET Framework 2.0 and C# 2005. In many cases, you will find the recipes in this book still work on .NET Framework 1.1, except for those recipes that use features new to .NET Framework 2.0. In such cases, the recipe highlights the new .NET Framework 2.0 features being used and presents possible alternatives for those using .NET Framework 1.1.
xxi


C H A P T E R 1
■ ■ ■
Application Development
This chapter covers some of the fundamental activities you will need to perform when developing your C# solutions. The recipes in this chapter describe how to do the following:
•Use the C# command-line compiler to build console and Windows Forms applications (recipes 1-1 and 1-2)
•Create and use code modules and libraries (recipes 1-3 and 1-4)
•Access command-line arguments from within your applications (recipe 1-5)
•Use compiler directives and attributes to selectively include code at build time (recipe 1-6)
•Access program elements built in other languages whose names conflict with C# keywords (recipe 1-7)
•Give assemblies strong names and verify strong-named assemblies (recipes 1-8, 1-9, 1-10, and 1-11)
•Sign an assembly with a Microsoft Authenticode digital signature (recipes 1-12 and 1-13)
•Manage the shared assemblies that are stored in the global assembly cache (recipe 1-14)
•Prevent people from decompiling your assembly (recipe 1-15)
•Manipulate the appearance of the console (recipe 1-16)
■Note All the tools discussed in this chapter ship with the Microsoft .NET Framework or the .NET Framework software development kit (SDK). The tools that are part of the .NET Framework are in the main directory for the version of the framework you are running. For example, they are in the directory C:\WINDOWS\Microsoft.NET\Framework\v2.0.50727 if you install version 2.0 of the .NET Framework to the default location. The .NET installation process automatically adds this directory to your environment path.
The tools provided with the SDK are in the Bin subdirectory of the directory in which you install the SDK, which is C:\Program Files\Microsoft Visual Studio 8\SDK\v2.0 if you chose the default path during the installation of Microsoft Visual Studio 2005. This directory is not added to your path automatically, so you must manually edit your path in order to have easy access to these tools or use the shortcut to the command prompt installed in the Windows Start Programs menu of Visual Studio that calls vcvarsall.bat to set the right environment variables.
Most of the tools support short and long forms of the command-line switches that control their functionality. This chapter always shows the long form, which is more informative but requires additional typing. For the shortened form of each switch, see the tool’s documentation in the .NET Framework SDK.
1

2 C H A P T E R 1 ■ A P P L I C AT I O N D E V E L O P M E N T
1-1. Create a Console Application from the Command Line
Problem
You need to use the C# command-line compiler to build an application that does not require
a Windows graphical user interface (GUI) but instead displays output to, and reads input from, the Windows command prompt (console).
Solution
In one of your classes, ensure you implement a static method named Main with one of the following signatures:
public static void Main();
public static void Main(string[] args); public static int Main();
public static int Main(string[] args);
Build your application using the C# compiler (csc.exe) by running the following command (where HelloWorld.cs is the name of your source code file):
csc /target:exe HelloWorld.cs
■Note If you own Visual Studio, you will most often use the Console Application project template to create new console applications. However, for small applications, it is often just as easy to use the command-line compiler. It is also useful to know how to build console applications from the command line if you are ever working on a machine without Visual Studio and want to create a quick utility to automate some task.
How It Works
By default, the C# compiler will build a console application unless you specify otherwise. For this reason, it’s not necessary to specify the /target:exe switch, but doing so makes your intention clearer, which is useful if you are creating build scripts that will be used by others or will be used repeatedly over a period of time.
To build a console application consisting of more than one source code file, you must specify all the source files as arguments to the compiler. For example, the following command builds an application named MyFirstApp.exe from two source files named HelloWorld.cs and ConsoleUtils.cs:
csc /target:exe /main:HelloWorld /out:MyFirstApp.exe HelloWorld.cs ConsoleUtils.cs
The /out switch allows you to specify the name of the compiled assembly. Otherwise, the assembly is named after the first source file listed—HelloWorld.cs in the example. If classes in both the HelloWorld and ConsoleUtils files contain Main methods, the compiler cannot automatically determine which method represents the correct entry point for the assembly. Therefore, you must use the compiler’s /main switch to identify the name of the class that contains the correct entry point for your application. When using the /main switch, you must provide the fully qualified class name (including the namespace); otherwise, you will get a CS1555 compilation error: “Could not find ‘HelloWorld’ specified for Main method.”
If you have a lot of C# code source files to compile, you should use a response file. This simple text file contains the command-line arguments for csc.exe. When you call csc.exe, you give the name of this response file as a single parameter prefixed by the @ character. For example:

C H A P T E R 1 ■ A P P L I C AT I O N D E V E L O P M E N T |
3 |
csc @commands.rsp
To achieve the equivalent of the previous example, commands.rsp would contain this:
/target:exe /main:HelloWorld /out:MyFirstApp.exe HelloWorld.cs ConsoleUtils.cs
The Code
The following code lists a class named ConsoleUtils that is defined in a file named ConsoleUtils.cs:
using System;
namespace Apress.VisualCSharpRecipes.Chapter01
{
public class ConsoleUtils
{
//A method to display a prompt and read a response from the console. public static string ReadString(string msg)
{
Console.Write(msg); return Console.ReadLine();
}
//A method to display a message to the console.
public static void WriteString(string msg)
{
Console.WriteLine(msg);
}
// Main method used for testing ConsoleUtility methods. public static void Main()
{
// Prompt the reader to enter a name.
string name = ReadString("Please enter your name : ");
// Welcome the reader to Visual C# 2005 Recipes. WriteString("Welcome to Visual C# 2005 Recipes, " + name);
}
}
}
The HelloWorld class listed next uses the ConsoleUtils class to display the message “Hello, world” to the console (HelloWorld is contained in the HelloWorld.cs file):
using System;
namespace Apress.VisualCSharpRecipes.Chapter01
{
class HelloWorld
{
public static void Main()
{
ConsoleUtils.WriteString("Hello, world");
Console.WriteLine("\nMain method complete. Press Enter."); Console.ReadLine();
}
}
}

4 C H A P T E R 1 ■ A P P L I C AT I O N D E V E L O P M E N T
Usage
To build HelloWorld.exe from the two source files, use the following command:
csc /target:exe /main:Apress.VisualCSharpRecipes.Chapter01.HelloWorld /out:HelloWorld.exe ConsoleUtils.cs HelloWorld.cs
1-2. Create a Windows-Based Application from the Command Line
Problem
You need to use the C# command-line compiler to build an application that provides a Windows Forms–based GUI.
Solution
Create a class that extends the System.Windows.Forms.Form class. (This will be your application’s main form.) In one of your classes, ensure you implement a static method named Main. In the Main method, create an instance of your main form class and pass it to the static method Run of the System.Windows.Forms.Application class. Build your application using the command-line C# compiler, and specify the /target:winexe compiler switch.
■Note If you own Visual Studio, you will most often use the Windows Application project template to create new Windows Forms–based applications. Building large GUI-based applications is a time-consuming undertaking that involves the correct instantiation, configuration, and wiring up of many forms and controls. Visual Studio automates much of the work associated with building graphical applications. Trying to build a large graphical application without the aid of tools such as Visual Studio will take you much longer, be extremely tedious, and result in a greater chance of bugs in your code. However, it is also useful to know the essentials required to create a Windows-based application using the command line in case you are ever working on a machine without Visual Studio and want to create
a quick utility to automate some task or get input from a user.
How It Works
Building an application that provides a simple Windows GUI is a world away from developing a full-fledged Windows-based application. However, you must perform certain tasks regardless of whether you are writing the Windows equivalent of Hello World or the next version of Microsoft Word, including the following:
•For each form you need in your application, create a class that extends the
System.Windows.Forms.Form class.
•In each of your form classes, declare members that represent the controls that will be on that form, such as buttons, labels, lists, and textboxes. These members should be declared private or at least protected so that other program elements cannot access them directly. If you need to expose the methods or properties of these controls, implement the necessary members in your form class, providing indirect and controlled access to the contained controls.

C H A P T E R 1 ■ A P P L I C AT I O N D E V E L O P M E N T |
5 |
•Declare methods in your form class that will handle events raised by the controls contained by the form, such as button clicks or key presses when a textbox is the active control. These methods should be private or protected and follow the standard .NET event pattern (described in recipe 13-11). It’s in these methods (or methods called by these methods) where you will define the bulk of your application’s functionality.
•Declare a constructor for your form class that instantiates each of the form’s controls and configures their initial state (size, color, position, content, and so on). The constructor should also wire up the appropriate event handler methods of your class to the events of each control.
•Declare a static method named Main—usually as a member of your application’s main form class. This method is the entry point for your application, and it can have the same signatures as those mentioned in recipe 1-1. In the Main method, call Application.EnableVisualStyles to allow XP theme support, create an instance of your application’s main form, and pass it as an argument to the static Application.Run method. The Run method makes your main form visible and starts a standard Windows message loop on the current thread, which passes the user input (key presses, mouse clicks, and so on) to your application form as events.
The Code
The Recipe01-02 class shown in the following code listing is a simple Windows Forms application that demonstrates the techniques just listed. When run, it prompts a user to enter a name and then displays a message box welcoming the user to Visual C# 2005 Recipes.
using System;
using System.Windows.Forms;
namespace Apress.VisualCSharpRecipes.Chapter01
{
class Recipe01_02 : Form
{
//Private members to hold references to the form's controls. private Label label1;
private TextBox textBox1; private Button button1;
//Constructor used to create an instance of the form and configure
//the form's controls.
public Recipe01_02()
{
//Instantiate the controls used on the form. this.label1 = new Label();
this.textBox1 = new TextBox(); this.button1 = new Button();
//Suspend the layout logic of the form while we configure and
//position the controls.
this.SuspendLayout();
// Configure label1, which displays the user prompt. this.label1.Location = new System.Drawing.Point(16, 36); this.label1.Name = "label1";
this.label1.Size = new System.Drawing.Size(128, 16); this.label1.TabIndex = 0;
this.label1.Text = "Please enter your name:";

6C H A P T E R 1 ■ A P P L I C AT I O N D E V E L O P M E N T
//Configure textBox1, which accepts the user input. this.textBox1.Location = new System.Drawing.Point(152, 32); this.textBox1.Name = "textBox1";
this.textBox1.TabIndex = 1; this.textBox1.Text = "";
//Configure button1, which the user clicks to enter a name. this.button1.Location = new System.Drawing.Point(109, 80); this.button1.Name = "button1";
this.button1.TabIndex = 2; this.button1.Text = "Enter";
this.button1.Click += new System.EventHandler(this.button1_Click);
//Configure WelcomeForm, and add controls.
this.ClientSize = new System.Drawing.Size(292, 126); this.Controls.Add(this.button1); this.Controls.Add(this.textBox1); this.Controls.Add(this.label1);
this.Name = "form1";
this.Text = "Visual C# 2005 Recipes";
//Resume the layout logic of the form now that all controls are
//configured.
this.ResumeLayout(false);
}
//Event handler called when the user clicks the Enter button on the
//form.
private void button1_Click(object sender, System.EventArgs e)
{
//Write debug message to the console. System.Console.WriteLine("User entered: " + textBox1.Text);
//Display welcome as a message box. MessageBox.Show("Welcome to Visual C# 2005 Recipes, "
+textBox1.Text, "Visual C# 2005 Recipes");
}
//Application entry point, creates an instance of the form, and begins
//running a standard message loop on the current thread. The message
//loop feeds the application with input from the user as events. [STAThread]
public static void Main()
{
Application.EnableVisualStyles(); Application.Run(new Recipe01_02());
}
}
}
Usage
To build the Recipe01-02 class into an application, use this command:
csc /target:winexe Recipe01-02.cs.
The /target:winexe switch tells the compiler that you are building a Windows-based application. As a result, the compiler builds the executable in such a way that no console is created when
C H A P T E R 1 ■ A P P L I C AT I O N D E V E L O P M E N T |
7 |
you run your application. If you use the /target:exe switch to build a Windows Forms application instead of /target:winexe, your application will still work correctly, but you will have a console window visible while the application is running. Although this is undesirable for production-quality software, the console window is useful if you want to write debug and logging information while you’re developing and testing your Windows Forms application. You can write to this console using the Write and
WriteLine methods of the System.Console class.
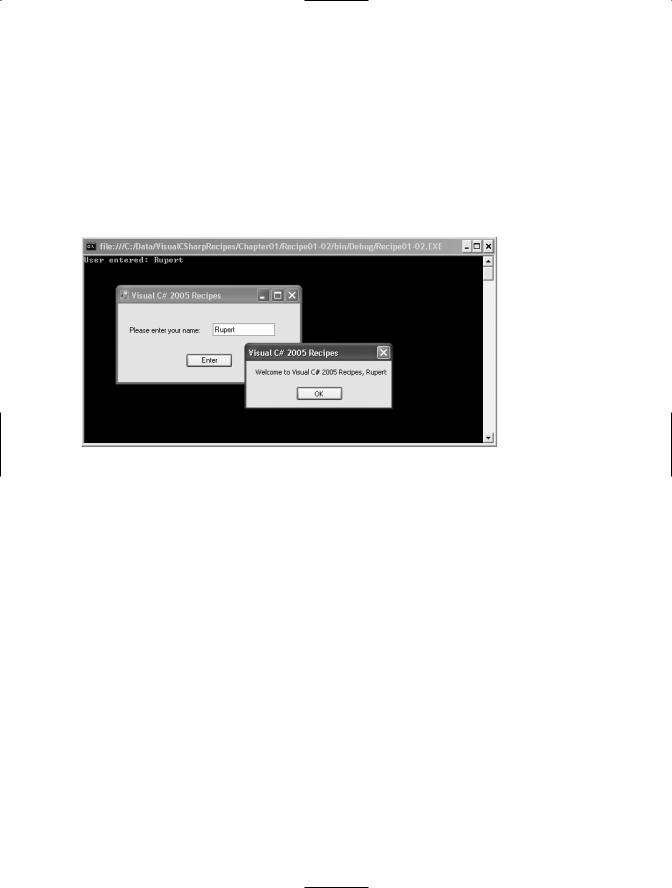
Figure 1-1 shows the WelcomeForm.exe application greeting a user named Rupert. This version of the application is built using the /target:exe compiler switch, resulting in the visible console window in which you can see the output from the Console.WriteLine statement in the button1_Click event handler.
Figure 1-1. A simple Windows Forms application
1-3. Create and Use a Code Module
Problem
You need to do one or more of the following:
•Improve your application’s performance and memory efficiency by ensuring the runtime loads rarely used types only when they are required
•Compile types written in C# to a form you can build into assemblies being developed in other .NET languages
•Use types developed in another language and build them into your C# assemblies
Solution
Build your C# source code into a module by using the command-line compiler and specifying the /target:module compiler switch. To incorporate existing modules into your assembly, use the /addmodule compiler switch.
How It Works
Modules are the building blocks of .NET assemblies. Modules consist of a single file that contains the following: