

Visual CSharp 2005 Recipes (2006) [eng]
.pdf18 C H A P T E R 1 ■ A P P L I C AT I O N D E V E L O P M E N T
Solution
When you build your assembly using the command-line C# compiler, use the /keyfile or /keycontainer compiler switches to specify the location of your strong name key pair. Use assembly-level attributes to specify optional information such as the version number and culture for your assembly. The compiler will strong name your assembly as part of the compilation process.
■Note If you are using Visual Studio, you can configure your assembly to be strong named by opening the project properties, selecting the Signing tab, and checking the Sign the Assembly box. You will need to specify the location of the file where your strong name keys are stored—Visual Studio does not allow you to specify the name of a key container.
How It Works
To strong name an assembly using the C# compiler, you need the following:
•A strong name key pair contained either in a file or in a CSP key container. (Recipe 1-8 discusses how to create strong name key pairs.)
•Compiler switches to specify the location where the compiler can obtain your strong name key pair:
•If your key pair is in a file, use the /keyfile compiler switch, and provide the name of the file where the keys are stored. For example, use /keyfile:MyKeyFile.snk.
•If your key pair is in a CSP container, use the /keycontainer compiler switch, and provide the name of the CSP key container where the keys are stored. For example, use
/keycontainer:MyKeyContainer.
•Optionally, specify the culture that your assembly supports by applying the attribute
System.Reflection.AssemblyCultureAttribute to the assembly. (You can’t specify a culture for executable assemblies because executable assemblies support only the neutral culture.)
•Optionally, specify the version of your assembly by applying the attribute System.Reflection. AssemblyVersionAttribute to the assembly.
If you are using the .NET Framework 1.0 or 1.1, the command-line C# compiler does not support the
/keyfile and /keycontainer compiler switches. Instead, you must use the AssemblyKeyFileAttribute and
AssemblyKeyNameAttribute assembly-level attributes within your code to specify the location of your strong name keys. Alternatively, use the Assembly Linker tool (al.exe), which allows you to specify the strong name information on the command line using the /keyfile and /keyname switches. Refer to the Assembly Linker information in the .NET Framework SDK documentation for more details.
The Code
The executable code that follows (from a file named Recipe01-09.cs) shows how to use the optional attributes (shown in bold text) to specify the culture and the version for the assembly:
using System;
using System.Reflection;
[assembly:AssemblyCulture("")]
[assembly:AssemblyVersion("1.1.0.5")]

C H A P T E R 1 ■ A P P L I C AT I O N D E V E L O P M E N T |
19 |
namespace Recipe01_09
{
class Recipe01_09
{
public static void Main()
{
Console.WriteLine("Welcome to Visual C# 2005 Recipes");
// Wait to continue.
Console.WriteLine("\nMain method complete. Press Enter."); Console.Read();
}
}
}
Usage
To create a strong-named assembly from the example code, create the strong name keys and store them in a file named MyKeyFile using the command sn -k MyKeyFile.snk. Then install the keys into the CSP container named MyKeys using the command sn -i MyKeyFile.snk MyKeys. You can now compile the file into a strong-named assembly using the command csc /keycontainer:MyKeys Recipe01-09.cs.
1-10. Verify That a Strong-Named Assembly Has
Not Been Modified
Problem
You need to verify that a strong-named assembly has not been modified after it was built.
Solution
Use the Strong Name tool (sn.exe) to verify the assembly’s strong name.
How It Works
Whenever the .NET runtime loads a strong-named assembly, the runtime extracts the encrypted hash code that’s embedded in the assembly and decrypts it with the public key, which is also embedded in the assembly. The runtime then calculates the hash code of the assembly manifest and compares it to the decrypted hash code. This verification process will identify whether the assembly has changed after compilation.
If an executable assembly fails strong name verification, the runtime will display an error message or an error dialog box (depending on whether the application is a console or Windows application). If executing code tries to load an assembly that fails verification, the runtime will throw a System.IO.FileLoadException with the message “Strong name validation failed,” which you should handle appropriately.
As well as generating and managing strong name keys (discussed in recipe 1-8), the Strong Name tool allows you to verify strong-named assemblies. To verify that the strong-named assembly Recipe01-09.exe is unchanged, use the command sn -vf Recipe01-09.exe. The -v switch requests the Strong Name tool to verify the strong name of the specified assembly, and the -f switch forces

20C H A P T E R 1 ■ A P P L I C AT I O N D E V E L O P M E N T
strong name verification even if it has been previously disabled for the specified assembly. (You can disable strong name verification for specific assemblies using the -Vr switch, as in sn -Vr Recipe01-09.exe; see recipe 1-11 for details about why you would disable strong name verification.)
If the assembly passes strong name verification, you will see the following output:
Microsoft (R) .NET Framework Strong Name Utility Version 2.0.50727.42 Copyright (C) Microsoft Corporation. All rights reserved.
Assembly 'Recipe01-09.exe' is valid
However, if the assembly has been modified, you will see this message:
Microsoft (R) .NET Framework Strong Name Utility Version 2.0.50727.42
Copyright (C) Microsoft Corporation. All rights reserved.
Failed to verify assembly --
Strong name validation failed for assembly 'Recipe01-09.exe'.
1-11. Delay Sign an Assembly
Problem
You need to create a strong-named assembly, but you don’t want to give all members of your development team access to the private key component of your strong name key pair.
Solution
Extract and distribute the public key component of your strong name key pair. Follow the instructions in recipe 1-9 that describe how to give your assembly a strong name. In addition, specify the /delaysign switch when you compile your assembly. Disable strong name verification for the assembly using the -Vr switch of the Strong Name tool (sn.exe).
■Note If you are using Visual Studio, you can configure your strong-named assembly to be delay signed by opening the project properties, selecting the Signing tab, and checking the Delay Sign Only box.
How It Works
Assemblies that reference strong-named assemblies contain the public key token of the referenced assemblies. This means the referenced assembly must be strong named before it can be referenced. In a development environment in which assemblies are regularly rebuilt, this would require every developer and tester to have access to your strong name key pair—a major security risk.
Instead of distributing the private key component of your strong name key pair to all members of the development team, the .NET Framework provides a mechanism named delay signing with which you can partially strong name an assembly. The partially strong-named assembly contains the public key and the public key token (required by referencing assemblies) but contains only a placeholder for the signature that would normally be generated using the private key.

C H A P T E R 1 ■ A P P L I C AT I O N D E V E L O P M E N T |
21 |
After development is complete, the signing authority (who has responsibility for the security and use of your strong name key pair) re-signs the delay-signed assembly to complete its strong name. The signature is calculated using the private key and embedded in the assembly, making the assembly ready for distribution.
To delay sign an assembly, you need access only to the public key component of your strong name key pair. No security risk is associated with distributing the public key, and the signing authority should make the public key freely available to all developers. To extract the public key component from a strong name key file named MyKeyFile.snk and write it to a file named MyPublicKey.snk, use the command sn -p MyKeyFile.snk MyPublicKey.snk. If you store your strong name key pair in a CSP key container named MyKeys, extract the public key to a file named MyPublicKey.snk using the command sn -pc MyKeys MyPublicKey.snk.
Once you have a key file containing, the public key, you build the delay-signed assembly using the command-line C# compiler by specifying the /delaysign compiler switch. For example, to build a delay-signed assembly from a source file named Recipe01-11, use this command:
csc /delaysign /keyfile:MyPublicKey.snk Recipe01-11.cs.
When the runtime tries to load a delay-signed assembly, the runtime will identify the assembly as strong named and will attempt to verify the assembly, as discussed in recipe 1-10. Because it doesn’t have a digital signature, you must configure the runtime on the local machine to stop verifying the assembly’s strong name using the command sn -Vr Recipe01-11.exe. Note that you need to do so on every machine on which you want to run your application.
■Tip When using delay-signed assemblies, it’s often useful to be able to compare different builds of the same assembly to ensure they differ only by their signatures. This is possible only if a delay-signed assembly has been re-signed using the -R switch of the Strong Name tool. To compare the two assemblies, use the command sn -D assembly1 assembly2.
Once development is complete, you need to re-sign the assembly to complete the assembly’s strong name. The Strong Name tool allows you to do this without changing your source code or recompiling the assembly; however, you must have access to the private key component of the strong name key pair. To re-sign an assembly named Recipe01-11.exe with a key pair contained in the file MyKeys.snk, use the command sn -R Recipe01-11.exe MyKeys.snk. If the keys are stored in a CSP key container named MyKeys, use the command sn -Rc Recipe01-11.exe MyKeys.
Once you have re-signed the assembly, you should turn strong name verification for that assembly back on using the -Vu switch of the Strong Name tool, as in sn -Vu Recipe01-11.exe. To enable verification for all assemblies for which you have disabled strong name verification, use the command sn -Vx. You can list the assemblies for which verification is disabled using the command sn -Vl.
If you are using the .NET Framework 1.0 or 1.1, the command-line C# compiler does not support the
/delaysign compiler switch. Instead, you must use the System.Reflection.AssemblyDelaySignAttribute assembly-level attributes within your code to specify that you want the assembly delay signed. Alternatively, use the Assembly Linker tool (al.exe), which does support the /delaysign switch. Refer to the Assembly Linker information in the .NET Framework SDK documentation for more details.

22 C H A P T E R 1 ■ A P P L I C AT I O N D E V E L O P M E N T
1-12. Sign an Assembly with an Authenticode Digital Signature
Problem
You need to sign an assembly with Authenticode so that users of the assembly can be certain you are its publisher and the assembly is unchanged after signing.
Solution
Use the Sign Tool (signtool.exe) to sign the assembly with your software publisher certificate (SPC).
■Note Versions 1.0 and 1.1 of the .NET Framework provided a utility called the File Signing tool (signcode.exe) that enabled you to sign assemblies. The File Signing tool is not provided with the .NET Framework 2.0 and has been superseded by the Sign Tool discussed in this recipe.
How It Works
Strong names provide a unique identity for an assembly as well as proof of the assembly’s integrity, but they provide no proof as to the publisher of the assembly. The .NET Framework allows you to use Authenticode technology to sign your assemblies. This enables consumers of your assemblies to confirm that you are the publisher, as well as confirm the integrity of the assembly. Authenticode signatures also act as evidence for the signed assembly, which people can use when configuring code access security policy.
To sign your assembly with an Authenticode signature, you need an SPC issued by a recognized certificate authority (CA). A CA is a company entrusted to issue SPCs (along with many other types of certificates) for use by individuals or companies. Before issuing a certificate, the CA is responsible for confirming that the requesters are who they claim to be and also for making sure the requestors sign contracts to ensure they don’t misuse the certificates that the CA issues them.
To obtain an SPC, you should view the Microsoft Root Certificate Program Members list at http:// msdn.microsoft.com/library/default.asp?url=/library/en-us/dnsecure/html/rootcertprog.asp. Here you will find a list of CAs, many of whom can issue you an SPC. For testing purposes, you can create a test SPC using the process described in recipe 1-13. However, you can’t distribute your software signed with this test certificate. Because a test SPC isn’t issued by a trusted CA, most responsible users won’t trust assemblies signed with it.
Once you have an SPC, you use the Sign Tool to Authenticode sign your assembly. The Sign Tool creates a digital signature of the assembly using the private key component of your SPC and embeds the signature and the public part of your SPC in your assembly (including your public key). When verifying your assembly, the consumer decrypts the encrypted hash code using your public key, recalculates the hash of the assembly, and compares the two hash codes to ensure they are the same. As long as the two hash codes match, the consumer can be certain that you signed the assembly and that it has not changed since you signed it.
Usage
The Sign Tool provides a graphical wizard that walks you through the steps to Authenticode sign your assembly. To sign an assembly named MyAssembly.exe, run this command:
signtool signwizard MyAssembly.exe
C H A P T E R 1 ■ A P P L I C AT I O N D E V E L O P M E N T |
23 |
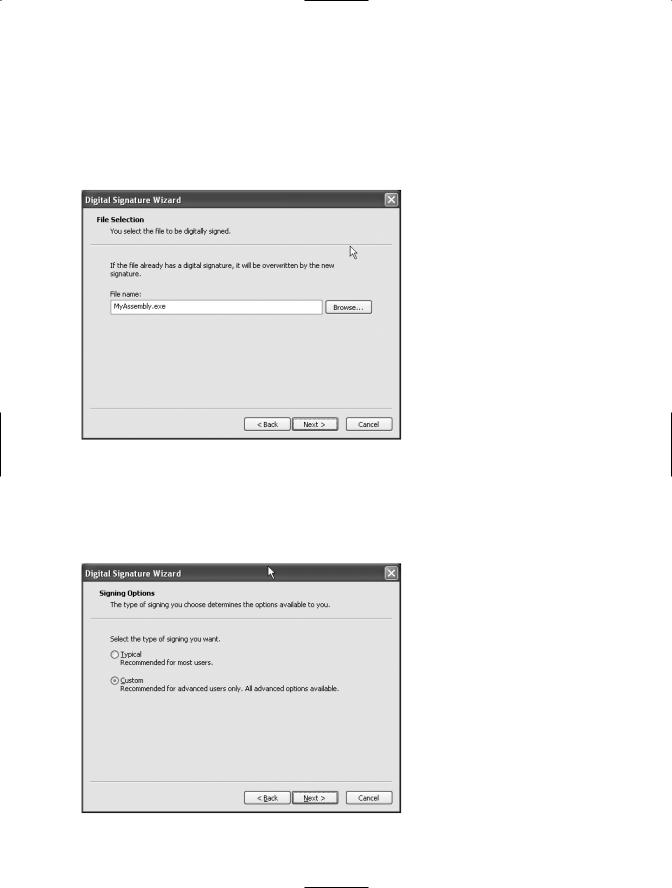
Click Next on the introduction screen, and you will see the File Selection screen, where you must enter the name of the assembly to Authenticode sign (see Figure 1-2). Because you specified the assembly name on the command line, it is already filled in. If you are signing a multifile assembly, specify the name of the file that contains the assembly manifest. If you intend to both strong name and Authenticode sign your assembly, you must strong name the assembly first—see recipe 1-9 for details on strong naming assemblies.
Figure 1-2. The Sign Tool’s File Selection screen
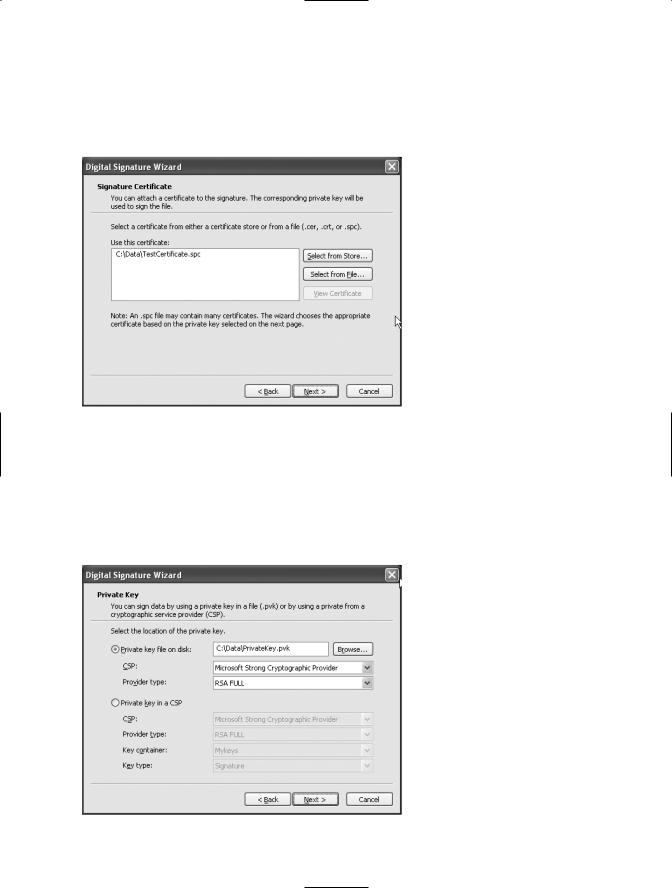
Clicking Next takes you to the Signing Options screen (see Figure 1-3). If your SPC is in a certificate store, select the Typical radio button. If your SPC is in a file, select the Custom radio button. Then click Next.
Figure 1-3. The Sign Tool’s Signing Options screen
24 C H A P T E R 1 ■ A P P L I C AT I O N D E V E L O P M E N T
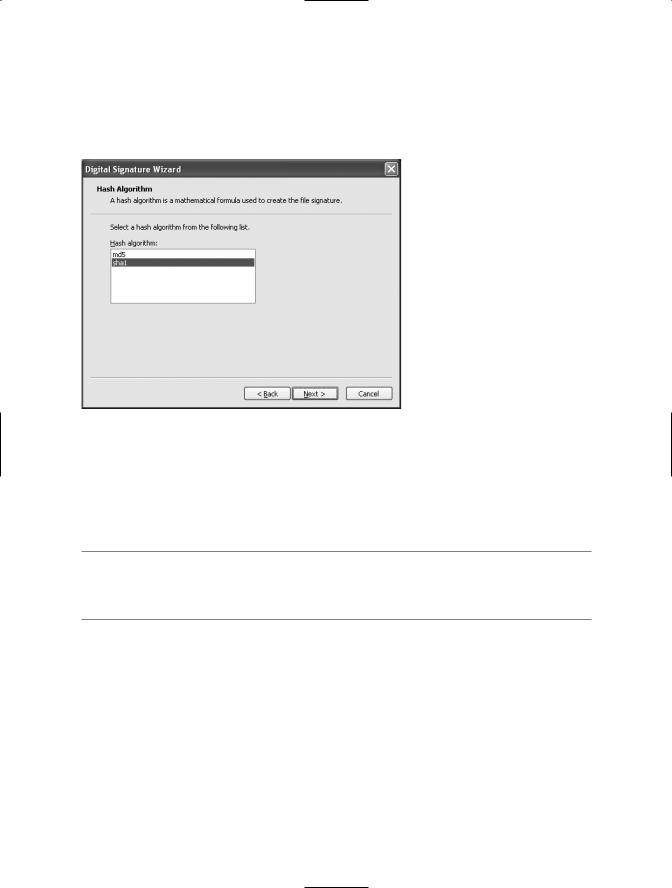
Assuming you want to use a file-based certificate (like the test certificate created in recipe 1-13), click the Select from File button on the Signature Certificate screen (see Figure 1-4), select the file containing your SPC certificate, and then click Next.
Figure 1-4. The Sign Tool’s Signature Certificate screen
The Private Key screen allows you to identify the location of your private keys, which will either be in a file or in a CSP key container depending on where you created and stored them (see Figure 1-5). The example assumes they are in a file named PrivateKeys.pvk. When you click Next, if you selected to use a file, you will be prompted to enter a password to access the file (if required).
Figure 1-5. The Sign Tool’s Private Key screen
C H A P T E R 1 ■ A P P L I C AT I O N D E V E L O P M E N T |
25 |
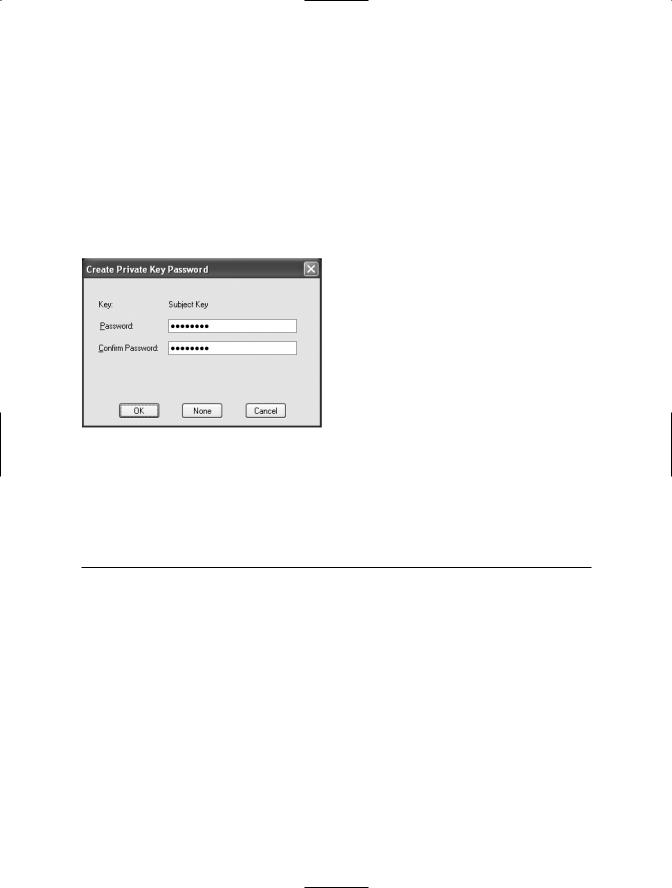
You can then select whether to use the sha1 or md5 hash algorithm in the Hash Algorithm screen (see Figure 1-6). The default is sha1, which is suitable for most purposes. Pick an algorithm, and click Next.
Figure 1-6. The Sign Tool’s Hash Algorithm screen
Click Next to leave the default values for the Data Description screen and again for the Timestamping screen. Finally, click Finish. If you are using a file-based private key that is password protected, you will once again be prompted to enter the password, after which the Sign Tool will Authenticode sign your assembly.
■Note The Sign Tool uses capicom.dll version 2.1.0.1. If an error occurs when you run signtool.exe that indicates capicom is not accessible or not registered, change to the directory where capicom.dll is located, and run the command regsvr32 capicom.dll.
1-13. Create and Trust a Test Software Publisher
Certificate
Problem
You need to create an SPC to allow you to test the Authenticode signing of an assembly.
Solution
Use the Certificate Creation tool (makecert.exe) to create a test X.509 certificate and the Software Publisher Certificate Test tool (cert2spc.exe) to generate an SPC from this X.509 certificate. Trust the root test certificate using the Set Registry tool (setreg.exe).
26 C H A P T E R 1 ■ A P P L I C AT I O N D E V E L O P M E N T
How It Works
To create a test SPC for a software publisher named Allen Jones, create an X.509 certificate using the Certificate Creation tool. The command makecert -n "CN=Allen Jones" -sk MyKeys TestCertificate.cer creates a file named TestCertificate.cer containing an X.509 certificate and stores the associated private key in a CSP key container named MyKeys (which is automatically created if it does not exist). Alternatively, you can write the private key to a file by substituting the -sk switch with -sv. For example, to write the private key to a file named PrivateKeys.pvk, use the command makecert -n " CN=Allen Jones" -sv PrivateKey.pvk TestCertificate.cer. If you write your private key to a file, the Certificate Creation tool will prompt you to provide a password with which to protect the private key file (see Figure 1-7).
Figure 1-7. The Certificate Creation tool requests a password when creating file-based private keys.
The Certificate Creation tool supports many arguments, and Table 1-2 lists some of the more useful ones. You should consult the .NET Framework SDK documentation for full coverage of the Certificate Creation tool.
Table 1-2. Commonly Used Switches of the Certificate Creation Tool
Switch |
Description |
-e |
Specifies the date when the certificate becomes invalid. |
-m |
Specifies the duration—in months—that the certificate remains valid. |
-n |
Specifies an X.500 name to associate with the certificate. This is the name of the |
|
software publisher that people will see when they view details of the SPC you create. |
-sk |
Specifies the name of the CSP key store in which to store the private key. |
-ss |
Specifies the name of the certificate store where the Certificate Creation tool should |
|
store the generated X.509 certificate. |
-sv |
Specifies the name of the file in which to store the private key. |
|
|
Once you have created your X.509 certificate with the Certificate Creation tool, you need to convert it to an SPC with the Software Publisher Certificate Test tool (cert2spc.exe). To convert the certificate TestCertificate.cer to an SPC, use the command cert2spc TestCertificate.cer TestCertificate.spc. The Software Publisher Certificate Test tool doesn’t offer any optional switches.

C H A P T E R 1 ■ A P P L I C AT I O N D E V E L O P M E N T |
27 |
The final step before you can use your test SPC is to trust the root test CA, which is the default issuer of the test certificate. The Set Registry tool (setreg.exe) makes this a simple task with the command setreg 1 true. When you have finished using your test SPC, you must remove trust of the root test CA using the command setreg 1 false. You can now Authenticode sign assemblies with your test SPC using the process described in recipe 1-12.
1-14. Manage the Global Assembly Cache
Problem
You need to add or remove assemblies from the GAC.
Solution
Use the Global Assembly Cache tool (gacutil.exe) from the command line to view the contents of the GAC as well as to add and remove assemblies.
How It Works
Before you can install an assembly in the GAC, the assembly must have a strong name; see recipe 1-9 for details on how to strong name your assemblies. To install an assembly named SomeAssembly.dll into the GAC, use the command gacutil /i SomeAssembly.dll. You can install different versions of the same assembly in the GAC side-by-side to meet the versioning requirements of different applications.
To uninstall the SomeAssembly.dll assembly from the GAC, use the command gacutil /u SomeAssembly. Notice that you don’t use the .dll extension to refer to the assembly once it’s
installed in the GAC. This will uninstall all assemblies with the specified name. To uninstall
a particular version, specify the version along with the assembly name; for example, use gacutil /u SomeAssembly,Version=1.0.0.5.
To view the assemblies installed in the GAC, use the command gacutil /l. This will produce a long list of all the assemblies installed in the GAC, as well as a list of assemblies that have been precompiled to binary form and installed in the ngen cache. To avoid searching through this list to determine whether a particular assembly is installed in the GAC, use the command gacutil /l SomeAssembly.
■Note The .NET Framework uses the GAC only at runtime; the C# compiler won’t look in the GAC to resolve any external references that your assembly references. During development, the C# compiler must be able to access a local copy of any referenced shared assemblies. You can either copy the shared assembly to the same directory as your source code or use the /lib switch of the C# compiler to specify the directory where the compiler can find the required assemblies.
1-15. Prevent People from Decompiling Your Code
Problem
You want to ensure people can’t decompile your .NET assemblies.