Pro Visual C++-CLI And The .NET 2.0 Platform (2006) [eng]-1
.pdf838 C H A P T E R 2 1 ■ A D V A N C E D U N S A F E O R U N M A N A G E D C + + . N E T P R O G R A M M I N G
generate the COM Interop code from the command line. There is no big difference between using Visual Studio 2005 or the command line when it comes to creating the COM Interop code—the results are virtually the same.
■Note This chapter assumes that you know how to code, register, etc., your own COM objects and will not cover those topics.
I am including (just for completeness) Listing 21-8, the COM component that I use for all of the examples to follow. As you can see, it is simply a COM-ification of NativeCode.dll from Listing 21-2.
Listing 21-8. The Chapter’s Test COM Component TestCOM
//Compile from command line using
//cl /LD TestCOM.cpp
//regsvr32 TestCOM.dll
#define _ATL_ATTRIBUTES #include <atlbase.h> #include <atlcom.h>
[module(name="TestCOM",type="dll")];
//ITestCOM interface with Square method [dual]
__interface ITestCOM : IDispatch
{
[id(0x01)] HRESULT Square([in]LONG Value, [out,retval]LONG* Result);
};
//coclass CTestCOM implements the ITestCOM interface
[coclass, threading="both"] class CTestCOM : public ITestCOM
{
HRESULT Square(LONG Value, LONG* Result)
{
if (Value > 0x0ffff)
{
*Result = -1;
return E_INVALIDARG;
}
else
{
*Result = Value * Value; return S_OK;
}
}
};

C H A P T E R 2 1 ■ A D V A N C E D U N S A F E O R U N M A N A G E D C + + . N E T P R O G R A M M I N G |
839 |
Interop Assembly
To put it bluntly, COM objects and .NET objects are quite different and I’m impressed by the magic invoked by Microsoft to get these square pegs into round holes. This magic is the Interop Assembly. Best of all, you don’t have to write a single line of code to create an Interop Assembly!
An Interop Assembly is usually known as a runtime callable wrapper (RCW) because of the functionality it provides. As this name suggests, a RCW is a managed wrapper assembly that enables
.NET to understand a COM object at runtime. In other words, not only does it provide marshaling code for parameters and return values, it also does all the prep work required to get the COM object up and running, manages the lifetime of the COM object (I know I don’t miss trying to keep the AddRef() and Release() method calls in sync!), identifies and provides interfaces to the members of the COM object, and allows .NET to access these COM object members via dynamic references instead of raw fixed pointers.
■Caution With an RCW, you do not have control of when its COM object is garbage collected. On the other hand, you may have heard of the static method System::Runtime::InteropServices::Marshal:: ReleaseComObject(), which you can use to immediately release your RCW. It is true that this method exists, but you must use it with extreme caution (and I mean extreme) as you are removing yourself from the safety net that
.NET provides. The ReleaseComObject() method is a very complex topic and I will not cover it further, but if you insist on using the method, make sure you understand completely how it works (there are many Web pages about it) and then test thoroughly.
Creating the Interop Assembly
Since there are two methods of creating the Interop Assembly, let’s look at both of them; that way you can make your own decision on which you want to use. (If you don’t have Visual Studio 2005, then the choice has already been made for you.)
Type Library Importer
Because not everyone who develops with .NET uses Visual Studio 2005, the .NET Framework provides the developer with a command-line tool called the Type Library Importer (tlbimp) to convert a COM type library into an Interop Assembly. In other words, this command line converts your .tlb file into an RCW.
The default command to run is quite simple:
tlbimp.exe <type_library_name>.tlb
An example would be the conversion of the .tlb file created from compiling the COM type library TestCOM shown earlier in Listing 21-8:
Tlbimp.exe _TestCom.tlb
When you use the default command line you get an assembly called TestCom.dll, which contains all the wrapper classes for the COM type library.
■Tip When you compile a COM object using only the /LD option, your .tlb file is named vc80.tlb. Before I run tlbimp on this file, I rename and move it to its own directory so I don’t accidentally overwrite the actual COM type library DLL file—the default result of running tlbimp is a DLL file with the same name and extension as the originating COM type library.

840 C H A P T E R 2 1 ■ A D V A N C E D U N S A F E O R U N M A N A G E D C + + . N E T P R O G R A M M I N G
If you need more specific information generated within the assembly, tlbimp provides a number of optional parameters. Some of the more commonly used parameters are shown in Table 21-2.
Table 21-2. Common tlbimp Options
Option |
Description |
/asmversion:number |
Allows you to specify your own version number for the assembly |
|
being generated. |
/help |
Displays help information in the command window. |
/keyfile:filename |
The filename of the strong name key file that you want to sign the |
|
assembly with. You use this parameter along with the /asmversion |
|
option to make the generated assembly into a shared assembly that |
|
you can place in the GAC. You can create the file using the tool |
|
sn.exe covered in Chapter 18. |
/namespace:name |
Allows you to overrule the default namespace (the name of the type |
|
library) with a value of your own choice. |
/out:filename |
Allows you to specify the output filename. The default value generated |
|
is the name of the type library with the extension .dll. |
/primary |
Creates a primary Interop Assembly containing information about |
|
the publisher of the type library. The assembly must be signed with a |
|
strong name and have a version number. |
/reference:filename |
Specifies the name of a file that contains a reference to types defined |
|
outside the current type library. |
/sysarray |
Specifies that COM SafeArrays should be mapped to .NET’s |
|
System::array. |
/unsafe |
Creates an interface without .NET security checks. I personally don’t |
|
recommend you use this since it introduces security risks, but it is |
|
available if you absolutely need it. |
|
|
Now that you have an Interop Assembly, all that is required for a .NET application to reference its members is to add the following to the top of the code:
#using <TestCom.dll>
And just like you would with any other .NET DLL, make sure that the CLR can reference it by placing it either in the path of the application or in the GAC.
Visual Studio 2005 Generated COM Interop Assembly
If you have Visual Studio 2005, you can let it do all the work. The process is nearly the same as adding a .NET reference to a project, except instead of selecting from the .NET tab you select from the COM tab. Here are the relevant steps:
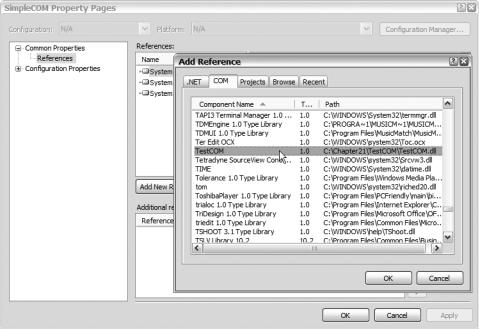
842 C H A P T E R 2 1 ■ A D V A N C E D U N S A F E O R U N M A N A G E D C + + . N E T P R O G R A M M I N G
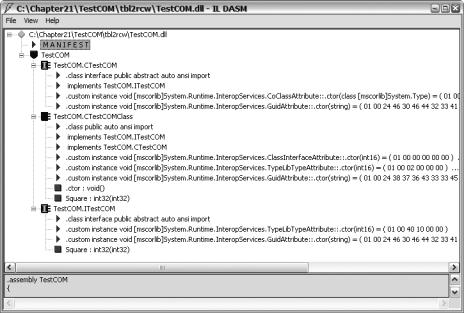
Figure 21-6. An ildasm view of the TestCOM Interop Assembly
This makes things easy as it allows the implementation of the code to be the same no matter which method you used to create the Interop Assembly.
The first thing you are going to need is the namespace and the name of the class within the Interop Assembly that you will be using to interface with your COM object. There are three easy ways to obtain this.
The first is to use ildasm. Looking back at Figure 21-6, you’ll notice the blue shield icon with a red top. This is the namespace you need to use. Next, navigate down into the namespace branch of the tree. You’ll find three class icons. Two of the icons have an “I” in the center of them; these are interfaces. You can use them if you want, but I prefer to use the real class: the one without the “I.” This is the RCW created by either tlbimp or VS .NET.
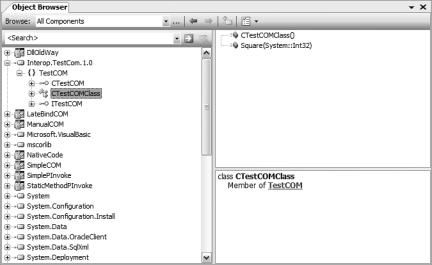
The second method is to use the Object Browser in Visual Studio 2005. The first step is to add a reference to the COM object as I described earlier. This will make the Interop Assembly available to the Object Browser. Next, open the Object Browser by choosing View Object Browser. This will open a docked window, as shown in Figure 21-7.
Select the COM Object Interop Assembly that you referenced. The namespace you will need to use will be the one next to the curly brackets icon. Expand this icon and you will see three more icons: two interfaces and a class. Again I use the class, but you can use the interface if you prefer.
The third method is a last resort and requires that you know the COM coclass. The namespace will be the name of the Interop Assembly minus any suffixes or prefixes, and the RCW class will be the coclass with a “C” in front and “Class” on the end.
Here is the result of all three methods for the TestCOM assembly:
•Namespace of TestCOM
•RCW of CTestCOMClass
Now all you need to do to use the COM object in your code is to create an instance of the RCW and then call the methods you want, as shown in Listing 21-9.
C H A P T E R 2 1 ■ A D V A N C E D U N S A F E O R U N M A N A G E D C + + . N E T P R O G R A M M I N G |
843 |
Figure 21-7. Object Browser
Listing 21-9. Invoking the COM Component TestCOM
// #using <TestCom.dll> // Add if you are not referencing using VS .NET
using namespace System; using namespace TestCOM;
int main(array<System::String ^> ^args)
{
CTestCOMClass^ test = gcnew CTestCOMClass();
long ret = test->Square(4);
Console::WriteLine("The Square of 4 is {0}", ret); return 0;
}
As you can see, there is no difference between using an RCW and a standard .NET class. Even IntelliSense works. Like I said, Microsoft performed some major league magic.
Handling COM Object Errors
How return values and errors are handled is hidden in the auto-generated RCW code. All COM methods return a 32-bit HRESULT value and not the nicely marshaled values that .NET presents to the developer. Here is the snippet of the TestCOM code that shows the Square method call:
HRESULT Square(LONG Value, LONG* Result)
{
if (Value > 0x0ffff)
{
*Result = -1;
return E_INVALIDARG;
}
844 C H A P T E R 2 1 ■ A D V A N C E D U N S A F E O R U N M A N A G E D C + + . N E T P R O G R A M M I N G
else
{
*Result = Value * Value; return S_OK;
}
}
And here is the call you make in your .NET application:
long ret = test->Square(4);
They don’t match! What is happening is that the PreserveSig is being set to false, which causes the method to return the [out, retval] parameter if the HRESULT is not an error; otherwise, an exception is thrown.
So, to handle a COM object method error just add a try block around the method call and a catch block to handle the error like this:
try
{
long ret = test->Square(0x10000);
}
catch (Exception^ ex)
{
Console::WriteLine("Oops an exception occurred: {0}", ex->Message);
}
Clean and simple, don’t you think?
Late Binding a COM Object
When implementing a COM object with an Interop Assembly, you are performing early binding. In other words, the COM object is connected to the calling application at compile time. In the absence of an Interop Assembly, it is still possible to connect to a COM object as long as the COM object implements IDispatch. This form of connection, which is done at runtime, is called late binding.
To perform late binding on a COM object, you have to know the COM progID, the Registry entry associated with the COM object. Then with the COM progID, you use reflection (see Chapter 18 for a refresher on reflection) to invoke the COM object’s methods.
Implementing late binding using reflection for COM objects is very similar to using reflection with assemblies. The big difference is that you use the static method Type::GetTypeFromProgID() to get the Type object (which represents the coclass) instead of the Type::GetType() method.
To help you understand how to code late binding of a COM object, let’s look at the full example first and then walk through it step by step. Listing 21-10 provides the same functionality as the early binding example.
Listing 21-10. Invoking the COM Using Late Binding
using namespace System;
using namespace System::Reflection;
int main(array<System::String ^> ^args)
{
Type ^typeTestCom = Type::GetTypeFromProgID(L"CTestCOM.CTestCOM");

846 C H A P T E R 2 1 ■ A D V A N C E D U N S A F E O R U N M A N A G E D C + + . N E T P R O G R A M M I N G
Finally, the InvokeMember() method returns an Object type, so you need to typecast it to the type you want. In the example, WriteLine() handles the typecast for me.
■Caution Late binding is less efficient than early binding.
Summary
In this chapter you looked at interfacing with unmanaged DLLs and COM objects. You started off looking at P/Invoke using simple data types. You then moved on to data marshaling with more complex data types. Finally, you looked at interfacing with COM objects using Interop Assemblies using either early binding with RCW or late binding directly with the COM object itself.
Because there is no next chapter to describe, I would like to instead thank you for reading my book. I hope you got as much enjoyment out of reading it as I did writing it.