

Visual CSharp 2005 Express Edition (2006) [eng]
.pdf
12
Utilizing .NET Data Controls
Over the last several chapters, you have been introduced to relational databases and, in particular, to the database tools included in C# Express to use with SQL Server. Besides the tools to work interactively with data, .NET provides classes and, more importantly, data controls to use data in your applications. Typical data applications entail binding different controls to fields in tables of a database, then being able to navigate and work with the data using forms. Editing and updating customer records are a good example of a typical data application.
In using data controls you will have to learn how to use more than one at the time and how to use those data controls with each other. Some of the controls that bind to data include TextBox, ComboBox, and ListBox controls. One of the data controls that you will use on your form is the DataGridView control. This powerful control enables you to view your data with practically no programming, just with dragging and dropping it on the form and setting a few properties.
In this chapter, you will read about the DataGridView control and other data controls that you now use on your forms. The following topics are discussed:
An overview of the data controls available for use
Using data sources in your application and managing them using the Data Sources panel
Working with the DataGridView control
Utilizing TextBox controls with the DataGridView control to display data
Adding a BindingNavigator to manipulate data and save data
Getting Star ted Using Data in Your Applications
There are a number of ways to utilize data in your applications — some more difficult than others. The techniques and controls discussed in this chapter are some of the easiest ways. There are some people who believe that you should be using code to control everything yourself. This is a great

Chapter 12
philosophy when you have been building a library of classes to control all the data handling yourself, such as adding, deleting, and modifying records in tables of a SQL Server database. However, when you start out and are just learning, you don’t necessary have the luxury to create all your own code.
It is true that a number of code libraries are out there that can take you a long way toward creating the necessary classes. But, again, to use those classes, you really need to understand how to work with data in your applications. In the next chapter, I will go into more details about how to work with ADO.NET, which is used “under the covers” by the data controls discussed in this chapter, to work with data using your code. For this chapter, I will give you a quick overview of the data controls provided by .NET, starting with data sources.
Starting with Data Sources
You may remember the discussion from Chapter 11 on the Database Explorer. Shown in Figure 12-1, the Database Explorer is where you maintain your databases from C# Express.
Figure 12-1
If your Database Explorer is not currently displayed, you can do so by choosing View Database Explorer. However, while you can manipulate the databases using this tool, it doesn’t connect the data to your projects themselves. To do that, you need to use data sources.
Data sources are just what the name implies, the source of data for your projects. When you create a data source, C# Express walks you through the Data Source Configuration Wizard, which first sets up a connection string, usually from databases you have added to the Data Explorer. It then sets up a data set.
Data Sets
A data set is data that you set up to be stored in memory, called cache. Data sets are made up of collections of tables and relationships. Although this sounds complicated, C# Express goes to a great deal of
196

Utilizing .NET Data Controls
trouble to make it so you can use the data controls and not have to deal with specifics of writing each line of code to perform work with the data set. You will just pick the tables you want to include, and C# Express generates the code necessary for you. Once you have created the data source and the data set, then you are able to use them with other controls on the forms by dragging and dropping them onto the forms.
Using the Data Source Configuration Wizard
The simplest way to create a data source is to use the wizard provided. This utility asks you the following questions:
Which type of data do you want to use? The choices are Database, Web Service, and Data Object. For this chapter, you will be using the first option.
Which data connection would you like to use? You will be using the connection string created for the database you specified using the Database Explorer.
Which objects in the database do you want to include? By choosing a SQL Server database, you will have the choices of tables, views, stored procedures, and functions.
Try It Out |
Create a Data Source |
To get going with this chapter’s project, create a new Windows application project. Once this project has been created:
1.Select Data Add New Data Source . . . . The first page of the Data Source Configuration Wizard appears, as shown in Figure 12-2.
Figure 12-2
197

Chapter 12
2.Click Next, leaving the default value of Database. The next two pages ask which connection string you want to use, which will be the CoffeeSQLConnectionString, created in Chapter 11, and, finally, which objects in the database to include.
3.Select the tables that you want, as shown in Figure 12-3.
Figure 12-3
4.Click Finish. The data source is created. You will now use that data source for accessing data in your application.
You can keep track of your data sources in your project by choosing Data Show Data Sources. When you do this, the Data Sources panel appears beside the Data Explorer, as shown in Figure 12-4.
Figure 12-4
198

Utilizing .NET Data Controls
Notice that the last portion of the name of the data source created is DataSet. DataSet happens to be one of the data controls that are included for working with data in .NET.
Data Controls Overview
As mentioned, you will be using the various data controls in one way or another depending on the task you are trying to accomplish. The following table discusses those data controls and their purpose.
Control |
Purpose |
|
|
DataSet |
Used to represent data in memory. Multiple tables can be included |
|
in a DataSet control. |
DataGridView |
Displays data in a gridlike view, so you can browse through the |
|
data. |
BindingSource |
Binds the DataSet control to other controls that can be bound to |
|
data, such as TextBox and ComboBox controls, along with the |
|
DataGridView control, of course. |
BindingNavigator |
Provides navigation for forms and data working with the |
|
BindingSource control. |
TableAdapter |
Not displayed in the toolbox, this control provides the means to |
|
perform updates back to the database. A real workhorse, SQL |
|
commands are created and loaded into various properties of this |
|
controls for performing various tasks including selecting, deleting, |
|
and modifying data. |
|
|
As with the majority of the controls that you can add to your form from the toolbox, the data controls can also be added just using code. Most of these controls are actually built around ADO.NET classes, which are discussed in the next chapter.
One of the cool things about using these controls is that C# Express will generate most of the code necessary for utilizing them in your applications, which is very helpful, since multiple steps have to occur to set them up. The best way to describe the use of the data controls is to actually add them to the forms yourself. As you walk through the steps, you will also notice that C# Express adds the additional data controls needed to provide the necessary functionality for the control you added.
Using the DataGridView Control
For instance, when you want to use the DataGridView control, you just have to drag and drop it onto the form, and the prompt that appears will let you set up most of the necessary properties (see Figure 12-5).
199
Chapter 12
Figure 12-5
If all you want to do is display data using the DataGridView control, all you have to do is literally drag and drop it onto the form and select some of the items in Figure 12-5. Give it a shot.
Try It Out |
Add a DataGridView Control |
As has been done in most of chapters before this, you will want to create a main form to use as a switchboard for your sample forms. Once you have done that, you can then create the form that will be used to display a DataGridView control.
1.Right-click the project, and select Add New Item from the menu.
2.Select Windows Form for the template to use, and name it as desired. For the purpose of this example, the name frmUseDataGridView was used.
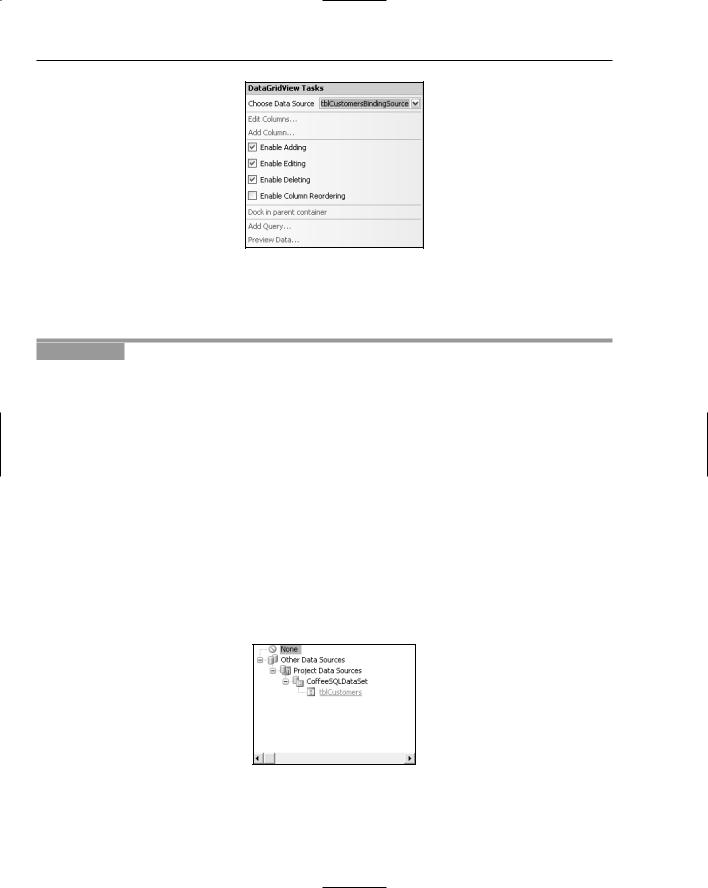
3.Drag and drop a DataGridView control onto the form from the Data Controls section of the toolbox. The menu in Figure 12-5 appears, without the Choose Data Source field filled in.
If you accidentally lost this window by clicking off it, aim for the black and white arrow in the top right of the control. The window will appear again.
4.Click the drop-down menu for the Choose Data Source field. A tree view appears with the top node displaying Other Data Sources.
5.Keep expanding the data sources until you get to tblCustomers, as shown in Figure 12-6.
Figure 12-6
200

Utilizing .NET Data Controls
6.Click on tblCustomers. Back in the DataGridView tasks, the Choose Data Source field will then be filled with tblCustomersBindingSource.
7.Click the Dock in Parent Container link. You see the DataGridView control fill the form.
8.Click off the task pane onto the form anywhere. The Task pane disappears, and the form is then displayed, with the fields in the tblCustomers table, as well as the new DataSet, DataBinding, and TableAdapter controls shown in Figure 12-7.
9.Click F5 to test the application. Choose the new form to be displayed, and the data is displayed in the DataGridView control, shown in Figure 12-8.
If you were to look at the properties of the component used, you would see that they refer to each other. The BindingSource’s DataSource property is set to the CoffeeSQLDataSet, and the DataMember property is set to tblCustomers. The DataGridView’s DataSource property is set to the tblCustomerBindingSource. So you can see how they are all interjoined by setting properties to each other. Again, it is great that C# Express does all lot of the work for you.
Figure 12-7
201

Chapter 12
Figure 12-8
Creating a DataGridView with
Single Record Display
There will be times when you want to display just a single form view showing one record on the form at a time. Accomplishing this takes a little more work, but it also shows off another one of the data controls, the BindingNavigator control.
BindingNavigator Control
The BindingNavigator control is an interface to the BindingSource control and enables you to display buttons on your forms for adding and deleting records, as well as for moving around the records that you are working with. Once again, it is very straightforward to bind controls to data once you learn the steps to take.
The first thing I do when I am going to create a form using TextBox controls that will be bound to data is to add all of the controls on the form first, except the data controls. Then, once the TextBox controls and any other that are needed are positioned where you want them on the form, you can start the process of binding them. In fact, you can add a DataGridView control onto the form with the text boxes with no programming, just by dragging and dropping and then modifying some properties.
Try It Out |
Display a DataGridView control with TextBoxes |
For this Try It Out, create a new Windows Form, in the example frmDisplayIndividualRecords, and then:
1.Add three Label controls, with three TextBox controls, laid out side by side on the form.
2.Type Customer ID, Customer Name, and Email for the Label controls’ Text property.
3.Type txtCustomerID, txtCustomerName, and txtEmail for the Name property for each TextBox control, beside the appropriate label.
202

Utilizing .NET Data Controls
4.Position the controls toward the bottom of the form, leaving room at the top for the
DataGridView.
5.Click the Data Sources pane.
6.Drag and drop the tblCustomers node from the Data Sources pane over onto the top of the form (see Figure 12-9).
That’s right. A heck of lot happened right there. Not only did the data source cause the DataGridView to be added to the form, but the needed data controls as well, including the BindingNavigator control discussed earlier. You can see the buttons that were added because of the control at the top of the form.
7.Click the first TextBox control, beside the label Customer ID.
8.Click the + symbol next to the (DataBindings) property category. The category then expands to display (Advanced), Tag, and Text properties.
9.Click the drop-down arrow next to the Text property. The same data source dialog box displayed when you were creating the data grid control appears. However, instead of choosing Other Data Sources as you did last time, choose CustomerID from tblCustomersBindingSource, as shown in Figure 12-10.
Figure 12-9
203