

Visual CSharp 2005 Express Edition (2006) [eng]
.pdfChapter 13
5.Press F5 to build and run the application.
As you select the various names, you will see the orders change.
Executing Parameterized Stored Procedures using the SqlCommand Class
Thus far, you have been displaying data on your forms. But when you need to update data in a table back in the database, you will want to use a stored procedure in a SqlCommand object with parameters.
The Stored Procedure
To start, take a look at the stored procedure, found in the CoffeeSQL.mdf database:
ALTER PROCEDURE dbo.StoredProcedure1 (@intCustID int,
@strEmail varchar(50))
AS
Update tblCustomers Set EmailName = @strEmail from tblCustomers Where CustomerID = @intCustID
RETURN
The purpose of this stored procedure is to update a person’s e-mail in his or her record. This stored procedure takes the two parameters, @intCustID and @strEmail, and uses them to specify the CustomerID to look for and the new EmailName to supply. This stored procedure can be found in the stored procedures of the CoffeeSQL database.
The Form
For this form, you use the ComboBox control to choose a customer who needs his or her e-mail name updated and then a TextBox control. The code for executing the stored procedure will be created for a button on the form. You can see the form in Figure 13-4.
Figure 13-4
The Code
The first code that needs to be written is much the same as was used for loading the ListBox control in the last section. The only thing that changes is that instead of using listBox1 you use comboBox1. Even the properties remain the same.
The code for actually executing the stored procedure will be different than what you have seen before. The first code looks familiar in that it instantiates both SqlConnection and SqlCommand objects.
214

Working with ADO.NET
SqlConnection scnn = new SqlConnection(strConn);
SqlCommand scmdUpdate = new SqlCommand();
After these lines of code, the CommandText property is set to the name of the stored procedure, and the
CommandType to CommandType.StoredProcedure.
scmdUpdate.CommandText = “StoredProcedure1”;
scmdUpdate.CommandType = CommandType.StoredProcedure;
Next, parameters are added to the SqlCommand object, one for @intCustID and the other for @strEmail, using the AddWithValue method of the Parameters collection. The Connection property of the SqlCommand object is then set to scnn.
scmdUpdate.Parameters.AddWithValue(“@intCustID”,
comboBox1.SelectedValue);
scmdUpdate.Parameters.AddWithValue(“@strEmail”, txtEmail.Text); scmdUpdate.Connection = scnn;
The SQLConnection is then opened. The ExecuteNonQuery of the SqlCommand object executes the stored procedure. Lastly, the SqlConnection object is closed.
scnn.Open();
scmdUpdate.ExecuteNonQuery();
scnn.Close();
That is all there is to it.
Try It Out |
Executing a Stored Procedure with Parameters |
Using the project you have been working with throughout the chapter:
1.Add a new Windows form.
2.Add two Label controls, a ComboBox control, a Textbox control, and a Button control, as shown in Figure 13-4.
3.Double-click anywhere on the form itself. This creates the Form Load routine definition, as shown here:
private void Form1_Load(object sender, EventArgs e)
{
}
4.Type the following code between the opening and closing curly brackets:
SqlDataAdapter sdaCusts = new
SqlDataAdapter(“Select * From tblCustomers”, strConn);
DataTable dtCusts = new DataTable();
sdaCusts.Fill(dtCusts);
215
Chapter 13
comboBox1.DisplayMember = “CustomerName”; comboBox1.ValueMember = “CustomerID”; comboBox1.DataSource = dtCusts;
5.Double-click the Button control you added. The definition for the Click routine is created:
private void btnRunCommand_Click(object sender, EventArgs e)
{
6.
7.
8.
9.
}
Type the following code:
SqlConnection scnn = new SqlConnection(strConn);
SqlCommand scmdUpdate = new SqlCommand();
scmdUpdate.CommandText = “StoredProcedure1”; scmdUpdate.CommandType = CommandType.StoredProcedure;
scmdUpdate.Parameters.AddWithValue(“@intCustID”,
comboBox1.SelectedValue); scmdUpdate.Parameters.AddWithValue(“@strEmail”, txtEmail.Text);
scmdUpdate.Connection = scnn;
scnn.Open();
scmdUpdate.ExecuteNonQuery();
scnn.Close();
Press F5 to build and execute the application.
Pick a customer and type an e-mail to update.
Click the Button control to execute the stored procedure.
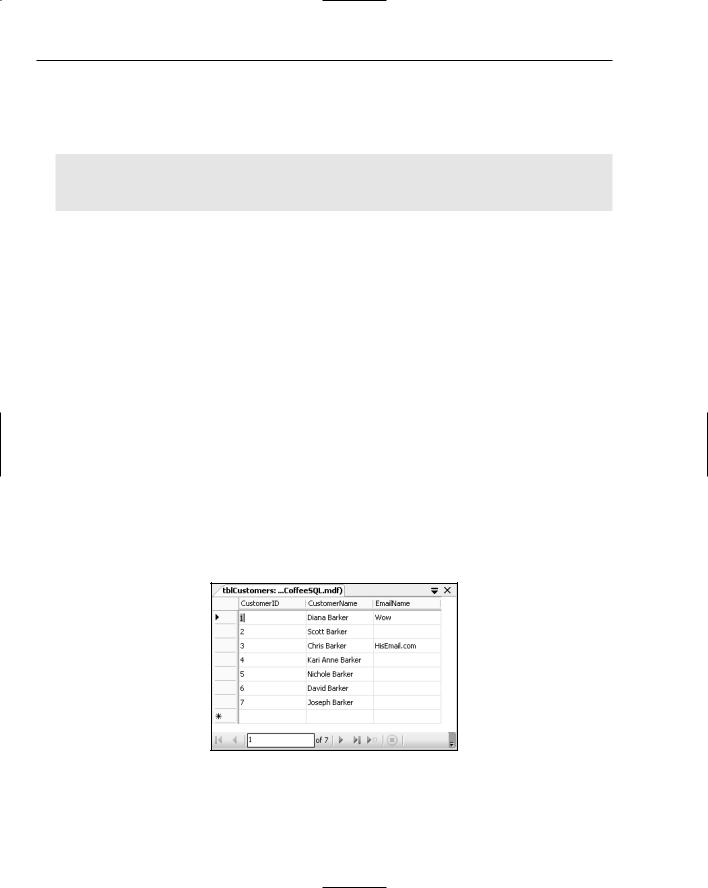
Now when you go and look at the data, you will see that the e-mail name is updated for the client you specified, as shown in Figure 13-5.
Figure 13-5
You can see this pane in the Database Explorer by right-clicking on the table and choosing Show Table Data.
216

Working with ADO.NET
Summar y
C# Express goes to great trouble to create the necessary data controls and to write the code to have your application work with those controls. But there are some cases when you will want to write your code and manage the data yourself. To do so, you need to use ADO.NET and data provider classes. Which object you will use depends on what you are trying to do.
The DataSet class with the SqlDataAdapter class can be used to retrieve hierarchal data. With command objects you can update data in the database by using parameterized stored procedures. The connection object is used with most of the other classes to create a connection that can be opened and closed as necessary.
Exercises
1.Name the three prior types of access methods provided by Microsoft in the past.
2.In ADO.NET the main object for working with data is the DataSet. What was the main object in the prior version?
3.ADO used connected data methodology. What does ADO.NET use?
4.DataAdapters are used to load data into DataTables and DataSets. What are Command objects used for?
217


Part IV
Finishing Touches


14
Getting More Experience
with Controls
In a lot of books when you find out about a couple of the more common controls, it is assumed that you will just figure out the rest of the controls by yourself. This is probably very true because you are extremely intelligent. But there are so many very useful controls included in C# Express for use in your C# applications that I wanted to cover as many as possible for you. In Chapter 9, I covered the RichTextBox control and a number of the dialog controls. A total of five controls were covered. This chapter even beats that!
In this chapter there are three tasks that are accomplished: create a file browser using a SplitContainer control, a WebBrowser control, and more. The last two tasks deal with various ways of working with date controls, status bars, and progress bars. This chapter includes about 10 different very useful controls. In it, you will:
Take concepts and command statements you have learned in prior chapters and put them to practical use.
Use a TabControl to include multiple pages (tasks) on one form.
Utilize various controls such as the SplitContainer, ListBox, FolderBrowserDialog, and WebBrowser control to create a file browser utility to display files in a Web browser.
Create a demo to display working graphically with dates using the MonthlyCalendar and DateDrop controls.
Demostrate using ProgressBar controls on a form and in a StatusStrip control at the bottom of a form.

Chapter 14
Walking through the Demo Application
As mentioned in the introduction, this chapter is packed with controls — all displayed using a single form. There are three demos, each broken out into its own page using a Tab control.
Demo 1: Browsing Web Files
The first page is a utility that enables the user to point to a folder using a FolderBrowserDialog control. The folder chosen is then displayed in a ListBox control. When the user selects a particular file in the ListBox control, that file is displayed using a WebBrowser control. An example is shown in Figure 14-1.
Figure 14-1
Another great thing about this demo is that the ListBox and WebBrowser controls are contained within a SplitContainer control. The SplitContainer control enables users to control the width of the display of items contained within it — in this case, the list of files and the current file being displayed. There are a number of different types of files you can display using this demo, including text, html, and graphic files, but additional work may be required to display files such as Excel worksheets. File types are determined by current browser plug-ins; images, sounds files, and so on may be accessible via QuickTime, for example.
Demo 2: Choosing and Displaying Dates
The second demo displays a couple of controls that are specifically designed for choosing and displaying dates in your applications. Those controls are the MonthCalendar and DateTimePicker controls. These controls have been around awhile in the programming world as ActiveX controls before .NET. You can see the demo with a date chosen in the MonthCalendar control in Figure 14-2.
222

Getting More Experience with Controls
Figure 14-2
The DateTimePicker control reflects the date chosen in the MonthCalendar control. You also can choose a date in the DateTimePicker control, as shown in Figure 14-3.
Figure 14-3
When you click a DateTimePicker control, another calendar that looks coincidentally like the MonthCalendar control drops down. You can pick from the calendar displayed.
There have been times in the real world when I have used both the MonthCalendar and DateTimePicker controls for different purposes and fields on the same page.
223