

(ebook) Programing - Introduction to Visual Basic NET
.pdf1 0 8 C h a p t e r 6 : D a t a b a s e A c c e s s w i t h V B . N E T a n d A D O . N E T
enter the login information, and finally choose the name of the database, which in this case is Northwind. Your final Connection tab should look similar to Figure 6.3. After you’re done, feel free to test the connection, and then click the OK button.
Figure 6.3
The second page of the Data Link Properties.
The DataAdapter Configuration Wizard should now show the connection you just set up, as shown in Figure 6.4. Click the Next button.
Figure 6.4
The DataAdapter Configuration Wizard showing you the new connection.
The wizard now asks you what type of query you want to perform. Your choices are to use a SQL statement, create a new stored procedure, or use an existing stored

A c c e s s i n g a D a t a b a s e f r o m a W i n d o w s A p p l i c a t i o n 1 0 9
procedure, as shown in Figure 6.5. Although stored procedures are the way to go 99% of the time, for this demonstration just choose Use SQL Statements and click the Next button.
Figure 6.5
Choosing to use a SQL statement for this command.
Next, you are asked to enter the SQL statement you want to use. There are two buttons on this page of the wizard. The Advanced Options handles issues dealing with inserts, updates, and deletes, so don’t worry about those for this example. The second button launches the SQL Builder. The SQL Builder is a very nice, graphical tool for creating queries. If you have used the SQL Builder in Visual InterDev or the Microsoft Query Tool, this tool will be familiar to you. If you have used Access, this tool is very similar to the Query Designer in Access. For now, just type in the SQL statement in the text box. Your query should be Select * from Products as shown in Figure 6.6.
Figure 6.6
Your query entered into the wizard.

1 1 0 C h a p t e r 6 : D a t a b a s e A c c e s s w i t h V B . N E T a n d A D O . N E T
Click Next and you will be on the last screen, which again is just for information. Click the Finish button and you will exit the wizard.
You will now be returned to the Component1.vb [Design] tab. If you look at the design surface, two controls have been added: oleDbDataAdapter1 and oleDbConnection1. These controls represent the connection and the query you have added to this form. If you think about it, the DataAdapter is similar to a Command object in ADO.
The oleDbConnection1 control describes the database connection; if you click on it once and look at the Properties window, you will see the connection string, database, server, provider, and other information about the connection. The oleDbDataAdapter1 control describes your actual query. If you don’t see that in the Properties window, expand the SelectCommand property, and the CommandText (your SQL statement) is revealed.
If you are keeping score, what you have done so far is basically equivalent to creating an ADO Connection object, and then an ADO Command object. What has to happen next is to actually get the records into memory, which is the equivalent of creating an ADO Recordset. In VB.NET, the object you use to store data is called a DataSet.
Click once on the form. Notice that on the menu bar, a new menu item has appeared: Data. If you don’t click on the form first, you won’t see Data on the menu bar. If you click on the Data menu, you’ll see two choices: Generate DataSet and Preview Data. You can see these same choices, and an additional one, by selecting the oleDbDataAdapter1 control and looking in the Properties window.
The Generate DataSet option creates a DataSet object, which is the object that holds the data in memory, just like the ADO Recordset.
Click on the Data menu and choose Generate DataSet. The Generate DataSet dialog box opens, and asks you for the name of the DataSet. Name the DataSet dsProducts. Leave the option to add an instance of the class to the designer unchecked. Your dialog box should look like the one shown in Figure 6.7. Click the OK button.
If you look in the Solution Explorer window, you will notice that a new file has been added: dsProducts.xsd. The XSD file is an XML Schema Definition file. This is your first indication that the data access in .NET relies heavily on XML.

A c c e s s i n g a D a t a b a s e f r o m a W i n d o w s A p p l i c a t i o n 1 1 1
Figure 6.7
Creating the DataSet.
Next, you’ll need to add code to load the DataSet. Open the code window of the component by selecting Code from the View menu. Inside Form1, add the following methods:
Public Function FillDataSet() as LearningVBdata.dsProducts
Dim ds as new LearningVBdata.dsProducts
Me.oleDbConnection1.Open()
Try
Me.oleDbDataAdapter1.Fill(ds)
Catch fillException As System.Exception
msgBox(“Caught exception: “ & fillException.Message) End Try
Me.oleDbConnection1.Close()
Return ds
End Sub
Public Sub UpdateDataSource(ByVal ds As LearningVBdata.dsProducts) oleDbConnection1.Open()
Dim UpdatedRows As System.Data.DataSet
Dim InsertedRows As System.Data.DataSet
Dim DeletedRows As System.Data.DataSet
UpdatedRows = ds.GetChanges(System.Data.DataRowState.Modified) InsertedRows = ds.GetChanges(System.Data.DataRowState.Added) DeletedRows = ds.GetChanges(System.Data.DataRowState.Deleted) Try
oleDbDataAdapter1.Update(UpdatedRows)
oleDbDataAdapter1.Update(InsertedRows)

1 1 2 C h a p t e r 6 : D a t a b a s e A c c e s s w i t h V B . N E T a n d A D O . N E T
oleDbDataAdapter1.Update(DeletedRows) Catch updateException As System.Exception
msgBox(“Caught exception: “ & updateException.Message) End Try
Me.oleDbConnection1.Close()
End Sub
These methods might appear complex, but they’re actually quite easy to understand. The first of these two methods is used to get data from the datasource described by the DataAdapter and DataConnection. When called, it returns a DataSet that has already been filled. The second of the methods takes a parameter of a DataSet. It is used to update the datasource. Any rows that the DataSet has added, deleted, or changed since the last time it was filled will be sent to the datasource. Because ADO.NET is built to work in a disconnected fashion, you will make changes to a single disconnected DataSet. Then ADO.NET will figure out whether a particular record has been added, updated, or deleted, and carry out the appropriate actions against the back-end database.
Using the DataForm Wizard
Although most VB developers scoff at the concept of bound controls, they are very useful for quickly building a prototype or proof-of-concept. In addition, bound controls work well to demonstrate some of the functionality in VB.NET.
To start the DataForm Wizard, right-click the LearningVBData project node, select Add, and then Add New Item. Double-click the DataForm Wizard icon. This starts the DataForm Wizard. The first screen is just information, so after reading it, click the Next button.
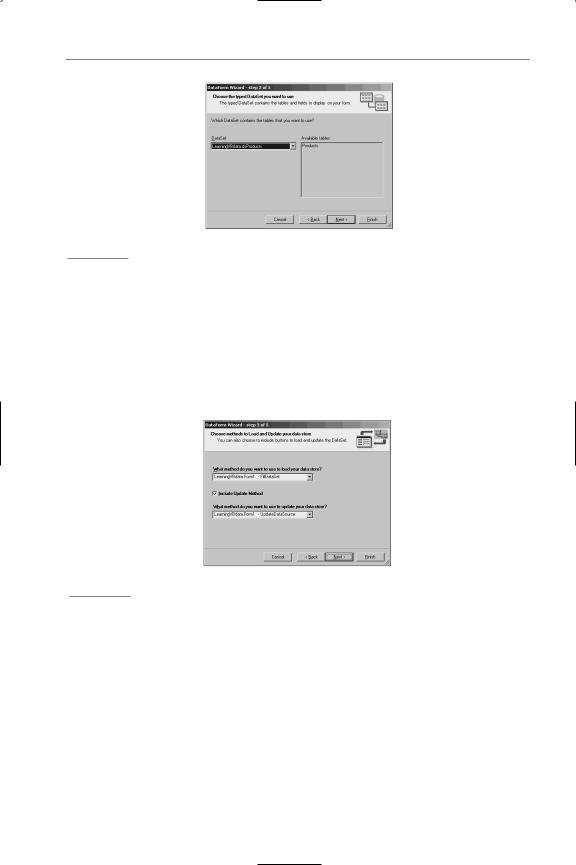
Step 2 of the DataForm Wizard asks you to choose whether to use a new DataSet or to use one you’ve already created. Because you have already created the DataSet you will be using, select the Existing radio button. If you drop down the list, you should see only one DataSet, which is the one you just finished creating: dsProducts. The DataSet is listed as LearningVBdata.dsProducts, and the list of available tables is shown in the list box on the right side. Figure 6.8 shows what your form should look like. Click the Next button after choosing your DataSet.
Step 3 of the wizard asks you what method you want to use to load the data store. Earlier, when you added the controls and set the SQL statement, a FillDataSet method was created in Component1. Choose the FillDataSet method for the first box.
A c c e s s i n g a D a t a b a s e f r o m a W i n d o w s A p p l i c a t i o n 1 1 3
Figure 6.8
Step 2 of the DataForm Wizard.
If you want, you can check the Include Update Method box, but be aware that doing so enables you to manipulate the data as you work with it, and this might not be something you want to do. However, if this is just a test machine, feel free to check this box and then select UpdateDataSource as the method to use to update the data store. Figure 6.9 shows what this screen should look like when you are done. Click Next to move forward.
Figure 6.9
Step 3 of the DataForm Wizard.
Step 4 of the DataForm Wizard displays a list of the tables in your DataSet, as well as the columns in each table. If you had a DataSet with relationships between tables, you could even display a hierarchical relationship with this screen. Make sure that all the fields are chosen and click the Next button.
Finally, Step 5 asks whether you want to display all the records (which will show them in a grid) or just a single record (which will show the record in text boxes).
If you choose the grid display, the generated form displays the DataSet in a Datagrid. A Datagrid has the functionality to navigate, add, and remove records already built into it. Thus, choosing to view the records in a grid removes the options for adding

1 1 4 C h a p t e r 6 : D a t a b a s e A c c e s s w i t h V B . N E T a n d A D O . N E T
navigation controls, as well as buttons for Add, Delete, and Cancel. Select the Single Record radio button and leave all the buttons enabled, as shown in Figure 6.10. Click the Finish button to exit the wizard, have it create a form, and work its magic.
Figure 6.10
Choosing how to view the data on the form.
The form sports a large number of controls: buttons, text boxes, and panels. Before running the result, you need to set DataForm1 as the Startup object for your application. Select Properties from the Project menu. In the Startup object drop-down, select DataForm1 and press the OK button. Go ahead and run the form by clicking on the Start button.
After the form is loaded, click the Load button. This actually fills the DataSet and then displays the first record on the form. Use the navigation buttons to walk through the records. Figure 6.11 shows how your form should look.
Figure 6.11
Your first data-driven VB.NET form.
If you update the data, you will get an interesting lesson in just how ADO.NET works. For example, in Figure 6.11, the current record is ProductID 9, Mishi Kobe Niku. The UnitsInStock is 29. If you change the UnitsInStock to 28, and then click the Next (>) button, you scroll to ProductID 10. Then, if you click the Previous (<)

A c c e s s i n g a D a t a b a s e f r o m a W i n d o w s A p p l i c a t i o n 1 1 5
button, ProductID 9 shows a UnitsInStock of 28. “Aha!” you think. “I’ve updated that record.” And you have. But you haven’t.
ADO.NET uses a disconnected paradigm. That means that the data in the DataSet is not connected to the underlying database in real-time. The data you have changed is in the DataSet, and not in the SQL Server table. You can verify this by opening SQL Server’s Query Analyzer and running the following SQL statement against the Northwind database:
Select * from Products where ProductID=9
If you run this SQL statement, you will see that the UnitsInStock is still 29, even though you now see 28 in the application you built.
This disconnected mode of working is why the DataForm Wizard adds an Update button. The Update button calls the UpdateDataSource procedure that you selected in the DataForm Wizard. As soon as you click the Update button, the data is updated in SQL Server. Using this disconnected model, you could make multiple inserts, updates, and deletes, and then send them to the underlying database all at once.
Some of you might have used disconnected recordsets in ADO. If so, this sounds familiar to you. For those of you who didn’t use ADO’s disconnected recordsets, this might sound strange. Just be aware that this is the default behavior in ADO.NET.
You can also see the data in the form of a grid. Select Add New Item from the Project menu. Double-click the DataForm Wizard icon to start the DataForm Wizard. Choose the dsProducts DataSet that you created earlier. In the method you want to use to load the data store, pick the FillDataSet in Component1. Select the Products table and all the fields. Finally, choose to display All Records (grid) on Step 5 of the wizard.
VB.NET adds a DataGrid control to the form, along with a Load button. Don’t start the project yet; if you do, you will see only Form1. To see DataForm2 at startup, rightclick the project in the Solution Explorer window and choose Properties. In the Startup Object box, choose LearningVBdata.DataForm2. Now, start the project and click the Load button. You should see the records from the Products table in the form, as shown in Figure 6.12.
Figure 6.12
Your DataForm using the grid.

1 1 6 C h a p t e r 6 : D a t a b a s e A c c e s s w i t h V B . N E T a n d A D O . N E T
Binding to Data Without the DataForm Wizard
What if you wanted to bind fields to the DataSet manually? This step involves placing the controls on the form and binding them through setting properties. In addition, you have to write the navigation code yourself. Still, this is a common request, so it is important to see how it works.
Add a new Windows form to the LearningVBdata project. Name the form BoundControls.vb. After the form is ready, open the Toolbox and add a ComboBox to the form. Name this control cboCountry. Change the DropDownStyle property to DropDownList. Find the Items property and click the ellipses (...) in the property box to open the String Collection Editor. Typing one per line, enter the following countries: USA, France, Germany, Brazil, UK, Mexico, and Spain. Figure 6.13 shows what this should look like.
Figure 6.13
Filling in the countries for the cboCountry box.
Next, add three text boxes to the form, and a label for each text box. Name the three text boxes txtCustName, txtContName, and txtPhone; clear out the Text property of each. Set the Text properties for the labels to Customer Name, Contact Name, and Phone, respectively. Finally, add a label for the combo box and label it Country.
Now, it’s time to add some data to the form. Open Component1, and go to the Toolbox. In the Data tab, drag over an oleDbDataAdapter to the component. This

A c c e s s i n g a D a t a b a s e f r o m a W i n d o w s A p p l i c a t i o n 1 1 7
starts the DataAdapter Configuration Wizard you saw earlier. Choose the data connection you created earlier, and then choose to use a SQL statement. In the screen that asks you to enter a SQL statement, enter the following command:
Select CompanyName, ContactName, Phone
From Customers
Where (Country=?)
This code creates a parameterized query. It can’t run properly unless you provide a value to replace the question mark. This way, you will choose a country from the combo box, and only the records that match that country will be retrieved and used to populate the DataSet.
Finish the wizard and you will see that you have a new OleDbDataAdapter on the component (because you used the same connection as last time, there was no need to create a new oleDbConnection). You still need a DataSet, so click on the Data menu and choose Generate DataSet. Select the option to create a new DataSet, and name it dsCustomers. Make sure that only the Customers table is selected and click OK. As happened the last time, a file named dsCustomers.xsd is added to the Solution Explorer.
Next, you’ll have to write new methods to fill and update the new DataSet. Add the following methods to Component1:
Public Function FillCustomers(country as String) _
as LearningVBdata.dsCustomers
Dim ds as new LearningVBdata.dsCustomers
Me.oleDbConnection1.Open()
Try
Me.oleDbDataAdapter2.SelectCommand.Parameters.Item(0).Value _ = country
Me.oleDbDataAdapter2.Fill(ds)
Catch fillException As System.Exception
msgBox(“Caught exception: “ & fillException.Message) End Try
Me.oleDbConnection1.Close()
Return ds
End Sub
Public Sub UpdateCustomers(ByVal ds As LearningVBdata.dsCustomers) oleDbConnection1.Open()
Dim UpdatedRows As System.Data.DataSet
Dim InsertedRows As System.Data.DataSet
Dim DeletedRows As System.Data.DataSet