

(ebook) Programing - Introduction to Visual Basic NET
.pdf1 5 8 C h a p t e r 8 : B u i l d i n g W e b S e r v i c e s w i t h V B . N E T
Figure 8.3
The ListItem Collection Editor.
Figure 8.4
Adding items to the drop-down list box.
Now, click the drop-down list box next to the To: label. Change its name to toValue. Click the ellipses in the Items property box. Add one item, US Dollars, and mark it as Selected. Your final form should look like the one in Figure 8.5.

C r e a t i n g a W e b S e r v i c e C l i e n t 1 5 9
Figure 8.5
The final user interface for the form, showing the drop-down list boxes containing default values.
Next, double-click on the Convert button to get to the code window. Before you write the code for the click event, however, you need to add a reference to the Web service you created in the last section. Adding a reference is critical; doing so allows you to program against the Web service as if it were a local object.
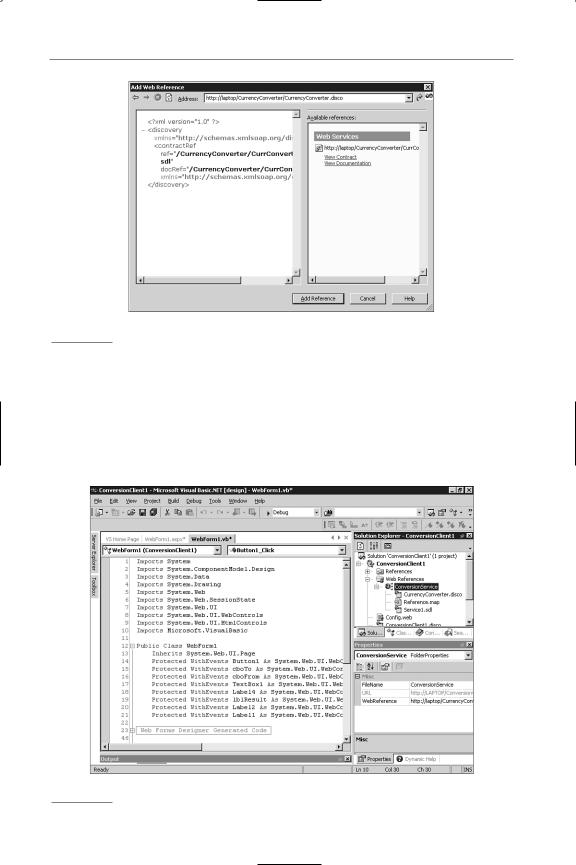
In the Solution Explorer, right-click on the ConversionClient project name and choose Add Web Reference. This is different from the Add Reference option, so make sure that you choose the correct one. The Add Web Reference dialog box will appear. In the Address field, you need to type the address of your Web service. This takes on the following format:
http://<servername>/<projectname>/<disco file>
Your server name might be different, but in my case, the address looks like the following (you could just use localhost as the server name if it is on the same machine):
http://laptop/CurrencyConverter/CurrencyConverter.vsdisco
After you have entered the URL, click the go arrow. The dialog box will make contact with the DISCO file and retrieve the necessary information from the Web service. Your Add Web Reference dialog box will look like the one in Figure 8.6. Click the Add Reference button to complete this process.
1 6 0 C h a p t e r 8 : B u i l d i n g W e b S e r v i c e s w i t h V B . N E T
Figure 8.6
The Add Web Reference dialog box has retrieved information about your Web service.
After you add the reference, you’ll see a Web References node appear in the Solution Explorer. If you expand the node, you’ll see an item with the name of the server holding the component to which you just connected. You can rename this if you want, so right-click on the server name and change the name to ConversionService. Figure 8.7 shows what this should look like when you are done.
Figure 8.7
The Add Web Reference dialog box has retrieved information about your Web service.

C r e a t i n g a W e b S e r v i c e C l i e n t 1 6 1
Now, in the WebForm1.asmx.vb code window, you need to import the namespace for the Web service. The namespace is the name of your current application and the name of the server on which the Web service resides. However, you just changed the name to ConversionService, so add the following code just under the last Imports statement at the top of the code window:
Imports ConversionClient.ConversionService
CoversionClient is the name of your client program, and ConversionService is how you reference the Web service.
In the Button1_Click procedure, you need to write the code to call the Web service, pass in the proper parameters, and then display the output. Type the following code:
Public Sub Button1_Click(ByVal sender As Object, _ ByVal e As System.EventArgs)
Dim convertService As Service1 convertService = New Service1()
Dim convertAmount As Decimal
Dim convertFrom As String
Dim convertTo As String
Dim convertAnswer As Decimal
convertAmount = CType(TextBox1().Text, Decimal) convertFrom = fromValue().SelectedItem.ToString convertTo = toValue().SelectedItem.ToString
convertAnswer = convertService.ConvertCurrency(convertAmount, convertFrom, convertTo)
resultValue.Text = convertAnswer.ToString End Sub
This code first creates an object of type Service1, which is the name of the service you created in the last section. You can call it this way because it resides inside the ConversionService namespace you imported at the top of the code window. Next, some variables are created and filled with values from the controls on the form. The code calls the ConvertCurrency method and passes in the parameters. The result is returned into a variable, which is then used to set the resultValue.Text property.
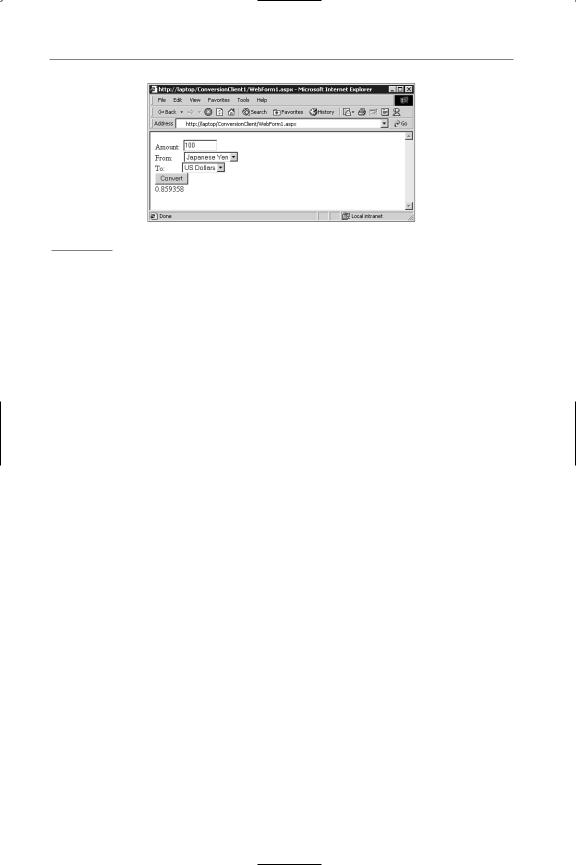
Go ahead and run the project. You’ll see the Web form start up in IE. Put 100 in the Amount: box, and choose Japanese Yen for the From: box. Click the Convert button, and you should see the value 0.859358 appear below the button after the page makes a round trip to the server. The resulting page should appear like the one shown in Figure 8.8.
1 6 2 C h a p t e r 8 : B u i l d i n g W e b S e r v i c e s w i t h V B . N E T
Figure 8.8
Your Web Application project has just received a result from your Web service.
One of the important things to understand about this process is that you never had to get your hands dirty handling the underlying XML. Instead, you programmed the service just like a Class Library application, with properties and methods, but you are now calling components that could be anywhere on the Internet.
Another thing to realize is that you have basically supplanted DCOM, which is specific to the Microsoft platform, and replaced it with the ubiquitous HTTP and XML. This means that the client does not have to be running the Windows operating system. Because the communication is all text, it flows freely through firewalls.
How Web Services Work
As you saw in the code, any method that you want to publicly expose is made public by adding the <WebMethod()> attribute to the method declaration. This makes the method automatically discoverable by anyone accessing the project’s URL. Any class that has one or more methods marked with <WebMethod()> becomes a Web service. The Framework handles the task of setting up all the necessary hooks for the component to be callable via HTTP.
Most Web services will import the System.Web.Services namespace. This isn’t necessary, but if you don’t, you’ll have to use the full System.Web.Services.myService syntax to call your service. Many services also inherit from the System.Web.Services.WebService base class because doing so gives them access to the intrinsic ASP objects, such as the Application and Session objects. This class contains the underlying methods to enable the Web service functionality. Web services also have a discovery file (the DISCO file) that later helps generate a WSDL (Service Description Language) file. You will see more on this later.
You saw earlier that you can test a Web service by choosing the View in Browser option from the ASMX file. The browser builds a page on-the-fly that contains text boxes that map to each parameter in the various methods in the service. This page

H o w W e b S e r v i c e s W o r k 1 6 3
also contains some descriptive text and a link to view the SDL for the service. The SDL is quite lengthy even for the small, single method service you created earlier.
And You Thought Disco Was Dead
After you have created the service, it is time to deploy it to the Web server. Earlier in the chapter, deployment was easy because you just had to choose to build the project. However, if you now want to copy the service to another machine, you have to make sure that you place the proper discovery document on that machine. The DISCO file allows a user to determine what services are available on your server, and what methods these services support. When users point their browser to your VSDISCO file, they can discover the Web services you have to offer.
However, what if your user does not know the path to—or the name of—the discovery document? Any development machine with VS.NET installed has the dynamic discovery document, default.vsdisco. In general, ASP.NET servers rely on default.disco files for static discovery. Therefore, the Web service developer needs to think carefully about which services should be available to the outside world on the deployment machine, and must author the static disco file properly.
How you actually deploy the Web service depends on whether you are using Visual Studio.NET or performing a manual copy. Furthermore, it changes depending on whether you are distributing a binary file or the text-based ASMX file. This deployment discussion is beyond the scope of this book, but will be covered in my later version of this book, based on the final release of Visual Studio.NET.
Speaking of discovery, you should be aware of UDDI. UDDI stands for Universal Discovery, Description, and Integration. The UDDI Project is an attempt to form a registration service for Web services. This means that you could search for Web services within a particular industry or even a particular company. This initiative represents a real attempt to create a central repository for Web components, which means you could easily create Web applications using components that already exist and are accessible over the Web. You can learn more about the UDDI Project by visiting its site at http://www.uddi.org.
Accessing Web Services
ASP.NET currently supports three for accessing a Web service: HTTP-GET, HTTPPOST, and SOAP. SOAP, which stands for Simple Object Access Protocol, defines an XML format for calling methods and passing in parameters, all surrounded by the schema definition. In addition, the result comes back in an XML format. HTTP-GET and HTTP-POST can call Web services, but SOAP adds the ability to pass more complex data types, such as classes, structures, and datasets. Despite these advanced features, SOAP is still all text, which has the advantage of being portable and able to traverse firewalls, unlike DCOM and CORBA.

1 6 4 C h a p t e r 8 : B u i l d i n g W e b S e r v i c e s w i t h V B . N E T
The Web services you create with VB.NET automatically support all three mechanisms. In fact, because your services support SOAP, they can be called not only with HTTP, but with other protocols as well, such as SMTP.
If you know the URL for your Web service, you can enter it in the browser and you will get the same type of page that was generated for you when you tested the service inside the IDE. For example, the following is a line that points to the service you built in this chapter. Don’t forget to change the name of the server as necessary:
http://localhost/currencyconverter/currconvert.asmx
This creates a page that allows you to test the service. This is important because by knowing this address, anyone can connect to your Web service using any tool. There is also a link to the WSDL contract, which is used by your client application. This contract contains more detailed information about the service. More importantly, it is the file used to generate a Web service proxy on the client. You don’t have to worry about doing this if your client is built in Visual Studio.NET and you add a Web reference, as you did in this chapter. VS.NET creates the proxy for you, which is just a VB.NET class file (or C#, depending on your language preference). If you want to create it manually, you merely save the SDL to your machine and run the Webserviceutil.exe program that comes with VS.NET.
Although it is beyond the scope of this book, security is a topic that often comes up when discussing Web services. You do have control over the security on these services, and you might not want everyone in the world to be able to access the service freely. Let’s face it: Some companies actually want to charge people for the use of certain services, in a display of what our capitalist system is all about. Because you are building your Web services for .NET, you can take full advantage of the security features it offers. Because these services are being offered via HTTP, Internet Information Server is another possible point for adding security. As with deployment, security will be discussed in a full version of this book to be based on the final release of Visual Studio.NET.
Summary
Although this chapter is short, it shows you the basic building blocks for creating Web services. Web services are one of the most exciting technologies in the .NET Framework because they allow you to use the architecture of the Internet as a way to extend the distributed nature of applications. No longer are you tied to accessing components only within your organization. Now you can access components anywhere, via HTTP. And you can do it without worrying about firewalls, or what operating systems exist on the host or the client.

C H A P T E R 9
Building Windows
Services with VB.NET
Visual Basic.NET lets you build Windows Services natively in VB for the first time. Windows Services, formerly called NT Services, are potentially long-running executables that can start without a user logging in, can be paused and restarted, and can be configured to run under different security contexts. Windows Services had been the domain of C++ developers until now, when the .NET Framework opens the ability for any .NET language to create services.
Windows Services should not be confused with Web Services, that are implemented as a different project type. Services are only supported on Windows NT, Windows 2000, and Windows XP.
Services work a little differently from just about any other project type. You cannot start a project within the Visual Studio.NET environment and step through it for debugging purposes. You must install your application as a service with the operating system in order for it to run. Then, after it is running, you can attach a debugger to it. Although Windows Services do not have a user interface, they typically use the event log to communicate problems or messages to the user or administrator.
Services are useful in certain circumstances. For example, I worked on an application in which files could arrive at any time, via FTP. A service ran that monitored a directory, and received an event when a file was added to the directory. The
NET.VB with Services Windows Building

1 6 6 C h a p t e r 9 : B u i l d i n g W i n d o w s S e r v i c e s w i t h V B . N E T
service then went about processing the file as necessary. This was a perfect use for a service: It needed to run all the time, regardless of whether anyone was logged in. The files could arrive at any time, so the service had to be running constantly. Finally, no user interface was necessary.
Once again, you will dive into a project and get it working, and then examine its various pieces. The service you will write checks the processor usage on a regular basis and logs the information to a file. This service introduces a couple of new items: working with text files and capturing performance counters. All this will be woven into your first service.
Creating Your First Windows Services Project
Open Visual Studio.NET and create a Windows Services project. Name the project LearningVBservice. You’ll see that all you have in the Solution Explorer is a .VB file named Service1, along with the AssemblyInfo file.
Double-click on the designer to access the code page. You have the definition Public Class Service1. Change this line to Public Class UsageMonitor.
If you expand the code the IDE generated for you, you’ll notice that you have a Sub New, which is not surprising. However, you also have a Sub Main, which is not something you have seen in most of your other applications. As you might suspect, the Sub Main is the first procedure that will run by default. Therefore, there is already some code in this routine to initialize the service. One line of code in Sub Main references Service1, but you’ve changed that name. Therefore, find the following line of code:
ServicesToRun = New System.ServiceProcess.ServiceBase() {New Service1()}
Change the code to this:
ServicesToRun = New System.ServiceProcess.ServiceBase() {New UsageMonitor()}
Next, find a line of code that starts with Me.ServiceName and change the line to this:
Me.ServiceName = “UsageMonitor”
Now, go back to the designer page. Open the Toolbox and in the Components tab, drag a Timer over and drop it on the designer. The entire Windows service is a component, which as you have seen, has a form-like designer. Because this designer is not a form, the Timer does not end up in the component tray; instead, VS.NET shows the control on the designer.
If you select the Timer1 component and look at its properties, you’ll see that by default it is disabled, and its Interval property is set to 100. The Interval property is in milliseconds, and is of type Double. Therefore, to wait one second, you put in a value of 1000. For this example, you want to capture statistics once every five

C r e a t i n g Yo u r F i r s t W i n d o w s S e r v i c e s P r o j e c t 1 6 7
seconds, so enter 5000 and enable the timer by setting its Enabled property to True. In a real application, you might want to grab values only every minute or every five minutes, but you probably don’t want to sit for 10 minutes just to make sure that this first Windows Services project works properly.
Next, drag over a PerformanceCounter control from the Components tab of the Toolbox. This allows you to access the same performance information you can get with the Performance tool (often called Performance Monitor, or PerfMon). Highlight the performanceCounter1 control and modify the following properties:
•Set CategoryName to “processor”
•Set CounterName to “% Processor Time”
•Set InstanceName to “_Total”
•Leave MachineName set to a period, which is a shortcut for the local machine name
N O T E
An alternative approach is to drag over a PerfCounter object from the Server Explorer, and then tweak the properties. Don’t forget about the Server Explorer when working with services.
Double-click on the Timer1 component to open the timer1_Tick event procedure. Before entering anything for the timer1_Tick procedure, go to the very top of the code window and add the following line of code:
Imports System.IO
Now, in the timer1_Tick event procedure, enter the following code:
Protected Sub Timer1_Tick(ByVal sender As Object, _ ByVal e As System.EventArgs)
Dim file As TextWriter = New StreamWriter(“c:\output.txt”, True) file.WriteLine(“CPU Usage: “ & _
PerformanceCounter1.NextValue.ToString & “ - “ & Now) file.Close()
End Sub
This is the code that runs every five seconds. It opens a text file called output.txt in the root of the C: drive. The True argument appends to the existing file. The code writes a string that contains the CPU usage from the performance counter, and then appends the current date and time. Finally, it closes the file. Notice that to use the shortcut name StreamWriter, you had to add the System.IO namespace, which has classes that handle many different types of I/O operations. This keeps you from having to type System.IO.StreamWriter to reference the class.