

Assembly Language Step by Step 1992
.pdfWithin the code segment of EAT.ASM, there is another directive, ASSUME:
ASSUME CS:MyProg,DS:MyData
Of all the directives a newcomer is likely to need to make a simple program work, ASSUME is almost certainly the toughest to understand. ASSUME has to do with labels and the way labels are used by the 8086/8088 CPU.
Recall that all memory addresses have two components: a segment address and an offset address. Furthermore, every label in an assembly-language program (with the single exception of labels used before the SEGMENT directive) represents some offset address from a segment address.
But which segment address?
Aye, that's the rub. Look at the data segment block named MyData:
; |
BEGIN |
DATA SEGMENT |
|
|
MyData |
SEGMENT |
;Strings are terminated by "$" |
||
Eatl |
|
DB |
"Eat at Joe's!"."$" |
|
CRLF |
|
DB |
ODH,OAH,'$' |
; for printing by DOS |
MyData |
ENDS |
|
;service 9 |
|
|
|
|||
;END DATA SEGMENT
Everything between the two directives SEGMENT and ENDS is the program's data segment. It says so (as they say) right on the label. But the label (by which I mean the comment blocks) is for our eyes only. The assembler ignores comments. There is nothing in this segment definition to tell the assembler that it is a data segment. You can define variables in the code segment or in the stack segment if you want, even though it's customary and more correct programming practice to keep variables in the data segment. Segment MyData could be just as easily considered a code segment, though not a stack segment. (Stack segments are a special case because, like Tigger, there can only be one. I'll speak of stacks, the stack segment, and the STACK directive in Section 7.2.)
We have the problem of indicating to the assembler which segment is the data segment. This might seem like an easy one, but rather than a single problem it is actually two problems: one is that the assembler needs to know which segment address to put into the Data Segment (DS) register; and the other problem is which form of memory-addressing machine instructions to use.
The first problem is easily addressed. Notice these two lines in EAT.ASM:
MOV |
AX.MyData |
; Set up our own data segment address in DS |
MOV |
DS,AX |
; Can't load segment reg. directly from memory |
MyData, if you recall, contains the segment address of a segment defined using the SEGMENT and ENDS directives. That address is first loaded into AX, and then from AX the address is loaded into DS. This roundabout path is necessary because the DS register cannot be loaded with either immediate data or memory data; it must be loaded from one of the other registers.
The end result is that the segment address represented by the label MyData is loaded into DS. This neatly solves the first problem of specifying the address of the data segment. We simply load the data segment's address into DS. Now Mydata can be considered a real data segment because its segment address is in the data segment register, DS.
That, however, doesn't solve the second problem. Although we wrote two instructions that moved the address of our data segment into DS, the assembler doesn't "know" that this move took place. Never forget that the assembler follows its orders without understanding them. It doesn't make inferences based on what you do to addresses or the segment registers. It must be told which segment is to be used as the data segment, the code segment, and the stack segment. Somewhere inside the assembler program is a little table where the assembler "remembers" that segment MyData is to be considered the data segment, and that segment MyCode is to be considered the code segment, and that segment MyStack is to be considered the stack segment. It can't remember these relationships, however, unless you first tell the assembler what they are somehow.
This somehow (for the data, code, and extra segments, at least) is the ASSUME directive. The ASSUME directive in EAT.ASM tidily specifies that MyData is the data segment and MyCode is the code segment.
Why is this important? It has to do with the way the assembler creates the binary opcodes for a given instruction. When you write an instruction that addresses memory data like this
MOV AX,MyWord
the assembler must put together the series of binary values that will direct the CPU to perform this action. What that series of binary values turns out to be depends on what segment the label MyWord resides in. If MyWord is in the data segment, the binary opcodes will be one thing, but if MyWord resides in the code segment, stack segment, or extra segment, the binary opcodes will be something else again. The assembler must know whether any label indicates an address within the data segment, code segment,
stack segment, or extra segment. The assembler knows that MyWord indicates an address within the segment MyData, but you must tell the assembler that MyData is in fact the data segment.
This is what ASSUME is for. As I've said before and will say again: knowing where things are is the greatest part of all your work in assembly language. Understand addresses and memory addressing (which includes telling the assembler how to find things, as we've done here with ASSUME), and the rest is easy.
The Main Program as a Procedure
All of the machine instructions in EAT.ASM are found between this pair of assemblylanguage statements:
Main PROC Main ENDP
Just as the SEGMENT and ENDS directives frame a segment, the PROC and ENDP directives frame what we call a procedure. A procedure is just a group of machine instructions that is given a name. This is almost entirely what a procedure is: a name. Unlike Pascal or C, there is no necessary structure to a procedure in assembly language. Making the main program portion of an assembly-language program a procedure is strictly optional, until you must begin dividing your program up into modules to keep it manageable. Then every executable component must be a procedure with a name, so that the linker can properly link the different modules together into the final executable program. If you're the least bit serious about assembly language, that will happen sooner than later, so I think it's a good idea to get in the habit of considering your main program a procedure at the outset.
In the next chapter I will explain the process of cutting a program up into procedures, and how the procedures work together to comprise a complete assembly-language program. Until then I won't have a lot more to say about procedures. The Main procedure defined in EAT.ASM is not germane to understanding the program's operation. Consider it a gesture to future expansion of the program, as we'll see in Chapter 8.
Choosing a Starting Point
There are no jumps, loops, or subroutines in EAT.ASM. If you've a smattering of assembly-language smarts you may wonder if the Start: label following the ASSUME
directive is unnecessary except for readability purposes. After all, Start is not referenced anywhere within the program, so one would think it's an ornament, like MyStack, the name of the stack segment. On the contrary— EAT.ASM will not assemble without it. The issue is this: DOS needs to know at what address to begin execution when it loads and runs the program. You might think DOS could assume that execution would begin at the start of the code segment, but not so—there may be more than one code segment, and under most circumstances the programmer does not specify the order of multiple code segments within a single program. (The linker has its own reasons for arranging them as it does.) Better to have no doubt about it, and for that reason you the programmer are required to pick a starting point and tell the assembler what it is.
The starting point may be any label that specifies an address within a code segment. Once you choose it, you inform the assembler of your choice by putting the chosen label at the very end of the sourcecode file, following the END directive. Note that you must put the colon after the label when you define its location in its code segment, but you cannot use the colon when you place the starting point label after END.
END does multiple service for the assembler. Its most obvious job is to tell the assembler, "That's all, folks—the source-code file is finished—no further machine instructions or assembler directives will be forthcoming." Any text placed after the END directive will be ignored by the assembler. You can put comment blocks there if you like, but don't forget that any instructions or directives you place after END will simply be ignored, and the assembler will not tell you that it is ignoring them. Best, I think, not to put anything at all after END.
Why specify the starting point after the END directive? Very simply: the assembler can, with confidence, assume that the starting point cannot be redefined. There can be more than one of most everything else in an assembly-language program (including stack segments—you just can't use more than one at a time) but there must be only one starting point for execution. Putting the starting label after END ensures that this will be the case.
7.2 First In, First Out via the Stack
One problem with assembly language is that it's tough knowing where to put things. There are only so many registers to go around. Having variables in a data segment is helpful, but it isn't the whole story. People who come to assembler from higher-level languages like Pascal and BASIC find this particularly jarring, since they're used to being able to create new variables at any time as needed. The 8086/8088 CPU contains the machinery to create and manage a vital storage area called the stack. The name is
appropriate, and for a usable metaphor I can go back to my high school days, when I was a dishwasher for Resurrection Hospital on Chicago's Northwest side.
Five Hundred Plates an Hour
What I did most of the time was pull clean plates from a moving conveyor belt of little prongs that emerged endlessly from the steaming dragon's mouth of a 180° dishwashing machine. This was hot work, but it was a lot less slimy than stuffing the dirty plates into the other end of the machine.
When you pull five hundred plates an hour out of a dishwashing machine, you had better have some place efficient to stash them. Obviously you could simply stack them on a table, but stacked ceramic plates in any place habituated by rowdy teenage boys is asking for fragments. What the hospital had instead was an army of little wheeled stainless steel cabinets equipped with one or more spring-loaded circular plungers accessed from the top. When you had a handful of plates, you pushed them down into the plunger. The plunger's spring was adjusted such that the weight of the added plates pushed the whole stack of plates down just enough to make the new top plate flush with the top of the cabinet.
Each plunger held about fifty plates. We rolled one up next to the dragon's mouth, filled it with plates, and then rolled it back into the kitchen where the clean plates were used at the next meal shift to set patients' trays.
It's instructive to follow the path of the first plate out of the dishwashing machine on a given shift. That plate got into the plunger first, and was subse-quently shoved down into the bottom of plunger by the remaining 49 plates that the cabinet could hold. After the cabinet was rolled into the kitchen, the kitchen girls pulled plates out of the cabinet one by one as they set trays. The first plate out of the cabinet was the last plate in. The last plate out of the cabinet had been the first plate to go in.
The 8086/8088 stack is like that. We call it a Last In, First Out, or LIFO stack.
An Upside-Down Segment
Two of the 8086/8088 registers team up to create and maintain the stack. Like everything else in 86 land, the stack must exist within a segment. The Stack Segment (SS) register holds the segment address of the segment chosen to be the stack segment, and the Stack Pointer (SP) register points to locations within the stack segment. As with all other segments, the stack segment can be as much as 65,536 bytes long, although you'll find in
practice that the stack rarely needs to be larger than a thousand bytes or so unless you're doing some really peculiar things.
The stack segment begins at SS:0, but the truly odd thing about it is that all the stack action happens at the opposite end of the stack segment. When a stack segment is set up, the SS register points to the base or beginning of the stack segment, and the SP register is set to point to the end of the stack segment. To store something in the stack segment (which we usually call "pushing something on the stack"), we move the SP "down the stack" (closer to SS) and then copy the item to the memory location pointed to by SS:SP. This takes some getting used to. Figure 7.1 provides the big picture of the stack segment and the two pointers that give it life. SS is set to the base of the stack segment by DOS when the program is loaded and begins running. SP is set to the far end of the stack segment, again by DOS when your program is loaded.
You can place data onto the stack in numerous ways, but the most straight-forward way involves a pair of related machine instructions; PUSH and PUSHF. The two are identical except that PUSHF pushes the Flags register onto the stack, while PUSH pushes a register that is specified by you in your source-code file onto the stack, like so:
PUSHF |
: |
Push the Flags register |
|
PUSH AX |
; |
Push |
the AX register |
PUSH [BX] |
; |
Push |
the word stored in memory at DS:BX |
PUSH DI |
: |
Push the DI register |
|
PUSH ES |
; |
Push |
the ES register |
Note that PUSHF takes no operands. You'll generate an assembler error if you try to hand it an operand; PUSHF pushes the Flags register and that's all it is capable of doing.
Both PUSH and PUSHF work this way: first SP is decremented by one word (two bytes) so that it points to an empty area of the stack segment that is two bytes long. Then whatever is to be pushed onto the stack is written to memory in the stack segment at the offset address in SP. Voila! The data is safe on the stack, and SP has crawled two bytes closer to SS. We call the word of memory pointed to by SP the top of the stack.
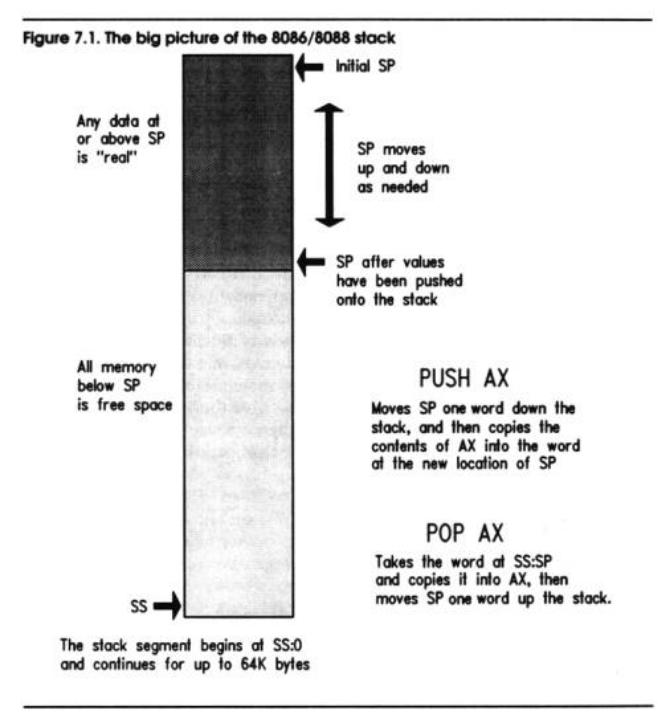
All memory between SP's initial position and its current position (the top of the stack) contains real data that was explicitly pushed on the stack and will presumably be fetched from the stack (we say popped from the stack) later on. Memory between SS and SP, however, is considered free and available, and is used to store new data that is to be pushed onto the stack.
All memory between SS:0 and SS:SP is considered free and available for the use of the stack.
Don't forget one important fact: the 8086/8088 pushes only word-sized items on the stack.
You can't push AL or BH or any other of the 8-bit registers. Nor can you push immediate data. Registers and memory are legal for pushing onto the stack, but immediate data will generate an assembler error. (There is, in fact, a variant of PUSH that will push immediate data on the stack, but it's only available on the 286, 386, and 486 CPUs. I'll take up the issue of the more advanced CPUs in Chapter 11.)
Your morbid curiosity may be wondering what happens when SP runs out of room in its downward crawl and collides with SS. Nothing good, certainly— it depends heavily on how your program is laid out, but I would lay money on your program crashing hard and probably taking the system with it. Stack crashes are serious business—in part because there is only one stack in action at a time in the 8086/8088. It's a little hard to explain (especially at this stage in our discussion) but this means that the stack you set up for your own program must be large enough to support the needs of DOS and any interrupt-driven code (typically in the BIOS) that may be active while your program is running. Even if you don't fully understand how someone else may be using your program's stack at the same time you are, give those other guys some extra room—and keep an eye on the proximity of SS and SP while you trace a program in DEBUG. I'll explain how to allocate space for your stack a little later in this section.
POP Goes the Opcode
In general, what gets pushed must get popped, or you can end up in any of several different kinds of trouble. Getting a word of data off the stack is done with another two instructions, POP and POPF. As you might expect, POP is the general-purpose popper, while POPF is dedicated to popping the Flags register off of the stack:
POPF |
; Pop the top of the stack into Flags |
|
POP SI |
; |
Pop the top of the stack into SI |
POP CS |
; Pop the top of the stack into CS |
|
POP [BX] |
; |
Pop the top of the stack into memory at DS:BX |
As with PUSH, POP only operates on word-sized operands. Don't try to pop data from the stack into an 8-bit register like AH or CL.
The PUSH and POP stack instructions work only on word-sized operands.
POP works pretty much the way PUSH does, but in reverse: first the word of data at SS:SP is copied from the stack and placed in POP's operand, whatever you specified that
to be. Then, SP is incremented (rather than decremented) by two bytes, so that in effect it moves two bytes up the stack, away from SS.
It's significant that SP is decremented before placing a word on the stack at push time, but incremented after removing a word from the stack at pop time. Certain other CPUs work in the opposite manner, which is fine—just don't get confused. Unless the stack is empty,
SP points to real data, not empty space.
Ordinarily, you don't have to remember that fact, as PUSH and POP handle it all for you and you don't have to manually keep track of what SP is pointing to. If you decide to manipulate the stack pointer directly, it helps to know the sequence of events behind
PUSH and POP.
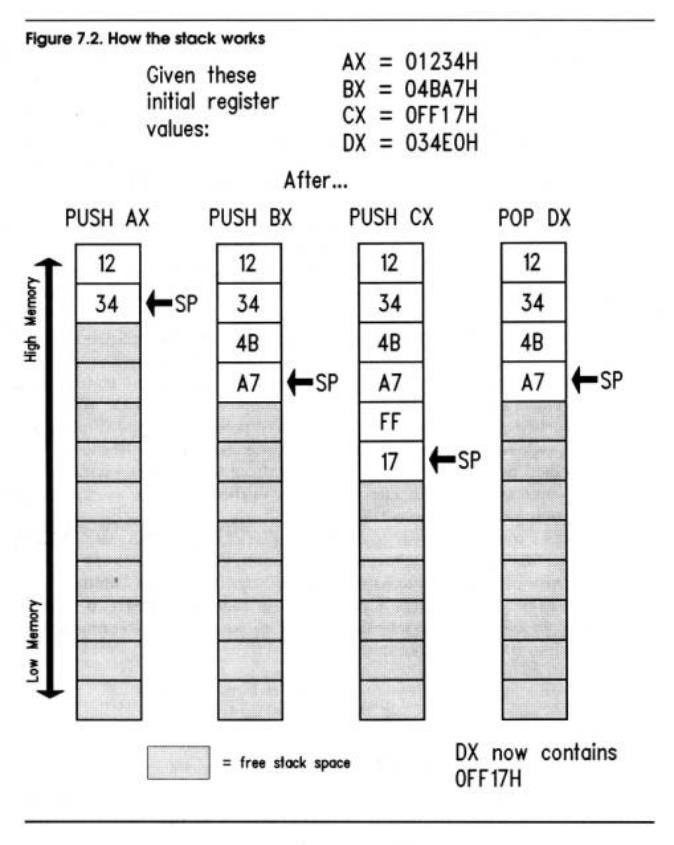
Figure 7.2 shows the stack's operation in a little more detail. The values of the four "X" registers at some hypothetical point in a program's execution are shown at the top of the figure. AX is pushed first on the stack. Its least significant byte is at SS:SP, and its most significant byte is at SS:SP+1. (Remember that both bytes are pushed onto the stack at once, as a unit!)
Each time one of the registers is pushed onto the stack, SP is decremented two bytes down toward SS. The first three columns show AX, BX, and CX being pushed onto the stack, respectively. But note what happens in the fourth column, when the instruction POP DX is executed. The stack pointer is incremented by two bytes and moves away from SS. DX now contains a copy of the contents of CX. In effect, CX was pushed onto the stack, and then immediately popped off into DX.
That's a roundabout way to copy the value of CX into DX. MOV DX,CX is lots faster and more straightforward. However, MOV will not operate on the Flags register. If you want to load a copy of Flags register into another register, you must first push the flags register onto the stack with PUSHF, then pop the same word off the stack into the register of your choice. Getting the Flags register into BX is done like this:
PUSHF |
; |
Push the flags register onto the stack.. |
POP BX |
; |
..and pop it immediately into BX |
Storage for the Short Term
The stack should be considered a place to stash things for the short term. Items stored on the stack have no names, and in general must be taken off the stack in the reverse order that they were put on.
One excellent use of the stack allows the all-too-few registers to do multiple duty. If you
need a register to temporarily hold some value to be operated on by the CPU and all the registers are in use, push one of the "busy" registers onto the stack. Its value will remain safe on the stack while you use the register for other things. When you're finished using the register, pop its old value off the stack—and you've gained the advantages of an additional register without