

Assembly Language Step by Step 1992
.pdfwhen you use the variable name Counter in an instruction to indicate memory data. This, for example, will be accepted by the assembler:
MOV BL,Counter
This instruction will take the current value located in memory at the address represented by the variable name Counter, and will load that variable into register-half BL.
What the assembler will refuse to do is load the variable MixTag (which is word-sized) into a register-half, like this:
MOV BL,MixTag |
; Won't assemble! |
By using a type override specifier, however, you can force the assembler to do your bidding and put half of MixTag into register BL:
MOV BL,BYTE PTR MixTag
The type override specifier BYTE PTR forces the assembler to look upon MixTag as being 1 byte in size. MixTag is not byte-sized, however, so what actually happens is that the least significant byte, the lowbyte, of MixTag will be loaded into BL, with the most significant byte left high and dry.
Is this useful? It can be. Is it dangerous? You bet. It is up to you to decide if overriding the type of memory data makes sense, and completely your responsibility to ensure that doing so doesn't sprinkle your code with bugs.
The best use of the type override specifiers is to clear up ambiguous instructions like EVC [DI], which could specify either a byte or a word as memory data pointed to by a segment register and DI. The other occasions will be rarer and riskier. Use your head—and know what you're doing. That's more important in assembly language than anywhere else in computer programming.

Our Object All Sublime
Creating Programs That Work
7.1The Bones of an Assembly-Language Program >• 182
7.2First In, First Out via the Stack >• 193
7.3Using DOS Services through INT >• 200
7.4Summary: EAT.ASM on the Dissection Table >• 209
They don't call it "assembly" for nothing. Facing the task of writing an assem-bly- language program brings to mind images of Christmas morning: you've spilled 1,567 small metal parts out of a large box marked Land Shark HyperBike (Some Assembly Required), and now you have to somehow put them all together with nothing left over. (In the meantime, the kids seem more than happy playing in the box ....)
I've actually explained just about all you absolutely must understand to create your first assembly-language program. Still, there is a non-trivial leap from here to there; you are faced with many small parts with sharp edges that can fit together in an infinity of different ways, most wrong, some workable, but only a few that are ideal.
So here's the plan: on the next page I will present you with the completed and operable Land Shark HyperBike—which I will then tear apart before your eyes. This is the best way to learn to assemble: by pulling apart programs written by those who know what they're doing. Over the rest of this book we'll pull a few more programs apart, in the hope that by the time it's over you'll be able to move in the other direction all by yourself.
7.1 The Bones of an Assembly-Language Program
The listing below is perhaps the simplest correct program that will do anything visible,
and still be comprehensible and expandable. This issue of comprehensibility is utterly central to quality assembly-language programming. With no other computer language (not even APL or that old devil FORTH) is there anything even close to the risk of writing code that looks so much like something scraped off the wall of King Tut's tomb. The program EAT.ASM displays one (short) line of text:
Eat at Joe's!
For that you have to feed 72 lines of text file to the assembler and linker. Many of those 72 lines are unnecessary in the strict sense, but serve instead as commentary to allow you to understand what the program is doing (or more important, how it's doing it) six months or a year from now.
One of the aims of assembly-language coding is to use as few instructions as possible in getting the job done. This does not mean creating as short a source-code file as possible. The more comments you put in your file, the better you'll remember how things work inside the program the next time you pick it up. I think you'll find it amazing how quickly the logic of a complicated assembly-language file goes cold in your head. After no more than 48 hours of working on other projects, I've come back to assembler projects and had to struggle to get back to flank speed on development.
Comments are neither time nor space wasted. IBM used to say, "one line of comments per line of code." That's good, but should be considered a minimum for assembly-language work. A better course (that I will in fact follow in the more complicated examples later on) is to use one short line of commentary to the right of each line of code, along with a comment block at the start of each sequence of instructions that work together in accomplishing some discrete task.
Here's the program. Read it carefully:
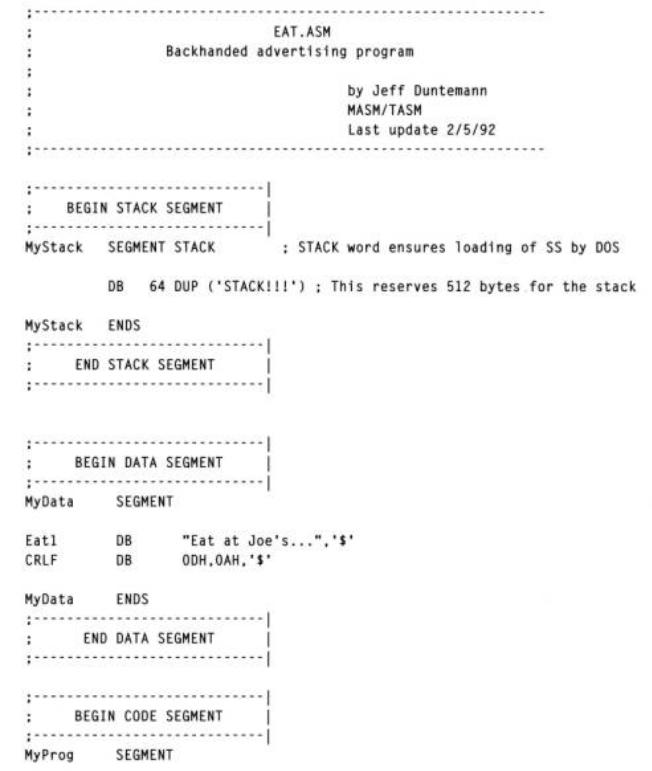
Three Segments
Useful assembly-language programs must contain at least three segments: one for code, one for data, and one for the stack. Larger programs may contain more than one code segment and more than one data segment, but 8086/8088 programs may contain only one stack segment at a time.
EAT.ASM has those three necessary segments. Each segment has a name: MyStack, MyData, and MyCode. Note that I've set off the three segments with comment blocks. This is a good idea when you're starting out, since separating a program's complexity into three compartments is a good first step in managing that complexity.
The code segment, pretty obviously, contains the machine instructions that do the program's work. The data segment contains variables, which are storage cubbyholes for
information. Variables can be defined as having some particular value when the program begins running (as with the Eat1 and CRLF variables defined in EAT.ASM's data segment), or they may simply be defined as empty boxes that can be filled at any point after the program begins operation.
The stack segment contains the program's stack. I haven't explained stacks just yet, and because you don't really need to understand stacks in order to understand how EAT.ASM works, I'm going to hold off just a little while longer. In short, a stack is simply an ordered place to stash things for the short term— and that will have to do until we cover
the concept in depth in Section 7.2.
Labels
A segment is defined in a program by associating a label with the assembler directive SEGMENT. Labels are just identifiers that name something, like MyStack. The type of a label refers to the sort of creature the label identifies. For example, in EAT.ASM, the labels MyStack, MyData, and MyCode are SEGMENT labels. The value of a segment label is the segment address of the named segment. This is why the instruction MOV AX,MyData moves the segment address of segment MyData into register AX.
Notice that the label MyData is used twice in defining the data segment we're naming MyData. The SEGMENT directive begins the segment, and the ENDS directive, (think end segment) ends the directive. Everything between MyData SEGMENT and MyData ENDS belongs to the segment named MyData.
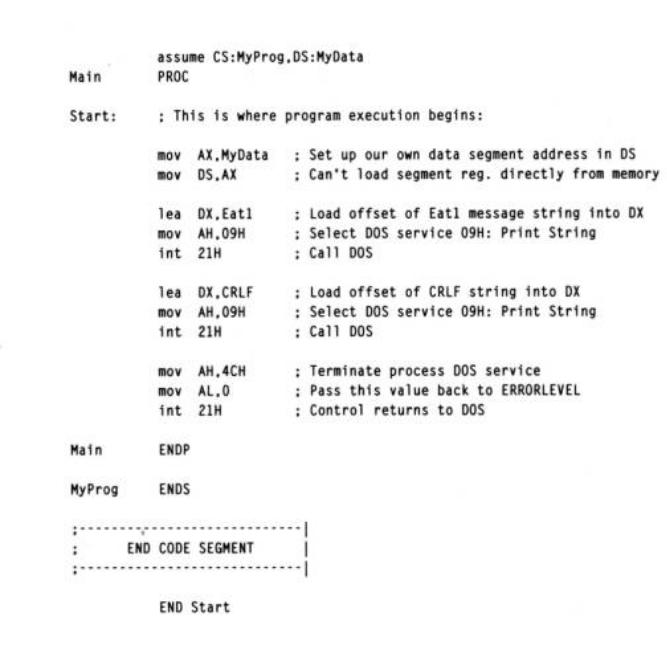
A label can be used to mark a location in the code segment. EAT1.ASM has one such label, Start:
Start: |
; This is where program execution begins |
Start's value is the offset of its location into the code segment. The way you can spot a label used to mark a code address is by the colon used after the label. The colon, in a sense, is the sign reading "you are here" in the code, where "here" has a name given in the label.
The label Start has a special job: it specifies the point in the program where execution is to begin when the program starts running. You'll see in the program listing that the label Start is repeated in the very last line of the file:
END Start
The label following the END directive is the address of the first instruction to be executed
when DOS loads and runs the program. The label used to specify the execution starting point does not have to be "Start," but there must be some label chosen as the starting point, and it must follow the END directive for your program to assemble and link without errors.
Later on, we'll see such labels used as the targets of jump instructions. For example, the following machine instruction transfers the flow of instruction execution to the location marked by the label
GoHome:
JNE GoHome
Notice that in both the instructions above, the colon is not used. The colon is only placed where the label is defined, not where it is referenced. Think of it this way: use the colon when you are marking a location, not when you are going there.
Variables
The labels Eat1 and CRLF define variables. A variable is defined by associating a label with a data definition directive. You've seen these used informally earlier in this book, and there are two in EAT.ASM. Data definition directives look like this:
MyByte |
DB 07H |
; 8 bits in size |
MyWord |
DW 0FFFFH |
; 16 bits in size |
MyDouble |
DD OB8000000H |
; 32 bits in size |
MyString |
DB "I was born on a pirate ship.","$" |
|
MyData |
DB ? |
; Uninitialized storage |
MyQuery |
DB '?' |
; Contains a question mark |
Think of the DB directive as "Define Byte." DB sets aside one byte of memory for data storage. Think of the DW directive as "Define Word." DW sets aside one word of memory for data storage. Think of the DD directive as "Define Double." DD sets aside a double word in memory for storage, typically for full 32-bit addresses.
All of the variable definitions shown above except for MyData both set aside memory for storage and then place some specific value in storage at that location. MyData simply sets aside storage and leaves the storage undefined, or empty. The undefined storage is indicated by the presence of a question mark after the directive.
If you really want to leave the defined variable empty, make sure you don't place the
question mark in quotation marks. If you place the question mark in quotation marks, the assembler will set aside storage and then place a question mark character (ASCII character 63, or 03FH) in that storage.
You may at some point want to create a variable with a question mark in it, for this variable you'll need the quotation marks.
I find it useful to put some recognizable value in a variable whenever I can. It helps to be able to spot a variable in a DEBUG dump of memory rather than have to find it by "dead reckoning"—that is, by spotting the closest known location to the variable in question and counting bytes to determine where it is.
String Variables
String variables are an interesting case. A string is just that: a sequence or string of characters, all in a row in memory. A string is defined in EAT.ASM:
Eat1 |
DB "Eat at Joe's","$" |
Strings are a slight exception to the rule that a data definition directive sets aside a particular quantity of memory. The DB directive ordinarily sets aside one byte only. However, a string may be any length you like, as long as it remains on a single line of your source-code file. Because there is no data directive that sets aside 16 bytes, or 42 bytes, strings are defined simply by associating a label with the place where the string starts. The Eat1 label and its DB directive specify one byte in memory as the string's starting point. The number of characters in the string is what tells the assembler how many bytes of storage to set aside for that string.
You can use either single quotation marks (') or double quotation marks (") to delineate a string—the choice is up to you—unless you are defining a string value that itself contains one or more quotation mark characters. Notice in EAT.ASM the string variable Eat1 contains a single quotation mark character used as an apostrophe. Because the string contains this character, you must delineate it with double quotation marks. The reverse is also true: if you define a string that contains one or more double quotation mark characters, you must delineate it with single quotation mark characters:
Yukkh DB "He said, "How disgusting!" and threw up.',"$"
You may combine several separate substrings into a single string variable by separating the substrings by commas. Both Eat1 and Yukkh do this, indi-cated by the dollar sign
($) in quotation marks at the end of the main string data. The dollar sign is used to mark the end of the string for the mechanism that displays the string to the screen. More on that mechanism and marking string lengths in Section 7.3.
Directives vs. Instruction Mnemonics
Data definition directives look a little like machine instruction mnemonics, but they are emphatically not machine instructions. One very common mistake made by beginners is looking for the binary opcode represented by a directive such as DB or DW. There is no binary opcode for DW, DB, and the other directives. Machine instructions, as the name implies, are instructions to the CPU itself. Directives, by contrast, are instructions to the assembler.
Understanding directives is easier when you understand the nature of the assembler's job. (Look back to Chapter 3 for a detailed refresher if you've gotten fuzzy on what the assembler and linker do.) The assembler scans your source-code file, and as it scans this file it builds an object-code file on disk. It builds this object-code file step by step, one byte at a time, starting at the beginning of the file and working its way through to the end. When it encounters a machine instruction mnemonic, it figures out what binary opcode is represented by that mnemonic and writes that binary opcode (which may be anywhere from one to six actual bytes) to the object-code file.
When the assembler encounters a directive like DW, it does not write any opcode to the object-code file. If the DW directive specifies an empty variable, the assembler just leaves two bytes of space in the next available slot in the data segment and moves on. If the DW directive specifies an initial value for the variable, the assembler writes the bytes corresponding to that value in the slot it set aside. The assembler writes the address of the allocated space into a table, beside the label that names the variable. Then the assembler moves on, to the next directive (if there are further directives) or on to whatever comes next in the source-code file.
When you write the following statement in your assembly language program:
MyVidOrg DW 0B800H
What you are really doing is instructing the assembler to set aside two bytes of data (Define Word, remember) and place the value 0B800H in those two bytes. The assembler writes the label MyVidOrg and the label's address into a table it builds of labels in the program for later use by the linker.
This is true for all kinds of directives, not simply data definition directives. An assembler
directive is just that: your walking orders handed to the assembler. There are numerous assembler directives other than DB, DW, and DD. The SEGMENT and ENDS directives are instructions to the assembler to consider the definitions they surround as belonging to a single segment. We'll take up the PROC and ENDP directives in Section 8.1, and the ASSUME directive shortly.
The Difference Between a Variable's Address and Its Contents
When you use a variable's label in a MOV instruction, you are accessing the value stored in that variable. Suppose you had defined a variable in the data segment called MyData this way:
MyData DW 0744H
The label MyData represents some address within the data segment, and at that address the assembler places the value 0744H. Now, if you want to copy the value contained in MyData to the AX register, you would use the following MOV instruction:
MOV AX,MyData
After this instruction, AX would contain 0744H.
Now, there are many situations where you need to move the address of a variable into a register rather than the contents of the variable. In fact, you may find yourself moving the addresses of variables around more than the contents of the variables, especially if you
make a lot of calls to DOS and BIOS services. (For more on that, see Section 7.4.) The 8086/8088 instruction set contains an instruction for moving the address of a variable into a register. The instruction is LEA, which stands for Load Effective Address. LEA is used twice in EAT.ASM. Here's a typical example:
LEA DX,Eat1
All this instruction does is take the offset address of the string variable Eat1in the data segment and place the offset address into register DX.
If you've used higher-level languages like BASIC and Pascal, this distinction may seem inane. After all, who would mistake the contents of a variable for its location? Well, that's easy for you to say—in BASIC and Pascal you rarely, if ever, even think about where a variable is. The language handles all that rigmarole for you. In assembler, knowing where a variable is located is essential to perform lots of important things.
The ASSUME Directive