

Beginning Mac OS X Tiger Dashboard Widget Development (2006)
.pdfAdding to the Widget Interface
The Stocks widget and the Widgets widget are examples of the two kinds of resizing available for widgets: absolute and relative — or live — resizing, respectively. Each has its own purpose.
Figure 8-3
Figure 8-4
131

Chapter 8
When to Resize the Widget
The information should dictate the kind of resizing that you need to provide. Before you begin by creating a widget for live resizing, you should look at the data to see if you can provide the additional information using absolute resizing. If the additional information is dynamic but consistent like the Stocks widget, you can use absolute resizing. Besides displaying additional information, absolute resizing can also be used for minimizing your widget to preserve screen space. When you examine all of the instances of resizing in your installed widgets, you may find that most of them are absolute resizing, which points out how infrequently you really need to use relative resizing.
However, if your widget needs to display dynamic information that could expand or if your widget displays information that has lots of detail in it, you may want to provide the user with a way of resizing the widget relatively. If your widget displays RSS feeds, for instance, you may want to give the user the option of resizing the widget to get more feeds onscreen. If you are displaying pictures, you may want to give the user the option of resizing the widget to display a larger version of a picture after he has found a picture he wants to view.
How to Resize a Widget
Making your widget resizable requires additions to the HTML, CSS, and JavaScript files. You have to give the user a control for resizing the widget. Typically this is a thumb control that you add to the lower-right corner of the widget, though you may want to provide a different control if you are resizing your widget only vertically. To make the thumb control work, you must provide a control region for it in the widget’s CSS file in addition to controlling the placement of the thumb control. Finally, you must include an event handler in the widget’s JavaScript that resizes the widget in response to the user’s drag.
As you examine how widgets are constructed, you’ll see that you have several ways to provide relative resizing. The way you resize your widget depends on the kind of control that you need and the kind of background you are using.
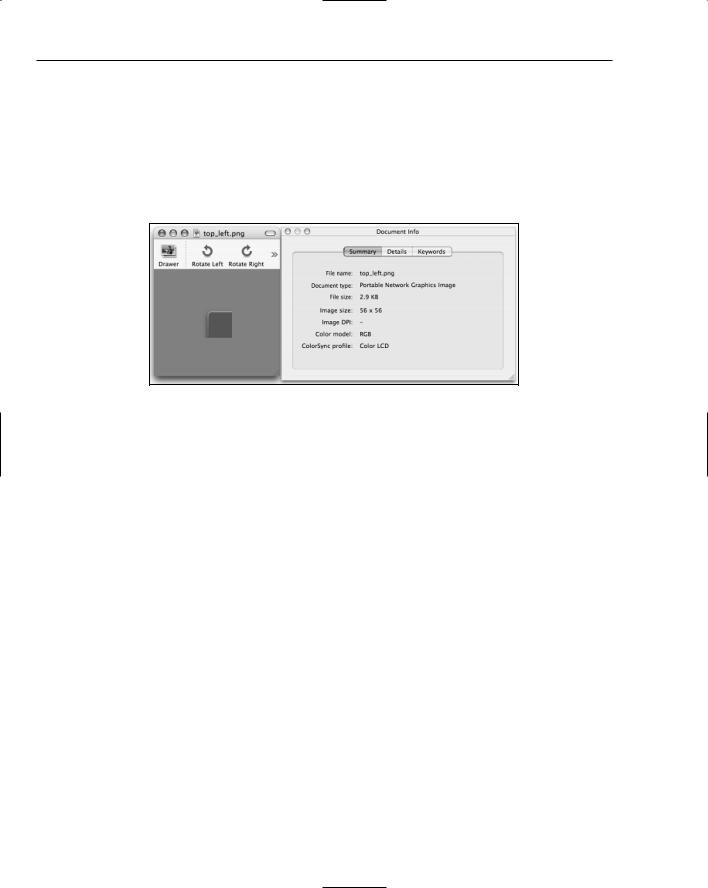
You can make your widget background one whole piece; this is the way most widgets are constructed. Or you can create your widget as a set of tiles that together make up the whole widget, as you can see in this Images folder (Figure 8-5), which contains the separate images for the widget. While this is mainly a matter of personal preference, you should be aware of the differences. If you decide to create your widget in sections, you will have to keep track of the individual pieces in your HTML and CSS file. The individual pieces may give you finer control of the widget interface, but it won’t be as straightforward as adding resizing to a widget that is a single panel.
If you are using a picture or a graphic as your background image, you may want to control how the user can resize the widget. If you allow the user to resize the image horizontally as well as vertically, the graphic may become distorted. You can control this by creating the widget with a single background image and then control the way it is resized. For instance, you could allow the user to resize the widget vertically only, like the Apple Events widget shown in Figure 8-6.
If you look in the bottom middle of the widget, you’ll see three white lines together on the foreground row of the chairs. This is the resize thumb control. When you resize the Apple Events widget, you’ll see that the author controls the way you can resize the widget; you can resize the widget only by making it taller. If you show the contents of the widget and look at the background image, you’ll see that it is
132

Adding to the Widget Interface
tuned for resizing vertically (Figure 8-7). Resizing the widget to display more content makes use of the tall background without affecting the foreground seats at the bottom of the image.
Let’s look at how a tiled widget would be set up for resizing.
Figure 8-5
Figure 8-6
133
Chapter 8
Figure 8-7
134
Adding to the Widget Interface
The HTML File
This rather spare HTML file for our Resize widget shows you how to go about adding the graphics for resizing. If you look under the widget parts comment, you’ll see how individual <div>s have been created for each one of the widget tiles. Below the <div>s you’ll see that the file URI has been added to link in the resize.png image for the thumb control from Apple’s WidgetResources directory.
<html>
<head>
<style type=”text/css”> @import “resize.css”;
</style>
<script type=’text/javascript’ src=’AppleClasses/AppleInfoButton.js’ charset=’utf-8’ />
<script type=’text/javascript’ src=’AppleClasses/AppleAnimator.js’ charset=’utf-8’ />
<script type=’text/javascript’ src=’AppleClasses/AppleButton.js’ charset=’utf-8’ />
</head>
<body onload=”init();”> <div id=”front”>
<!-- widget parts --> <div id=”top”>
<div id=”top_left”></div> <div id=”top_center”>
<div id=”title”>tiled resize</div>
</div>
<div id=”top_right”> </div>
</div>
<div id=”middle”>
<div id=”middle_left”></div> <div id=”middle_center”></div> <div id=”middle_right”></div>
</div>
<div id=”bottom_left”></div> <div id=”bottom_center”></div> <div id=”bottom_right”></div>
<img id=’resize’ src=’/System/Library/WidgetResources/resize.png’
onmousedown=’mouseDown(event);’/>
<div id=”back”> <div id=”prefs”> </div>
<div id=’doneButton’></div> </div>
</body>
</html>
135
Chapter 8
The CSS File
Once you have included the tiled pieces of the widget in the HTML file, you’ll need to create selectors for them in the CSS file. This is your way of organizing and joining those tiled images. As with most widget CSS files, the resize.css file contains selectors for the front and back panels of the widget. Between those two selectors and beneath the widget pieces comment, you’ll see the selectors for the individual pieces of the widget. Notice that in the selectors the margin settings for all of the tiles are relative to their location and the width of the tile is the important setting being based on the width of the tile (Figure 8-8).
Figure 8-8
For instance, the left margin for the top_left.png is 0 pixels and the right margin for the top_right.png is 0 pixels. The location of the top_middle.png is determined by the width of the left and right tiles and the left and right margins are the width of top_middle.png.
Also notice that the URIs to the tiles is included in the selector rather than in the HTML file. The background repeat: no-repeat; setting prevents the image from being tiled across the space. Notice also that each tile that makes up the background is positioned relative to its row and its position in the background. The top_left tile has a top position of 0 and a left position of 0 whereas the top_center tile has a top position of 0 and a left position of 56. This places the left edge of the top_center tile against the right edge of the top_left tile.
/*
*/
body { margin:0;
}
#front {
position: absolute; top: 0px;
left: 0px; width: 170px;
136
Adding to the Widget Interface
height: 170px; display: block; text-align: center;
}
#title {
font: 12px “Helvetica Neue”; font-weight: bold;
color: white; position: absolute; top: 10px;
width: 100%; z-index: 1; text-align: center;
}
/* widget pieces */
#top {
position: absolute; top: 0px;
left: 0px; right: 0px; bottom: 56px;
}
#top_left { position: absolute; top: 0px;
left: 0px; bottom: 0px; width: 56px;
background-image: url(“Images/top_left.png”); background-repeat: no-repeat;
}
#top_center { position: absolute; top: 0px;
left: 56px; right: 56px; bottom: 0px;
background-image: url(“Images/top_center.png”); background-repeat: repeat-x;
}
#top_right { position: absolute; top: 0px;
right: 0px; bottom: 0px;
137

Chapter 8
width: 56px;
background-image: url(“Images/top_right.png”); background-repeat: no-repeat;
}
#middle {
position: absolute; top: 56px;
left: 0px; right: 0px; bottom: 56px;
text-align: center;
}
#middle_left { position: absolute; top: 0px;
bottom: 0px; left: 0px; width: 56px;
background-image: url(“Images/middle_left.png”); background-repeat: repeat-y;
}
#middle_center { position: absolute; top: 0px;
bottom: 0px; left: 56px; right: 56px;
background-image: url(“Images/middle_center.png”); background-repeat: repeat;
}
#middle_right { position: absolute; top: 0px;
bottom: 0px; right: 0px; width: 56px;
background-image: url(“Images/middle_right.png”); background-repeat: repeat-y;
}
#bottom_left { position: absolute; left: 0px;
bottom: 0px; width: 56px; height: 56px;
background-image: url(“Images/bottom_left.png”);
138

Adding to the Widget Interface
background-repeat: no-repeat;
}
#bottom_center { position: absolute; left: 56px;
right: 56px; bottom: 0px; height: 56px;
background-image: url(“Images/bottom_center.png”); background-repeat: repeat-x;
}
#bottom_right { position: absolute; right: 0px; bottom: 0px; width: 56px; height: 56px;
background-image: url(“Images/bottom_right.png”); background-repeat: no-repeat;
}
#resize {
position: absolute; bottom: 18px; right: 14px;
-apple-dashboard-region: dashboard-region(control rectangle, 0 0 0 0);
}
/* widget back */
#back { display: none;
position: absolute; top: 0px;
left: 0px; width: 170px; height: 170px;
background-image: url(“Backside.png”);
}
At this point, you have the framework in place for adding resize functionality to your widget. As with any widget, the widget events and the JavaScript perform the resizing animation. The last selector for the front of the widget is the resize selector. It determines where the resize thumb appears on the front of the widget and is measured from the bottom and right side of the widget. The last line of the selector sets the control rectangle. This control region ties all of the resize functionality together through the JavaScript file.
139
Chapter 8
The JavaScript File
Whenever you mouse down on the resize thumb in the control rectangle, the mouse events trigger the appropriate functions in the JavaScript. The control region is linked to the resize thumb in the CSS file and the HTML file links the resize thumb to the mousedown function in the JavaScript file.
//tracks where the last mouse position was throughout the drag var resizeInset;
//the right offset of the grow thumb vs. the edge of widget window var rightEdgeOffset;
//the bottom offset of the grow thumb vs. the edge of widget window var bottomEdgeOffset;
//called when the mouse first clicks upon the resize
function mouseDown(event) {
//begin tracking the move document.addEventListener(“mousemove”, mouseMove, true);
//and notify when the drag ends document.addEventListener(“mouseup”, mouseUp, true);
//resizeInset tracks where the actual mouse click happened vs. the right and
//bottom edges of the widget
resizeInset = {x:(window.innerWidth - event.x), y:(window.innerHeight - event.y)};
event.stopPropagation();
event.preventDefault();
}
// called as the mouse button is down and the mouse moves function mouseMove(event) {
//x and y track where bottom-right corner of the widget should be, with relation
//to the event.
var x = event.x + resizeInset.x; var y = event.y + resizeInset.y;
//an arbitrary minimum width if(x < 105)
x = 105;
//an arbitrary minimum height if(y < 37)
y = 37;
//an arbitrary maximum width if(x > 210)
x = 210;
//an arbitrary maximum height if(y > 210)
y = 210;
//resize background document.getElementById(“front”).style.width = x; document.getElementById(“front”).style.height = y;
140