

Beginning Mac OS X Tiger Dashboard Widget Development (2006)
.pdfTiger, Dashboard, and Widgets
Downloading and Installing
Typically, users are going to download widgets from Apple’s Dashboard website or from another website. When they do this, Safari interacts with the Widget Installer to install the widget in Dashboard after it has been downloaded.
When you download a widget, Safari notices that it is an application and confirms that you want to continue downloading (Figure 1-9).
This allows you to cancel the download if the file isn’t what you thought it was.
Widgets may be web pages, but they are bundled and executable and, as a result, are considered applications.
Clicking the Download button continues the download and decompresses the file. You are asked if you want to install the widget after downloading it (Figure 1-10).
Figure 1-9
11

Chapter 1
Figure 1-10
Notice that Gas.wdgt is downloaded to your downloads folder. If you use the Desktop as your downloads folder, it will show up as in Figure 1-10.
As you saw in the Try It Out section, if you click the Install button, the widget is copied to the Widgets folder in your Library folder and Dashboard opens with the widget in a box and the option to keep or delete it (Figure 1-11).
Figure 1-11
12
Tiger, Dashboard, and Widgets
If you aren’t using Safari, you will probably have to double-click the widget to open the Widget Installer.
Reloading Widgets
Because widgets are essentially web pages, they behave the same way web pages do in browsers. If you make a change to a widget while you are developing it, you will have to reload the widget. You reload a widget in the same way you reload a page in Safari — you press Command-R. Select a widget and then press Command-R, the widget will spin (Figure 1-12) to let you know that it has reloaded.
Figure 1-12
You have to reload a widget for the same reason that you have to reload a page in Safari. Safari maintains a cache to make pages that you visit regularly load faster. Dashboard also maintains a cache.
What Widgets Are Not
Now that we know what widgets are, a word or two is in order about what widgets are not. Widgets are not applications that run in Dashboard. In other words, you should not plan to write a large, multifunction application as a widget. A word processor would not make good widget. A good widget should be small, focused in purpose.
Perhaps the best thing to do is to think of a real-world widget. That simple device typically does one thing very, very well and is better than anything else at what it does. The epitome of a widget for me is a paint scraper. You can find several varieties, but they all have one thing in common: a standard flat blade perfectly mounted to slide along glass under a layer of paint.
A Dashboard widget should functionally mimic that real world widget. Rather than create a database application to run as a widget, create your database in MySQL or Postgresql and create a widget interface to your database. The database itself runs in its own memory space as a process so you don’t have the overhead of a GUI, and your widget provides at-your-fingertips access to the data so you can query or create records. At least one web browser widget has been written for Dashboard. Ignoring the recursive ness, this is a good example of what not to do. Though widgets are essentially web pages running under Dashboard, they still use memory, as we will see in Chapter 7. The larger and more complex the widget, the greater the impact it will have on memory. Widgets should be thought of as a delivery mechanism for data.
13

Chapter 1
A widget can be a very elegant solution to normally intractable problem, and the best thing about widgets is that they are easy to write. So let’s get started!
Summar y
Dashboard widgets zoom into place with the touch of a keystroke and provide access to information on your computer, your network, and the Internet. Because widgets are based on familiar web technologies, they are easy to create. Over a thousand widgets have already been uploaded to Apple’s Dashboard website with more coming in every day — everything from Asteroid Run to Wikipedia. Because they run inside of Dashboard, you can create widgets that look more like applications than web pages because you aren’t limited to a rectangular browser window.
In this chapter, you learned to:
Manage widgets to reduce scrolling
Install widgets using the Widget Installer
Reload widgets whenever you make changes
In Chapter 2, you look inside one of Apple’s example widgets to see how it is created from different source and image files. You also look at how to bundle the files to make an executable widget and how to install the widget to test it.
Before you move on to Chapter 2, you may want to work through the exercises below to check your understanding of the concepts in this chapter. The answers to the exercises are in Appendix A.
Exercises
1.What were the code names of OS X 10.0 and 10.1?
2.Why do you have to keep a copy of your widget in your development area?
3.What’s a Unixy way to describe the location of your Widget folder, not the System’s Widget folder?
14

2
The Basics of Widgetr y
In Chapter 1, you learned about Dashboard and Dashboard widgets as well as how the Widget Installer works. Now you look under the hood and see how widgets are assembled before moving on to writing a widget. In this chapter, you examine the individual components of some Tiger widgets to see how they are made as well as learn how to put together an example widget.
When you look under the hood of these widgets — where you can easily see the source code and how widgets are constructed — you can learn how to access the filesystem and files, how to use Core Image, how to pull information from the Internet, and how to perform calculations.
By the end of this chapter, you will know:
What a widget is composed of
How to create an Info.plist file
How to bundle your widget
What a Widget Is Composed Of
Widgets are based on a set of standard web technologies that you may already know. A widget is based on HTML pages and HTML provides the structure for the widget.
Just as any good web page contains graphics, a widget has graphic elements to give it a user interface. These are Portable Network Graphics (PNG) files. A widget has a graphic file for the icon that is displayed in the Widget Bar. It has at least one graphic file for its user interface. If the widget has preferences, it may have a graphic file for the back of the widget. If a widget has a very complicated interface, it may have a number of graphic files. You can see this by looking at the contents of the Weather widget. To do this:
1.Open the /Library/Widgets/ directory on your system.
Chapter 2
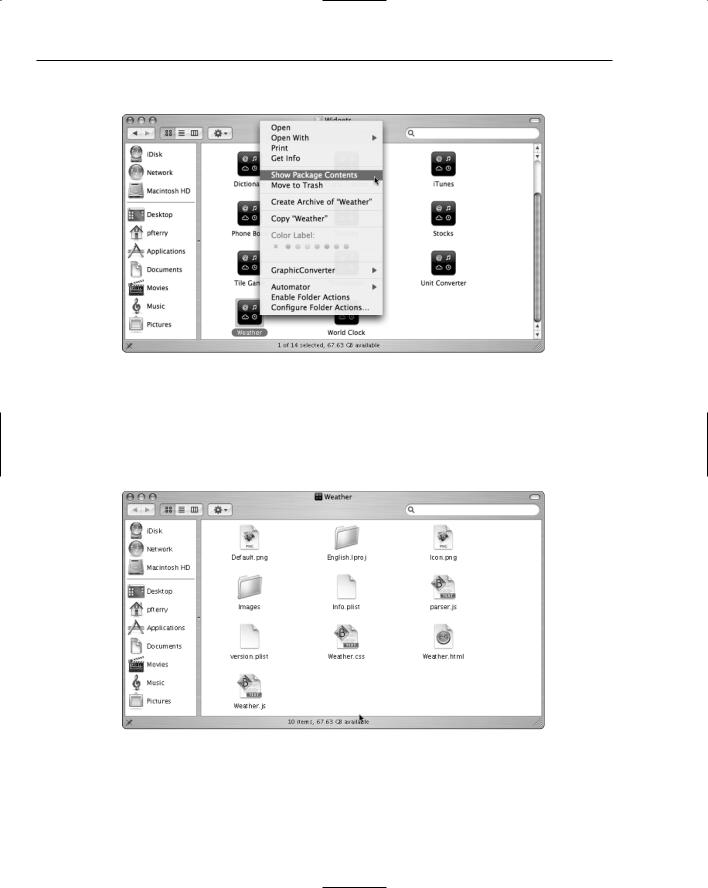
2.Find the Weather widget and Control-click it. A contextual pop-up menu appears (Figure 2-1).
Figure 2-1
If you have a mouse with multiple buttons, you can typically right-click an item to display the contextual menu.
3.Select Show Package Contents from the menu. A new Finder window opens with the contents of the widget (Figure 2-2).
Figure 2-2
16

The Basics of Widgetry
On OS X, applications are usually bundles and you can see the contents of the application with the Show Package Contents command.
At the root level of the widget directory, you see a Default.png file and an Icon.png file. The Icon.png is the icon that appears in the Widget Bar at the bottom of Dashboard. The Default.png file contains the Weather widget interface that you see whenever you add it to Dashboard. Most widgets have these two PNG files. In the Weather widget, there’s also an Images folder.
4.Open the Images folder. When you look around in the folder, you see a weather_backside.png file. Open this file in Preview and notice that it is the image you see whenever you flip the Weather widget over to change the preferences. The Weather widget is one of the more graphically interesting widgets. Notice that it has separate image files for the top, middle, and bottom of the widget for either night or day. Whenever you are checking the weather at night, the interface changes to match the time of day. If you look in the Minis folder, you find the different weather icons for clouds, rain, snow, and other weather conditions that appear above the temperature in the widget. Look in the Icons folder to find the images that appear in the top middle of the Weather widget. For instance, the moon appears at the top of the widget at night and the sun, during the day.
In addition to HTML and PNG files, widgets all have Cascading Style Sheets (CSS). These CSS files provide the design for the widget. Granted widgets are usually just one web page, but the presentation elements that CSS brings to web pages still apply. Finally, JavaScript provides the widget’s functionality. Any widget with preferences contains some basic JavaScript to control flipping the widget over.
Besides these standards, a widget has an XML property list, like most OS X applications, which provides Dashboard with information about the widget. Let’s look at each one of these components in more detail to see how they fit together.
HTML, CSS, and JavaScript
To get a better sense of how all of these pieces work together, you should assemble a widget. If you have installed the Xcode developer tools, you will find example widgets in the /Developer/Examples/ Dashboard/Sample Code/folder. Copy the Contents folder from the Fortune folder to your Documents folder where you can modify it. You may want to rename it Fortune.
Organizing your development files is a matter of personal preference. However you decide to organize your files, you should be consistent — it makes things easier to find — and you should back them up regularly — trying to recreate code is a bear.
Open the folder you copied and see that the Fortune widget has the CSS, HTML, JavaScript, Default
.png, and Icon.png files (Figure 2-3). The HTML, CSS, and JavaScript files aren’t required to have the same names or have the same name as the widget, but it does make it easier to keep track of the files as you are developing a widget.
17

Chapter 2
Figure 2-3
HTML
Open Fortune.html file in your favorite text editor so you can look at the source.
If you use Text Edit, you’ll need to launch Text Edit, select Open from the File menu, and then click the Ignore Rich Text Commands before you select Fortune.html. Otherwise, you will see rendered HTML and not the HTML source.
You’ll see the following HTML file:
<!--
Copyright © 2005, Apple Computer, Inc. All rights reserved.
NOTE: Use of this source code is subject to the terms of the Software License Agreement for Mac OS X, which accompanies the code. Your use of this source code signifies your agreement to such license terms and
conditions. Except as expressly granted in the Software License Agreement for Mac OS X, no other copyright, patent, or other intellectual property license or right is granted, either expressly or by implication, by Apple.
-->
<html>
<head>
<!-- The CSS file for this widget --> <style type=”text/css”>
@import “Fortune.css”;
18

The Basics of Widgetry
</style>
<!-- The JavaScript for this widget -->
<script type=’text/javascript’ src=’Fortune.js’ charset=’utf-8’/>
</head>
<body onclick=”next()”> <!-- If a click occurs anywhere on this widget, go to the
next fortune --> |
|
<img src=”Default.png”> |
<!-- The fortune cookie/paper image --> |
<div id=”quote”>Click here to obtain a fortune.</div> <!-- Basic placeholder |
|
text --> |
|
</body> |
|
</html> |
|
Notice that the Fortune.html file has the typical source structure of any web page. The top portion of the file is Apple’s copyright information inside of a comment block set off by <!-- and -->. If you glance down the rest of the file, you’ll see comments marking other sections. The file also begins and ends with HTML tags and it contains head and body sections. The links to the CSS and JavaScript files are included in the head section. For the CSS file, the style is given type=text/css and the Fortune.css file is included using an import directive. The head section also contains the link to the Fortune.js file. You look at the CSS and JavaScript files more closely in the following sections.
The body section of the Fortune.html file contains an action for clicking in the widget, a link to the image file, and a placeholder for the fortune text that appears in the Fortune widget. The onclick command
in the body of the file takes you to the next fortune whenever you click anywhere within the widget. The Default.png is linked to the widget through an <img src=””> tag. Because the image file has the name Default.png and it is linked through the Fortune.html file, it is used as the interface for the widget. The div id=”quote” is the placeholder for the fortune that is inserted whenever you click the widget, and the default phrase “Click here to obtain a fortune.” is inserted inside the div tags.
CSS
Open the Fortune.css file to see the style sheet for the widget. Like the Cascading Style Sheet for any web page, Fortune.css controls the look and placement of text in your widget. For the Fortune widget, the Cascading Style Sheet places the text in a very specific location. If you’re familiar with Cascading Style Sheets, you’ll see all of the familiar elements in the file.
The Apple copyright information is included at the top of the file in CSS-style comments, which are similar to C/C++ comments. The file also contains the selectors for the body and the quote of the HTML file. The declaration block for the body selector contains only the default margin setting of 0.
/*
Copyright © 2005, Apple Computer, Inc. All rights reserved.
NOTE: Use of this source code is subject to the terms of the Software License Agreement for Mac OS X, which accompanies the code. Your use of this source code signifies your agreement to such license terms and
19

Chapter 2
conditions. Except as expressly granted in the Software License Agreement for Mac OS X, no other copyright, patent, or other intellectual property license or right is granted, either expressly or by implication, by Apple.
*/
body { margin: 0;
}
#quote {
font: 10px “Lucida Grande” ; font-weight: bold;
color: gray;
text-shadow: white 0px 1px 0px; position: absolute;
top: 111px; left: 75px; width: 165px; opacity: 1.0;
}
All of the formatting for the quote that is going to appear in the widget and the placeholder text is contained in the quote selector. The font and style for the font is set in the first four elements: 10pt. Lucida Grande, bold style, gray color, with a white text shadow that has a 1 pixel vertical offset. The next four elements set the text position on the widget. With an absolute position, the top, left, and width settings place the text inside of the fortune paper (Figure 2-4). The top position is given in pixels and is the distance from the top of the fortune cookie to the top of the fortune paper. The left setting is the distance in pixels from the left side of the fortune cookie to the right side of the smiley face on the fortune cookie paper with a few pixels offset. The width setting places the fortune inside the fortune paper between the two smiley faces. The last element determines the opacity of the text: in this case, the default setting of 100 percent.
Figure 2-4
Though Cascading Style Sheets aren’t the subject of this book, seeing the relationship between the Default.png image file and the CSS file helps you understand how the widget is constructed.
20