

Beginning Perl Web Development - From Novice To Professional (2006)
.pdf190C H A P T E R 1 0 ■ A PA C H E A N D M O D _ P E R L
process. Note that if a script is modified, Apache::Registry will recompile the script; Apache doesn’t need to be restarted in order for the change to be picked up.
To demonstrate how namespace pollution can be important when you run scripts under Apache::Registry, consider this example:
use CGI;
$query = CGI->new();
if ($required_name) { print header;
print "name is $required_name\n"; #do something else
}
else {
$required_name = $query->param("name");
#die
}
With mod_cgi, since the script is initialized every time, the variable $required_name will always start out undefined. However, with mod_perl’s Apache::Registry, once $required_name is defined, it won’t be undefined or reinitialized, and therefore will always execute the code within the conditional. Code such as this might be found in a CGI program that carries values forward from page to page, such as a shopping cart or other wizard-style CGI program.
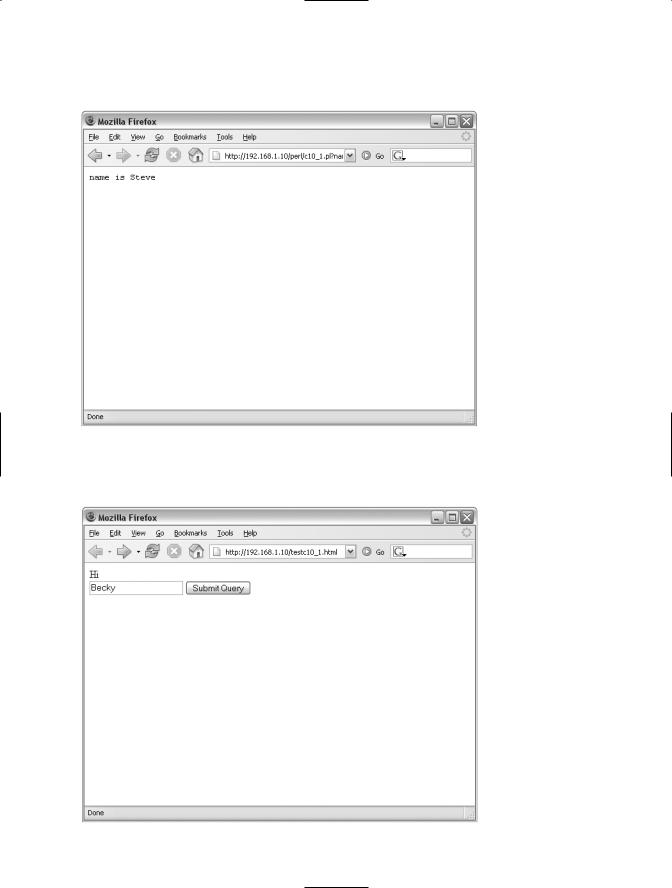
Let’s see what happens with this CGI script. On the first run, I input my name, as shown in Figure 10-1, and then click Submit Query.
C H A P T E R 1 0 ■ A PA C H E A N D M O D _ P E R L |
191 |
The output from this first run is shown in Figure 10-2. Everything looks okay.
Figure 10-2. All appears normal, as shown by this output.
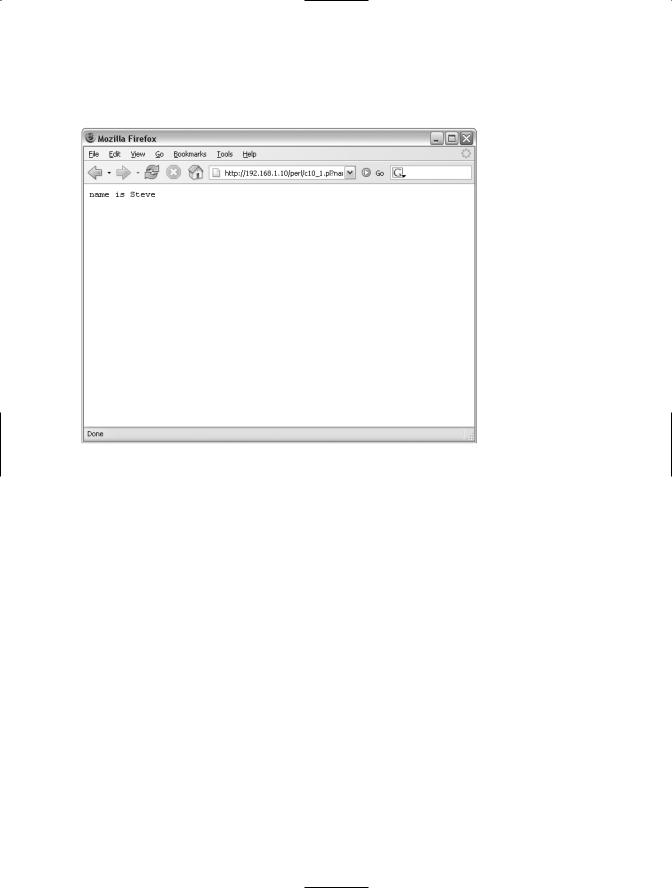
Figure 10-3 shows another run of the program, this time with a different name as input.
different name
192 C H A P T E R 1 0 ■ A PA C H E A N D M O D _ P E R L
After clicking Submit Query, the name originally submitted, Steve, still shows up in the output page, as shown in Figure 10-4.
Figure 10-4. The name originally used for input still shows up in the output with this program under mod_perl.
Obviously, something is wrong with this script when run with Apache::Registry under mod_perl. This code would run fine, however, with Apache::PerlRun.
Even though the code would work with Apache::PerlRun, the better solution would be to fix the code so that variables are reinitialized on each execution of the script. The scripts would then run under Apache::Registry. For example, the code example previously given can be fixed as follows:
use strict; use CGI;
my $query = CGI->new(); my $required_name;
if ($required_name) { print header;
print "name is $required_name\n"; #do something else
}
else {
my $required_name = $query->param("name"); print "name is $required_name\n";

C H A P T E R 1 0 ■ A PA C H E A N D M O D _ P E R L |
193 |
Another way to fix it is like this:
use strict; use CGI;
use vars qw($query $required_name);
$query = CGI->new();
$required_name = $query->param("name");
if ($required_name) { print header;
print "name is $required_name\n"; #do something
}
else { #die
}
Now that you have some idea of the advantages of mod_perl and its packages for executing scripts, you’re ready to start working with it. The first step is installing the module.
mod_perl Installation
mod_perl is included as a package with many distributions of Linux. For many installations, the stock version from the distributions package will work fine. In some distributions, mod_perl is actually installed with the default web server, although it might need to be activated.
■Note The information for packaged installation changes quite rapidly. It could be the case that by the time you’re reading this, mod_perl will be automatically installed and activated on your distribution. Check the documentation for your distribution to find out exactly how to install and activate mod_perl, if necessary.
If your distribution’s packages don’t provide the functionality that you need, the only other option is to compile from source.2 This section looks at how to perform a basic compile of Apache with mod_perl. This section assumes that you do not currently have Apache installed, or if you do, that it will be removed before installing mod_perl. If you have existing configuration files for Apache, be sure to save those to a safe location, so that they aren’t overwritten by the source install.
Getting the Code
Before you can compile the code, you need to get the code (that nugget of information alone made the entire book worthwhile for the reader, I’m sure). The code for mod_perl also requires the source code for Apache, so that the Perl interpreter can be embedded into Apache.
2. I suppose you could also download the source for the distribution’s package, make changes, and eader.

194 C H A P T E R 1 0 ■ A PA C H E A N D M O D _ P E R L
You can download mod_perl’s source code from http://perl.apache.org/, and you can get the source code for the Apache web server from http://httpd.apache.org/. Download the latest mod_perl in the 1.0 series and the latest Apache in the 1.3 series. Although the Apache 2.0 and mod_perl 2.0 series are available, the 1.N branch of each of these applications is much more widely deployed in production environments. Over the next three to five years, this situation will likely change, as is inevitable in the world of software.
Unpacking the Code
In these examples, I’ve downloaded the source code to my home directory, /home/ suehring. Within that directory are the two tarred files containing the source code: mod_perl-1.0-current.tar.gz and apache_1.N.NN.tar.gz.
Unpack the Apache source:
tar -zxvf apache_1.3.33.tar.gz
Unpack the mod_perl source:
tar -zxvf mod_perl-1.0-current.tar.gz
Looking for Prerequisites
Building Apache and mod_perl requires some supporting software to be available. Most systems will have this software already loaded. However, if you haven’t compiled software on the system before and no other software has been built as part of an installation, there’s a chance that one or more of these prerequisites might not be installed.
Every Linux distribution I’ve ever used has the software available through the normal package-management tools. Therefore, if you find that you’re missing a prerequisite, consult your distribution’s documentation for installation of that prerequisite. It will likely be an easy process, since the prerequisites for building mod_perl are quite common.
The following three commands are recommended by the mod_perl documentation to determine the status of the prerequisites:
make -v gcc -v perl -v
I would hope by this point in the book that the Perl command will be successful! If any of these return something like Command not found, you’ll need to install the prerequisite before proceeding.
Building and Installing mod_perl
Compiling Apache customized for a particular installation is a complex process. Locations for files, static linking, which modules to install, and other considerations make Apache one of the more complicated configurations of all Linux software. It would be quite difficult to select a certain set or subset of options to satisfy every need. The Apache documentation (http://httpd.apache.org/) is a good starting point for those wishing to learn about Apache’s configuration options. In addition, the INSTALL documentation that comes with the Apache source is another great resource. For the purposes of this chapter, I’m going to show you how to build Apache with mod_perl with all options

C H A P T E R 1 0 ■ A PA C H E A N D M O D _ P E R L |
195 |
■Note Best practice system administration says, and I agree, that enabling all options is a bad idea on production systems. More applications and options mean a greater footprint in terms of both resources and security. The difference in resources between everything and a minimum set of functions isn’t incredibly large with Apache and mod_perl, especially with modern hardware. However, more code almost always means more chances for bugs that could crop up at the most inopportune time. From a security standpoint, if something doesn’t exist, it can’t be exploited. When everything is compiled in, a security exploit for a piece of the code would make the program vulnerable. For these reasons, I recommend spending time learning exactly which Apache modules you need and disabling those you don’t need.
With both the Apache and mod_perl sources unzipped, change into the mod_perl source directory:
cd mod_perl-1.NN
For example, to change into the mod_perl directory for version 1.29, this command would get you there:
cd mod_perl-1.29
mod_perl uses Perl to create the Makefile and uses some command-line arguments and switches to configure the compile process. Chief among those command-line arguments is the location of the Apache source code. Since you unpacked the Apache source to the directory one level up from the mod_perl source directory, however, mod_perl will be able to find it.
From within the mod_perl source directory, type the following:
perl Makefile.PL EVERYTHING=1 USE_APACI=1
The Makefile.pl script will now run. Pay particular attention to any warnings and follow their instructions. Here is an example:
************* WARNING *************
Your Perl is configured to link against libgdbm, but libgdbm.so was not found.
You could just symlink it to /usr/lib/libgdbm.so.1.7.3
************* WARNING *************
The script will ask a couple questions about how to build the software:
Will configure via APACI
Configure mod_perl with ../apache_1.3.33/src ? [y]
Shall I build httpd in ../apache_1.3.33/src for you? [y]
The script will create a Makefile checking for other prerequisites such as the Perl development files. If you installed Perl as a package with your distribution (this is usually the case), you might need to install the Perl development package as well. I recommend installing this package from your distribution, rather than downloading a new version of Perl and compiling

196 C H A P T E R 1 0 ■ A PA C H E A N D M O D _ P E R L
When the script is finished running, you’ll see lines like the following towards the end of the output:
Writing Makefile for Apache::Table
Writing Makefile for Apache::URI
Writing Makefile for Apache::Util
Writing Makefile for mod_perl
Unfortunately, this doesn’t guarantee that everything went well. There could be an error hidden in the output. Scrolling back through the output might help you locate any problems. Sometimes, the process will stop entirely, as shown here:
======== Error Output for sanity check ========
cd ..; cc -DLINUX=22 -DHAVE_SET_DUMPABLE -DMOD_PERL -DUSE_PERL_SSI -D_REENTRANT -DTHREADS_HAVE_PIDS -DDEBIAN -fno-strict-aliasing -I/usr/local/include -D_LARGEFILE_SOURCE -D_FILE_OFFSET_BITS=64 -DUSE_HSREGEX -DNO_DL_NEEDED -D_REENTRANT -DTHREADS_HAVE_PIDS -DDEBIAN
-fno-strict-aliasing -I/usr/local/include -D_LARGEFILE_SOURCE |
|
|
-D_FILE_OFFSET_BITS=64 `./apaci` -I. -I/usr/lib/perl/5.8/CORE |
-o |
|
helpers/dummy helpers/dummy.c |
-lm -lcrypt -Wl,-E -L/usr/local/lib |
|
/usr/lib/perl/5.8/auto/DynaLoader/DynaLoader.a -L/usr/lib/perl/5.8/CORE -lperl -ldl -lm -lpthread -lc -lcrypt /usr/bin/ld: cannot find -lperl
collect2: ld returned 1 exit status make: *** [dummy] Error 1
============= End of Error Report =============
Aborting!
Examining the output shown in the example reveals that I didn’t have the Perl development libraries installed on the newly installed Debian Sarge computer. This is specifically shown in the following output:
/usr/bin/ld: cannot find -lperl
After installing the Perl development libraries (included with most distributions), I can restart the build.
Once the Makefile.pl script runs successfully, type the following:
make
The software will now be compiled. When that’s complete, test the build by typing this:
make test
You might be tempted to skip this testing step, but I don’t recommend doing so. The tests don’t take terribly long, and if they’re successful, you’ll know that the compile isn’t the problem if something goes wrong when you attempt to start Apache with mod_perl. When the test script is completed, you’ll see output similar to this:

C H A P T E R 1 0 ■ A PA C H E A N D M O D _ P E R L |
197 |
All tests successful, 6 tests skipped.
Files=34, Tests=402, 7 wallclock secs ( 5.14 cusr + 0.74 csys = 5.88 CPU) kill `cat t/logs/httpd.pid`
rm -f t/logs/httpd.pid rm -f t/logs/error_log
To install mod_perl, use the su - command to switch to the root user, and then type the following:
make install
This will install the mod_perl software, but you still need to install Apache. Do this by changing to the Apache source directory. If you’ve followed these instructions so far, the Apache source is in the directory just above the mod_perl source directory. From within the mod_perl source code directory, enter this command:
cd ../apache-<version>
Now, install the software by typing this:
make install
The last few lines of the Apache install output will show where the configuration file is located, as well as information about the apachectl script:
+ |
---------------------------------------------------------- |
|
+ |
| You now have successfully built and installed the |
| |
||
| Apache 1.3 HTTP server. To verify that Apache actually |
| |
||
| works correctly you now should first check the |
| |
||
| (initially created or preserved) configuration files |
| |
||
| |
|
|
| |
| |
/usr/local/apache/conf/httpd.conf |
| |
|
| |
|
|
| |
| and then you should be able to immediately fire up |
| |
||
| Apache the first time by running: |
| |
||
| |
|
|
| |
| |
/usr/local/apache/bin/apachectl start |
| |
|
| |
|
|
| |
| Thanks for using Apache. |
The Apache Group |
| |
|
| |
|
http://www.apache.org/ |
| |
+---------------------------------------------------------- |
|
|
+ |
You can now start Apache with the following command:
/usr/local/apache/bin/apachectl start
Point your web browser to the IP address of the server, paying particular attention to the port, as it might have been set to 8080 by default.
You should also see a line such as the following in /usr/local/apache/logs/error_log:
[Tue Jun 14 20:09:23 2005] [notice] Apache/1.3.33 (Unix) mod_perl/1.29 configured -- resuming normal operations
or log for more information.

198 C H A P T E R 1 0 ■ A PA C H E A N D M O D _ P E R L
Choosing Compile Options
When you’re installing mod_perl from source, configuration options abound. This section looks at some of the configuration options for mod_perl and Apache.
Since mod_perl causes the Perl interpreter to be compiled into the Apache binary, the Apache binary must be recompiled. Anyone who has ever compiled Apache knows that there are seemingly endless compile-time options for configuring Apache. One such option is the Apache Autoconf Interface (APACI), which makes the configuration easier because it enables you to change Apache compile-time options without needing to edit source configuration files.
Another popular option for Apache is Dynamic Shared Object (DSO) support. DSO support enables Apache modules to be loaded dynamically, rather than compiled into the Apache binary. Finally, Apache Extension (APXS) support enables development of modules outside the Apache source directory. This can add greater flexibility, especially for module development.
Recall the options that were passed to the Makefile.pl script:
perl Makefile.PL EVERYTHING=1 USE_APACI=1
As you can see from those options, the APACI option was indeed enabled, as was an option called EVERYTHING, which was specified within the earlier instructions for building and installing mod_perl.
An option that didn’t need to be explicitly defined was the one to locate the Apache source code tree. By default, the Makefile.pl script looks in the directory above its current directory for an Apache source code tree. Since the Apache source was unzipped to the parent directory, the Makefile was able to find it. However, if you need to specify the location for the Apache source, you can do that with the APACHE_SRC option:
APACHE_SRC=/home/suehring/apache-1.3/src
Other options include DO_HTTPD, which causes the source path specified to be the only path used, and PREP_HTTPD, which causes the Apache source to be prepared but not built. This means that you must manually go into the Apache source tree and run make and make install to build and install Apache, as you did in the preceding instructions to build mod_perl and Apache.
The APACHE_PREFIX option is another important compile-time option. Using APACHE_PREFIX, you set the location for the Apache binaries and related items to be installed once they are built.
If you wish to build Apache with SSL support, use the SSL_BASE option. The SSL_BASE option points Apache to the include and lib directories of the SSL installation.
Numerous other options are available at compile-time for mod_perl. See the INSTALL document included with mod_perl for the most current list and documentation on these options.
Configuring for mod_perl
Even though Apache is running, you need to do some configuration before mod_perl will work. At this point, the Apache server is capable of serving static pages and not much else.
The Apache configuration file for the installation that you just completed is located in /usr/local/apache/conf/ and is called httpd.conf. (Usually, a few other configuration files are also located in that directory, but is the important one for this section.) Modify the httpd.conf file to work with mod_perl. For example, if you had a directory of scripts to be served by mod_perl located in /home/suehring/perl/, you would place the following lines at the end of the Apache configuration file:

C H A P T E R 1 0 ■ A PA C H E A N D M O D _ P E R L |
199 |
Alias /perl/ /home/suehring/perl/ PerlModule Apache::Registry <Location /perl/>
SetHandler perl-script PerlHandler Apache::Registry Options +ExecCGI PerlSendHeader On
Allow from all </Location>
These options are very basic and will set up an environment where you can begin to code with mod_perl.
From mod_cgi to mod_perl
Recall what you’ve learned already in this book. CGI programs written in Perl normally use the mod_cgi Apache module to be interpreted and served through a web server. Developing a basic CGI program to be served through mod_cgi might look like this:
#!/usr/bin/perl
use CGI qw/:standard/; use strict;
my $cgi = new CGI;
print header;
print start_html(-title => 'Basic Program'); print "Hello World";
print end_html;
exit;
This simple program, written as it is, doesn’t require any modification to run with mod_perl. Moving the program to a directory configured to execute mod_perl programs, such as /home/suehring/perl/ in the example, will enable it to run through mod_perl. With a program of this size, however, you probably won’t notice the benefits of mod_perl.
However, when porting already written Perl programs from mod_cgi to mod_perl, you may sometimes find that those programs won’t behave as expected, or maybe they won’t work at all. In such cases, the best option is to fix the program itself, rather than implement a workaround at the server level. Using the strict pragma will go a long way toward ensuring that a program will run under mod_perl’s Apache::Registry. If a program runs with use strict enabled, chances are good that it will run correctly in mod_perl.
For times when a program absolutely won’t run with Apache::Registry, you can enable Apache::PerlRun instead of Apache::Registry. As noted earlier in this chapter, Apache::PerlRun does not cache scripts as Apache::Registry does. Programs are executed