

4F27E
.pdfTechnical Service Information
1
2
3
4
5
6
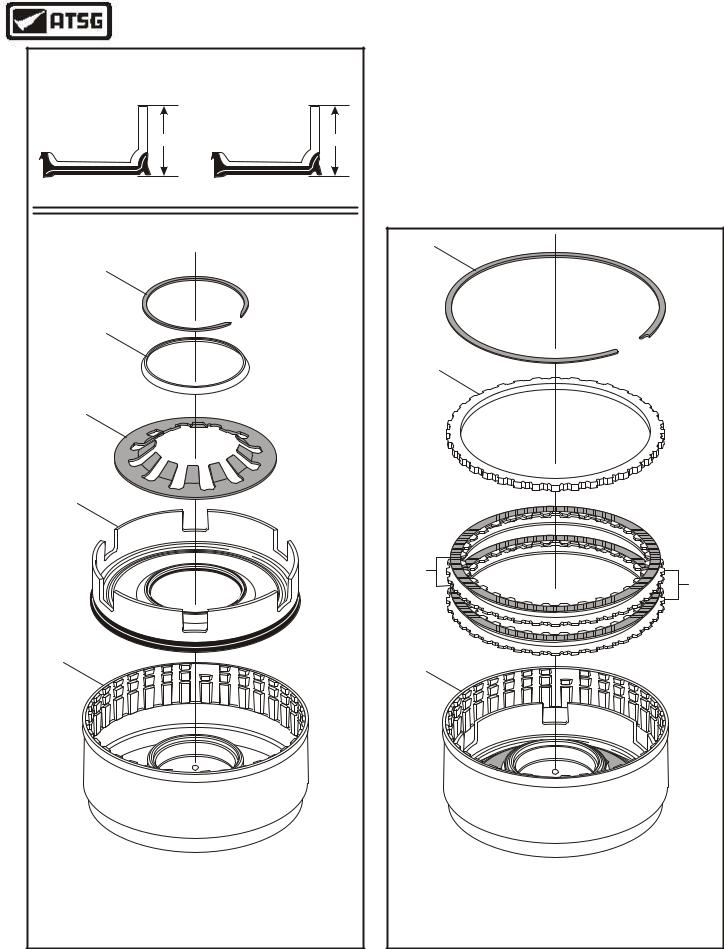
1REAR SUN GEAR ASSEMBLY RETAINING SNAP RING.
2REAR SUN GEAR ASSEMBLY.
3REAR SUN GEAR TO DIRECT HUB, NO. 3, THRUST BEARING.
4DIRECT CLUTCH HUB.
5DIRECT HUB TO DIRECT HOUSING, NO. 2, THRUST BEARING.
6REVERSE CLUTCH HOUSING ASSEMBLY.
Copyright © 2004 ATSG
Figure 74
COMPONENT REBUILD SECTION
DIRECT/REVERSE HOUSINGS DISASSEMBLE
1.Lay the direct/reverse clutch housing assembly on flat a work surface, as shown in Figure 74.
2.Remove the snap ring that retains the rear sun gear, as shown in Figure 74.
3.Remove the rear sun gear to direct clutch hub number 3 thrust bearing (See Figure 74).
4.Remove the direct clutch hub, as shown in Figure 74.
5.Remove the direct clutch hub to direct clutch housing number 2 thrust bearing, as shown in Figure 74.
6.Remove the direct clutch housing out of the reverse clutch housing by lifting straight up, as shown in Figure 75.
7.Set the reverse clutch housing aside for the moment and we will rebuild the direct.
Continued on Page 43
DIRECT CLUTCH
HOUSING ASSEMBLY
REVERSE CLUTCH
HOUSING ASSEMBLY
Copyright © 2004 ATSG
Figure 75
42 |
AUTOMATIC TRANSMISSION SERVICE GROUP |
|

Technical Service Information
COMPONENT REBUILD SECTION
DIRECT CLUTCH HOUSING ASSEMBLY
1.Disassemble the direct clutch housing using Figure 76 as a guide.
2.Clean all direct clutch housing parts thoroughly and dry with compressed air.
3.Inspect all of the direct clutch housing parts thoroughly for any wear and/or damage.
4.The direct clutch piston and the balance piston have molded rubber seals. If damaged, piston assembly must be replaced.
Continued on Page 44
|
DIRECT CLUTCH HOUSING EXPLODED VIEW |
|
||
|
7 |
8 |
9 |
|
|
|
|
||
|
|
|
10 |
|
|
12 |
|
14 |
15 |
|
|
|
|
|
|
11 |
13 |
|
|
|
|
|
|
|
7 |
DIRECT CLUTCH BACKING PLATE "SELECTIVE" SNAP RING. |
13 DIRECT CLUTCH PISTON RETURN SPRING. |
||
8 |
DIRECT CLUTCH BACKING PLATE. |
|
14 DIRECT CLUTCH APPLY PISTON. |
|
9 |
DIRECT CLUTCH FRICTION PLATES (3 REQUIRED). |
15 DIRECT CLUTCH HOUSING. |
||
10 |
DIRECT CLUTCH STEEL PLATES (3 REQUIRED). |
|
|
|
11 |
DIRECT CLUTCH BALANCE PISTON SNAP RING. |
|
|
|
12 |
DIRECT CLUTCH BALANCE PISTON. |
|
|
|
|
|
|
|
Copyright © 2004 ATSG |
Figure 76
AUTOMATIC TRANSMISSION SERVICE GROUP |
43 |
|

Technical Service Information
COMPONENT REBUILD SECTION
DIRECT CLUTCH HOUSING ASSEMBLY (CONT'D)
5.Lubricate the direct clutch piston seal surfaces with small amount of Trans-Jel® and install piston, as shown in Figure 77.
6.Install the direct clutch piston return spring assembly, as shown in Figure 77.
7.Lubricate the direct clutch balance piston with small amount of Trans-Jel® and install piston, as shown in Figure 77.
8.Compress the piston and return spring using foot press, install snap ring and ensure that it is fully seated.
11
12
13
14
15
11DIRECT CLUTCH BALANCE PISTON SNAP RING.
12DIRECT CLUTCH BALANCE PISTON.
13DIRECT CLUTCH PISTON RETURN SPRING.
14DIRECT CLUTCH APPLY PISTON.
15DIRECT CLUTCH HOUSING.
Copyright © 2004 ATSG
Figure 77
9.Install the direct clutch plates beginning with a steel plate and alternating with frictions until you have installed three of each, as shown in Figure 78.
Note: Friction plates should be soaked in Mercon® V for 15 minutes prior to installing.
10.Install the direct clutch backing plate, as shown in Figure 78.
11.Install the direct clutch backing plate selective snap ring, as shown in Figure 78.
Continued on Page 45
7
8
9
10
15
7DIRECT CLUTCH BACKING PLATE "SELECTIVE" SNAP RING.
8DIRECT CLUTCH BACKING PLATE.
9DIRECT CLUTCH FRICTION PLATES (3 REQUIRED).
10DIRECT CLUTCH STEEL PLATES (3 REQUIRED).
15 DIRECT CLUTCH HOUSING.
Copyright © 2004 ATSG
Figure 78
44 |
AUTOMATIC TRANSMISSION SERVICE GROUP |
|
Technical Service Information
COMPONENT REBUILD SECTION
DIRECT CLUTCH HOUSING ASSEMBLY (CONT'D)
12.Turn the direct clutch housing over and tap on flat work surface to seat snap ring to the top of the groove.
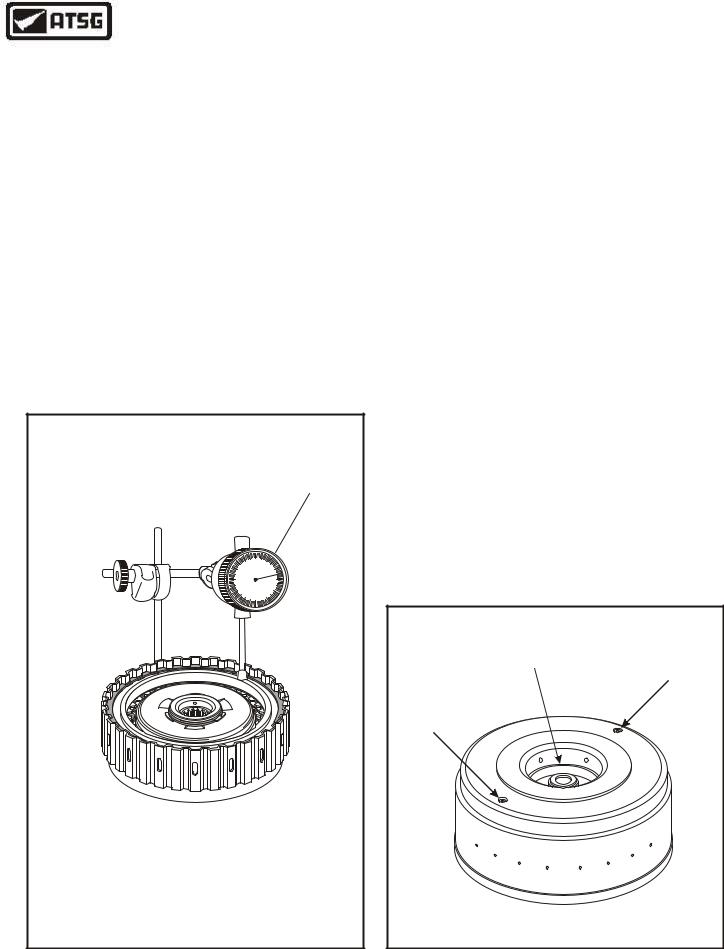
13.Install dial indicator, as shown in Figure 79, with the plunger resting on backing plate, and zero the dial indicator.
14.Lift both sides of clutch pack with scribes to measure for proper clutch pack clearance.
15.The direct clutch pack clearance should be, 1.0 to 1.3 mm (.040" to .051"), as shown in Figure 79.
16.Change the selective snap ring as necessary to obtain the specified clutch clearance.
17.Set the completed direct clutch housing aside while we rebuild the reverse clutch housing.
DIRECT CLUTCH CLEARANCE SHOULD BE
1.0 - 1.3 MM (.040" - .051")
DIAL
INDICATOR
10 |
0 |
10 |
20 |
|
20 |
30 |
|
30 |
40 |
|
40 |
50 |
0 |
50 |
Selective Snap Ring Thickness Available 1.15 - 1.25 mm (.045" - .049") 1.35 - 1.45 mm (.053" - .057") 1.55 - 1.65 mm (.061" - .065") 1.75 - 1.85 mm (.069" - .073") 1.95 - 2.05 mm (.077" - .081") 2.15 - 2.25 mm (.085" - .089")
Copyright © 2004 ATSG
Figure 79
COMPONENT REBUILD SECTION
REVERSE CLUTCH HOUSING ASSEMBLY
1.Disassemble the reverse clutch housing using Figure 81 as a guide.
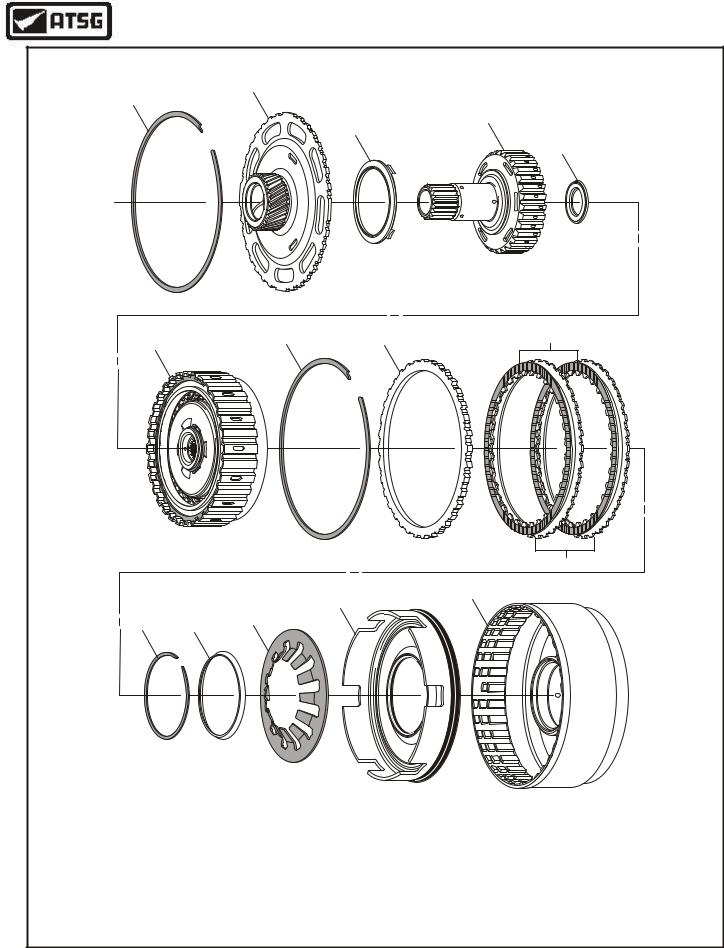
2.Inspect the bushing area, and the ball capsules for proper operation in reverse clutch housing, as shown in Figure 80.
Note: Refer to Page 40 for more information.
3.Install the reverse clutch molded piston into reverse clutch housing, as shown in Figure 82.
Note: There are two different dimension reverse clutch molded pistons, as shown in Figure 82. Ensure that you are installing the proper piston for model you are building.
4.Install the reverse clutch piston "Bellville" return spring, as shown in Figure 82.
5.Install the bellville return spring retainer, as shown in Figure 82.
6.Compress the bellville spring and retainer and install snap ring, as shown in Figure 82, and ensure snap ring is fully seated.
Continued on Page 47
INSPECT |
INSPECT |
BUSHING |
|
|
BALL CAPSULE |
INSPECT
BALL CAPSULE
Copyright © 2004 ATSG
Figure 80
AUTOMATIC TRANSMISSION SERVICE GROUP |
45 |
|
Technical Service Information
REVERSE CLUTCH HOUSING EXPLODED VIEW
2
1
4
3
5
16 |
17 |
18 |
6
19
24
23
20 |
22 |
21 |
1 |
REAR SUN GEAR ASSEMBLY RETAINING SNAP RING. |
18 |
REVERSE CLUTCH FRICTION PLATES (2 REQUIRED). |
2 |
REAR SUN GEAR ASSEMBLY. |
19 |
REVERSE CLUTCH STEEL PLATES (2 REQUIRED). |
3 |
REAR SUN GEAR TO DIRECT HUB, NO. 3, THRUST BEARING. |
20 |
REVERSE CLUTCH PISTON BELLVILLE RETAINER SNAP RING. |
4 |
DIRECT CLUTCH HUB. |
21 |
REVERSE CLUTCH PISTON BELLVILLE SPRING RETAINER. |
5 |
DIRECT HUB TO DIRECT HOUSING, NO. 2, THRUST BEARING. |
22 |
REVERSE CLUTCH PISTON BELLVILLE RETURN SPRING. |
6 |
DIRECT CLUTCH HOUSING ASSEMBLY, COMPLETE. |
23 |
REVERSE CLUTCH PISTON. |
16 REVERSE CLUTCH BACKING PLATE "SELECTIVE" SNAP RING. |
24 |
REVERSE CLUTCH HOUSING ASSEMBLY. |
|
17 REVERSE CLUTCH BACKING PLATE. |
|
Copyright © 2004 ATSG |
|
Figure 81
46 |
AUTOMATIC TRANSMISSION SERVICE GROUP |
|
Technical Service Information
|
FORD PISTON |
MAZDA PISTON |
|
XS4Z-7D402-AB |
FN01-19-SHOA |
|
"A" |
"A" |
DIMENSION "A" = 1.475" |
DIMENSION "A" = 1.375" |
|
|
20 |
|
|
21 |
|
|
22 |
|
|
23 |
|
|
24 |
|
20 |
REVERSE CLUTCH PISTON BELLVILLE RETAINER SNAP RING. |
|
21 |
REVERSE CLUTCH PISTON BELLVILLE SPRING RETAINER. |
|
22 |
REVERSE CLUTCH PISTON BELLVILLE RETURN SPRING. |
|
23 |
REVERSE CLUTCH PISTON. |
|
24 |
REVERSE CLUTCH HOUSING ASSEMBLY. |
|
|
|
Copyright © 2004 ATSG |
REVERSE CLUTCH HOUSING ASSEMBLY (CONT'D)
7.Install the reverse clutch plates beginning with a steel plate and alternating with friction plates until you have installed two of each, as shown in Figure 83.
Note: Friction plates should be soaked in Mercon® V fluid for 15 minutes prior to installation.
Continued on Page 48
|
16 |
|
17 |
|
18 |
|
19 |
|
24 |
16 |
REVERSE CLUTCH BACKING PLATE "SELECTIVE" SNAP RING. |
17 |
REVERSE CLUTCH BACKING PLATE. |
18 |
REVERSE CLUTCH FRICTION PLATES (2 REQUIRED). |
19 |
REVERSE CLUTCH STEEL PLATES (2 REQUIRED). |
24 |
REVERSE CLUTCH HOUSING ASSEMBLY. |
|
Copyright © 2004 ATSG |
Figure 82 |
Figure 83 |
AUTOMATIC TRANSMISSION SERVICE GROUP |
47 |
|
Technical Service Information
COMPONENT REBUILD SECTION
REVERSE CLUTCH HOUSING ASSEMBLY (CONT'D)
8.Install reverse clutch backing plate, as shown in Figure 83.
9.Install reverse clutch backing plate selective snap ring, as shown in Figure 83.
10.Turn the housing over and tap on work bench to seat the snap ring against top of groove.
11.Check the reverse clutch pack clearance using a feeler gauge between the backing plate and the selective snap ring, as shown in Figure 84.
12.The reverse clutch pack clearance should be 1.0 to 1.3 mm (.040" to .051"), as shown in Figure 84.
13.Change the selective snap ring as necessary to obtain specified clearance and recheck clutch pack clearance (See Figure 84).
REVERSE CLUTCH CLEARANCE SHOULD BE
1.0 - 1.3 MM (.040" - .051")
FEELER
GAUGE
Selective Snap Ring Thickness Available 1.15 - 1.25 mm (.045" - .049") 1.35 - 1.45 mm (.053" - .057") 1.55 - 1.65 mm (.061" - .065") 1.75 - 1.85 mm (.069" - .073") 1.95 - 2.05 mm (.077" - .081") 2.15 - 2.25 mm (.085" - .089")
Copyright © 2004 ATSG
Figure 84
COMPONENT REBUILD SECTION
DIRECT/REVERSE HOUSINGS ASSEMBLE
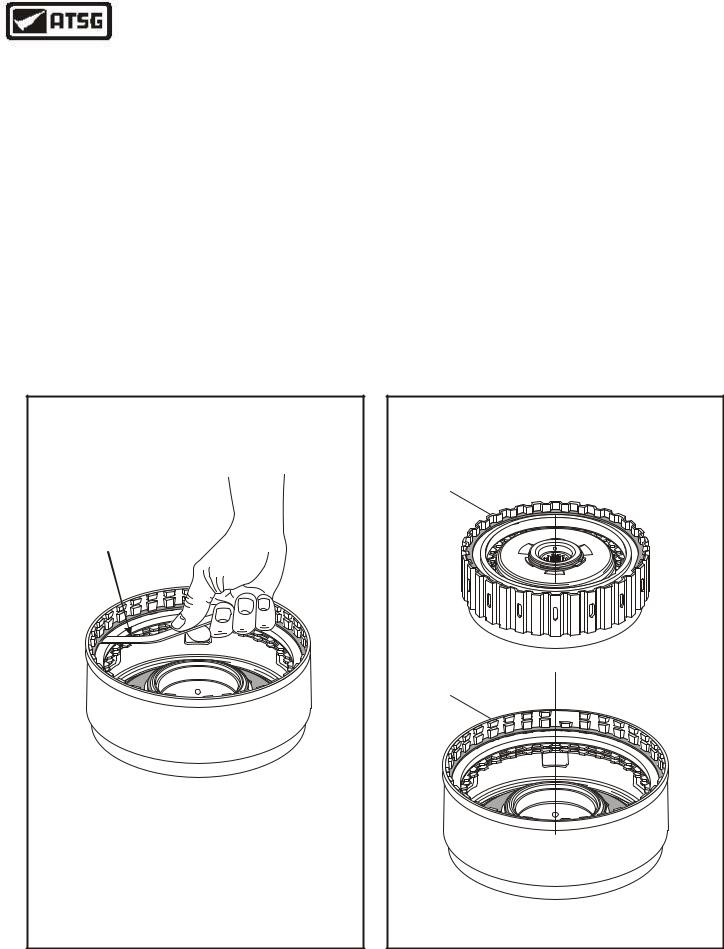
1.Lay the completed reverse clutch housing on a flat work surface, as shown in Figure 85.
2.Install the completed direct clutch housing into the completed reverse clutch housing, rotating back and forth to engage reverse clutches onto the direct clutch housing (See Figure 85).
Continued on Page 49
COMPLETED
DIRECT CLUTCH
HOUSING ASSEMBLY
COMPLETED
REVERSE CLUTCH
HOUSING ASSEMBLY
Copyright © 2004 ATSG
Figure 85
48 |
AUTOMATIC TRANSMISSION SERVICE GROUP |
|
Technical Service Information
COMPONENT REBUILD SECTION
DIRECT/REVERSE HOUSINGS ASSEMBLE (CONT'D)
3.Install the number 2 direct clutch thrust bearing onto the direct clutch housing, in the direction shown in Figure 86, and retain with a small amount of Trans-Jel®.
4.Install number 3 rear sun gear thrust bearing onto the direct clutch hub, in the direction shown in Figure 87, and retain with a small amount of Trans-Jel®.
Continued on Page 50
NUMBER 2
DIRECT CLUTCH
THRUST BEARING
NUMBER 3
REAR SUN GEAR
THRUST BEARING
DIRECT CLUTCH
HUB
Copyright © 2004 ATSG
Figure 87
Copyright © 2004 ATSG
Figure 86
AUTOMATIC TRANSMISSION SERVICE GROUP |
49 |
|
Technical Service Information
REAR SUN GEAR
SNAP RING
REAR SUN GEAR
DIRECT CLUTCH
HUB AND BEARING
ASSEMBLY
NUMBER 2
DIRECT CLUTCH
THRUST BEARING
Copyright © 2004 ATSG
Figure 88
COMPONENT REBUILD SECTION
DIRECT/REVERSE HOUSINGS ASSEMBLE (CONT'D)
5.Install direct clutch hub and bearing assembly into direct clutches by rotating back and forth until fully seated (See Figure 88).
6.Install the rear sun gear into the reverse clutch housing, as shown in Figure 88.
7.Install the rear sun gear snap ring into reverse clutch housing, as shown in Figure 88, and ensure that it is fully seated.
8.Set the completed direct/reverse assembly aside for the final assembly process (See Figure 89).
COMPLETED DIRECT/REVERSE
CLUTCH HOUSING ASSEMBLY
Copyright © 2004 ATSG
Figure 89
COMPONENT REBUILD SECTION
PLANETARY ASSEMBLIES
1.Disassemble the planetary gear train assemblies using Figure 90 as a guide.
2.Inspect all planetary gear train parts for any wear and/or damage.
3.Clean all planetary gear train parts thoroughly and dry with compressed air.
Note: Do not spin planetary gears with the air pressure, as damage will occur.
Continued on Page 52
50 |
AUTOMATIC TRANSMISSION SERVICE GROUP |
|
Technical Service Information
PLANETARY GEAR TRAIN EXPLODED VIEW
10 |
11 |
13
12
14
17
16
15
21 |
|
|
20 |
19 |
18 |
|
|
|
|
|
|
|
|
|
|
|
|
|
|
|
|
|
|
|
|
|
|
|
|
|
|
|
|
|
|
|
|||||||||||||||||
19 |
|
|
|
|
|
|
|
|
|
|
|
|
|
|
|
|
|
|
|
|
|
|
|
|
|
|
|
|
|
|
|
|
|
|
|
|
|
|
|
||||||||||||||
|
|
|
|
|
|
|
|
|
|
|
|
|
|
|
|
|
|
|
|
|
|
|
|
|
|
|
|
|
|
|
|
|
|
|
|
|
|
|
|
|
|
|
|
|
|
|
|
|
|
|
|
|
|
|
|
|
|
|
|
|
|
|
|
|
|
|
|
|
|
|
|
|
|
|
|
|
|
|
|
|
|
|
|
|
|
|
|
|
|
|
|
|
|
|
|
|
|
|
|
|
|
|
|
|
|
|
|
|
|
|
|
|
|
|
|
|
|
|
|
|
|
|
|
|
|
|
|
|
|
|
|
|
|
|
|
|
|
|
|
|
|
|
|
|
|
|
|
|
|
|
|
|
|
|
|
|
|
|
|
|
|
|
|
|
|
|
|
|
|
|
|
|
|
|
|
|
|
|
|
|
|
|
|
|
|
|
|
|
|
|
|
|
|
|
|
|
|
|
|
|
|
|
|
|
|
|
|
|
|
|
|
|
|
|
|
|
|
|
|
|
|
|
|
|
|
|
|
|
|
|
|
|
|
|
|
|
|
|
|
|
|
|
|
|
|
|
|
|
|
|
|
|
|
|
|
|
|
|
|
|
|
|
|
|
|
|
|
|
|
|
|
|
|
|
|
|
|
|
|
|
|
|
|
|
|
|
|
|
|
|
|
|
|
|
|
|
|
|
|
|
|
|
|
|
|
|
|
|
|
|
|
|
|
|
|
|
|
|
|
|
|
|
|
|
|
|
|
|
|
|
|
|
|
|
|
|
|
|
|
|
|
|
|
|
|
|
|
|
|
|
|
|
|
|
|
|
|
|
|
|
|
|
|
|
|
|
|
|
|
|
|
|
|
|
|
|
|
|
|
|
|
|
|
|
|
|
|
|
|
|
|
|
|
|
|
|
|
|
|
|
|
|
|
|
|
|
|
|
|
|
|
|
|
|
|
|
|
|
|
|
|
|
|
|
|
|
|
|
|
|
|
|
|
|
|
|
|
|
|
|
|
|
|
|
|
|
|
|
|
|
|
|
|
|
|
|
|
|
|
|
|
|
|
|
|
|
|
|
|
|
|
|
|
|
|
|
|
|
|
|
|
|
|
|
|
|
|
|
|
|
|
|
|
|
|
|
|
|
|
|
|
|
|
|
|
|
|
|
|
|
|
|
|
|
|
|
|
|
|
|
|
|
|
|
|
|
|
|
|
|
|
|
|
|
|
|
|
|
|
|
|
|
|
|
|
|
|
|
|
|
|
|
|
|
|
|
|
|
|
|
|
|
|
|
|
|
|
|
|
|
|
|
|
|
|
|
|
|
|
|
|
|
|
|
|
|
|
|
|
|
|
|
|
|
|
|
|
|
|
|
|
|
|
|
|
|
|
|
|
|
|
|
|
|
|
|
|
|
|
|
|
|
|
|
|
|
|
|
|
|
|
|
|
|
|
|
|
|
|
|
|
|
|
|
|
|
|
|
|
|
|
|
|
|
|
|
|
|
|
|
|
|
|
|
|
|
|
|
|
|
|
|
|
|
|
|
|
|
|
|
|
|
|
|
|
|
|
|
|
|
|
|
|
|
|
|
|
|
|
|
|
|
|
|
|
|
|
|
|
|
|
|
|
|
|
|
|
|
|
|
|
|
|
|
|
|
|
|
|
|
|
|
|
|
|
|
|
|
|
|
|
|
|
|
|
|
|
|
|
|
|
|
|
|
|
|
|
|
|
|
|
|
|
|
|
|
|
|
|
|
|
|
|
|
|
|
|
|
|
|
|
|
|
|
|
|
|
|
|
|
|
|
|
|
|
|
|
|
|
|
|
|
|
|
|
|
|
|
|
|
|
|
|
|
|
|
|
|
|
|
|
|
|
|
|
|
|
|
|
|
|
|
|
|
|
|
|
|
|
|
|
|
|
|
|
|
|
|
|
|
|
|
|
|
|
|
|
|
|
|
|
|
|
|
|
|
|
|
|
|
|
|
|
|
|
|
|
|
|
|
|
|
|
|
|
|
|
|
|
|
|
|
|
|
|
|
|
|
|
|
|
|
|
|
|
|
|
|
|
|
|
|
|
|
|
|
|
|
|
|
|
|
|
|
|
|
|
|
|
|
|
|
|
|
|
|
|
|
|
|
|
|
|
|
|
|
|
|
|
|
|
|
|
|
|
|
|
|
|
|
|
|
|
|
|
|
|
|
|
|
|
|
|
|
|
|
|
|
|
|
|
|
|
|
|
|
|
|
|
|
|
|
|
|
|
|
|
|
|
|
|
|
|
|
|
|
|
|
|
|
|
|
|
|
|
|
|
|
|
|
|
|
|
|
|
|
|
|
|
|
|
|
|
|
|
|
|
|
|
|
|
|
|
|
|
|
|
|
|
|
|
|
|
|
|
|
|
|
|
|
|
|
|
|
|
|
|
|
|
|
|
|
|
|
|
|
|
|
|
|
|
|
|
|
|
|
|
|
|
|
|
|
|
|
|
|
|
|
|
|
|
|
|
|
|
|
|
|
|
|
|
|
|
|
|
|
|
|
|
|
|
|
|
|
|
|
|
|
|
|
|
|
|
|
|
|
|
|
|
|
|
|
|
|
|
|
|
|
|
|
|
|
|
|
|
|
|
|
|
|
|
|
|
|
|
|
|
|
|
|
|
|
|
|
|
|
|
|
|
|
|
|
|
|
|
|
|
|
|
|
|
|
|
|
|
|
|
|
|
|
|
|
|
|
|
|
|
|
|
|
|
|
|
|
|
|
|
|
|
|
|
|
|
|
|
|
|
|
|
|
|
|
|
|
|
|
|
|
|
|
|
|
|
|
|
|
|
|
|
|
|
|
|
|
|
|
|
|
|
|
|
|
|
|
|
|
|
|
|
|
|
|
|
|
|
|
|
|
|
|
|
|
|
|
|
|
|
|
|
|
|
|
|
|
|
|
|
|
|
|
|
|
|
|
|
|
|
|
|
|
|
|
|
|
|
|
|
|
|
|
|
|
|
|
|
|
|
|
|
|
|
|
|
|
|
|
|
|
|
|
|
|
|
|
|
|
|
|
|
|
|
|
|
|
|
|
|
|
|
|
|
|
|
|
|
|
|
|
|
|
|
|
|
|
|
|
|
|
|
|
|
|
|
|
|
|
|
|
|
|
|
|
|
|
|
|
|
|
|
|
|
|
|
|
|
|
|
|
|
|
|
|
|
|
|
|
|
|
|
|
|
|
|
|
|
|
|
|
|
|
|
|
|
|
|
|
|
|
|
|
|
|
|
|
|
|
|
|
|
|
|
|
|
|
|
|
|
|
|
|
|
|
|
|
|
|
|
|
|
|
|
|
|
|
|
|
|
|
|
|
|
|
|
|
|
|
|
|
|
|
|
|
|
|
|
|
|
|
|
|
|
|
|
|
|
|
|
|
|
|
|
|
|
|
|
|
|
|
|
|
|
|
|
|
|
|
|
|
|
|
|
|
|
|
|
|
|
|
|
|
|
|
|
|
|
|
|
|
|
|
|
|
|
|
|
|
|
|
|
|
|
|
|
|
|
|
|
|
|
|
|
|
|
|
|
|
|
|
|
|
|
|
|
|
|
|
|
|
|
|
|
|
|
|
|
|
|
|
|
|
|
|
|
|
|
|
|
|
|
|
|
|
|
|
|
|
|
|
|
|
|
|
|
|
|
|
|
|
|
|
|
|
|
|
|
|
|
|
|
|
|
|
|
|
|
|
|
|
|
|
|
|
|
|
|
|
|
|
|
|
|
|
|
|
|
|
|
|
|
|
|
|
|
|
|
|
|
|
|
|
|
|
|
|
|
|
|
|
|
|
|
|
|
|
|
|
|
|
|
|
|
|
|
|
|
|
|
|
|
|
|
|
|
|
|
|
|
|
|
|
|
|
|
|
|
|
|
|
|
|
|
|
|
|
|
|
|
|
|
|
|
|
|
|
|
|
|
|
|
|
|
|
|
|
|
|
|
|
|
|
|
|
|
|
|
|
|
|
|
|
|
|
|
|
|
|
|
|
|
|
|
|
|
|
|
|
|
|
|
|
|
|
|
|
|
|
|
|
|
|
|
|
|
|
|
|
|
|
|
|
|
|
|
|
|
|
|
|
|
|
|
|
|
|
|
|
|
|
|
|
|
|
|
|
|
|
|
|
|
|
|
|
|
|
|
|
|
|
|
|
|
|
|
|
|
|
|
|
|
|
|
|
|
|
|
|
|
|
|
|
|
|
|
|
|
|
|
|
|
|
|
|
|
|
|
|
|
|
|
|
|
|
|
|
|
|
|
|
|
|
|
|
|
|
|
|
|
|
|
|
|
|
|
|
|
|
|
|
|
|
|
|
|
|
|
|
|
|
|
|
|
|
|
|
|
|
|
|
|
|
|
|
|
|
|
|
|
|
|
|
|
|
|
|
|
|
|
|
|
|
|
|
|
|
|
|
|
|
|
|
|
|
|
|
|
|
|
|
|
|
|
|
|
|
|
|
|
|
|
|
|
|
|
|
|
|
|
|
|
|
|
|
|
|
|
|
|
|
|
|
|
|
|
|
|
|
|
|
|
|
|
|
|
|
|
|
|
|
|
|
|
|
|
|
|
|
|
|
|
|
|
|
|
|
|
|
|
|
|
|
|
|
|
|
|
|
|
|
|
|
|
|
|
|
|
|
|
|
|
|
|
|
|
|
|
|
|
|
|
|
|
|
|
|
|
|
|
|
|
|
|
|
|
|
|
|
|
|
|
|
|
|
|
|
|
|
|
|
|
|
|
|
|
|
|
|
|
|
|
|
|
|
|
|
|
|
|
|
|
|
|
|
|
|
|
|
|
|
|
|
|
|
|
|
|
|
|
|
|
|
|
|
|
|
|
|
|
|
|
|
|
|
|
|
|
|
|
|
|
|
|
|
|
|
|
|
|
|
|
|
|
|
|
|
|
|
|
|
|
|
|
|
|
|
|
|
|
|
|
|
|
|
|
|
|
|
|
|
|
|
|
|
|
|
|
|
|
|
|
|
|
|
|
|
|
|
|
|
|
|
|
|
|
|
|
|
|
|
|
|
|
|
|
|
|
|
|
|
|
|
|
|
|
|
|
|
|
|
|
|
|
|
|
|
|
|
|
|
|
|
|
|
|
|
|
|
|
|
|
|
|
|
|
|
|
|
|
|
|
|
|
|
|
|
|
|
|
|
|
|
|
|
|
|
|
|
|
|
|
|
|
|
|
|
|
|
|
|
|
|
|
|
|
|
|
|
|
|
|
|
|
|
|
|
|
|
|
|
|
|
|
|
|
|
|
|
|
|
|
|
|
|
|
|
|
|
|
|
|
|
|
|
|
|
|
|
|
|
|
|
|
|
|
|
|
|
|
|
|
|
|
|
|
|
|
|
|
|
|
|
|
|
|
|
|
|
|
|
|
|
|
|
|
|
|
|
|
|
|
|
|
|
|
|
|
|
|
|
|
|
|
|
|
|
|
|
|
|
|
|
|
|
|
|
|
|
|
|
|
|
|
|
|
|
|
|
|
|
|
|
|
|
|
|
|
|
|
|
|
|
|
|
|
|
|
|
|
|
|
|
|
|
|
|
|
|
|
|
|
|
|
|
|
|
|
|
|
|
|
|
|
|
|
|
|
|
|
|
|
|
|
|
|
|
|
|
|
|
|
|
|
|
|
|
|
|
|
|
|
|
|
|
|
|
|
|
|
|
|
|
|
|
|
|
|
|
|
|
|
|
|
|
|
|
|
|
|
|
|
|
|
|
|
|
|
|
|
|
|
|
|
|
|
|
|
|
|
|
|
|
|
|
|
|
|
|
|
|
|
|
|
|
|
|
|
|
|
|
|
|
|
|
|
|
|
|
|
|
|
|
|
|
|
|
|
|
|
|
|
|
|
|
|
|
|
|
|
|
|
|
|
|
|
|
|
|
|
|
|
|
|
|
|
|
|
|
|
|
|
|
|
|
|
|
|
|
|
|
|
|
|
|
|
|
|
|
|
|
|
|
|
|
|
|
|
|
|
|
|
|
|
|
|
|
|
|
|
|
|
|
|
|
|
|
|
|
|
|
|
|
|
|
|
|
|
|
|
|
|
|
|
|
|
|
|
|
|
|
|
|
|
|
|
|
|
|
|
|
|
|
|
|
|
|
|
|
|
|
|
|
|
|
|
|
|
|
|
|
|
|
|
|
|
|
|
|
|
|
|
|
|
|
|
|
|
|
|
|
|
|
|
|
|
|
|
|
|
|
|
|
|
|
|
|
|
|
|
|
|
|
|
|
|
|
|
|
|
|
|
|
|
|
|
|
|
|
|
|
|
|
|
|
|
|
|
|
|
|
|
|
|
|
|
|
|
|
|
|
|
|
|
|
|
|
|
|
|
|
|
|
|
|
|
|
|
|
|
|
|
|
|
|
|
|
|
|
|
|
|
|
|
|
|
|
|
|
|
|
|
|
|
DO NOT REMOVE
THIS SNAP RING
10REAR PLANETARY CARRIER RETAINING SNAP RING.
11REAR PLANETARY CARRIER ASSEMBLY.
12FRONT PLANETARY SUN GEAR THRUST BEARING (NUMBER 5).
13FRONT PLANETARY SUN GEAR.
14FRONT PLANETARY SUN GEAR SNAP RING (CIR-CLIP).
15FRONT PLANETARY CARRIER THRUST BEARING (NUMBER 6).
16FRONT PLANETARY CARRIER/REAR RING GEAR ASSEMBLY.
17FRONT PLANETARY CARRIER RING GEAR AND HUB ASSEMBLY.
18FRONT RING GEAR AND HUB ASSEMBLY (REAR VIEW).
19LOW SPRAG ASSEMBLY END BEARINGS (2 REQUIRED).
20LOW SPRAG CAGE ASSEMBLY.
21LOW SPRAG RETAINER.
Copyright © 2004 ATSG
Figure 90
AUTOMATIC TRANSMISSION SERVICE GROUP |
51 |
|