


Cancel Printing
•You cannot stop printing when printing only one copy of an image. If you are printing more than one copy or more than one image, you can cancel the rest of the printing by pressing the FUNC./SET button. Once the current print is finished, a confirmation dialog appears. Select [OK] and press the FUNC./ SET button.
Printing Errors
•An error message appears if an error occurs for some reason during the printing process. Select [Stop] or [Resume] and press the FUNC./SET button. See List of Messages (p. 70) for details.
The [Resume] option may not appear with some types of errors. In that case, select [Stop].
Selecting Print Settings
Setting the Number of Copies
1 |
Select [ |
] and set the number of prints. |
|
|
|
1 to 99 copies can be set. |
|
|
|
||
Setting the Print Style (Image, Borders and Date) |
|
|
|||
|
|
|
|
|
|
|
|
Standard |
Prints one image per page. |
|
|
|
|
|
|
|
|
Image |
Multiple*1 |
Prints eight copies of the same |
|
|
|
image on one page. |
|
|
|||
|
|
|
|
|
|
|
|
ID Photo*2 |
Prints a specified print size (p. 61). |
|
|
Borders |
Borderless |
Prints right to the edges of the paper. |
|
|
|
|
|
|
|
||
Bordered |
Prints with a border. |
|
|
||
|
|
|
|
||
|
|
|
|
|
|
Date |
On |
Adds the date to the print. |
|
|
|
|
|
|
|
||
Off |
Prints without the date. |
|
|
||
|
|
|
|
||
|
|
|
|
|
|
*1 This option can only be selected when printing on card size paper. *2 This option can be selected when printing large size images.
55
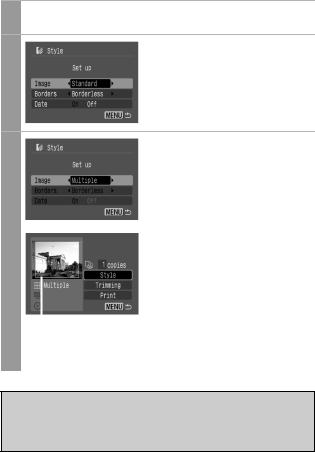
1 In the print order screen, select [Style] and press the FUNC./SET button.
Select [Image], [Borders], or [Date].
2
Select settings as needed.
3
|
|
Press the MENU button to |
|
|
end the setting selection |
|
|
process. |
|
|
With borderless or multiple prints, |
4 |
|
the top, bottom and sides of the |
|
image may be cropped slightly. If |
|
|
|
you have not specified a trimming |
|
|
setting, a frame will appear around |
Print Area Frame |
the area of the image that will be |
|
|
|
printed, allowing you to check the |
|
|
portion that will be cropped. |
|
|
|
If you select an image which has had the shooting date embedded in it using a camera with a Postcard Date Imprint mode, [Date] in the [Style] menu will be set to [Off]. If you set [Date] to [On], dates will appear twice on the printed image.
56
•When printing multiple prints, the [Borders] and the [Date] cannot be set. (Images are printed without any date or borders.)
•Practically all of the image area displayed on the LCD monitor is printed on bordered prints.
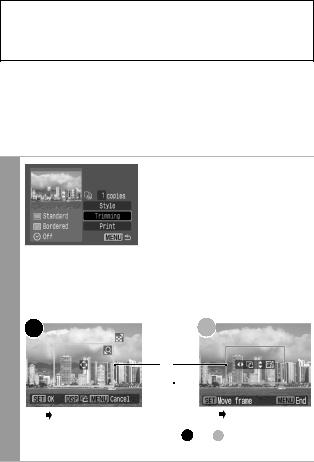
Setting the Printing Area (Trimming)
You can specify which portion of an image gets printed.
Please set the Print Style (Image, Borders and Date) before setting the trimming settings. If the print style is changed after having made the trimming settings, you must select the settings again.
In the print order screen, select [Trimming] and press the FUNC./SET button.
The trimming frame will appear at the center of the image. If a trimming setting has already been selected for the image, the frame will appear around the previously selected portion.
The trimming setting screen differs depending on the camera model. Check which of the following screens
1 appear before selecting settings.
a |
b |
|
|
|
|||
|
|
|
|
|
|
|
|
|
|
|
|
Trimming Frame |
|
|
|
Steps 2a and 3a |
Steps 2b and 3b |
|
|
* Proceed to procedure a |
or b depending |
|
|
on the display screen which appears.
57

When screen a displays
Trim the image.
Changing the Size of the Trimming Frame
• Press the zoom lever or the zoom button to adjust the size of the trimming frame.
• The trimming frame can be changed to a minimum selection of approximately half the displayed image (in width and height) or a maximum selection that is virtually the same size as the image.
• Expanding the trimming frame beyond its maximum size cancels the trimming setting.
2a • When printing an image that has been magnified using the trimming option, the image quality may become coarser and grainier depending on the level of magnification. If this happens, the trimming frame displays in red.
Moving the Trimming Frame
•Move the trimming frame using the omni selector or the up, down, right and left buttons.
Rotating the Trimming Frame
•You can rotate the trimming frame by pressing the DISP. (or DISPLAY) button.
Pressing the MENU button cancels the settings.
3a Pressmenu.the FUNC./SET button to close the setting
58
When screen b displays
Trim the image.
Changing the Size of the Trimming Frame
•Press the up and down buttons to adjust the size of the trimming frame.
•The trimming frame can be changed to a minimum selection of approximately half the displayed image (in width and height) or a maximum selection that is virtually the same size as the image.
•Expanding the trimming frame beyond its maximum size cancels the trimming setting.
2b • When printing an image that has been magnified using the trimming option, the image quality may become coarser and grainier depending on the level of magnification. If this happens, the trimming frame displays in red.
Rotating the Trimming Frame
•You can rotate the trimming frame using the left and right buttons.
Moving the Trimming Frame
•Press the FUNC./SET button and use the up, down, right and left buttons to move the trimming frame. Pressing the FUNC./SET button again allows you to change the size of the frame and to rotate it.
|
Press the MENU button, |
|
select [OK] and press the |
3b |
FUNC./SET button. |
Selecting [Cancel setting] cancels |
the selected trimming setting. If [Edit] is selected, the display returns to the previous screen.
59

•The trimming setting only applies to one image.
•The trimming setting is canceled with the following operations.
•When you set the trimming settings for another image.
•When you close the Print mode (when you turn the camera power off, change the camera mode, or detach the connection cable).
•All or part of the shooting date which has been embedded in images using a camera with the Postcard Date Imprint mode may not be printed properly depending on the trimming setting.
•Images smaller than 640 × 480 pixels cannot be trimmed.
•The selected image and border settings determine the shape of the trimming frame.
•Please use the LCD monitor to set the trimming settings. The trimming frame may not display correctly on a TV screen.
60