

Selecting the Paper Settings
1
2
3
Select [Paper Settings] and press the FUNC./SET button.
The paper size setting screen appears.
Select a paper size* and press the FUNC./SET button.
The default settings and specified paper cassette size are displayed.
The paper type setting screen appears.
* Paper sizes vary according to region.
Press the FUNC./SET button.
The page layout screen appears.
19
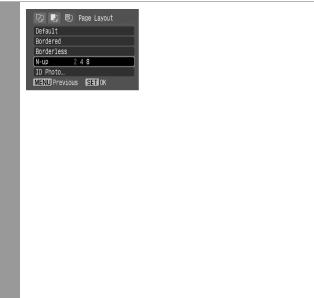
Select a layout.
The following layout can be selected.
|
Default |
Print effects will differ |
|
|
according to your printer’s |
|
|
settings. Refer to your |
|
|
printer’s user guide for |
|
|
details. |
|
|
|
|
Bordered |
Prints with a border. |
|
|
|
|
Borderless |
Prints right to the edges |
4 |
|
of the paper. |
|
|
|
N-up |
Prints 2, 4 or 8 images on |
|
|
|
a single sheet of paper |
|
|
(p. 21). |
|
|
|
|
ID Photo |
Specifies the print size |
|
|
and print portion of an |
|
|
image as an ID photo |
|
|
(p. 22). |
|
|
|
|
Fixed Size* |
Prints by specifying the |
|
|
print size of the image on |
|
|
a sheet of paper (p. 24). |
*A layout cannot be selected when printing on card size paper.
20
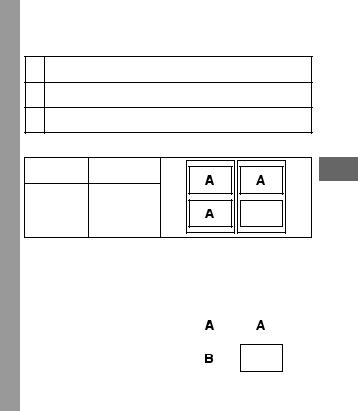
Printing Multiple Images on a Sheet of Paper
Selecting [N-up] in the layout setting (p. 20) will allow you to specify the following layout settings.
22 images (height 2 x width 1) of the same dimensions are arranged on a single sheet of paper.
44 images (height 2 x width 2) of the same dimensions are arranged on a single sheet of paper.
88 images (height 4 x width 2) of the same dimensions are arranged on a single sheet of paper or a label sheet.
[Printing example 1] Printing 3 copies of image A in 2-up
Number of |
Image A: |
copies (p. 14) |
[3] copies |
Layout |
2 |
DPOF print setting (p. 28) allows you to separately print different images by specifying the number of frames to be printed per image. [Printing example 2] Printing 2 copies of image A and 1 copy of image B in 4-up
DPOF print |
Image A: |
|
|
|
|
|
|
settings* |
[2] copies |
|
|
|
|
|
|
(p. 28) |
Image B: |
|
|
|
|
|
|
|
[1] copies |
|
|
|
|
|
|
|
|
|
|
|
|
||
Layout |
4 |
|
|
|
|
|
|
|
|
|
|
|
|
|
|
|
|
|
|
|
|
|
|
|
|
|
|
|
|
|
|
*Please refer to the Camera User Guide for instructions on DPOF print setting method.
21

Printing by Specifying the Print Size (ID Photo Print)
Selecting [ID Photo] in the layout setting (p. 20) will allow you to specify the print size and print portion of an image as an ID photo*.
*Images printed with the ID Photo Print function may not be allowed as a formal certificate photo. Refer to the party (organization) or administration requiring the photo.
The print size can be specified for only L (Large) resolution images in the camera connected to the printer.
Select [ID Photo], then press the FUNC./SET button.
T
Specify the print size by selecting the length of the long side and the short side, then press the FUNC./SET button.
Specify the size by selecting the length of the long side first, then the short side. See the next table for selectable combinations of the long side length and the short side length.
22
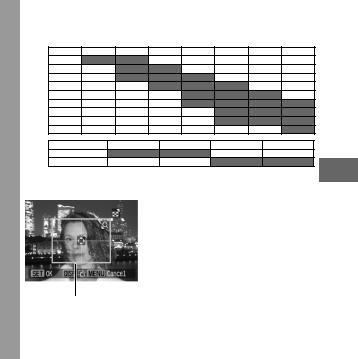
Long Side
z Selectable combination
 : Available print size Short Side
20 mm 25 mm 30 mm 35 mm 40 mm 45 mm 50 mm
25 mm
30 mm
35 mm
40 mm
45 mm
50 mm
55 mm
60 mm
70 mm
1.4 inch |
1.5 inch |
1.8 inch |
2.0 inch |
1.8 inch
2.0 inch
T
Trim the image to specify the print area.
See Step 2 of Setting the Printing Area (Trimming) (pp. 16, 17, 18) on how to trim the image.
The trimming setting screen differs depending on the camera model.
Trimming Frame Follow the steps according to the screen that displays on your camera.
Pressing the MENU button will cancel trimming.
23