- •Table of Contents
- •Direct Print
- •Allows for Printing without the Use of a Computer
- •Various Printing Operations Can Be Performed
- •You Can Also Perform the Following Printing Operations
- •Printing Movies (Movie Print)
- •Printing Multiple Images on a Sheet of Paper
- •ID Photo Print
- •Connecting the Camera to the Printer
- •Printing
- •Easy Print
- •Print after Changing the Print Settings
- •Selecting Print Settings
- •Setting the Print Effect
- •Setting the Number of Copies
- •Setting the Printing Area (Trimming)
- •Selecting the Paper Settings
- •Printing Multiple Images on a Sheet of Paper
- •Printing by Specifying the Print Size (ID Photo Print)
- •Printing Images in the Fixed Size
- •Printing Movies (Movie Print)
- •Single-frame
- •Sequence-frame
- •Specifying and Printing Multiple Images (Setting the DPOF Print Settings)
- •List of Messages
- •Printing with Inkjet Printers using PictBridge
- •Printing
- •Easy Print
- •Print after Changing the Print Settings
- •Selecting Print Settings
- •Setting the Date and the File Number Printing Option
- •Setting the Print Effect
- •Setting the Number of Copies
- •Setting the Printing Area (Trimming)
- •Selecting the Paper Settings
- •Printing Multiple Images on a Sheet of Paper
- •Printing Movies (Movie Print)
- •Specifying and Printing Multiple Images (Setting the DPOF Print Settings)
- •List of Messages
- •Printing with Non-Canon, PictBridge Compliant Printers
- •Printing
- •Printing with SELPHY CP Series Printers using Canon Direct Print
- •Printing
- •Easy Print
- •Print after Changing the Print Settings
- •Selecting Print Settings
- •Setting the Number of Copies
- •Setting the Print Style (Image, Borders and Date)
- •Setting the Printing Area (Trimming)
- •Printing by Specifying the Print Size (ID Photo Print)
- •Printing Movies (Movie Print)
- •Single-frame
- •Sequence-frame
- •Specifying and Printing Multiple Images (Setting the DPOF Print Settings)
- •List of Messages
- •Printing
- •Setting the Print Style
- •Settings that Can Be Set with the Camera
- •SELPHY ES Series/SELPHY CP Series Printers using PictBridge
- •Inkjet Printers using PictBridge
Connecting the Camera to the Printer
Connect the camera to the printer. For instructions on printer and camera operation methods, refer to their respective user guides.
Set one of the following into the camera.
•Compact power adapter (sold separately)
•Fully charged battery
•New batteries
If the camera battery power is depleted while printing, printing may be interrupted. To prevent this, use a fully charged battery or new battery. When using the camera for extended periods of time, use of the compact power adapter is recommended.
Place paper, ink cassette/cartridge, etc. into the printer.
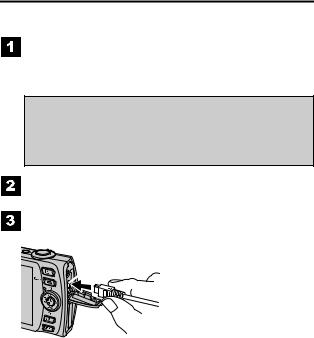
Connect the camera to the printer with the appropriate interface cable supplied with the camera.
DIGITAL terminal
Camera: Connect the cable to the DIGITAL terminal.
Printer: Refer to the printer’s user guide.
Connecting the interface cable
Some printers require specific connection cables which differ from the above cable. Please refer to the printer’s user guide.
Turn the printer’s power on.
8
Set the camera to Playback mode and turn the power on.
Depending on the camera model, the camera’s power will automatically turn on when the printer’s power is turned on.
The following operations are not available during a camera/printer connection.
•Language settings that use the FUNC./SET button and the MENU button (Depending on the camera model, use the FUNC./SET button and the JUMP button).
•Resetting the camera’s settings to default.
Disconnecting the Camera and the
Printer
Turn the power off.
Detach the cable.
Pull out the cable while holding the connector plug. Do not pull out by the cable.
9