

Printing by Specifying the Print Size (ID Photo Print)
You can specify the print size and print a portion of an image as an ID photo*.
*Images printed with the ID Photo Print function may not be allowed as a formal certificate photo. Refer to the party (organization) or administration requiring the photo.
The print size can be specified for only L (Large) resolution images in the camera connected to the printer.
1
2
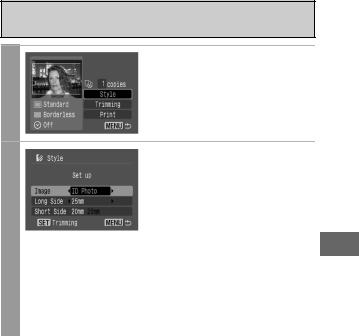
In the print order screen, select [Style] and press the FUNC./SET button.
Select [Image], then select [ID Photo]. Specify the print size by selecting the length of the long side and the short side, then press the FUNC./ SET button.
Specify the size by selecting the length of the long side first, then the short side. See the next table for selectable combinations of the long side length and the short side length.
Press the MENU button to exit without making any trimming settings.
61
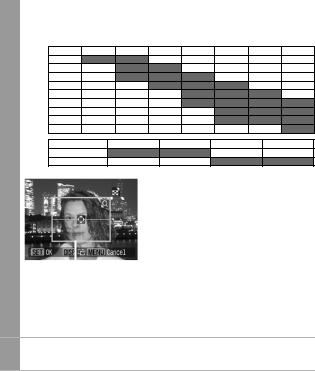
z Selectable combination
 : Available print size Short Side
Long Side
20 mm 25 mm 30 mm 35 mm 40 mm 45 mm 50 mm
25 mm
30 mm
35 mm
40 mm
45 mm
50 mm
55 mm
60 mm
70 mm
1.4 inch |
1.5 inch |
1.8 inch |
2.0 inch |
1.8 inch
2.0 inch
|
|
Trim the image to specify the |
|
|
print area. |
|
|
See Step 2 of Setting the Printing |
|
|
Area (Trimming) (pp. 58, 59) on |
|
|
how to trim the image. |
3 |
|
The trimming setting screen differs |
|
||
|
|
depending on the camera model. |
Trimming |
Frame |
Follow the steps according to the |
|
|
screen that displays on your |
|
|
camera. |
|
|
Press the MENU button to end |
|
|
trimming. |
4 Pressmenu.the FUNC./SET button to close the setting
62
•The print size setting only applies to one image.
•The print size setting is canceled with the following operations:
•When you set the print size settings for another image.
•When you close the Print mode (when you turn the camera power off, change the camera mode, or detach the connection cable).
•The shape of the trimming frame varies depending on the specified print size.
•Use the LCD monitor to specify the print size settings. The trimming frame may not display correctly on a TV screen.
63