

- •Book of Vaadin
- •Table of Contents
- •Preface
- •Part I. Introduction
- •1.1. Overview
- •1.2. Example Application Walkthrough
- •1.3. Support for the Eclipse IDE
- •1.4. Goals and Philosophy
- •1.5. Background
- •2.1. Overview
- •2.2. Setting up the Development Environment
- •2.2.1. Installing Java SDK
- •Windows
- •Linux / UNIX
- •2.2.2. Installing Eclipse IDE
- •Windows
- •Linux / OS X / UNIX
- •2.2.3. Installing Apache Tomcat
- •2.2.4. Firefox and Firebug
- •Using Firebug with Vaadin
- •2.3. Overview of Vaadin Libraries
- •2.4. Installing Vaadin Plugin for Eclipse
- •2.4.1. Installing the IvyDE Plugin
- •2.4.2. Installing the Vaadin Plugin
- •2.4.3. Updating the Plugins
- •2.4.4. Updating the Vaadin Libraries
- •2.5. Creating and Running a Project with Eclipse
- •2.5.1. Creating the Project
- •2.5.2. Exploring the Project
- •The UI Class
- •Deployment Descriptor (web.xml)
- •2.5.3. Coding Tips for Eclipse
- •2.5.4. Setting Up and Starting the Web Server
- •2.5.5. Running and Debugging
- •2.6. Using Vaadin with Maven
- •2.6.1. Working from Command-Line
- •2.6.2. Compiling and Running the Application
- •2.6.3. Using Add-ons and Custom Widget Sets
- •2.7. Creating a Project with NetBeans IDE
- •2.7.1. Maven Project from a Vaadin Archetype
- •2.7.2. Regular Web Application Project
- •2.8. Vaadin Installation Package
- •2.8.1. Package Contents
- •2.8.2. Installing the Libraries
- •3.1. Overview
- •3.2. Technological Background
- •3.2.1. HTML and JavaScript
- •3.2.2. Styling with CSS and Sass
- •3.2.3. AJAX
- •3.2.4. Google Web Toolkit
- •3.2.5. Java Servlets
- •3.3. Client-Side Engine
- •3.4. Events and Listeners
- •Part II. Server-Side Framework
- •4.1. Overview
- •4.2. Building the UI
- •4.2.1. Application Architecture
- •4.2.2. Compositing Components
- •4.2.3. View Navigation
- •4.2.4. Layered Architectures
- •4.2.5. Accessing UI, Page, Session, and Service
- •4.3. Handling Events with Listeners
- •4.3.1. Implementing a Listener in a Regular Class
- •4.3.2. Differentiating Between Event Sources
- •4.3.3. The Easy Way: Using Anonymous Classes
- •4.4. Images and Other Resources
- •4.4.1. Resource Interfaces and Classes
- •4.4.2. File Resources
- •4.4.3. Class Loader Resources
- •4.4.4. Theme Resources
- •4.4.5. Stream Resources
- •4.5. Handling Errors
- •4.5.1. Error Indicator and message
- •4.5.2. Customizing System Messages
- •4.5.3. Handling Uncaught Exceptions
- •4.6. Notifications
- •4.6.1. Notification Type
- •4.6.2. Customizing Notifications
- •4.6.3. Styling with CSS
- •4.7. Application Lifecycle
- •4.7.1. Deployment
- •Undeploying and Redeploying
- •Redeployment and Serialization
- •4.7.2. Vaadin Servlet, Portlet, and Service
- •Customization
- •4.7.3. User Session
- •4.7.4. Loading a UI
- •4.7.5. UI Expiration
- •4.7.6. Session Expiration
- •4.7.7. Closing a Session
- •4.8. Deploying an Application
- •4.8.1. Creating Deployable WAR in Eclipse
- •4.8.2. Web Application Contents
- •4.8.3. Deployment Descriptor web.xml
- •Widget Set
- •Servlet Mapping with URL Patterns
- •4.8.4. Other Deployment Parameters
- •Production Mode
- •Custom UI Provider
- •UI Heartbeat
- •Session Timeout After User Inactivity
- •Cross-Site Request Forgery Prevention
- •4.8.5. Deployment Configuration
- •5.1. Overview
- •5.2. Interfaces and Abstractions
- •5.2.1. Component Interface
- •Component Tree Management
- •5.2.2. AbstractComponent
- •5.2.3. Field Components (Field and AbstractField)
- •Field Interface
- •Data Binding and Conversions
- •Handling Field Value Changes
- •AbstractField Base Class
- •5.3. Common Component Features
- •5.3.1. Caption
- •5.3.2. Description and Tooltips
- •5.3.3. Enabled
- •5.3.4. Icon
- •5.3.5. Locale
- •5.3.6. Read-Only
- •5.3.7. Style Name
- •5.3.8. Visible
- •5.3.9. Sizing Components
- •5.3.10. Managing Input Focus
- •5.4. Component Extensions
- •5.5. Label
- •5.5.1. Content Mode
- •5.5.2. Making Use of the HTML Mode
- •5.5.3. Spacing with a Label
- •5.5.4. CSS Style Rules
- •5.6. Link
- •5.7. TextField
- •5.7.1. Data Binding
- •5.7.2. String Length
- •5.7.3. Handling Null Values
- •5.7.4. Text Change Events
- •5.7.5. CSS Style Rules
- •5.8. TextArea
- •5.9. PasswordField
- •5.10. RichTextArea
- •5.11. Date and Time Input with DateField
- •5.11.1. PopupDateField
- •5.11.2. InlineDateField
- •5.11.3. Time Resolution
- •5.11.4. DateField Locale
- •5.12. Button
- •5.13. CheckBox
- •5.14. Selecting Items
- •5.14.1. Binding Selection Components to Data
- •Adding New Items
- •Item Captions
- •Getting and Setting Selection
- •5.14.2. Basic Select Component
- •Filtered Selection
- •5.14.3. ListSelect
- •5.14.4. Native Selection Component NativeSelect
- •5.14.5. Radio Button and Check Box Groups with OptionGroup
- •Disabling Items
- •5.14.6. Twin Column Selection with TwinColSelect
- •5.14.7. Allowing Adding New Items
- •5.14.8. Multiple Selection Mode
- •5.14.9. Other Common Features
- •Item Icons
- •5.15. Table
- •5.15.1. Selecting Items in a Table
- •5.15.2. Table Features
- •Page Length and Scrollbar
- •Resizing Columns
- •Reordering Columns
- •Collapsing Columns
- •Components Inside a Table
- •Iterating Over a Table
- •Filtering Table Contents
- •5.15.3. Editing the Values in a Table
- •Field Factories
- •Navigation in Editable Mode
- •5.15.4. Column Headers and Footers
- •Headers
- •Footers
- •Handling Mouse Clicks on Headers and Footers
- •5.15.5. Generated Table Columns
- •5.15.6. Formatting Table Columns
- •5.15.7. CSS Style Rules
- •Setting Individual Cell Styles
- •5.16. Tree
- •5.17. MenuBar
- •5.18. Embedded Resources
- •5.18.1. Embedded Image
- •Generating and Reloading Images
- •5.18.2. Adobe Flash Graphics
- •5.18.3. BrowserFrame
- •5.18.4. Generic Embedded Objects
- •5.19. Upload
- •5.20. ProgressIndicator
- •5.20.1. Doing Heavy Computation
- •5.21. Slider
- •5.22. Component Composition with CustomComponent
- •5.23. Composite Fields with CustomField
- •6.1. Overview
- •6.2. Window and Panel Content
- •6.3. VerticalLayout and HorizontalLayout
- •6.3.1. Sizing Contained Components
- •6.4. GridLayout
- •6.4.1. Sizing Grid Cells
- •6.5. FormLayout
- •6.6. Panel
- •6.6.1. Scrolling the Panel Content
- •6.7. Sub-Windows
- •6.7.1. Opening and Closing a Sub-Window
- •6.7.2. Window Positioning
- •6.7.3. Scrolling Sub-Window Content
- •6.7.4. Modal Windows
- •6.8. HorizontalSplitPanel and VerticalSplitPanel
- •6.9. TabSheet
- •6.10. Accordion
- •6.11. AbsoluteLayout
- •6.12. CssLayout
- •6.13. Layout Formatting
- •6.13.1. Layout Size
- •Expanding Components
- •6.13.2. Layout Cell Alignment
- •Size of Aligned Components
- •6.13.3. Layout Cell Spacing
- •6.13.4. Layout Margins
- •6.14. Custom Layouts
- •7.1. Overview
- •7.2. Creating a New Composite
- •7.3. Using The Visual Designer
- •7.3.1. Adding New Components
- •7.3.2. Setting Component Properties
- •Basic Properties
- •Layout Properties
- •7.3.3. Editing an AbsoluteLayout
- •7.4. Structure of a Visually Editable Component
- •7.4.1. Sub-Component References
- •7.4.2. Sub-Component Builders
- •7.4.3. The Constructor
- •8.1. Overview
- •8.2. Introduction to Cascading Style Sheets
- •8.2.1. Basic CSS Rules
- •8.2.2. Matching by Element Class
- •8.2.3. Matching by Descendant Relationship
- •8.2.4. Notes on Compatibility
- •8.3. Syntactically Awesome Stylesheets (Sass)
- •8.3.1. Sass Overview
- •Variables
- •Nesting
- •8.3.2. Sass Basics with Vaadin
- •8.3.3. Compiling On the Fly
- •8.3.4. Compiling Sass to CSS
- •8.4. Creating and Using Themes
- •8.4.1. Sass Themes
- •Built-in Themes
- •8.4.2. Plain Old CSS Themes
- •8.4.3. Styling Standard Components
- •8.4.4. Built-in Themes
- •8.4.5. Using Themes in an UI
- •8.4.6. Theme Inheritance
- •8.5. Creating a Theme in Eclipse
- •9.1. Overview
- •9.2. Properties
- •9.2.1. Property Viewers and Editors
- •9.2.2. ObjectProperty Implementation
- •9.2.3. Converting Between Property Type and Representation
- •Basic Use of Converters
- •Implementing a Converter
- •Converter Factory
- •9.2.4. Implementing the Property Interface
- •9.3. Holding properties in Items
- •9.3.1. The PropertysetItem Implementation
- •9.3.2. Wrapping a Bean in a BeanItem
- •Nested Beans
- •9.4. Creating Forms by Binding Fields to Items
- •9.4.1. Simple Binding
- •9.4.2. Using a FieldFactory to Build and Bind Fields
- •9.4.3. Binding Member Fields
- •Encapsulating in CustomComponent
- •9.4.4. Buffering Forms
- •9.4.5. Binding Fields to a Bean
- •9.4.6. Bean Validation
- •Annotations
- •Validating the Beans
- •Locale Setting for Bean Validation
- •9.5. Collecting Items in Containers
- •9.5.1. Basic Use of Containers
- •Default Containers and Delegation
- •Creating and Binding a Container
- •Adding Items and Accessing Properties
- •Adding Items by Given ID
- •9.5.2. Container Subinterfaces
- •9.5.3. IndexedContainer
- •9.5.4. BeanContainer
- •Nested Properties
- •Defining a Bean ID Resolver
- •9.5.5. BeanItemContainer
- •9.5.6. Iterating Over a Container
- •9.5.7. Filterable Containers
- •Atomic and Composite Filters
- •Built-In Filter Types
- •Implementing Custom Filters
- •10.1. Architecture
- •10.2. Getting Started with SQLContainer
- •10.2.1. Creating a connection pool
- •10.2.2. Creating the TableQuery Query Delegate
- •10.2.3. Creating the Container
- •10.3. Filtering and Sorting
- •10.3.1. Filtering
- •10.3.2. Sorting
- •10.4. Editing
- •10.4.1. Adding items
- •10.4.2. Fetching generated row keys
- •10.4.3. Version column requirement
- •10.4.4. Auto-commit mode
- •10.4.5. Modified state
- •10.5. Caching, Paging and Refreshing
- •10.5.1. Container Size
- •10.5.2. Page Length and Cache Size
- •10.5.3. Refreshing the Container
- •10.5.4. Cache Flush Notification Mechanism
- •10.6. Referencing Another SQLContainer
- •10.7. Using FreeformQuery and FreeformStatementDelegate
- •10.8. Non-implemented methods of Vaadin container interfaces
- •10.9. Known Issues and Limitations
- •11.1. Handling Browser Windows
- •11.1.1. Opening Popup Windows
- •The Popup Window UI
- •Popping It Up
- •Popup Window Name (Target)
- •URL and Session
- •11.2. Embedding UIs in Web Pages
- •11.2.1. Embedding Inside a div Element
- •The Head Matter
- •The Body Matter
- •UI Placeholder Element
- •Initializing the UI
- •Summary of Div Embedding
- •11.2.2. Embedding Inside an iframe Element
- •11.2.3. Cross-Site Embedding with the Vaadin XS Add-on
- •11.3. Debug and Production Mode
- •11.3.1. Debug Mode
- •11.3.2. Analyzing Layouts
- •11.3.3. Custom Layouts
- •11.3.4. Debug Functions for Component Developers
- •11.4. Request Handlers
- •11.5. Shortcut Keys
- •11.5.1. Click Shortcuts for Default Buttons
- •11.5.2. Field Focus Shortcuts
- •11.5.3. Generic Shortcut Actions
- •11.5.4. Supported Key Codes and Modifier Keys
- •Supported Key Combinations
- •11.6. Printing
- •11.6.1. Printing the Browser Window
- •11.6.2. Opening a Print Window
- •11.6.3. Printing PDF
- •11.7. Google App Engine Integration
- •11.8. Common Security Issues
- •11.8.1. Sanitizing User Input to Prevent Cross-Site Scripting
- •11.9. Navigating in an Application
- •11.9.1. Setting Up for Navigation
- •View Providers
- •View Change Listeners
- •11.9.2. Implementing a View
- •11.9.3. Handling URI Fragment Path
- •11.10. URI Fragment and History Management with UriFragmentUtility
- •11.11. Drag and Drop
- •11.11.1. Handling Drops
- •11.11.2. Dropping Items On a Tree
- •Accept Criteria for Trees
- •11.11.3. Dropping Items On a Table
- •Accept Criteria for Tables
- •11.11.4. Accepting Drops
- •Client-Side Criteria
- •Server-Side Criteria
- •Accept Indicators
- •11.11.5. Dragging Components
- •11.11.6. Dropping on a Component
- •Target Details for Wrapped Components
- •11.11.7. Dragging Files from Outside the Browser
- •11.12. Logging
- •11.13. JavaScript Interaction
- •11.13.1. Calling JavaScript
- •11.13.2. Handling JavaScript Function Callbacks
- •11.14. Accessing Session-Global Data
- •11.14.1. Passing References Around
- •11.14.2. Overriding attach()
- •11.14.3. ThreadLocal Pattern
- •12.1. Deploying to a Portal
- •12.2. Creating a Portal Application Project in Eclipse
- •12.3. Portlet Deployment Descriptors
- •12.4. Portlet Hello World
- •12.5. Installing Vaadin in Liferay
- •12.5.1. Removing the Bundled Installation
- •12.5.2. Installing Vaadin
- •12.6. Handling Portlet Requests
- •12.7. Handling Portlet Mode Changes
- •12.8. Non-Vaadin Portlet Modes
- •12.9. Vaadin IPC for Liferay
- •12.9.1. Installing the Add-on
- •12.9.2. Basic Communication
- •12.9.3. Considerations
- •Browser Security
- •Efficiency
- •12.9.4. Communication Through Session Attributes
- •12.9.5. Serializing and Encoding Data
- •12.9.6. Communicating with Non-Vaadin Portlets
- •Part III. Client-Side Framework
- •13.1. Overview
- •13.2. Installing the Client-Side Development Environment
- •13.3. Client-Side Module Descriptor
- •13.3.1. Specifying a Stylesheet
- •13.3.2. Limiting Compilation Targets
- •13.4. Compiling a Client-Side Module
- •13.4.1. Vaadin Compiler Overview
- •13.4.2. Compiling in Eclipse
- •13.4.3. Compiling with Ant
- •13.4.4. Compiling with Maven
- •13.5. Creating a Custom Widget
- •13.5.1. A Basic Widget
- •13.5.2. Using the Widget
- •13.6. Debugging Client-Side Code
- •13.6.1. Launching Development Mode
- •13.6.2. Launching SuperDevMode
- •Debugging Java Code in Chrome
- •14.1. Overview
- •14.2. Client-Side Module Entry-Point
- •14.2.1. Module Descriptor
- •14.3. Compiling and Running a Client-Side Application
- •14.4. Loading a Client-Side Application
- •15.1. Overview
- •15.2. GWT Widgets
- •15.3. Vaadin Widgets
- •16.1. Overview
- •16.2. Starting It Simple With Eclipse
- •16.2.1. Creating a Widget
- •16.2.2. Compiling the Widget Set
- •16.3. Creating a Server-Side Component
- •16.3.1. Basic Server-Side Component
- •16.4. Integrating the Two Sides with a Connector
- •16.4.1. A Basic Connector
- •16.4.2. Communication with the Server-Side
- •16.5. Shared State
- •16.5.1. Accessing Shared State on Server-Side
- •16.5.2. Handing Shared State in a Connector
- •16.5.3. Referring to Components in Shared State
- •16.5.4. Sharing Resources
- •16.6.1. RPC Calls to the Server-Side
- •Making a Call
- •Handling a Call
- •16.7. Component and UI Extensions
- •16.7.1. Server-Side Extension API
- •16.7.2. Extension Connectors
- •16.8. Styling a Widget
- •16.8.1. Determining the CSS Class
- •16.8.2. Default Stylesheet
- •16.9. Component Containers
- •16.10. Creating Add-ons
- •16.10.1. Exporting Add-on in Eclipse
- •Configuration and Initialization
- •Compiling the Server-Side
- •Compiling the JavaDoc
- •Packaging the JAR
- •16.11. Migrating from Vaadin 6
- •16.11.1. Quick (and Dirty) Migration
- •16.12. Integrating JavaScript Components and Extensions
- •16.12.1. Example JavaScript Library
- •16.12.2. A Server-Side API for a JavaScript Component
- •Basic Server-Side Component
- •16.12.3. Defining a JavaScript Connector
- •16.12.4. RPC from JavaScript to Server-Side
- •Handling RPC Calls on the Server-Side
- •Making an RPC Call from JavaScript
- •Part IV. Vaadin Add-ons
- •17.1. Overview
- •17.2. Downloading Add-ons from Vaadin Directory
- •17.2.1. Compiling Widget Sets with an Ant Script
- •17.3. Installing Add-ons in Eclipse with Ivy
- •17.4. Using Add-ons in a Maven Project
- •17.4.1. Adding a Dependency
- •17.4.2. Compiling the Project Widget Set
- •Recompiling the Widget Set
- •17.4.3. Enabling Widget Set Compilation
- •17.5. Troubleshooting
- •18.1. Overview
- •18.2. Installing Calendar
- •18.3. Basic Use
- •18.3.1. Setting the Date Range
- •18.3.2. Adding and Managing Events
- •18.3.3. Getting Events from a Container
- •Keeping the Container Ordered
- •Delegation of Event Management
- •18.4. Implementing an Event Provider
- •18.4.1. Custom Events
- •18.4.2. Implementing the Event Provider
- •18.5. Configuring the Appearance
- •18.5.1. Sizing
- •18.5.2. Styling
- •Style for Undefined Size
- •Event Style
- •18.5.3. Visible Hours and Days
- •18.6. Drag and Drop
- •18.7. Using the Context Menu
- •18.8. Localization and Formatting
- •18.8.1. Setting the Locale and Time Zone
- •18.8.2. Time and Date Caption Format
- •18.9. Customizing the Calendar
- •18.9.1. Overview of Handlers
- •18.9.2. Creating a Calendar
- •18.9.3. Backward and Forward Navigation
- •18.9.4. Date Click Handling
- •18.9.5. Handling Week Clicks
- •18.9.6. Handling Event Clicks
- •18.9.7. Event Dragging
- •18.9.8. Handling Drag Selection
- •18.9.9. Resizing Events
- •19.1. Overview
- •19.2. Installing Vaadin Charts
- •19.3. Basic Use
- •19.3.1. Displaying Multiple Series
- •19.3.2. Mixed Type Charts
- •19.3.3. Chart Themes
- •19.4. Chart Types
- •19.4.1. Line and Spline Charts
- •Plot Options
- •19.4.2. Area Charts
- •Plot Options
- •19.4.3. Column and Bar Charts
- •19.4.4. Scatter Charts
- •Data Point Markers
- •Marker Shape Properties
- •Marker Symbols
- •19.4.5. Pie Charts
- •Plot Options
- •Data Model
- •Donut Charts
- •19.4.6. Gauges
- •Gauge Configuration
- •Axis Configuration
- •Setting and Updating Gauge Data
- •19.4.7. Area and Column Range Charts
- •19.4.8. Polar, Wind Rose, and Spiderweb Charts
- •Spiderweb Charts
- •19.5. Chart Configuration
- •19.5.1. Plot Options
- •19.5.2. Axes
- •Categories
- •Labels
- •Axis Range
- •19.5.3. Legend
- •19.6. Chart Data
- •19.6.1. List Series
- •19.6.2. Generic Data Series
- •Adding and Removing Data Items
- •Updating Data Items
- •Range Data
- •19.6.3. Range Series
- •Setting the Data
- •19.6.4. Container Data Series
- •19.7. Advanced Uses
- •19.7.1. Server-Side Rendering and Exporting
- •Using a Remote Export Service
- •Using the SVG Generator
- •20.1. Overview
- •20.2. Using Timeline
- •20.2.1. Data Source Requirements
- •20.2.2. Events and Listeners
- •20.2.3. Configurability
- •20.2.4. Localization
- •20.3. Code example
- •20.3.1. Prerequisites
- •20.3.2. Create the data sources
- •20.3.3. Create the Vaadin Timeline
- •20.3.4. Final Touches
- •21.1. Overview
- •21.2. Installing
- •21.2.1. Downloading the Package
- •21.2.2. Installation Package Content
- •21.2.3. Downloading with Maven
- •Using the Maven Archetype
- •21.2.4. Including Libraries in Your Project
- •21.2.5. Persistence Configuration
- •Persistence XML Schema
- •Defining the Persistence Unit
- •Database Connection
- •Logging Configuration
- •Other Settings
- •21.2.6. Troubleshooting
- •21.3. Defining a Domain Model
- •21.3.1. Persistence Metadata
- •Annotation: @Entity
- •Annotation: @Id
- •Annotation: @OneToOne
- •Annotation: @Embedded
- •Annotation: @OneToMany
- •Annotation: @ElementCollection
- •Annotation: @ManyToOne
- •Annotation: @Transient
- •21.4. Basic Use of JPAContainer
- •21.4.1. Creating JPAContainer with JPAContainerFactory
- •Creating JPAContainer Manually
- •21.4.2. Creating and Accessing Entities
- •Entity Items
- •Refreshing JPAContainer
- •21.4.3. Nested Properties
- •21.4.4. Hierarchical Container
- •Unsupported Hierarchical Features
- •21.5. Entity Providers
- •21.5.1. Built-In Entity Providers
- •LocalEntityProvider
- •MutableLocalEntityProvider
- •BatchableLocalEntityProvider
- •CachingLocalEntityProvider
- •CachingMutableLocalEntityProvider
- •CachingBatchableLocalEntityProvider
- •21.5.2. Using JNDI Entity Providers in JEE6 Environment
- •21.5.3. Entity Providers as Enterprise Beans
- •21.6. Filtering JPAContainer
- •21.7. Querying with the Criteria API
- •21.7.1. Filtering the Query
- •21.7.2. Compatibility
- •21.8. Automatic Form Generation
- •21.8.1. Configuring the Field Factory
- •21.8.2. Using the Field Factory
- •21.8.3. Master-Detail Editor
- •21.9. Using JPAContainer with Hibernate
- •21.9.1. Lazy loading
- •21.9.2. The EntityManager-Per-Request pattern
- •21.9.3. Joins in Hibernate vs EclipseLink
- •22.1. Overview
- •22.2. Considerations Regarding Mobile Browsing
- •22.2.1. Mobile Human Interface
- •22.2.2. Bandwidth
- •22.2.3. Mobile Features
- •22.2.4. Compatibility
- •Back Button
- •22.3. Installing Vaadin TouchKit
- •22.3.1. Installing the Zip Package
- •Library Dependencies
- •22.3.2. Installing in Maven
- •Defining as a Dependency
- •22.3.3. Importing the Vornitologist Demo
- •22.4. Elements of a TouchKit Application
- •22.4.1. Deployment Descriptor
- •22.4.2. Creating a Custom Servlet
- •22.4.3. TouchKit Settings
- •Application Icons
- •Viewport Settings
- •Web App Capability for iOS
- •Cache Manifest
- •22.4.5. Mobile Widget Set
- •22.5. Mobile User Interface Components
- •22.5.1. NavigationView
- •Navigation Bar
- •Toolbar
- •Styling with CSS
- •22.5.2. Toolbar
- •Styling with CSS
- •22.5.3. NavigationManager
- •Handling View Changes
- •Tracking Breadcrumbs
- •22.5.4. NavigationButton
- •Styling with CSS
- •22.5.5. Popover
- •Styling with CSS
- •22.5.6. Switch
- •Styling with CSS
- •22.5.7. VerticalComponentGroup
- •Styling with CSS
- •22.5.8. HorizontalComponentGroup
- •22.5.9. TabBarView
- •Styling with CSS
- •22.5.10. EmailField
- •22.5.11. NumberField
- •22.5.12. UrlField
- •22.6. Advanced Mobile Features
- •22.6.1. Providing a Fallback UI
- •22.6.2. Geolocation
- •Displaying Position on a Map
- •22.7. Offline Mode
- •22.7.1. Enabling the Cache Manifest
- •22.7.2. Enabling Offline Mode
- •22.7.3. The Offline User Interface
- •22.7.4. Sending Data to Server
- •22.7.5. The Offline Theme
- •22.8. Building an Optimized Widget Set
- •22.9. Testing and Debugging on Mobile Devices
- •22.9.1. Debugging
- •23.1. Overview
- •23.2. Installing Vaadin TestBench
- •23.2.1. Test Development Installation
- •23.2.2. A Distributed Testing Environment
- •23.2.3. Downloading and Unpacking the Installation Package
- •23.2.4. Installation Package Contents
- •23.2.5. Example Contents
- •23.2.6. Installing the Recorder
- •23.2.7. Installing Browser Drivers
- •23.2.8. Test Node Configuration
- •Operating system settings
- •Settings for Screenshots
- •23.3. Preparing an Application for Testing
- •23.4. Using Vaadin TestBench Recorder
- •23.4.1. Starting the Recorder
- •23.4.2. Recording
- •23.4.3. Selectors
- •23.4.4. Playing Back Tests
- •23.4.5. Editing Tests
- •23.4.6. Exporting Tests
- •23.4.7. Saving Tests
- •23.5. Developing JUnit Tests
- •23.5.1. Starting From a Stub
- •23.5.2. Finding Elements by Selectors
- •Finding by ID
- •Finding by Vaadin Selector
- •Finding by CSS Class
- •23.5.3. Running JUnit Tests in Eclipse
- •23.5.4. Executing Tests with Ant
- •23.5.5. Executing Tests with Maven
- •Installing TestBench in Local Repository
- •Defining TestBench as a Dependency
- •Running the Tests
- •23.5.6. Test Setup
- •TestBench Parameters
- •23.5.7. Creating and Closing a Web Driver
- •Browser Drivers
- •23.5.8. Basic Test Case Structure
- •23.5.9. Waiting for Vaadin
- •23.5.10. Testing Tooltips
- •23.5.11. Scrolling
- •23.5.12. Testing Notifications
- •23.5.13. Testing Context Menus
- •23.5.14. Profiling Test Execution Time
- •23.6. Taking and Comparing Screenshots
- •23.6.1. Screenshot Parameters
- •23.6.2. Taking Screenshots on Failure
- •23.6.3. Taking Screenshots for Comparison
- •Screenshot Comparison Error Images
- •Reference Images
- •Masking Screenshots
- •Visualization of Differences in Screenshots with Highlighting
- •23.6.4. Practices for Handling Screenshots
- •23.6.5. Known Compatibility Problems
- •23.7. Running Tests in an Distributed Environment
- •23.7.1. Running Tests Remotely
- •23.7.2. Starting the Hub
- •23.7.3. Node Service Configuration
- •Configuration File Format
- •Browser Capabilities
- •Example Configuration
- •23.7.4. Starting a Grid Node
- •Browser Capabilities
- •Browser Driver Parameters
- •23.7.5. Mobile Testing
- •23.8. Known Issues
- •23.8.1. Using assertTextPresent and assertTextNotPresent
- •23.8.2. Exporting Recordings of the Upload Component
- •23.8.3. Running Firefox Tests on Mac OS X

Managing Layout
Figure 6.14. A TabSheet with Hidden and Disabled Tabs
CSS Style Rules
.v-tabsheet {}
.v-tabsheet-tabs {}
.v-tabsheet-content {}
.v-tabsheet-deco {}
.v-tabsheet-tabcontainer {}
.v-tabsheet-tabsheetpanel {}
.v-tabsheet-hidetabs {}
.v-tabsheet-scroller {}
.v-tabsheet-scrollerPrev {}
.v-tabsheet-scrollerNext {}
.v-tabsheet-scrollerPrev-disabled{}
.v-tabsheet-scrollerNext-disabled{}
.v-tabsheet-tabitem {}
.v-tabsheet-tabitem-selected {}
.v-tabsheet-tabitemcell {}
.v-tabsheet-tabitemcell-first {}
.v-tabsheet-tabs td {}
.v-tabsheet-spacertd {}
The entire tabsheet has the v-tabsheet style. A tabsheet consists of three main parts: the tabs on the top, the main content pane, and decorations around the tabsheet.
The tabs area at the top can be styled with v-tabsheet-tabs, v-tabsheet-tabcontainer and v-tabsheet-tabitem*.
The style v-tabsheet-spacertd is used for any empty space after the tabs. If the tabsheet has too little space to show all tabs, scroller buttons enable browsing the full tab list. These use the styles v-tabsheet-scroller*.
The content area where the tab contents are shown can be styled with v-tabsheet-content, and the surrounding decoration with v-tabsheet-deco.
6.10. Accordion
Accordion is a multicomponent container similar to TabSheet, except that the "tabs" are arranged vertically. Clicking on a tab opens its contained component in the space between the tab and the next one. You can use an Accordion identically to a TabSheet, which it actually inherits. See Section 6.9, “TabSheet” for more information.
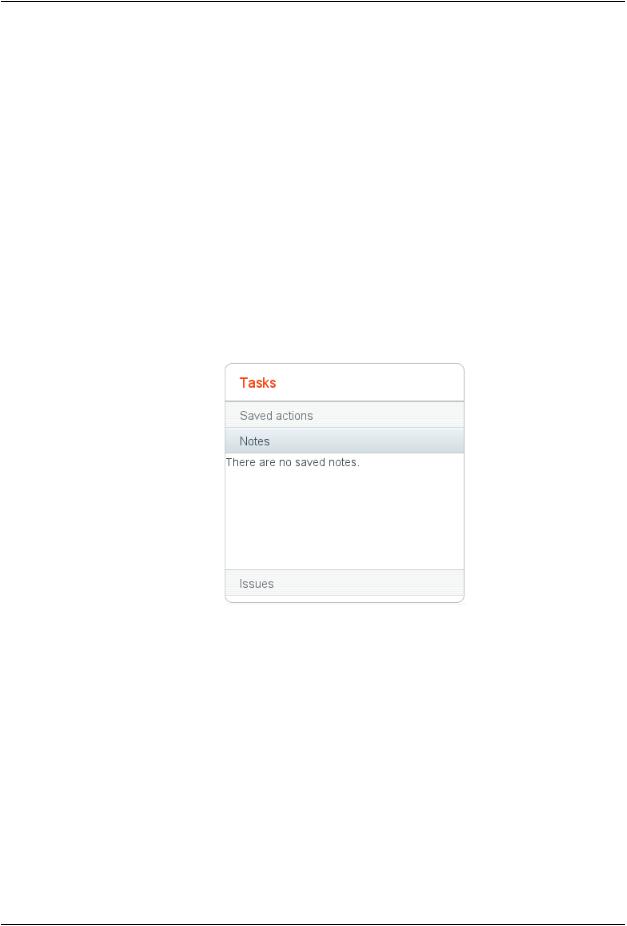
The following example shows how you can create a simple accordion. As the Accordion is rather naked alone, we put it inside a Panel that acts as its caption and provides it a border.
// Create the Accordion.
Accordion accordion = new Accordion();
// Have it take all space available in the layout. accordion.setSizeFull();
CSS Style Rules |
195 |
Managing Layout
// Some components to put in the Accordion.
Label l1 = new Label("There are no previously saved actions."); Label l2 = new Label("There are no saved notes.");
Label l3 = new Label("There are currently no issues.");
//Add the components as tabs in the Accordion. accordion.addTab(l1, "Saved actions", null); accordion.addTab(l2, "Notes", null); accordion.addTab(l3, "Issues", null);
//A container for the Accordion.
Panel panel = new Panel("Tasks"); panel.setWidth("300px"); panel.setHeight("300px"); panel.addComponent(accordion);
// Trim its layout to allow the Accordion take all space. panel.getLayout().setSizeFull(); panel.getLayout().setMargin(false);
Figure 6.15, “An Accordion” shows what the example would look like with the default theme.
Figure 6.15. An Accordion
CSS Style Rules
.v-accordion {}
.v-accordion-item {}
.v-accordion-item-open {}
.v-accordion-item-first {}
.v-accordion-item-caption {}
.v-accordion-item-caption .v-caption {}
.v-accordion-item-content {}
The top-level element of Accordion has the v-accordion style. An Accordion consists of a sequence of item elements, each of which has a caption element (the tab) and a content area element.
The selected item (tab) has also the v-accordion-open style. The content area is not shown for the closed items.
196 |
CSS Style Rules |

Managing Layout
6.11. AbsoluteLayout
AbsoluteLayout allows placing components in arbitrary positions in the layout area.The positions are specified in the addComponent() method with horizontal and vertical coordinates relative to an edge of the layout area. The positions can include a third depth dimension, the z-index, which specifies which components are displayed in front and which behind other components.
The positions are specified by a CSS absolute position string, using the left, right, top, bottom, and z-index properties known from CSS. In the following example, we have a 300 by 150 pixels large layout and position a text field 50 pixels from both the left and the top edge:
//A 400x250 pixels size layout AbsoluteLayout layout = new AbsoluteLayout(); layout.setWidth("400px"); layout.setHeight("250px");
//A component with coordinates for its top-left corner TextField text = new TextField("Somewhere someplace"); layout.addComponent(text, "left: 50px; top: 50px;");
The left and top specify the distance from the left and top edge, respectively. The right and bottom specify the distances from the right and top edge.
// At the top-left corner
Button button = new Button( "left: 0px; top: 0px;"); layout.addComponent(button, "left: 0px; top: 0px;");
// At the bottom-right corner
Button buttCorner = new Button( "right: 0px; bottom: 0px;"); layout.addComponent(buttCorner, "right: 0px; bottom: 0px;");
// Relative to the bottom-right corner
Button buttBrRelative = new Button( "right: 50px; bottom: 50px;"); layout.addComponent(buttBrRelative, "right: 50px; bottom: 50px;");
// On the bottom, relative to the left side
Button buttBottom = new Button( "left: 50px; bottom: 0px;"); layout.addComponent(buttBottom, "left: 50px; bottom: 0px;");
// On the right side, up from the bottom
Button buttRight = new Button( "right: 0px; bottom: 100px;"); layout.addComponent(buttRight, "right: 0px; bottom: 100px;");
The result of the above code examples is shown in Figure 6.16, “Components Positioned Relative to Various Edges”.
AbsoluteLayout |
197 |

Managing Layout
Figure 6.16. Components Positioned Relative to Various Edges
In the above examples, we had components of undefined size and specified the positions of components by a single pair of coordinates. The other possibility is to specify an area and let the component fill the area by specifying a proportinal size for the component, such as "100%". Normally, you use setSizeFull() to take the entire area given by the layout.
// Specify an area that a component should fill Panel panel = new Panel("A Panel filling an area"); panel.setSizeFull(); // Fill the entire given area
layout.addComponent(panel, "left: 25px; right: 50px; "+ "top: 100px; bottom: 50px;");
The result is shown in Figure 6.17, “Component Filling an Area Specified by Coordinates”
Figure 6.17. Component Filling an Area Specified by Coordinates
You can also use proportional coordinates to specify the coordinates:
//A panel that takes 30% to 90% horizontally and
//20% to 80% vertically
Panel panel = new Panel("A Panel"); panel.setSizeFull(); // Fill the specified area layout.addComponent(panel, "left: 30%; right: 10%;" +
"top: 20%; bottom: 20%;");
The result is shown in Figure 6.18, “Specifying an Area by Proportional Coordinates”
198 |
AbsoluteLayout |