

Lab 3.4.2: Managing a Web Server
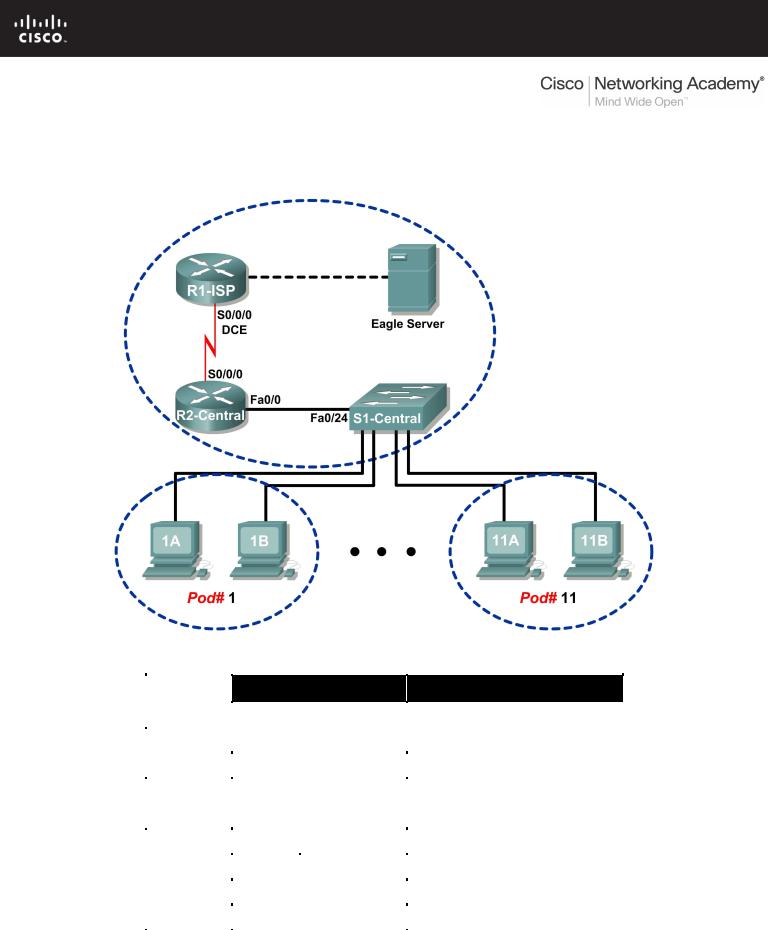
Topology Diagram
Addressing Table
Device |
Interface |
IP Address |
Subnet Mask |
Default Gateway |
|
|
|
|
|
|
|
R1-ISP |
S0/0/0 |
10.10.10.6 |
255.255.255.252 |
N/A |
|
|
|
|
|
||
Fa0/0 |
192.168.254.253 |
255.255.255.0 |
N/A |
||
|
|||||
|
|
|
|
|
|
R2-Central |
S0/0/0 |
10.10.10.5 |
255.255.255.252 |
10.10.10.6 |
|
|
|
|
|
||
Fa0/0 |
172.16.255.254 |
255.255.0.0 |
N/A |
||
|
|||||
|
|
|
|
|
|
|
N/A |
192.168.254.254 |
255.255.255.0 |
192.168.254.253 |
|
Eagle Server |
|
||||
|
|
|
|
||
N/A |
172.31.24.254 |
255.255.255.0 |
N/A |
||
|
|
||||
|
|
|
|
|
|
hostPod#A |
N/A |
172.16. Pod#.1 |
255.255.0.0 |
172.16.255.254 |
|
|
|||||
|
|
|
|
|
|
hostPod#B |
N/A |
172.16. Pod#.2 |
255.255.0.0 |
172.16.255.254 |
|
|
|||||
|
|
|
|
|
|
S1-Central |
N/A |
172.16.254.1 |
255.255.0.0 |
172.16.255.254 |
|
|
|||||
|
|
|
|
|
All contents are Copyright © 1992–2007 Cisco Systems, Inc. All rights reserved. This document is Cisco Public Information. Page 1 of 8

CCNA Exploration |
|
Network Fundamentals: |
|
Application Layer Functionality and Protocols |
Lab 3.4.2: Managing a Web Server |
Learning Objectives
Upon completion of this lab, you will be able to:
•Download, install, and verify a web server application
•Verify the default web server configuration file
•Capture and analyze HTTP traffic with Wireshark
Background
Web servers are an important part of the business plan for any organization with a presence on the Internet. Web browsers are used by consumers to access business web sites. However, web browsers are only half of the communication channel. The other half of the communication channel is web server support. Web server support is a valuable skill for network administrators. Based on a survey by Netcraft in January, 2007, the following table shows the top three web server applications by percent of use:
Web Server |
Percent of use |
Apache |
60 % |
Microsoft |
31 % |
Sun |
1.6 % |
Scenario
In this lab you will download, install, and configure the popular Apache web server. A web browser will be used to connect to the server, and Wireshark will be used to capture the communication. Analysis of the capture will help you understand how the HTTP protocol operates.
Task 1: Download, Install, and Verify the Apache Web Server.
The lab should be configured as shown in the Topology Diagram and logical address table. If it is not, ask the instructor for assistance before proceeding.
Step 1: Download the software from Eagle Server.
The Apache web server application is available for download from Eagle Server.
1.Use a web browser and URL ftp://eagleserver.example.com/pub/eagle_labs/eagle1/chapter3 to access and download the software. See Figure 1.
Figure 1. FTP Download Screen for the Apache Web Server
2. Right-click the file and save the software on the pod host computer.
All contents are Copyright © 1992–2007 Cisco Systems, Inc. All rights reserved. This document is Cisco Public Information. |
Page 2 of 8 |

CCNA Exploration |
|
Network Fundamentals: |
|
Application Layer Functionality and Protocols |
Lab 3.4.2: Managing a Web Server |
Step 2: Install the Apache web server on the pod host computer.
1.Open the folder where the software was saved, and double-click the Apache file to begin installation. Choose default values and consent to the licensing agreement. The next installation step requires customized configuration of the web server, shown in Figure 2.
Figure 2. Customized Configuration Screen
Use the following values:
Information |
Value |
Network Domain |
example.com |
Server Name |
IP address of computer |
Administrator’s E-mail Address |
ccna*@example.com |
*For example, for users 1 through 22, if the computer is on Pod 5, Host B, the administrator’s e- mail number is ccna10@example.com
2.Accept the recommended port and service status. Click Next.
3.Accept the default typical installation, and click Next.
What is the default installation folder?
___________________________________________________________________________________
4.Accept the default installation folder, click Next, and then Install. When the installation has finished, close the screen.
All contents are Copyright © 1992–2007 Cisco Systems, Inc. All rights reserved. This document is Cisco Public Information. |
Page 3 of 8 |
CCNA Exploration |
|
Network Fundamentals: |
|
Application Layer Functionality and Protocols |
Lab 3.4.2: Managing a Web Server |
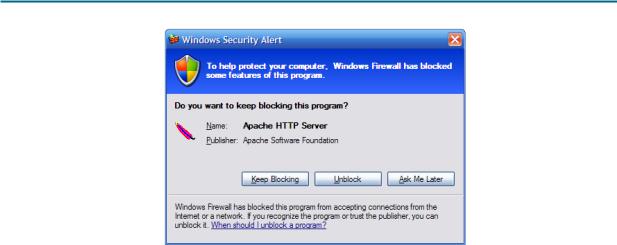
Figure 3. Windows Security Alert
Note: If a Windows Security Alert is displayed, select unblock. See Figure 3. This will permit connections to the web server.
Step 3: Verify the web server.
The netstat command will display protocol statistics and connection information for this lab computer.
1.Choose Start > Run and open a command line window. Type cmd, and then click OK. Use the netstat –a command to discover open and connected ports on your computer:
C:\>netstat -a
Active Connections
Proto |
Local Address |
Foreign Address |
State |
TCP |
GW-desktop-hom:http |
GW-desktop-hom:0 |
LISTENING |
TCP |
GW-desktop-hom:epmap |
GW-desktop-hom:0 |
LISTENING |
TCP |
GW-desktop-hom:microsoft-ds |
GW-desktop-hom:0 |
LISTENING |
TCP |
GW-desktop-hom:3389 |
GW-desktop-hom:0 |
LISTENING |
<output omitted> C:\>
2.Using the command netstat –a, verify that the web server is operating properly on the pod host computer.
The Apache web server monitor icon  should be visible on the lower right side of the screen, close to the time.
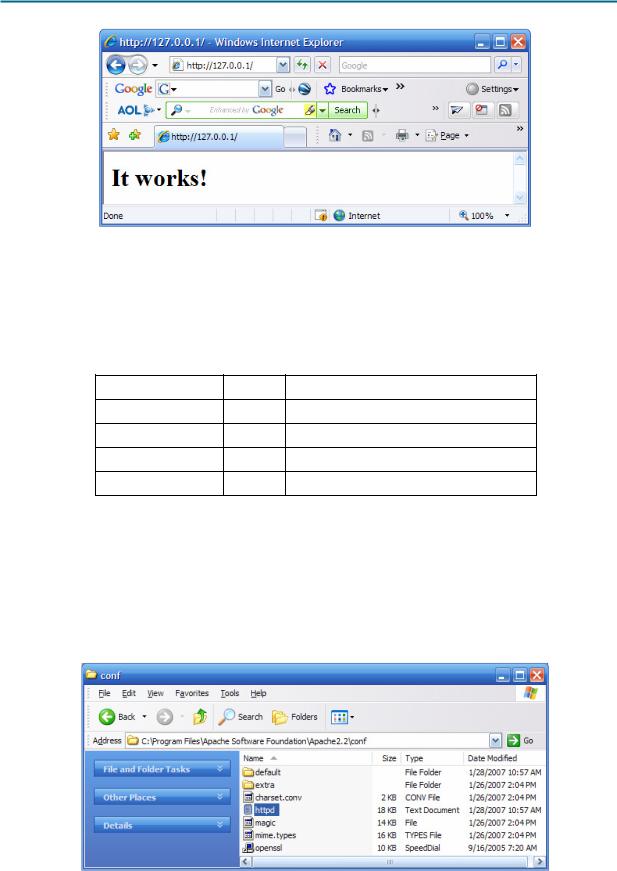
3.Open a web browser, and connect to the URL of your computer. A web page similar to Figure 4 will be displayed if the web server is working properly.
All contents are Copyright © 1992–2007 Cisco Systems, Inc. All rights reserved. This document is Cisco Public Information. |
Page 4 of 8 |
CCNA Exploration |
|
Network Fundamentals: |
|
Application Layer Functionality and Protocols |
Lab 3.4.2: Managing a Web Server |
Figure 4. Web Server Default Page
The 127.0.0.0 / 8 network address is reserved and is used for local IP addresses. The same page should be displayed if the URL is changed to the IP address on the Ethernet interface or to any host IP address in the 127.0.0.0 / 8 network range.
4.Test the web server on several different IP addresses from the 127.0.0.0 /8 network range. Fill in the following table with the results:
IP Address |
Status Explanation |
127.0.0.1
127.255.255.254
127.255.255.255
127.0.0.0
Task 2: Verify the Default Web Server Configuration File.
Step 1: Access the httpd.conf file.
A system administrator may find the need to verify or modify the default configuration file.
Open the Apache web server configuration file, C:\Program Files\Apache Software Foundation\Apache2.2\conf\httpd.conf. See Figure 5.
Figure 5. Apache Web Server Configuration File
All contents are Copyright © 1992–2007 Cisco Systems, Inc. All rights reserved. This document is Cisco Public Information. |
Page 5 of 8 |
CCNA Exploration |
|
Network Fundamentals: |
|
Application Layer Functionality and Protocols |
Lab 3.4.2: Managing a Web Server |
Step 2: Review the httpd.conf file.
Numerous configuration parameters allow the Apache web server to be fully customizable. The “#” character indicates a comment for system administrators, exempt from access by the web server. Scroll down the configuration file, and verify the following settings:
Value |
Meaning |
#Listen 12.34.56.78:80 |
Listen on TCP port 80 for all incoming connections. |
Listen 80 |
To accept connections from only this host, change |
|
the line to Listen 127.0.0.1 80. |
ServerAdmin ccna2@example.com |
If there are problems, e-mail the web server at this |
|
e-mail address. |
ServerName 172.16.1.2:80 |
For servers without DNS names, use the IP |
|
address:port number. |
DocumentRoot "C:/Program |
This is the root directory for the web server. |
Files/Apache Software |
|
Foundation/Apache2.2/htdocs" |
|
<IfModule dir_module> |
DirectoryIndex sets the file that Apache will |
DirectoryIndex index.html |
serve if a directory is requested. If no page is |
</IfModule> |
requested from that directory, display index.html |
|
if it is present. |
Step 3: Modify the web server default page.
Figure 4 shows the default web page from file index.html. Although this page is sufficient for testing, something more personal should be displayed.
1.Open folder C:\Program Files\Apache Software Foundation\Apache2.2\htdocs. The file index.html should be present. Right-click the file, and choose Open With. From the pull-down list, choose notepad. Change the file content to something similar to the following example:
<html><body><h1>Welcome to the Pod1HostB Web Server!!!</h1> <center><bold>
Operated by me! </center></bold>
Contact web administrator: ccna2@example.com </body></html>
2.Save the file, and refresh the web browser. Or, open URL http://127.0.0.1. The new default page should be displayed. As changes to index.html are made and saved, simply refresh the web browser to view the new content.
Task 3: Capture and Analyze HTTP Traffic with Wireshark.
Wireshark will not capture packets sent from or to the 127.0.0.0 network on a Windows computer. The interface will not display. To complete this task, connect to either a student’s computer or Eagle Server and analyze the data exchange.
Step 1: Analyze HTTP traffic.
1.Start Wireshark, and set the capture interface to the interface bound to the 172.16 network. Open a web browser, and connect to another computer with an active web server.
Why does index.html not have to be entered in the URL for the file contents to be displayed?
_____________________________________________________________________________
All contents are Copyright © 1992–2007 Cisco Systems, Inc. All rights reserved. This document is Cisco Public Information. |
Page 6 of 8 |
CCNA Exploration |
|
Network Fundamentals: |
|
Application Layer Functionality and Protocols |
Lab 3.4.2: Managing a Web Server |
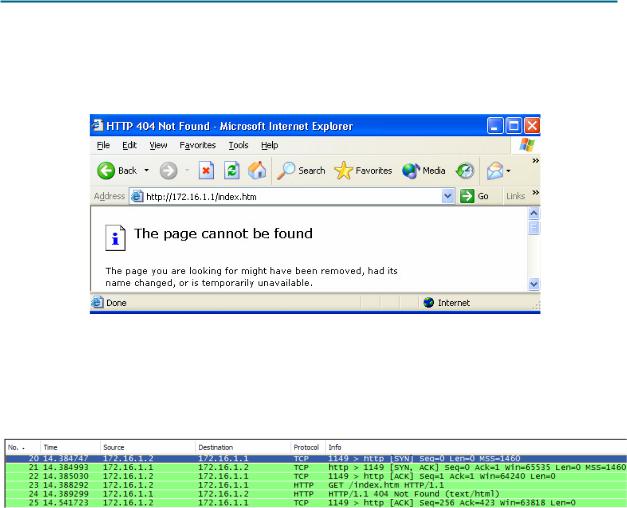
2.Deliberately enter a web page that is not on the web server, as shown in Figure 6. Note that an error message is displayed in the web browser.
Figure 6. 404 Not Found Error
Figure 7 contains a captured HTTP session. File index.htm was requested from the web server, but the server did not have the file. Instead, the server sent a 404 error. The web browser simply displayed the server response “The page cannot be found”.
Figure 7. Wireshark Capture of HTTP Traffic
3.Highlight the capture line with the 404 error, and move into the second (middle) Wireshark window. Expand the line-based text-data record.
What are the contents?
_____________________________________________________________________________
Task 4: Challenge
Modify the default web server configuration file httpd.conf and change the Listen 80 line to Listen 8080. Open a web browser and access URL http://127.0.0.1:8080. Verify with the netstat command that the new web server TCP port is 8080.
Task 5: Reflection
Web servers are an important component of e-commerce. Depending on the organization, the network or web administrator has the responsibility of maintaining the corporate web server. This lab demonstrated how to install and configure the Apache web server, test for proper operation, and identify several key configuration parameters.
The student modified the default web page index.html and observed the effect on the web browser output.
All contents are Copyright © 1992–2007 Cisco Systems, Inc. All rights reserved. This document is Cisco Public Information. |
Page 7 of 8 |

CCNA Exploration |
|
Network Fundamentals: |
|
Application Layer Functionality and Protocols |
Lab 3.4.2: Managing a Web Server |
Finally, Wireshark was used to capture an HTTP session of a file not found. The web server responded with an HTTP 1.1 error 404 and returned a file not found message to the web browser.
Task 6: Clean Up
During this lab the Apache web server was installed on the pod host computer. It should be uninstalled. To uninstall the web server, click Start > Control Panel > Add or Remove Programs. Click Apache Web Server, and then click Remove.
Unless directed otherwise by the instructor, turn off power to the host computers. Remove anything that was brought into the lab, and leave the room ready for the next class.
All contents are Copyright © 1992–2007 Cisco Systems, Inc. All rights reserved. This document is Cisco Public Information. |
Page 8 of 8 |