

Visual CSharp .NET Programming (2002) [eng]
.pdfthe schema into the Schema Designer, which has much more helpful validation error messages (including line and character numbers) than the XmlSchema.Compile method.
Listing 12.2: Creating and Validating the Schema in Code
using System.Xml;
using System.Xml.Schema; using System.IO;
using System.Text;
...
FileStream file; FileStream nfile; StreamReader reader;
private void btnCreate_Click(object sender, System.EventArgs e) { Cursor = Cursors.WaitCursor;
try{
XmlSchema schema = new XmlSchema(); XmlSchemaElement eProduct = new XmlSchemaElement(); eProduct.Name = "Product";
schema.Items.Add (eProduct);
XmlSchemaComplexType ct = new XmlSchemaComplexType(); eProduct.SchemaType = ct;
XmlSchemaSequence ss = new XmlSchemaSequence(); ct.Particle = ss;
XmlSchemaElement eName = new XmlSchemaElement(); eName.Name = "Name";
eName.SchemaTypeName = new XmlQualifiedName("string", "http://www.w3.org/2001/XMLSchema");
ss.Items.Add (eName);
XmlSchemaElement eDesc = new XmlSchemaElement(); eDesc.Name = "Desc";
eDesc.SchemaTypeName = new XmlQualifiedName("string", "http://www.w3.org/2001/XMLSchema");
ss.Items.Add (eDesc);
XmlSchemaElement eSubPart = new XmlSchemaElement(); eSubPart.Name = "SubPart";
eSubPart.SchemaTypeName = new XmlQualifiedName("string", "http://www.w3.org/2001/XMLSchema");
eSubPart.MinOccurs = 0; eSubPart.MaxOccursString = "unbounded"; ss.Items.Add (eSubPart);
XmlSchemaAttribute aProdId = new XmlSchemaAttribute(); aProdId.Name = "ProdId";
aProdId.SchemaTypeName = new XmlQualifiedName("integer" , "http://www.w3.org/2001/XMLSchema");
aProdId.Use = XmlSchemaUse.Required; ct.Attributes.Add(aProdId);
XmlSchemaAttribute aProdType = new XmlSchemaAttribute(); aProdType.Name = "ProdType";
aProdType.Use = XmlSchemaUse.Required;
XmlSchemaSimpleType st = new XmlSchemaSimpleType(); aProdType.SchemaType = st; XmlSchemaSimpleTypeRestriction res = new
XmlSchemaSimpleTypeRestriction();
res.BaseTypeName = new XmlQualifiedName ("string", "http://www.w3.org/2001/XMLSchema");
st.Content = res;
XmlSchemaEnumerationFacet f1 = new XmlSchemaEnumerationFacet(); XmlSchemaEnumerationFacet f2 = new XmlSchemaEnumerationFacet(); XmlSchemaEnumerationFacet f3 = new XmlSchemaEnumerationFacet(); f1.Value = "Candy";
f2.Value = "Toy"; f3.Value = "Gadget"; res.Facets.Add(f1); res.Facets.Add(f2); res.Facets.Add(f3);
ct.Attributes.Add(aProdType);
schema.Compile(new ValidationEventHandler(SOMHandler)); if (txtValidate.Text == "")
txtValidate.Text = "Schema validates without problems."; file = new FileStream("Product.xsd", FileMode.Create,
FileAccess.ReadWrite);
XmlTextWriter xwriter = new XmlTextWriter(file, new UTF8Encoding()); xwriter.Formatting = Formatting.Indented;
schema.Write (xwriter); xwriter.Close();
nfile = new FileStream("Product.xsd", FileMode.Open, FileAccess.ReadWrite);
reader = new StreamReader(nfile); txtSchema.Text = reader.ReadToEnd();
}
finally { file.Close(); nfile.Close(); reader.Close();
Cursor = Cursors.Default;
}
private void SOMHandler(object sender, ValidationEventArgs e){ txtValidate.Text += e.Message;
}
Validating Against the Schema
It’s a good thing to go with the flow, go with the tide, and not to cut against the grain. Similarly, you don’t want to go against the schema—which is all a roundabout way of saying that the next logical step is to validate XML programmatically against the programmatically created schema. That is normally, after all, the point of a schema. So the application allows the user to enter some XML in the TextBox that can be programmatically validated against the schema.
As in the previous example, the contents of a TextBox are saved using normal FileStream mechanisms as a text file:
...
FileStream fs = new FileStream("Product.xml", FileMode.Create, FileAccess.ReadWrite);
try {
sw.Write (txtXML.Text);
}
finally {

sw.Flush();
sw.Close();
fs.Close();
}
...
Note As usual when writing to a file, be sure to flush the StreamWriter when creating file; otherwise text may not get written from the buffer to the file. If you flush and close the StreamWriter within the finally clause of a try...finally construct, you can be sure it will get executed.
Next, another FileStream is used to create an XmlValidatingReader, opening the XML file that we just created:
FileStream nfs = new FileStream("Product.xml", FileMode.Open, FileAccess.ReadWrite);
XmlValidatingReader vr = new XmlValidatingReader (nfs, XmlNodeType.Element, null);
The file containing the Product.xsd schema is added to the schemas collection of the XmlValidatingReader:
vr.Schemas.Add(null, "Product.xsd");
The ValidationType of the XmlValidatingReader is set to ValidationType.Schema:
vr.ValidationType = ValidationType.Schema;
Note A XmlValidatingReader can also be used to validate XML with older schema formats— such as DTD and XDR—by changing the ValidationType setting.
As with the schema validation code, a callback is set up to handle validation errors:
vr.ValidationEventHandler += new ValidationEventHandler(XmlValidHandler);
...
}
private void XmlValidHandler(object sender, ValidationEventArgs e){ txtValidate.Text += e.Message;
}
The only thing that remains is to read through the entire XmlValidatingReader—and display an appropriate message if there are no validation problems:
while (vr.Read());
if (txtValidate.Text == "")
txtValidate.Text = "XML validates without problems.";
The complete code for validating a piece of XML against an XSD schema is shown in Listing 12.3.
Listing 12.3: Validating XML Against the XSD Schema
using System.Xml;
using System.Xml.Schema; using System.IO;
...

private void btnValXML_Click(object sender, System.EventArgs e) { if (txtXML.Text == String.Empty){
MessageBox.Show("Please enter some XML to validate!"); return;
}
txtValidate.Text = String.Empty;
FileStream fs = new FileStream("Product.xml", FileMode.Create, FileAccess.ReadWrite);
StreamWriter sw = new StreamWriter(fs); try {
sw.Write (txtXML.Text);
}
finally { sw.Flush(); sw.Close(); fs.Close();
}
FileStream nfs = new FileStream("Product.xml", FileMode.Open, FileAccess.ReadWrite);
XmlValidatingReader vr = new XmlValidatingReader (nfs, XmlNodeType.Element, null);
vr.Schemas.Add(null, "Product.xsd"); vr.ValidationType = ValidationType.Schema; vr.ValidationEventHandler += new
ValidationEventHandler(XmlValidHandler); while (vr.Read());
if (txtValidate.Text == "")
txtValidate.Text = "XML validates without problems."; vr.Close();
}
private void XmlValidHandler(object sender, ValidationEventArgs e){ txtValidate.Text += e.Message;
}
To test it, run the program, and enter the original Product XML in the TextBox:
<?xml version="1.0" encoding="utf-8" ?> <Product ProdId="123" ProdType="Toy">
<Name>Purple Wheeler</Name> <Desc>Tastes like grape</Desc> <SubPart>Wheel</SubPart> <SubPart>Purple</SubPart>
</Product>
Next, click Validate XML. The message will indicate that there have been no validation problems (Figure 12.8).
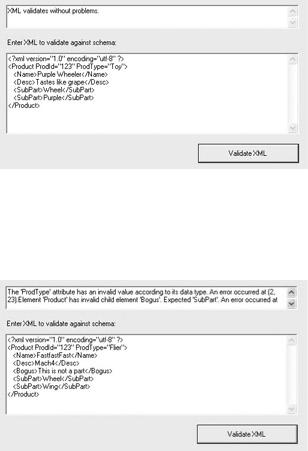
Figure 12.8: Well-formed XML that matches the schema file is validated without problems.
In the interests of science, try making some changes, such as entering a ProdType value that is not part of the enumeration and a "Bogus" element. Both things will be reported as validation problems (Figure 12.9).
Figure 12.9: The XmlValidatingReader has found some problems in the XML.
Creating an XML Data File
Before we get to some more of the interesting things you can do reading and writing XML, it’s worth emphasizing that you can use the Data tab of the Visual Studio XML Designer to add element data against XML.
In order to use this feature, you must first create the XML for a table using the XML tab of the XML Designer. For example, the XML for a simplified Product table might look like this:
<Product ProdId="" ProdType=""> <Name></Name>
<Desc></Desc>
<SubPart></SubPart>
</Product>
With this in place, if you switch to the Data tab of the XML Designer, shown in Figure 12.10, you can start entering your data using the table provided. This approach is a great deal faster than hand-constructing each XML data element—although in real life, you’ll probably prefer to get your XML data from databases, files, or code generation.
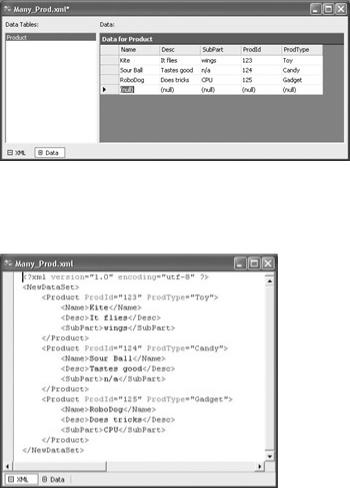
Figure 12.10: XM L data can be entered using a table once the element has been constructed.
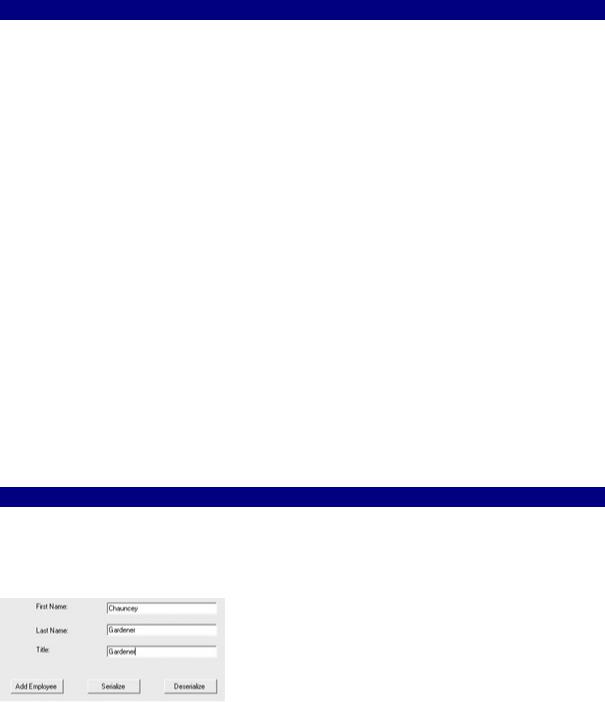
Once you have entered your data in tabular fashion, you can view it as straight XML by clicking the XML tab, as shown in Figure 12.11.
Figure 12.11: Dat a entered in the table can be viewed as “straight” XML.
As I mentioned earlier in this chapter, you don’t need to create an XML schema. If you don’t set up a schema, the DataSet will do the best it can to create a schema on the fly from an XML data file. The reasons to first create an XML schema are to ensure consistency and to make the schema available to remote applications that may communicate with your application.
It’s a neat feature that you can auto-generate an XML schema based on your XML data file. To do this, right-click in the XML Designer and choose Create Schema from the context menu. The newly generated XSD file will appear in the Solution Explorer with the same name as the original XML file but with a .xsd file extension. The XML required to connect the XML file to the schema will automatically be added to the XML file.
Note In many cases, you might want to mirror the sequence I’ve used in this chapter. First, create an XML fragment. Use it to auto-generate a schema. Tweak the schema. Then distribute the schema for validation of longer XML documents.
Serializing XML
Let’s have some fun with serializing a class to XML! Actually, it’s quite easy to use the Serialize method of XmlSerializer objects to turn the fields and properties of a class into XML (methods are ignored). The Deserialize method lets one "re-hydrate" the serialized XML and

access it by the name of each element—just as though you were accessing a property belonging to an instance of a class.
It is a little bit harder to serialize multiple elements of the same type under a single root node—but not that difficult. Here’s how it works.
Let’s start with the Employee class shown in Listing 12.4. This will be the member information used for serialization into XML. The class provides first name, last name, and title properties for each employee. For convenience sake, it has a class constructor that supplies these values, as well as a parameter-less constructor.
Note I went to the trouble of implementing properties in this class because it is good programming practice to use properties for access combined with private variables to maintain property state. It would have worked just as well from the viewpoint of serialization to use public class fields.
Listing 12.4: A Class Ripe for Serialization to XML
public class Employee {
public Employee(string fname, string lname, string title)
{
m_Fname = fname; m_Lname = lname; m_Title = title;
}
public Employee(){
}
private string m_Fname = String.Empty; private string m_Lname = String.Empty; private string m_Title = String.Empty;
public string Fname { get {
return m_Fname;
}
set {
m_Fname = value;
}
}
public string Lname { get {
return m_Lname;
}
set {
m_Lname = value;
}
}
public string Title { get {
return m_Title;
}
set {
m_Title = value;
}
}
}
Note Many aspects of how an object is serialized to XML can be controlled with attributes. For more information, see the topic “Controlling XML Serialization Using Attributes” in online help.
The next step is to “wrap” the Employee class in a collection class named OurTeam that implements the ICollection interface, shown in Listing 12.5. ICollection defines size, enumerators, and synchronization for all collection classes. In addition, the XmlSerializer needs the class to have an Add method and an Indexer. For my own convenience, I also added a Clear method to the class.
Listing 12.5: Implementing the ICollection Interface Around the Employee Class
using System.Collections;
...
public class OurTeam: ICollection { public OurTeam(){
}
private ArrayList empArray = new ArrayList(); public Employee this[int index]{
get{return (Employee) empArray[index];}
}
public int Count{
get{return empArray.Count;}
}
public void CopyTo(Array a, int index){ empArray.CopyTo(a, index);
}
public object SyncRoot{ get{return this;}
}
public bool IsSynchronized{ get{return false;}
}
public IEnumerator GetEnumerator(){ return empArray.GetEnumerator();
}
public void Add(Employee newEmployee){ empArray.Add(newEmployee);
}
public void Clear(){ empArray.Clear();
}
}
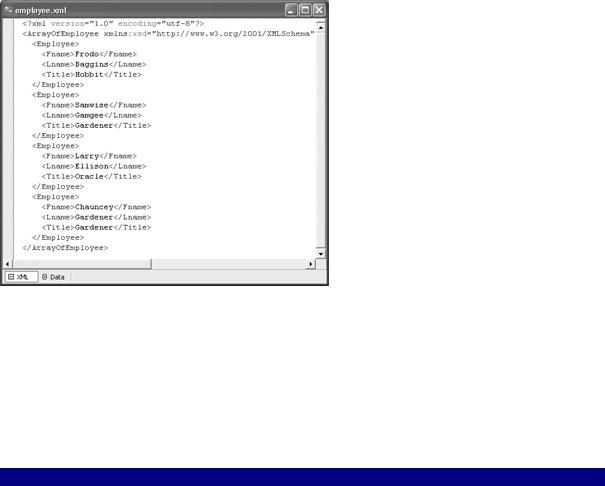
The preliminaries are now in place. The user interface can be implemented in a Windows form.

The user will enter a first name, last name, and title for each employee. When the Add Employee button is clicked, the employee will be added to the OurTeam collection. When all the employees have been added, the Serialize button is used to serialize the class to a file. The Deserialize button recovers the information from the XML and reads it into ListBoxes.
To get started in the form, a variable needs to be declared to hold the OurTeam instance at the form level, and the object is instantiated in the form constructor—both are done so that
the instance of the collection class is available while the form is running:
OurTeam ourteam; //at the form level
...
ourteam = new OurTeam(); // in the form constructor
Listing 12.6 shows the code for adding Employee instances, based on user input, to the collection class.
Listing 12.6: Adding Employee Instances to the Collection Class
private void btnAdd_Click(object sender, System.EventArgs e) { Employee employee = new Employee(txtFname.Text, txtLname.Text,
txtTitle.Text); ourteam.Add (employee); txtFname.Text = String.Empty; txtLname.Text = String.Empty; txtTitle.Text = String.Empty;
}
To serialize the collection class, you need to add directives to System.IO and System.Xml.Serialization. Listing 12.7 shows the code required to serialize the class.
Listing 12.7: Serializing the Collection Class
using System.IO;
using System.Xml.Serialization;
...
StreamWriter sw;
private void btnSerial_Click(object sender, System.EventArgs e) { try {
XmlSerializer theSerial = new XmlSerializer (typeof(OurTeam)); sw = new StreamWriter("employee.xml",false); theSerial.Serialize(sw, ourteam);
}
catch (Exception excep){ MessageBox.Show (excep.Message);
}
finally{
sw.Flush();
sw.Close();
ourteam.Clear();
}
This code is pretty straightforward. A new XmlSerializer is created, using the typeof method to pass it the type of the OurTeam collection. A StreamWriter is connected to the file employee.xml in the application directory.
Note The second argument to the StreamWriter constructor, the Boolean false, tells the StreamWriter to overwrite a file with the given path (rather than append to it).
Finally, the XmlSerializer’s Serialize method is used to connect the collection class and the StreamWriter.
If you try this out and examine the file that results, you’ll see that it produces multiple XML elements of this sort:
<Employee>
<Fname>Frodo</Fname>
<Lname>Baggins</Lname>
<Title>Hobbit</Title>
</Employee>
All the <Employee> elements are contained within a single root <ArrayOfEmployee> </ArrayOfEmployee> node. If you open the file created by the XmlSerializer in an XML editor, it will appear along the lines of Figure 12.12.
Figure 12.12: The <Employee> elements are contained within one <ArrayOfEmployee> root node tag.
The code for deserializing the XML in the file is shown in Listing 12.8. To deserialize the XML contained in the file into Employee instances of an instance of the OurTeam class, first instantiate an XmlSerializer and a FileStream. Next, use the Deserialize method of the XmlSerializer to connect with the FileStream, and cast the result to type OurTeam:
newteam = (OurTeam) theSerial.Deserialize(fs);
Listing 12.8: Deserializing XML from a File to Class Instances
using System.IO;
using System.Xml.Serialization;