Visual CSharp .NET Programming (2002) [eng]
.pdfFigure 12.18: You can display all the nodes of an XmlDocument using a recursive method. Listing 12.12: Displaying the Nodes of an XML Document Using DOM
using System.Xml;
...
TreeNode tn; XmlNode xn; XmlTextReader xr;
private void btnFile_Click(object sender, System.EventArgs e) { string theFile;
openFileDialog1.InitialDirectory = Application.ExecutablePath; openFileDialog1.DefaultExt = "xml";
openFileDialog1.Filter = "XML Files (*.xml)|*.xml|All Files (*.*) | *.*";
if (openFileDialog1.ShowDialog() == DialogResult.OK){ theFile = openFileDialog1.FileName;
try { tView.Nodes.Clear();
this.Cursor = Cursors.WaitCursor; xr = new XmlTextReader(theFile);
xr.WhitespaceHandling = WhitespaceHandling.None; XmlDocument xDoc = new XmlDocument();
xDoc.Load (xr);
tn = new TreeNode("XML Document"); tView.Nodes.Add(tn);
xn = xDoc.DocumentElement; WalkTheTree (xn, tn);
}
catch (Exception excep) { MessageBox.Show (excep.Message);
}
finally { xr.Close();
this.Cursor = Cursors.Default;
}
}
}
private void WalkTheTree(XmlNode xn, TreeNode tn){ XmlNode tmpXn;
TreeNode tmpTn; TreeNode tmpTnAttr;


Once again, XSLT is a topic far too big for a small portion of a chapter. At its best, XSLT is an extraordinary tool for separating form—the appearance of the thing—from structure.
For a simple example of how this works, open a new ASP.NET Web Application. Add an XML file, shown in Listing 12.13, and a file containing an XSLT transformation, shown in Listing 12.14, to the project.
Listing 12.13: The XML File
<?xml version="1.0" encoding="utf-8" ?> <NewDataSet>
<Product>
<Name>Kite</Name> <Desc>It flies</Desc> <SubPart>wings</SubPart>
</Product>
<Product>
<Name>Sour Ball</Name> <Desc>Tastes good</Desc> <SubPart>n/a</SubPart>
</Product>
<Product>
<Name>RoboDog</Name> <Desc>Does tricks</Desc> <SubPart>CPU</SubPart>
</Product>
</NewDataSet>
Listing 12.14: The XSLT Transformation
<?xml version='1.0'?>
<xsl:stylesheet xmlns:xsl="http://www.w3.org/1999/XSL/Transform" version="1.0">
<xsl:template match="/"> <html>
<body>
<table cellspacing="3" cellpadding="8"> <tr bgcolor="#AAAAAA">
<td class="heading"><B>Name</B></td>
<td class="heading"><B>Description</B></td> <td class="heading"><B>SubPart</B></td>
</tr>
<xsl:for-each select="NewDataSet/Product"> <tr bgcolor="#DDDDDD">
<td valign="top">
<b><xsl:value-of select="Name"/></b> </td>
<td valign="top">
<b><xsl:value-of select="Desc"/></b> </td>
<td valign="top">
<b><xsl:value-of select="SubPart"/></b> </td>
</tr> </xsl:for-each>
</table>
</body>
</html>
</xsl:template>
</xsl:stylesheet>
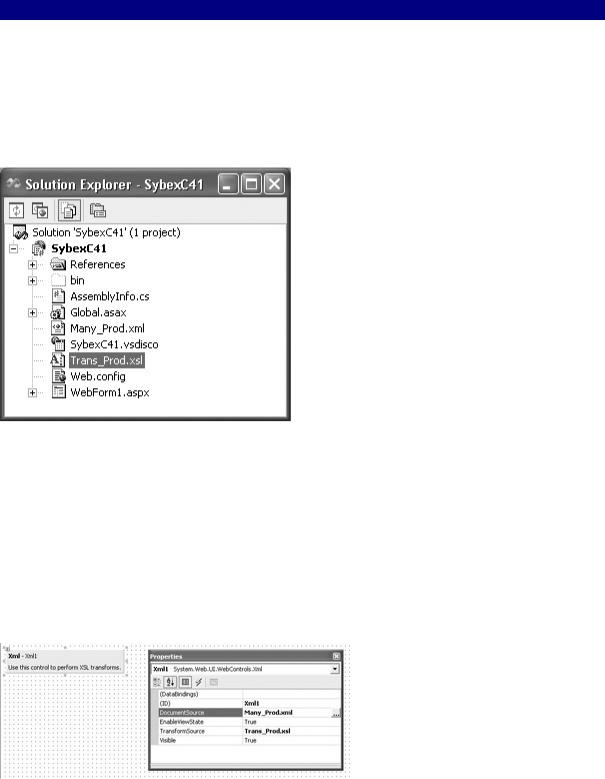
I’ve called the XML file shown in Listing 12.13 Many_Prod.xml. The XSLT file shown in Listing 12.14 is called Trans_Prod.xsl. You can add these files to the project in one of several ways: by adding empty XML and XSLT files using the Add New Item dialog, or by creating the files in an external editor and then selecting Project → Add Existing Item. Once the files have been added to the project, they will appear in Solution Explorer.
The XML file shown in Listing 12.13 is clearly straightforward, but let’s have a little closer look at the XSLT transformation shown in Listing 12.14. This listing combines HTML with tags specified in the http://www.w3.org/1999/XSL/Transform namespace that are replaced with values from the XML file to be transformed. You can identify these replacements in Listing 12.14 because the tags begin with xsl:.
With the project’s WebForm open, use the Toolbox to locate the Xml control (on the Web Forms tab). Add an Xml control to the project, right-click it, and select Properties from the context menu. The Properties window will open, with the Xml control selected in it (Figure 12.19).
Figure 12.19: You can set the XML file to be transformed, and the XSLT transformation to use, with the properties of the Xml control.
In the Properties window, set the DocumentSource to Many_Prod.xml (shown in Listing 12.13) and the TransformSource to Trans_Prod.xsl (shown in Listing 12.14). Run the project.
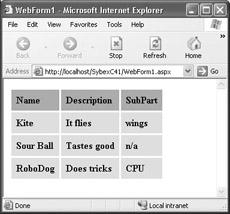
The data in the XML file will appear in your browser window as formatted by the XSLT file (Figure 12.20).
Figure 12.20: The XML file supplies the data, and the XSLT file formats it.
Database Basics
It’s true that you can create database applications in C# .NET without needing to program and without possessing a deep understanding of databases. (Obviously, willingness to program and having a sophisticated understanding of databases does help!)
You do need to know that databases are organized in tables. Each table contains rows and columns, called fields, of information. A row across a table is called a record.
Each table usually contains a primary key, which is used to uniquely identify records. In other words, within a table, the value of a primary key cannot be duplicated across records. For example, a primary key might be a Social Security number, an e-mail address, or other unique identifier. An example of a poorly chosen primary key would be a customer’s last name, because duplication is possible (two people can have the same last name).
In addition to primary keys, foreign keys, which do not need to be unique, are used to establish relationships between the data in tables. For example, suppose you have a Customers table in which cust_ID is the primary key. You could also have an Orders table in which the same cust_ID showed up several times as a foreign key (because one customer made multiple orders). This is called a one-to-many relationship.
Data organized in this fashion in independent tables is called relational. The software used to contain it is, logically, a relational database. Structured Query Language (SQL) is the common language used to manipulate and retrieve information stored in relational databases. Highpowered databases are organized as servers and are referred to as a database management system (DBMS). (You’ll also see the term relational database management system, RDBMS.) In effect, the access layer of a C# .NET program is a client of the database server (in the same sense that an Internet browser is the client of a web server).
Good architecture of databases often funnels access through special programs internal to the database, written in an internal, database-specific language intended for this purpose, and are called stored procedures. While stored procedures are far beyond the scope of this chapter, you should know that, from the viewpoint of a C# .NET program, what you want to do to a

database is either execute SQL statements against it or run a stored procedure in the database intended for access purposes (in large part, the stored procedure itself executes SQL).
Note In production applications, running stored procedures is generally far more scalable and secure than executing ad hoc SQL statements against a DBMS.
ADO.NET
For many developers today, input/output means working with a database. For those in the Microsoft environment, this likely means SQL Server.
Each new version of Microsoft’s programming languages has shipped with a new model for the data connectivity layer, and .NET is, of course, no exception. The latest incarnation is, of course, ADO.NET.
Since space in this chapter is limited, I’ll forgo historical discussion and concentrate on how ADO.NET provides data access to C# programs—and how to use the tools that Visual Studio provides to make connectivity easier.
Working with Managed Providers
The .NET Data components are supplied as a separate set of four components for each data source. Each set of objects, targeted at a particular data source, is known as a managed provider.
Currently, the only managed providers that ship with .NET are a set for Microsoft’s SQL Server DBMS and a set that works with any OLE database (OLE DB) source (in other words, a managed provider for all the rest). An ODBC managed provider is also currently available for download. To download it, or for further information, go to http://msdn.microsoft.com, and search for ODBC .NET Data Provider.
The two sets of Data components (one set for SQL Server and one set for OLE DB) are functionally identical. The purpose of each of the components is shown in Table 12.5.
Table 12.5: ADO.NET Data Components Available on the Toolbox
Component(s) |
|
Purpose |
|
||
OleDbDataAdapter |
|
Contains and controls Command objects (see Table 12.6). |
and |
|
|
SqlDataAdapter |
|
|
|
|
|
OleDbConnection |
|
Provides a connection to a database server (or source). |
and SqlConnection |
|
|
|
|
|
OleDbCommand |
|
Executes SQL statements (or stored procedures). ExecuteReader method |
and SqlCommand |
|
of the Command object used to createa DataReader object (to be |
|
|
discussed shortly). |
|
|
|
DataSet |
|
An in-memory cache of data (sometimes called a data store) made up of |
|
|
one or more tables. This fundamental ADO.NET object is filled using |
|
|
one or more managed provider data adapters. |

Table 12.5: ADO.NET Data Components Available on the Toolbox
Component(s) |
|
Purpose |
|
|
|
DataView |
|
Controls can be bound to a DataView, which contains filtered and sorted |
|
|
data based on a DataSet. |
The Data components belong to the System.Data namespace. SQL Server components are part of System.Data.SQLClient, and OLE DB components belong to System.Data.OleDB.
You should also know about one other object, the DataReader. The OleDbDataReader and OleSqlDataReader allow you to return read-only result sets from a database. If you need to quickly cycle through all the values in a field but have no need to update or change the values, then the DataReader is probably the easiest route. DataReader objects are created in code using the ExecuteReader method of either the OleDbCommand or SqlCommand objects (see the example in the next section).
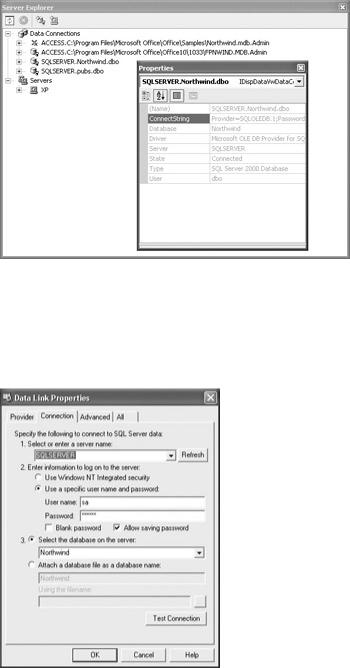
The examples in this chapter use the SqlDataAdapter provider with the sample Northwind database tables that ship with Microsoft’s SQL Server 2000.
Note Don’t worry if you don’t have SQL Server running. You almost certainly have some version of the Northwind database, probably in Access format, on your system. The specific location (and name) of the Northwind.mdb sample database will depend on your system and the software that you have installed on it. For example, if you have Office XP installed in the default location, you can find a copy of the database at C:\Program Files\Microsoft Office\Office10\1033\FPNWind.mdb. Those with older versions of Office may find it at C:\Program Files\
Microsoft Office\Office\Samples\Northwind.mdb. In addition, you will need to use the OleDbDataAdapter provider rather than the SQL Server provider.
Displaying Data with a DataReader
Before we get down to more specifics about how to use the ADO.NET Data components, it may help you to get a feeling for how these components work to run through a simple code example.
The task is to display the company names in the CompanyName field of the Suppliers table of the sample Northwind database. As a preliminary, in the web form application used to demonstrate XSLT transformations, add a ListBox named lstData—which will be filled in the WebForm load event with the required data.
The first step in the code module is to add a using directive to the System.Data.SqlClient namespace:
using System.Data.SqlClient;
Note If you were working with a OLE DB data source and the OleDbDataReader (instead of the SqlDataReader), you’d want to use the System.Data.OleDb namespace instead.
Next, within the WebForm’s load event procedure, create the query string and define a new SqlConnection object (for more information about connection strings, see the following section):
string mySelectQuery = "SELECT CompanyName FROM Suppliers"; SqlConnection myConnection = new SqlConnection("data source=SQLSERVER;initial" +
" catalog=Northwind;password=harold;user id=sa");
Using the query string and the SqlConnection, create a new SqlCommand:
SqlCommand myCommand = new SqlCommand(mySelectQuery, myConnection);
Open the connection:
myConnection.Open()
Declare an SqlDataReader, and use the ExecuteReader method of the SqlCommand to instantiate and populate it:
myConnection.Open();
SqlDataReader myReader = myCommand.ExecuteReader();
Use the Read method of the SqlDataReader to run through the DataReader and retrieve the desired data, and its GetString method to display it:
while (myReader.Read()){ lstData.Items.Add(myReader.GetString(0));
}
Finally, close the SqlDataReader and the SqlConnection:
myReader.Close()
myConnection.Close()
If you run the project and click the button, the company name information will be displayed in the ListBox when the WebForm loads (Figure 12.21).
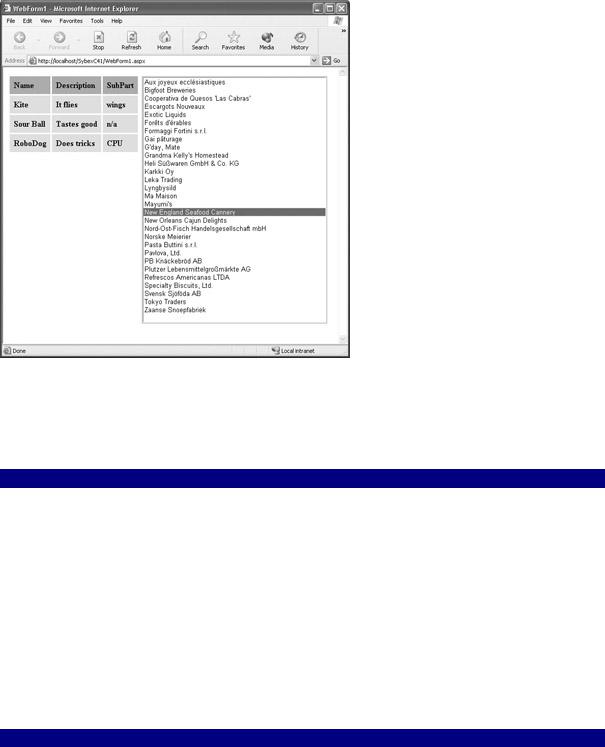
Figure 12.21: The DataReader displays the results of the query in the ListBox.
Listing 12.15 shows the complete procedure that uses the ADO.NET components to create an SqlDataReader, and then uses the SqlDataReader to display specified data.
Listing 12.15: Displaying Data with an SqlDataReader Component
using System.Data.SqlClient;
...
private void WebForm1_Load(object sender, System.EventArgs e) { string mySelectQuery = "SELECT CompanyName FROM Suppliers"; SqlConnection myConnection = new SqlConnection
("data source=SQLSERVER;initial" +
" catalog=Northwind;password=harold;user id=sa");
SqlCommand myCommand = new SqlCommand(mySelectQuery, myConnection); myConnection.Open();
SqlDataReader myReader = myCommand.ExecuteReader(); while (myReader.Read()){
lstData.Items.Add( myReader.GetString(0));
}
myReader.Close();
myConnection.Close();
}
Connection Strings
Many things can go into a connection string—depending, of course, upon the provider and configuration. A typical SQL Server connection string requires at a minimum the data source, the initial catalog, a user ID, and a password (if required for the user).
Warning As you are likely aware, the connection string shown in Listing 12.15 uses a plain-