Visual CSharp .NET Programming (2002) [eng]
.pdfListing 13.12, I entered the possible string values for the Scale ListBox into its Items collection using the Properties window. This means that these values are part of the "hidden" form code (see Chapter 3, "Windows Uses Web Services, Too!," for more of a discussion of hidden form code). If you expand the hidden area, the ListBox initialization code will look something like this:
this.lstScale.Items.AddRange(new object[] {
"Scale1m",
"Scale2m",
"Scale4m",
"Scale16m",
"Scale32m",
"Scale64m",
"Scale128m"}); this.lstScale.Location = new System.Drawing.Point(24, 64); this.lstScale.Name = "lstScale";
this.lstScale.Size = new System.Drawing.Size(88, 95); this.lstScale.TabIndex = 0;
I also wanted to make sure that an item in the Scale ListBox collection was initially selected, so I added the following code in the form constructor:
this.lstScale.SelectedItem = this.lstScale.Items[2];
Note If I had put this in the hidden ListBox initialization code, it would quite likely be removed the next time the project was recompiled by the form auto-generator.
Listing 13.12: Consuming the TerraService (Part I, Getting User Preferences)
private void btnDisplay_Click(object sender, System.EventArgs e) { pictureBox1.Image = null;
this.Text = "...Loading..."; Application.DoEvents(); Cursor = Cursors.WaitCursor; try {
net.terraservice.Theme Theme; if (rdoPhoto.Checked == true) {
Theme = net.terraservice.Theme.Photo;
}
else {
Theme = net.terraservice.Theme.Topo;
}
net.terraservice.LonLatPt point;
if (rdoCityandState.Checked == true){ net.terraservice.TerraService ts =
new net.terraservice.TerraService ();
//Get the latitude and longitude of the requested city net.terraservice.Place place = new net.terraservice.Place ();
//No empty cities or states
if (txtCity.Text == String.Empty || txtState.Text == String.Empty){
txtCity.Text = "San Francisco"; txtState.Text = "Ca";
}
place.City = txtCity.Text; place.State = txtState.Text; place.Country = "USA";
point = ts.ConvertPlaceToLonLatPt (place); // Display the lat/lon used for the city txtLat.Text = point.Lat.ToString();
txtLon.Text = point.Lon.ToString();
}
else {
// by lat/lon
point = new net.terraservice.LonLatPt(); point.Lat = Convert.ToDouble(txtLat.Text); point.Lon = Convert.ToDouble(txtLon.Text);
}
net.terraservice.Scale theScale = net.terraservice.Scale.Scale4m; // Get the scale picked by user
switch (lstScale.SelectedItem.ToString()){ case "Scale1m":
theScale = net.terraservice.Scale.Scale1m; break;
case "Scale2m":
theScale = net.terraservice.Scale.Scale2m; break;
case "Scale4m":
theScale = net.terraservice.Scale.Scale4m; break;
case "Scale8m":
theScale = net.terraservice.Scale.Scale8m; break;
case "Scale16m":
theScale = net.terraservice.Scale.Scale16m; break;
case "Scale32m":
theScale = net.terraservice.Scale.Scale32m; break;
case "Scale64m":
theScale = net.terraservice.Scale.Scale64m; break;
case "Scale128m":
theScale = net.terraservice.Scale.Scale128m; break;
default:
theScale = net.terraservice.Scale.Scale4m; break;
}
// Time to rock and roll - let’s get the picture
pictureBox1.Image = GetTiledImage (point, theScale,Theme, 640, 480);
}
catch (System.Web.Services.Protocols.SoapException){ MessageBox.Show ("Unable to return requested map or photo",
"TerraService", MessageBoxButtons.OK, MessageBoxIcon.Information);
}
catch (Exception excep){
MessageBox.Show (excep.Message, "TerraService", MessageBoxButtons.OK, MessageBoxIcon.Exclamation);
}
finally {
Cursor = Cursors.Default;
if (rdoCityandState.Checked == true){
this.Text = "TerraService loaded - " + txtCity.Text + ", " + txtState.Text;
}
else {
this.Text = "TerraService loaded - Lat: " + txtLat.Text + "; Lon: " + txtLon.Text;
}
}

}
Note that in Listing 12.12, if the user elects to see a photo or map by city and state, the web service method ConvertPlaceToLonLatPt is called to convert the city center to a lat/lon point:
point = ts.ConvertPlaceToLonLatPt (place); // Display the lat/lon used for the city txtLat.Text = point.Lat.ToString(); txtLon.Text = point.Lon.ToString();
As you can see, I took advantage of having this information to display it back to the user.
In Listing 12.12, once all the user choices have been gathered and the city (if selected) has been converted to a lat/lon point, the private method GetTiledImage is called:
pictureBox1.Image = GetTiledImage (point, theScale, Theme, 640, 480);
GetTiledImage is passed a lat/lon point, a scale constant, a theme constant (e.g., photo or map), and a size in pixels. The return value of this method, which does the actual dirty work of retrieving imagery from the TerraService web service, is loaded into the Image property of the PictureBox. As you can see in Listing 13.13, the tricky part about this is that TerraService GetTile method returns a 200?200 pixel image—too small to be much good. An iteration routine is needed to piece together an image of the proper size, using the AreaBoundingBox structure returned earlier by the web service to determine the corner coordinates for the required image.
Listing 13.13: Consuming the TerraServer (Part II, Obtaining the Tiled Image)
private Bitmap GetTiledImage (net.terraservice.LonLatPt point, net.terraservice.Scale Scale, net.terraservice.Theme Theme, int cx, int cy) {
//Instantiate the TerraServer proxy class net.terraservice.TerraService ts = new net.terraservice.TerraService ();
//Compute the parameters for a bounding box net.terraservice.AreaBoundingBox abb =
ts.GetAreaFromPt (point, Theme, Scale, cx, cy);
//Create an image to fit the bounding box
PixelFormat pf = PixelFormat.Format32bppRgb;
Bitmap bitmap = new Bitmap (cx, cy, pf);
Graphics g = Graphics.FromImage (bitmap);
int x1 = abb.NorthWest.TileMeta.Id.X; int y1 = abb.NorthWest.TileMeta.Id.Y; int x2 = abb.NorthEast.TileMeta.Id.X; int y2 = abb.SouthWest.TileMeta.Id.Y;
for (int x = x1; x <= x2; x++) { for (int y = y1; y >= y2; y--) {
net.terraservice.TileId tid = abb.NorthWest.TileMeta.Id; tid.X = x;
tid.Y = y;
Image tile = Image.FromStream (new MemoryStream (ts.GetTile
(tid)));
g.DrawImage (tile,

(x - x1) * tile.Width - (Int32) abb.NorthWest.Offset.XOffset, (y1 - y) * tile.Height - (Int32) abb.NorthWest.Offset.YOffset, tile.Width, tile.Height);
tile.Dispose();
}
}
// Return the resulting image return bitmap;
}
The TerraServer web service is amazing, and lots of fun too! You can use the application that I’ve shown you in this section as a starting place, and add aerial photos and maps as appropriate to your own applications.
Conclusion
May the circle be unbroken! May the last note be as sweet and elegant as the first note! C# is a powerful, intelligent, and easy-to-use language—as I hope you’ve seen in this book. In the beginning, in the first part of this book, the prelude, we created a simple ASP.NET web service, then we got to know ASP.NET web forms applications and learned how to consume the web service.
In the next part, the allemande, as things strode forward, we created Windows user interfaces and started our exploration of the .NET Framework’s class libraries.
The dance really heated up in the third part, the courante. We explored the C# language in detail and looked at arrays and collections of objects—and then looked more at objects in C#, and observed life from a string’s-eye view.
In the final part, the gigue, we started to close the circle. Files and streams, messaging, XML, and ADO.NET were discussed. In this chapter, we headed back to web services for a last visit. The end is not quite the same as the beginning: the primary concern in this chapter was how web services fit in as part of a larger picture—in the case of the TerraServer web service, a very large picture, indeed!
I hope you’ve enjoyed my book, and that it helps you to build beautiful, literate, and elegant
.NET applications using C#.
Appendix: Using C# .NET’s Help System
Overview
No matter how experienced a programmer you are, sometimes you need help understanding a concept or term or figuring out how a feature works. The auto-completion features of the Code Editor make it less likely that you’ll need help with basic language syntax or with knowing the members of an object. But it is still the case that nobody knows everything, and one of the most important skills in an environment as complex as C# .NET is being able to find help when you need it.
The help system available to C# might be dubbed “the good, the big, and the ugly,” because it includes documentation for the entire .NET Framework as well as the C# language. Along with the precious documentation gems that will help you solve your real-world problems, it also contains myriad “kitchen sink” topics you will never need. In other words, C# .NET’s help system is comprehensive, overwhelming, and not always well organized. For a programmer with limited time, adrift in a vast sea of information, the trick is to efficiently find the buried nuggets of information—which this appendix will help you to do.
The help system is so complex to use that you may find yourself referring to the “Help on Help” topic to understand how the various features work. (To access this topic, choose
Help →?Help on Help.) In addition, often the only way to find what you’re looking for is to browse through a great many topics. The good news is that one innovative feature, Dynamic Help, can make life a great deal easier.
This appendix briefly explains the mechanics of how to use the Dynamic Help, Contents, Index, Search, and filtering features of the C# .NET help system.
Dynamic Help and F1
Dynamic Help is a form of context-sensitive help in which a window provides links to help topics, depending on the selection in the development environment. To activate Dynamic Help, select Help →?Dynamic Help or press Ctrl+F1 on the keyboard. The Dynamic Help window will open.
Note Depending on how you have your Visual Studio environment set up, Dynamic Help may appear as a tab in another window, such as the Properties window, rather than in a separate window.
As you can see in Figure A.1, which shows the links in the Dynamic Help window when the MainMenu control is selected in the Toolbox, the Dynamic Help window provides
information about whatever is currently active in the environment-which can be very helpful, indeed!
There's no doubt that running with Dynamic Help turned on slows down the Visual Studio development environment. If this is a significant concern because you are running on older (and slower) hardware, it is likely that you will want to work with Dynamic Help turned off to gain an extra bit of speed.
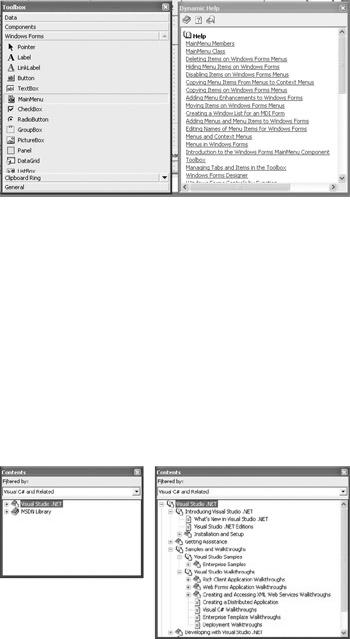
Figure A.1: When the MainMenu control is selected, Dynamic Help shows topics related to the MainMenu.
If you are working with Dynamic Help turned off, you should probably bear in mind that the F1 key still provides 'good, old-fashioned' context-sensitive help. When you press F1, a help topic relevant to the current active object in the IDE opens in a window.
Contents
The Contents window is used to drill down to find information using nodes and links. To open the Contents window, select Help →?Contents. The Contents window will open with a few top nodes showing, as in Figure A.2. Click the nodes to expand them to show further nodes and topics.
Figure A.2: The Contents window: its highest level (left) and some expanded nodes (right).
Select a topic to display it. Undoubtedly, it will show further links. Figure A.3 shows an example of the Visual Studio .NET topic page.
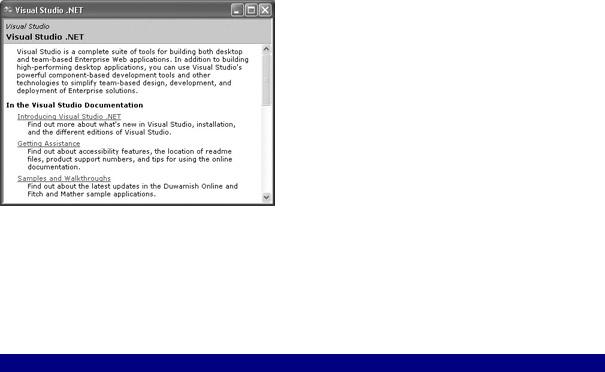
Figure A.3: Selecting a topic in the Contents window takes you to the topic's help page.
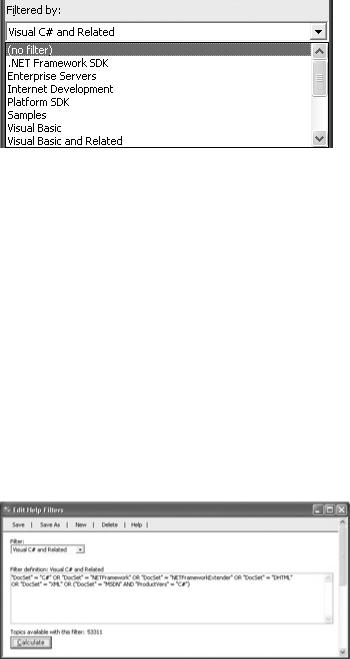
The Contents window, like the Index and Search windows, can be filtered by topic, so that it will show only the information related to the filter. Use the Filtered By drop-down list at the top of the window to choose a filter. You'll most likely want to filter information using the Visual C# or Visual C# And Related settings. For more information, see the 'Filtering' section later in this appendix.
Navigational Aids within a Help Topic Window
Many help topics have additional features that can be accessed using icons found at the upperleft of the help topic window. Since these icons are not available for all topics, don't be surprised if you do not see them (they are most commonly associated with help topic items that have been filtered by '.NET Framework SDK').
From left to right, the icons enable you to access the following features:
See Also Represented by a squiggly up arrow; helpful for finding other help topic articles that are relevant.
Requirements Represented by a check mark; details platform requirements for the item featured in the help topic-not very useful.
Language Filter Represented by something like a curved letter T. This is actually quite convenientif you are coding in C#, why should you want to see the VB code, and vice versa?
Index
The Index window allows you to look for specific information. To open the Index window, select Help →?Index. With the Index window open, enter the term you are searching for in the Look For box.
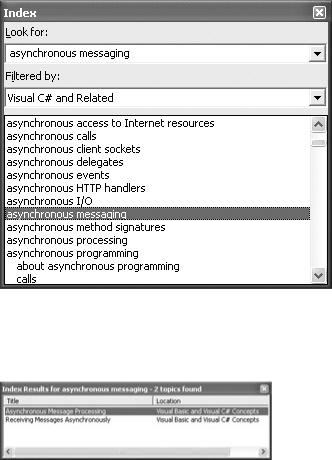
A list of indexed terms, based on the phrase you entered, will appear in the bottom pane of the Index window. If you select a term in the bottom pane, the Index Results window will open, showing all the indexed listings for the term.
If you double-click a listing in the Index Results window, the topic will open for viewing.
Note If there is only one topic indexed for a given search phrase, it will open immediately when you select it in the Index window (rather than opening the Index Results window).
You can open the Index Results window directly once you have already done a search, by selecting Help →?Index Results.
Search
The Search window works like the Index window, except that it produces more 'hits' because it searches within help documents, not just on the indexed titles.
To open the Search window, select Help → Search. The Search window offers four options:
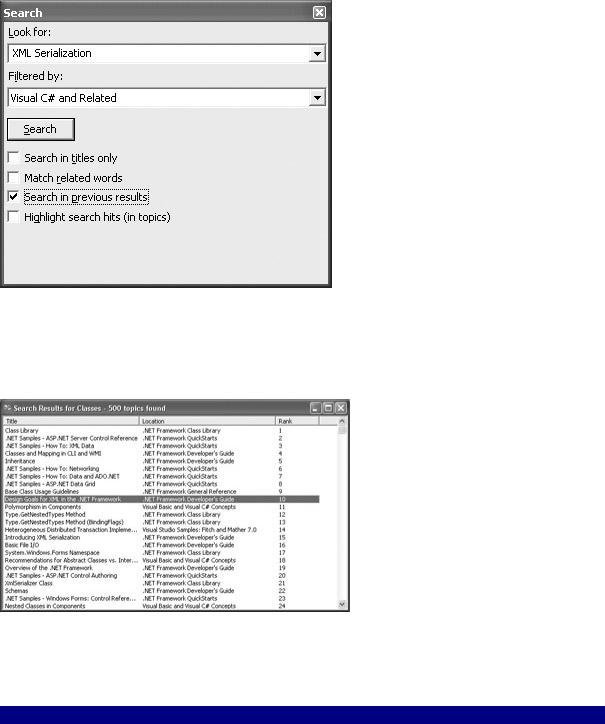
Tip The Search window is the tool I use most frequently to find things. I find the ability to search through previous results particularly useful.
As opposed to the Index Results window, the Search Results window is likely to show a great many hits-possibly in the hundreds, as you can see in Figure A.4.
Figure A.4: Search Results can be very extensive.
You can open the Search Results window directly once you have already done a search, by selecting Help →?Search Results.
The Help Toolbar
Many of the topics that result from searches are sections of larger articles. For example, you see 'Caching Versions of a Page' show up in the search results. It's part of a larger topic called 'ASP.NET Caching Features,' but how would you know that?
When you have a topic open, you can click the Sync Contents icon-a horizontal doubleheaded arrow-in the toolbar, and it will show you where the topic fits in the grand scheme of help information (by displaying the topic's location in the Contents window).