

Visual CSharp .NET Programming (2002) [eng]
.pdflabel1.Text = String.Empty;
}
private void btnAgain_Click(object sender, System.EventArgs e) { int numSessions = ss.GetSession (txtName.Text);
int numApps = ss.GetTotalUsage(); if (numSessions < 1){
this.Text = "Sorry, I don't recognize you, stranger!";
}
else {
this.Text = "Welcome back, " + txtName.Text + "!"; label1.Text = "Number of times for this named session is " +
numSessions.ToString();
label2.Text = "Total named usage of application is " + numApps.ToString();
}
}
private void btnReset_Click(object sender, System.EventArgs e) { ss.ResetGlobal();
label1.Text = String.Empty; label2.Text = String.Empty;
}
...
To try this out, run the client project. Enter a name in the TextBox, and click Initialize. The session has now started (Figure 13.5).
Figure 13.5: Once the user has entered a name, the service initializes session tracking.
Next, click Invoke Again. It’s easy to see that the session number is incrementing (Figure 13.6).
Figure 13.6: Each time the Invoke Again button is clicked, the session is restarted and the tracking counter incremented.
Now it’s time to fire up a whole bunch of instances of the client application. You can easily verify that, in addition to the individual session counters, the global application counter is

working—and is tracking the total number of times the service has been accessed by any client (Figure 13.7).
Figure 13.7: Session tracking tracks individual sessions, while application tracking records the total number of times the service has been invoked (by any client).
Exposing Data Using a Web Service
As I explained in Chapter 12, “Working with XML and ADO.NET,” a DataSet is a kind of miniature database that resides in memory—it can include relationships, tables, and a substantial amount of data. This means that the simple act of exposing a DataSet using a web service can be quite powerful; it provides remote (and cross-platform) access to the potentially extensive contents of the DataSet. Furthermore, it can make this access available to users who are not otherwise connected to the database.
The example I’ll show you uses an ASP.NET web application as the client for the web service. This implies that a browser-based application, from anywhere on the Internet, can access the data in a DataSet if it is exposed by a web service. While the sample application just fills a grid with the data in a table supplied by the DataSet, it’s easy to see how you can use this technique to create data-driven web applications.
Once again, we’ll use the sample Northwind database that ships with SQL Server; this time the DataSet will return the Suppliers table in that database (shown in Server Explorer in Figure 13.8).
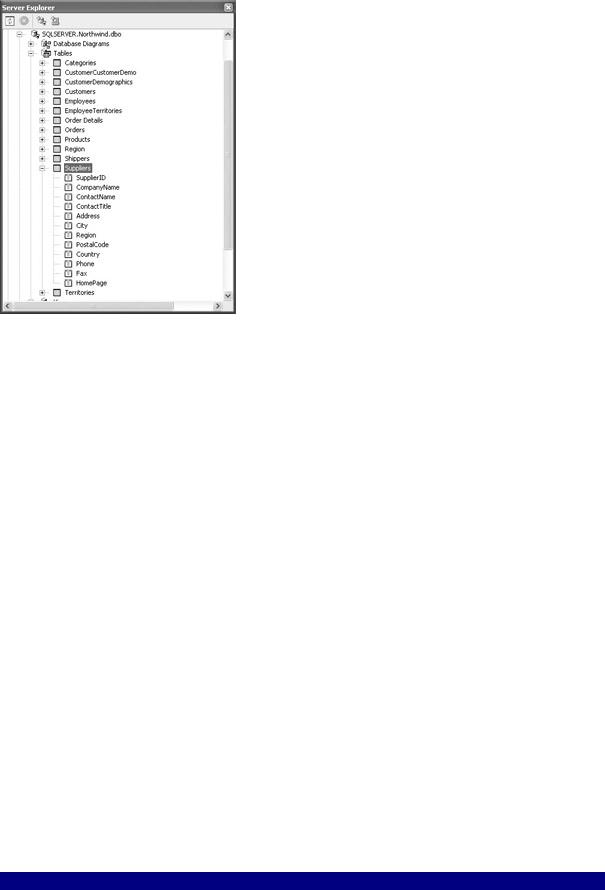
Figure 13.8: You can use Server Explorer to find the tables and fields in the Northwind database.
Note If you aren’t connected to SQL Server, don’t worry! You probably have an Access version of the Northwind database that you can use in its place (a copy ships with most versions of Microsoft Office). See Chapter 12 for details.
The first step is to add a new ASP.NET Web Service project. Within the web service module, add a using directive to System.Data.SqlClient. Next, name the web service class ExposeData.
The GetSuppliers web method should return a DataSet, so here’s its declaration:
public DataSet GetSuppliers() {
...
}
Within the web method, create a SqlConnection, a DataSet, and a SqlDataAdapter. Call the SqlDataAdapter’s constructor with the SQL query to be performed and the SqlConnection object, and then use the SqlDataAdapter’s Fill method to load the Suppliers table into the DataSet:
string mySelectQuery = "SELECT * FROM Suppliers";
SqlConnection myConnection = new SqlConnection ("data source=SQLSERVER;" + "initial catalog=Northwind;password=harold;user id=sa");
DataSet theData = new DataSet();
SqlDataAdapter theAdapter = new SqlDataAdapter (mySelectQuery, myConnection);
theAdapter.Fill(theData, "Suppliers");
Close the SqlConnection, and return the DataSet. The code for the web method is shown in Listing 13.6.
Listing 13.6: Using a Web Service to Expose a DataSet
...
using System.Data.SqlClient;
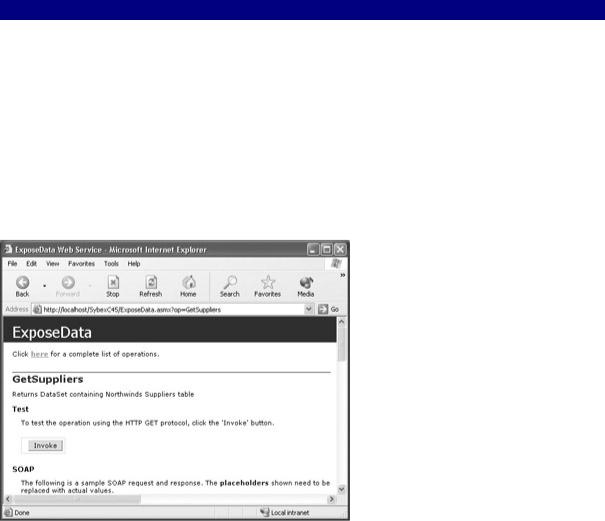
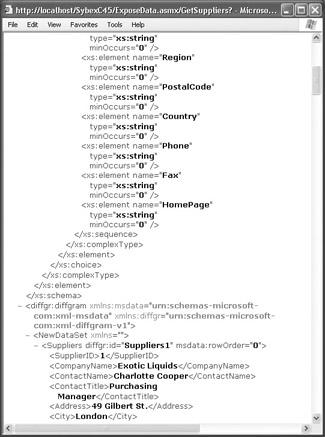
Click Invoke. The DataSet is returned as XML, starting with the XSD schema representing the Suppliers table, and continuing through the data in the table (Figure 13.10). Note that the schema structure shown in Figure 13.10 mirrors the fields shown in tabular form in the Server Explorer window shown back in Figure 13.8.
Figure 13.10: The XML returned by the method includes both a schema and data.
Consuming the Exposed DataSet
It’s time to create the client application that will demonstrate using this web service.
Open a new ASP.NET web application. (For more about the mechanics of working with ASP.NET web applications, see Chapter 2, “Consuming the Service on the Web.”)
Use the Toolbox to add a DataGrid (shown in Figure 13.11) and a Label to the Web Form Designer. Set the label’s Visible property to False (it will be used for exception handling messages, so we don’t need it yet).
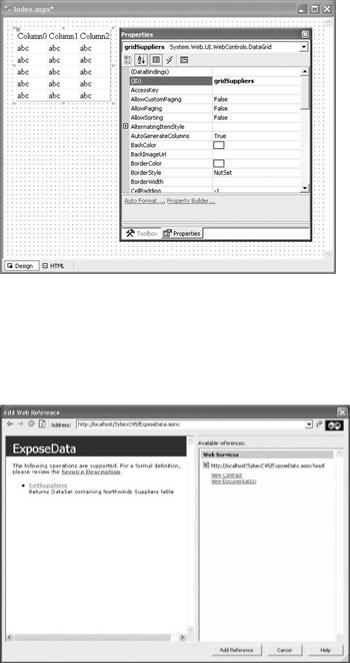
Figure 13.11: A DataGrid added to a WebForm can be used to display the DataSet returned by the service.
Add a reference to the web service in the normal fashion, by selecting Project → Add Web Reference. In the Add Web Reference dialog, enter the URL for the web service in the Address box at the top?(Figure 13.12), and click Add Reference.
Figure 13.12: A reference is added to the web service using its URL.
Once the reference to the web service has been added to the project, you’ll recall that you can change its name in Solution Explorer to anything you’d like. To keep the coding of this client transparent, let’s change the name of the service to “WebService” (Figure 13.13).
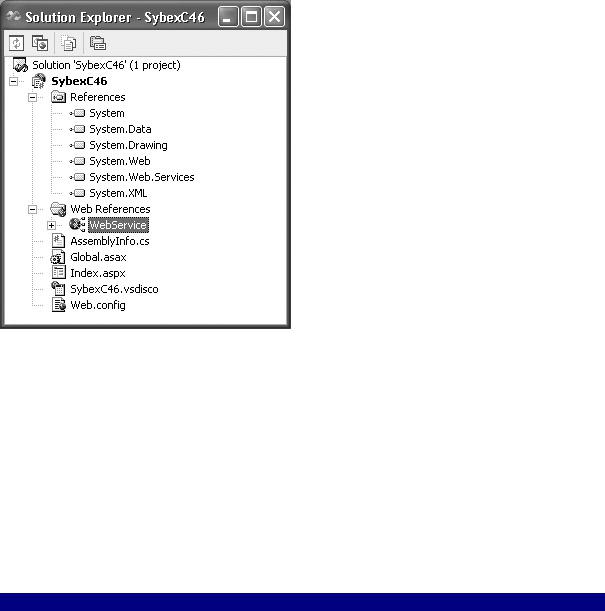
Figure 13.13: You can change the name of the web service using Solution Explorer in the interests of clarity.
It’s easy now to add code to the Page Load event of the web form that instantiates the web method and binds the Suppliers table to the DataGrid:
SybexC46.WebService.ExposeData ed = new SybexC46.WebService.ExposeData(); DataSet theData = ed.GetSuppliers();
gridSuppliers.DataSource = theData.Tables[0].DefaultView; gridSuppliers.DataBind();
The complete code for the Page Load event, including exception handling, is shown in Listing 13.7.
Listing 13.7: Using the Exposed Data in an ASP.NET WebForm
private void Page_Load(object sender, System.EventArgs e) { if (!Page.IsPostBack){
try {
SybexC46.WebService.ExposeData ed = new SybexC46.WebService.ExposeData();
DataSet theData = ed.GetSuppliers(); gridSuppliers.DataSource = theData.Tables[0].DefaultView; gridSuppliers.DataBind();
}
catch (System.Data.SqlClient.SqlException) {
lblExcep.Text = "Please check your SQL Server connection " + "and verify the connection string.";
lblExcep.Visible = true;
}
catch(IndexOutOfRangeException) {
lblExcep.Text = "Please check your SQL Server connection " + "and verify the connection string.";
lblExcep.Visible = true;
}
catch (Exception excep){ lblExcep.Text = excep.Message;
lblExcep.Visible = true;
}
}
}
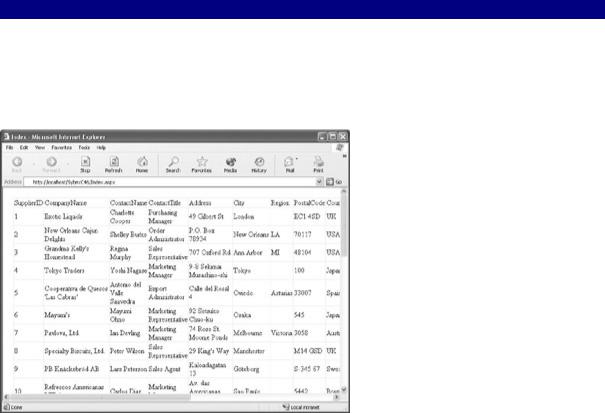
If you run the ASP.NET client application, provided you can connect to SQL Server and the Northwind sample database is loaded, the returned DataSet will fill the DataGrid (Figure 13.14).
Figure 13.14: The returned DataSet fills the DataGrid.
Note If you rewrite the code in the web service to return a strongly typed DataSet (rather than just a DataSet), you’ll then be able to take advantage of IntelliSense member completion in the Code Editor.
Handling Exceptions
It’s important to include exception handling in the client application, because all kinds of issues can come up with database access. For example, as noted earlier in this section, unless you change the connection string in the web method, it will not run on your system as written. Since the MessageBox method is not available in a web forms application, one way to display exception messages is in a label (Figure 13.15).
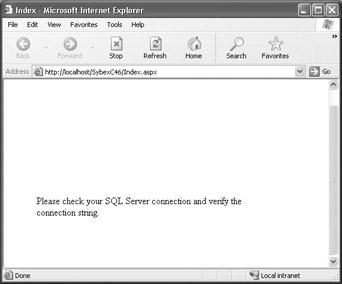
Figure 13.15: It’s important to include exception handling in the client application if the web service involves database connectivity.
Note If the web service cannot connect to a database for whatever reason, it is written to still return a DataSet (but one with no content). In this case, the most likely exception to be thrown is IndexOutOfRangeException (because Tables[0] will not be found in the DataSet).
Managing Transactions
A transaction groups multiple actions together. In its simplest form, a transaction, also sometimes called a “two-stage commit,” makes sure that all the actions take place—or none of them do. If one of the actions succeeds, and the next one fails, then both actions are “rolled back.”
In the context of the enterprise, transactions are important. The example in this section explores a scenario in which you want to be sure that a log file is written to if the related primary table is altered. But there are many situations in which you need to make sure that an entire transaction—or none of its components—succeeds. One example that is becoming increasingly common in enterprise applications that operate across operating systems and data repositories is a transaction that needs to perform operations using several data sources. A single transaction might need to check inventory on an Oracle server, write order records to SQL Server, and write customer information to a DB2 database.
So if web services are to be part of a scalable, enterprise architecture, they must support transactions. Fortunately, ASP.NET web services do support transactions. As you’ll see in the substantially oversimplified—but not entirely unrealistic—example in this chapter, implementing transactions is essentially an issue of turning on a switch.
Warning The example in this section does not implement exception handling—which, of course, you should in the real world. Also, to get the example to work, you’ll need to create the database that is described in SQL Server. In addition, once again my connection string is not your connection string. You must alter the connection string to suit your circumstances.
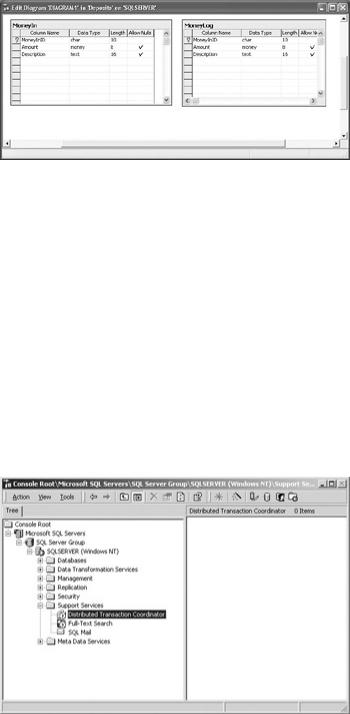
The idea is this: there’s a database, Deposits, with two tables, MoneyIn and MoneyLog. These tables are shown using the Diagram feature of SQL Server in Figure 13.16.
Figure 13.16: The two tables in the Deposits database are shown in a Diagram in SQL Server Enterprise Manager.
I’d like a web method that inserts a deposit amount, along with an ID and a description, in both tables. The transaction problem is that I want to be sure that the deposit information is inserted in both tables—or rolled back so that it is inserted in neither.
Note As a preliminary, to get this example to work, you need to create the tables shown in Figure 13.16.
Implementing a Web Service that Supports Transactions
To start with, make sure that Distributed Transaction Coordinator is running in SQL Server. You can do this from the Services applet in Administrative tools, or by using SQL Server’s Enterprise Manager. In Enterprise Manager, expand the Support Services folder (see Figure 13.17), and right-click Distributed Transaction Coordinator to start it (if it isn’t already).
Figure 13.17: If it isn’t already running, start Distributed Transaction Coordinator.
Next, start a new ASP.NET Web Service project. Select Project → Add Reference to open the Add Reference dialog, and use the dialog to add the System.EnterpriseServices library to the project (Figure 13.18).