

Visual CSharp .NET Programming (2002) [eng]
.pdfUsing the Class Template
If you open the Add New Item dialog (shown in Figure 8.5), select the Class template, give the class a name, and click Open, Visual Studio will create for you the default class module shown in Listing 8.1.
Figure 8.5: Adding a class module with the Add New Item dialog
Listing 8.1: Default Class Module
using System;
namespace SybexC21
{
///<summary>
///Summary description for myClass.
///</summary>
public class MyClass
{
public MyClass()
{
//
// TODO: Add constructor logic here
//
}
}
}
What, exactly, does the default class produced by this class template buy you? I'll answer this question in a moment, but the overall answer is, not much. Class modules are good places to start class libraries. And, as a matter of style, it can aid the clarity of the overall program architecture to put each substantive class in a module by itself. If you put each class in its own module file (.cs file) and name each file with the class name, it makes it very easy to find classes in your source code. It is also common and effective organization to group related classes in one module-for example, a business object class along with the collection class that groups them together.
But it is also perfectly reasonable to add short classes to existing modules-such as form modules. In addition, obviously it is not much work to create your own declaration
from scratch in an empty Code File module (also available via the Add New Item dialog).
The default class code gives you some comments, a using System directive, and inclusion in the namespace of the current assembly. It does not provide a base class for the newly created class. Significantly, it does provide the framework for a class constructor (see "Constructors" later in this chapter).
The C# Class Wizard
The C# Class Wizard is a visual interface that gives you a jump start in creating a class definition. If you'd like aid from the IDE in creating a class, you'll find you get much more 'bang for your buck' from the Class Wizard than from the Class Template described in the previous section.
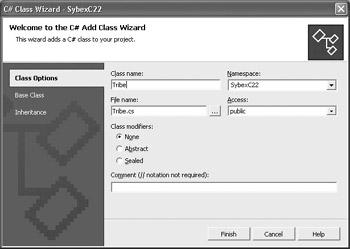
To start the Class Wizard, you must have the Class View window open. In Class View, rightclick a namespace and select Add →?Add Class from the context menu. The first panel of the wizard, shown in Figure 8.6, will open.
Figure 8.6: The C# Class Wizard provides a flexible and thorough mechanism for the creation of a class module.
The first panel lets you set general class elements, such as its name and accessibility level. The Base Class panel, opened by clicking the link in the left pane, lets you select a namespace and the base class from which the new class will be derived. Finally, the Inheritance panel, also opened via a link, lets you select multiple interfaces that the new class inherits (interfaces are discussed in Chapter 9, 'Everything Is String Manipulation').
Class Members
C# classes can contain the following ten kinds of members (in alphabetic order):
•Classes (in other words, classes can be nested within classes)
•Constructors
•Delegates

•Destructors
•Enumerations
•Events
•Fields
•Indexers
•Methods
•Properties
Member Access
Table 8.3 shows the access modifiers that can be used in a class member declaration. The access modifier controls the scope of the member-in other words, where it is 'visible' and can be used.
|
|
Table 8.3: Class Member Access Modifiers |
Modifier |
|
Description |
|
|
|
internal |
|
Accessible to class methods within the same assembly |
|
|
|
private |
|
Only available to members of the same class (this is the default access level) |
protected Accessible to members of the same class and of classes derived fromthe current class
protected Accessible to both assembly class methods and derived class members internal
public |
|
Accessible to the methods of any class |
If you leave the access modifier off a class member, it defaults to private access. However, as a matter of good programming style, you should explicitly mark the access level of your class members: if they are local in scope to the class, declare them using the private access modifier.
At the risk of getting a little bit ahead of ourselves, let's make the concept of protected access a little more concrete. Suppose you have a class named Surprise, with a single member, the protected string hiddenValley:
namespace SybexC22 { public class Surprise {
public Surprise() {
}
protected string hiddenValley = "How green was it?";
}
}
You might then attempt to instantiate an object based on Surprise and access hiddenValley, perhaps in a click event like so:
private void btnGet_Click(object sender, System.EventArgs e) { Surprise surprise = new Surprise();
MessageBox.Show (surprise.hiddenValley);
}
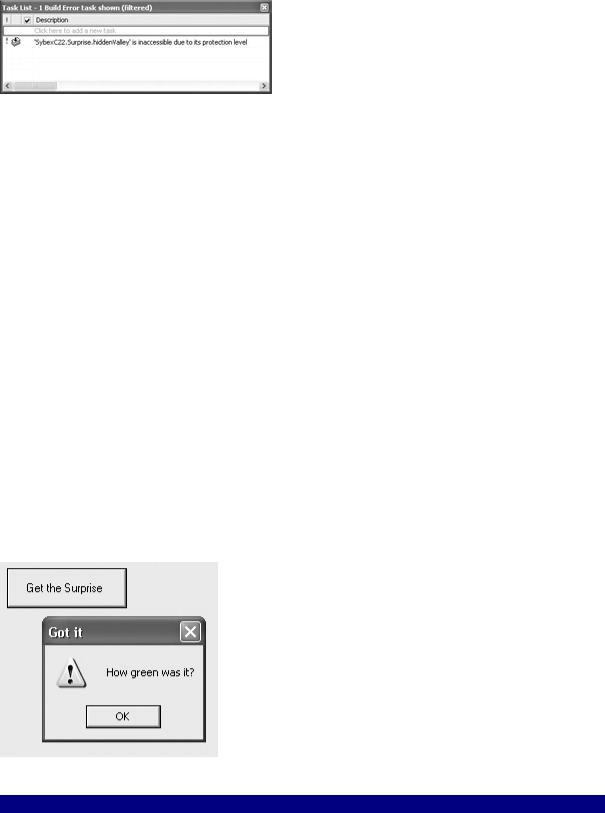
If you attempt to run this, you will get a compile-time syntax error, due to the inaccessibility of the hiddenValley member.
However, you can use Surprise as the base class for a new class, UnWrap:
namespace SybexC22 {
public class UnWrap : Surprise { public UnWrap() {
}
public string GetSurprise(){ return hiddenValley;
}
}
}
UnWrap has access to the protected members of its base class (Surprise). Using this
access, UnWrap can make hiddenValley available in a public method, in the example named GetSurprise. UnWrap can then be instantiated, and hiddenValley returned via the GetString method:
private void btnGet_Click(object sender, System.EventArgs e) { UnWrap unWrap = new UnWrap();
MessageBox.Show (unWrap.GetSurprise(), "Got it", MessageBoxButtons.OK, MessageBoxIcon.Exclamation);
}
Running this code shows that the value of the protected field can be displayed via a method of a derived class (Figure 8.7). The two classes and the click event are shown in Listing 8.2.
Figure 8.7: A protected member can be accessed via public methods of a derived class. Listing 8.2: A Derived Class to Access a Protected Member of Its Base Class
namespace SybexC22 { public class Surprise {
public Surprise() {

}
protected string hiddenValley = "How green was it?";
}
}
namespace SybexC22 {
public class UnWrap : Surprise { public UnWrap() {
}
public string GetSurprise(){ return hiddenValley;
}
}
}
// in class Form1
private void btnGet_Click(object sender, System.EventArgs e) { UnWrap unWrap = new UnWrap();
MessageBox.Show (unWrap.GetSurprise(), "Got it", MessageBoxButtons.OK, MessageBoxIcon.Exclamation);
}
Member Modifiers
In addition to the access modifiers, class member declarations can be modified with other keywords, which are shown in Table 8.4.
|
|
Table 8.4: Class Member Modifiers |
|
|
|
Modifier |
|
Meaning |
|
|
|
const |
|
The field or variable cannot be modified. See the section 'Constants' in Chapter 6, |
|
|
'Zen and Now: The C# Language.' |
|
|
|
extern |
|
The marked method is implemented outside the C# code, probably in an imported |
|
|
library. For more information, look up 'extern' in online help. |
|
|
|
override |
|
The member provides a new implementation of a virtual member inherited from a |
|
|
base class. See 'Polymorphism and Overriding' later in this chapter. |
|
|
|
readonly |
|
The field can be assigned a value only in its declaration or in its class constructor. |
|
|
|
static |
|
The member belongs to a type itself rather than an instance of the type. |
|
|
See'Instance vs. Static Members' later in this chapter. |
|
|
|
unsafe |
|
The member is operating in an unsafe context (as is required for explicit pointer |
|
|
operations). For more information, look up 'unsafe' in online help. |
|
|
|
virtual |
|
The implementation of the member (or property accessor) can be changed by an |
|
|
overriding member in a derived class. See 'Polymorphism and Overriding' later in |
|
|
this chapter. |
|
|
|
volatile |
|
The field is modifiable by something external to the current program (such as the |
|
|
operating system, hardware, or a program operating on another thread). For more |
|
|
information, look up 'volatile' in online help. |
|
|
|
Using the Member Wizards
A little earlier in this chapter, I showed you how to use the C# Class Wizard to add a class definition. Member wizards, also accessible from the Class View window, provide an interface that helps you to add fields, methods, properties, and indexers to a class.
To open a member wizard, select a class in Class View. Right-click the class, then select Add. A submenu will open, as shown in Figure 8.8.
Figure 8.8: Member wizards help you add methods, properties, fields, and indexers to a class.
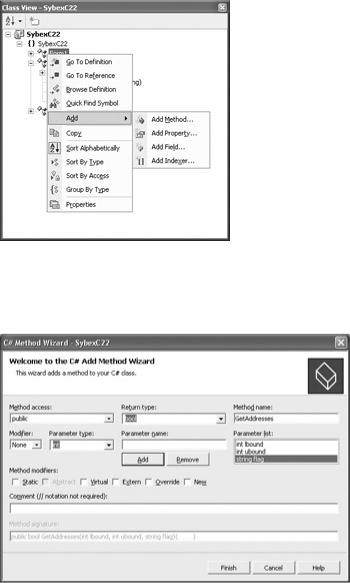
From the submenu, select the kind of member you would like to add. Figure 8.9 shows the Add Method Wizard being used to create the declaration for a method.
Figure 8.9: The Add Method Wizard adds a method to a class.
When the method shown in the wizard interface in Figure 8.9 is created, the following code is added to the class:
public bool GetAddresses(int lbound, int ubound, string flag) { return true;
}
I show the generated code here essentially to make the point that running the member wizards can be helpful, particularly when you are getting started with C#, but will not really save you much work as opposed to creating members by hand.
The this Keyword
The keyword this means the current instance of an object. (I almost said "current instance of an object based on a class," but in C# the "based on a class" clause is redundant-since all objects are based on classes.) In other words, this references each instance of a class from within the instance (see the next section of this chapter for an explanation of static versus instance members of a class).
There are three ways you might use this:
•To refer to instance members that would otherwise be hidden by parameters of a method or property (for an example, see 'Class Variables, Fields, and Properties' later in this chapter)
•To pass as a parameter a reference to the current object (for some examples, see 'Whose Form Is It?' later in this chapter)
•With indexers (for an example, see 'Indexers' in Chapter 7, 'Arrays, Indexers, and Collections')
It's also good practice to use this.member syntax when referring to object instance membersbecause the syntax makes it clear exactly what you are referring to even when the member is not hidden by a local variable or parameter.
Tip The Visual Basic equivalent of the this keyword is the me keyword.
Instance vs. Static Members
Class members are either instance or static. Instance members require that a reference to an object based on the class be created in memory before the member can be used. This process is called instantiation.
In contrast, static members of a class are associated with the class itself rather than an instance of a type based on the class. You access a static member by simply qualifying it with the name of the class it belongs to. In C#, static members cannot be accessed through an instanceso you cannot use the this keyword to invoke a static method.
By default, members of a class are instance members. To make a member static, it must be marked with the static keyword as a modifier following the access modifier. For example, many members of the String class, such as String.Format, are static, meaning you do not have to create an instance of System.String to use the System.String.Format method. (The String class is discussed in detail in Chapter 9.)
Tip The VB .NET equivalent to static is the Shared keyword.
Instance Member Example
Let's take an example of using an instance member from the Guns, Germs, and Steel project. As you'll recall, the GroupOfPeople class is used as the "facade"-or combination of traffic cop and gateway-for managing the growth and display of cultures added by the user. One of the instance members of GroupOfPeople is the method CreateNewTribe. Here's the declaration for CreateNewTribe:
public void CreateNewTribe(frmSettings dlg) {
...
}
Now let's take a look at instantiating a GroupOfPeople object and invoking the CreateNewTribe method. This is done, as you probably are aware, with the new keyword.
In the application, the instantiation takes place after the user clicks the Add a Tribe button on the program's main form, within the Button's click event method. However, gop, the variable that holds the instance of GroupOfPeople, is declared at the form class level, not within the Button's click method. This is done so that the variable holding the instance will be available to other members of the form class. Here's the excerpted code:
...
GroupOfPeople gop;
private void btnAddaTribe_Click(object sender, System.EventArgs e) {
frmSettings dlg = new frmSettings();
...
gop = new GroupOfPeople();
...
gop.CreateNewTribe (dlg);
...
}
Had I not needed to keep the declaration of the GroupOfPeople variable at the form class level-so that it would be accessible to all members of the form class-I could, of course, have declared and instantiated it in one statement:
GroupOfPeople gop = new GroupOfPeople();
rather than the two actually used:
GroupOfPeople gop;
...
gop = new GroupOfPeople();
Note It is conventional to name classes starting with an uppercase letter and to name the variables that hold instances of the class starting with a lowercase letter-for example, GroupOfPeople (the class) and gop (the instance variable).
Static Members Example
In C#, all code is within classes that are declared as explained earlier in this chapter. There is no such thing as a global module of code. This leads to the question of where to put declarations for variables and constants that you will need in multiple class instances.
Note Constants are considered static members. Therefore, they do not need to be-for that matter, they cannot be-marked with the static keyword.
A good answer is to mark global variables public as well as static, mark constants you will need globally as public, and place them all in one class devoted just for that purpose.
Listing 8.3 shows the class used for that purpose in the Guns, Germs, and Steel application.
Listing 8.3: A Class Used for Global Variables and Constants

namespace SybexC21
{
public class Globals
{
// Global Constants and Variables public static long globalTime = 0000; public const int totalAnimals = 5; public const int totalPlants = 7; public const int generation = 20;
}
}
Here's how I used the globalTime variable and the generation constant with the main form class of the program to increment the time by a generation:
Globals.globalTime += Globals.generation;
The Main Method Is Static
As you may have noticed, every C# application requires a Main method as an entry point-the place where the program starts execution. The Main method is always static. Here's the Main method added by default to Form1 when you open a new C# Windows application:
static void Main() { Application.Run(new Form1());
}
Unlike in C++, static members cannot directly access instance members of a class-hence the need to instantiate Form1 using the new keyword.
Constructors
A constructor is a method that is used to initialize a class instance. A constructor is invoked when a class is instantiated. Every C# class must have one or more constructors-or rely on the default constructor provided by the Common Language Runtime (CLR) environment.
To define a class constructor in C#, declare a method within the class whose name is the same as the class that it constructs.
Earlier in this chapter I reproduced the default code generated by the Class template (back in Listing 8.1). If the class were named MyClass, the important parts looked like this:
public class MyClass
{
public MyClass()
{

}
}
The method with the same name as the class, within the MyClass class declaration,
public MyClass()
is the framework for a class constructor.
Tip Constructors are defined using a rather different syntax in VB .NET (by declaring a New subroutine within the VB class).
If you don't declare a class constructor, or don't add implementation code within the constructor declaration, the CLR provides a default constructor for you. This default constructor creates an object and initializes members innocuously-numeric members to 0, strings to the empty string, and so on-but takes no other action.
Most of the time, you'll want to define your own constructors so that instances of the class are initialized to appropriate values. But don't worry! You don't have to actually take care of creating an object by allocating a reference in memory-the compiler and the CLR take care of that for you. All you have to do is assign appropriate values for members in the constructor.
As a matter of fact, you can have more than one constructor for a given class, provided that the signature-meaning method type and the types of its arguments-of each constructor method is different. (Having multiple methods with the same name and different signatures is called overloading, discussed later in this chapter.) The point of having multiple constructors for a class is that you can use whichever constructor is right, depending on circumstances.
Listing 8.4 shows three constructors for the Guns, Germs, and Steel Tribe class.
Listing 8.4: Three Tribe Class Constructors
public class Tribe
{
public Tribe()
{
}
public Tribe(string theName, string theText) { this.Name = theName;
this.Text = theText;
}
public Tribe(string theName, string theText, long theStartYear, Color theTrCol, Color theTextCol, int numAnimals, int numPlants, long numGenerations) {
this.Name = theName; this.Text = theText; this.StartYear = theStartYear this.TribalColor = theTrCol; this.TextColor = theTextCol;
this.SpeciesAnimals = numAnimals; this.SpeciesPlants = numPlants; this.numGenerations = numGenerations;