

Visual CSharp .NET Programming (2002) [eng]
.pdf
|
|
Table 7.4: Selected Collection Interfaces |
|
|
|
Interface |
|
Description |
|
|
|
|
|
collection. |
|
|
|
IEnumerator |
|
Supports a simple iteration over a collection. |
|
|
|
IHashCodeProvider |
|
Supplies a hash code for an object, using a custom hash function. |
|
|
|
IList |
|
Represents a collection of objects that can be individually accessed |
|
|
by index. |
|
|
|
Stacks
A stack is a last in, first out (LIFO) collection of items. The most recent thing to go on the stack (in stack terminology, 'pushed') is also the first to come off the stack (called 'popped').
Note In addition to pushing and popping, stacks (and queues) support 'peeking,' which returns the object on top of the stack (or queue) without removing it from the stack. I'll show you how this works in the Queue demonstration.
An array can fairly easily be used to simulate a stack (or a queue), but why go to the trouble of doing this if the functionality you need is already built into the Stack class? The essential difference between stacks and queues on the one hand, and arrays and lists on the other, is that when you pop an item off the stack or queue, it goes away. Arrays don't normally work
this way.
To demonstrate the System.Collections.Stack class, let's write an application that puts the current form of the mouse pointer (or cursor) on a stack. Here's how it will work: the user will be able to change the mouse pointer to a random pointer (referred to as the "current" mouse pointer). The current mouse pointer can always be pushed on the stack. When the stack is popped, the last pointer placed on it becomes the current mouse pointer.
Before we get started, you should know that the mouse pointer is set using a form's Cursor property, the default mouse pointer being indicated, naturally enough, by the Cursors enumeration value Default (for example, Form1.Cursor = Cursors.Default).
Our application will need:
•A mechanism for choosing a new mouse pointer. This will be accomplished by randomly choosing a new enumeration value from the Cursors enumeration list.
•A way to push the stack to store the current mouse pointer.
•A way to pop the stack to make the mouse pointer on the top of the stack the current cursor.
Figure 7.6 shows the interface that will be used to accomplish this, with one button for each task.
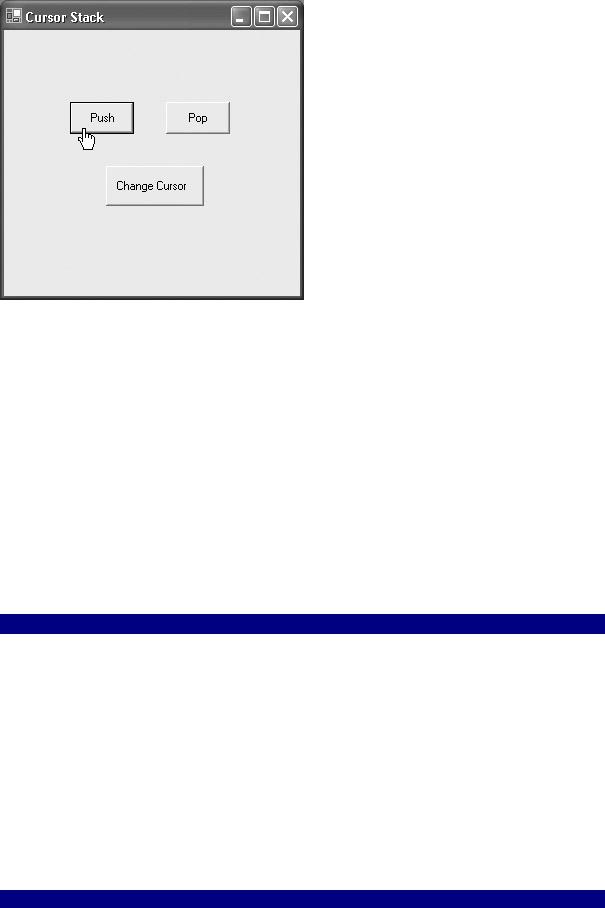
Figure 7.6: The current cursor can be changed, placed on a stack, and popped off the stack.
First let's look at Listing 7.10, which shows the click event that randomly selects a new cursor and assigns it to the form. This code declares an array of type Cursor named acursor, and loads it with all possible values of the Cursors enumeration. Next, a new Random object is created using a default seed value.
Warning The System.Random class generates pseudo-random numbers and should not be relied on to return truly random numbers in applications that involve things like cryptography.
With a Random object in place, its Next method is used to generate a random integer between 0 and 27 that is used to select an element (there are 28 members of the Cursors enumeration, so the acursor array index goes between 0 and 27). The selected element, which is of type Cursor, is then assigned to the form's current cursor.
Listing 7.10: Changing the Cursor to a Random Cursor
private void btnChange_Click(object sender, System.EventArgs e) {
Cursor [] acursor = { |
|
Cursors.Cross, |
Cursors.AppStarting, Cursors.Arrow, |
||
Cursors.Default, |
Cursors.Hand, |
Cursors.Help, |
Cursors.HSplit, |
Cursors.IBeam, |
Cursors.No, |
Cursors.NoMove2D, |
Cursors.NoMoveHoriz, |
Cursors.NoMoveVert, |
Cursors.PanEast, |
Cursors.PanNE, |
Cursors.PanNorth, |
Cursors.PanNW, |
Cursors.PanSE, |
Cursors.PanSouth, |
Cursors.PanSW, |
Cursors.PanWest, |
Cursors.SizeAll, |
Cursors.SizeNESW, |
Cursors.SizeNS, |
Cursors.SizeNWSE, |
Cursors.SizeWE, |
Cursors.UpArrow, |
Cursors.VSplit, |
Cursors.WaitCursor |
|
|
};
Random rnd = new Random();
Cursor cur = acursor[rnd.Next(27)]; this.Cursor = cur;
}

It's actually really easy to push a cursor on the stack. First, a new Stack object needs to be instantiated, using the variable curStack:
Stack curStack = new Stack();
Next, this click event code pushes the current form mouse pointer onto the stack:
private void btnPush_Click(object sender, System.EventArgs e) { curStack.Push(this.Cursor);
}
Popping the stack is only slightly trickier. You need to make sure that something is actually on the stack-by using the curStack.Count property-before you try to pop:
private void btnPop_Click(object sender, System.EventArgs e) { if (curStack.Count > 0)
this.Cursor = (Cursor) curStack.Pop(); else
MessageBox.Show("Nothing on the stack to pop!", "Too tired to pop!", MessageBoxButtons.OK, MessageBoxIcon.Exclamation);
}
The code for pushing and popping the stack is shown in Listing 7.11. If you run the demonstration application, you'll see that you can change the mouse pointer for a random new selection, place the current mouse pointer on the stack, and assign the mouse pointer on the top of the stack to the form. If you've popped everything off the stack-or there isn't anything on it to begin with-an error message will be displayed.
Listing 7.11: Pushing and Popping a Cursor on a Stack
...
Stack curStack = new Stack();
private void btnPush_Click(object sender, System.EventArgs e) { curStack.Push(this.Cursor);
}
private void btnPop_Click(object sender, System.EventArgs e) { if (curStack.Count > 0)
this.Cursor = (Cursor) curStack.Pop(); else
MessageBox.Show("Nothing on the stack to pop!", "Too tired to pop!", MessageBoxButtons.OK, MessageBoxIcon.Exclamation);
}
...
Queues
Queues are just like stacks, except that the objects collected by them are first in, first out (FIFO). The metaphor is waiting in line or, as the British say, 'on queue.' The idea is that if you are the first one waiting for the ticket booth to open, you should be the first one able to buy tickets.
The Enqueue method puts an item on the queue; the Dequeue method returns (and removes) the item that is at the front of the queue; and the Peek method looks at the item at the front of the queue (without removing it from the queue).
As an example, let's set up a queue of strings. The user can use TextBoxes and Buttons to put a string on the queue (Enqueue), take the front string off the queue (Dequeue), or just have a quiet look at the front string (Peek).
To make this application a little clearer to follow, I've added a ListBox named lstQ and set its Enabled property to False in the Properties window. The contents of the queue are shown in this ListBox, which is updated every time an item is put on or taken off of the queue.
First, a Queue object needs to be declared and instantiated:
Queue theQueue = new Queue();
Here's the code to enqueue a string:
private void btnEnqueue_Click(object sender, System.EventArgs e) { theQueue.Enqueue(txtIn.Text);
txtIn.Text = ""; lstQ.Items.Clear();
foreach (string s in theQueue) { lstQ.Items.Add(s);
}
}
Dequeuing is pretty much the same thing, although (as you'd suspect) a check needs to be added to see that there is actually something on the queue:
private void btnDequeue_Click(object sender, System.EventArgs e) { if (theQueue.Count > 0) {
txtOut.Text = (string) theQueue.Dequeue(); lstQ.Items.Clear();
foreach (string s in theQueue) { lstQ.Items.Add(s);
}
}
else
MessageBox.Show("Nothing on the queue to dequeue!", "No more waiting in line!", MessageBoxButtons.OK, MessageBoxIcon.Exclamation);
}
You should also note that the string value could be enqueued directly, but when it is dequeued, it needs to be cast to string, since items on the queue are maintained as type object.

Tip You can implicitly cast from string to object, but not from object to string.
Peeking works like dequeuing:
private void btnPeek_Click(object sender, System.EventArgs e) { if (theQueue.Count > 0) {
string str = (string) theQueue.Peek();
MessageBox.Show("'" + str + "' is at the head of the queue!",
"You peeked!", MessageBoxButtons.OK, MessageBoxIcon.Exclamation);
}
else
MessageBox.Show("Nothing on the queue to peek at!", "You peeked!", MessageBoxButtons.OK, MessageBoxIcon.Exclamation);
}
It's time to compile and run the project. Next, enter a text string word by word in the Text In box-for example, 'Able' 'Was' 'I' 'Ere' 'I' 'Saw' 'Elba'. After you've entered the last word in your string, you can peek to make sure the first word is at the head of the queue (Figure 7.7).
Figure 7.7: Peeking retrieves the object at the front of the queue without removing it from the queue.
Next, dequeue the first item ('Able'). If you peek now, you'll see that 'Was' is now at the front of the queue (Figure 7.8).

Figure 7.8: With 'Able' dequeued, peeking discloses that 'Was' is at the front of the queue.
Of course, if you keep dequeuing, pretty soon there will be nothing left 'in line' to dequeue (Figure 7.9)-all the words must have bought their tickets!
Figure 7.9: It's important to check that something is on the queue before attempting to dequeue (or peek).
We'll be discussing queues further in Chapter 11 in the context of messaging. For now, the code for queuing, enqueuing, and peeking is shown in Listing 7.12.
Listing 7.12: Queuing, Dequeuing, and Peeking
...
Queue theQueue = new Queue();
private void btnEnqueue_Click(object sender, System.EventArgs e) { theQueue.Enqueue(txtIn.Text);
txtIn.Text = ""; lstQ.Items.Clear();
foreach (string s in theQueue) { lstQ.Items.Add(s);
}
}
private void btnDequeue_Click(object sender, System.EventArgs e) { if (theQueue.Count > 0)
txtOut.Text = (string) theQueue.Dequeue(); else
MessageBox.Show("Nothing on the queue to dequeue!", "No more waiting in line!", MessageBoxButtons.OK,

MessageBoxIcon.Exclamation);
}
private void btnPeek_Click(object sender, System.EventArgs e) { if (theQueue.Count > 0) {
string str = (string) theQueue.Peek();
MessageBox.Show("'" + str + "' is at the head of the queue!",
"You peeked!", MessageBoxButtons.OK, MessageBoxIcon.Exclamation);
}
else
MessageBox.Show("Nothing on the queue to peek at!", "You peeked!", MessageBoxButtons.OK, MessageBoxIcon.Exclamation);
}
...
ArrayList
The ArrayList works like an array, except that it's dynamically resized depending on how many elements are actually stored in it.
Tip VB6 programmers will welcome this functionality as comparable to the ReDim statement.
The demonstration application in this section shows you how to add and remove objects from an ArrayList, and-more or less for purposes of verifying that the structure is workinghow to display a single element by index and how to display all ArrayList elements.
Figure 7.10 shows the user interface (in design mode) that we'll use for this purpose.
Figure 7.10: In design mode, the ErrorProvider sits on the 'tray' at the bottom of a form.
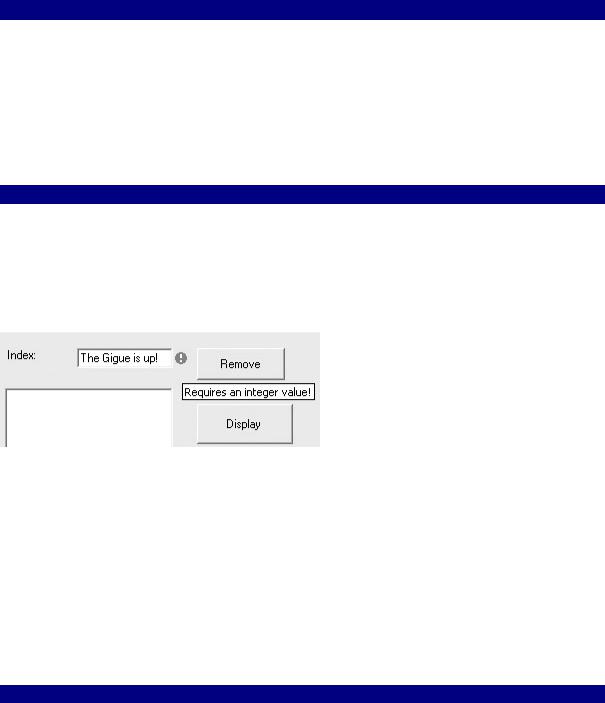
Note that an ErrorProvider component has been added from the Toolbox to the 'tray' at the bottom of the form. This ErrorProvider-in a (hopefully) profitable detour from the main topic of this section-will be used to check that user input in the Index TextBox really is a number.
To set this up, add the code shown in Listing 7.13 to the Validating event of the TextBox to check.
Listing 7.13: Using an ErrorProvider to Validate Numeric Input
private void txtIndex_Validating(object sender, System.ComponentModel.CancelEventArgs e) { try {
int x = Int32.Parse(txtIndex.Text); errorProvider1.SetError(txtIndex, "");
}
catch {
errorProvider1.SetError(txtIndex, "Requires an integer value!"); txtIndex.Text = "0";
}
}
If the user tries to enter nonnumeric data in this TextBox and then navigates away from the field, a red warning icon appears, and the error message specified in Listing 7.13 is displayed (see Figure 7.11). Next, the TextBox Text property is set in code to 0, presumably an innocuous value.
Figure 7.11: If the user input in the TextBox fails the validation-because it is a noninteger value-an error message is displayed.
The routine for working with the ArrayList should seem pretty familiar by now. First, an ArrayList object is instantiated:
ArrayList al = new ArrayList();
You'll find the code for adding a text element to the ArrayList, removing an element by index, displaying an element by index, and displaying all elements along with an ArrayList count, in Listing 7.14.
Listing 7.14: Adding, Removing, and Displaying the Items in an ArrayList
...
ArrayList al = new ArrayList();
private void btnAdd_Click(object sender, System.EventArgs e) { al.Add(txtIn.Text);
txtIn.Clear();
}
private void btnRemove_Click(object sender, System.EventArgs e) { int i;

if (txtIndex.Text == "") i = 0;
else
i = Convert.ToInt32(txtIndex.Text); if (i >= 0 && i < al.Count) {
al.RemoveAt(i);
txtIndex.Clear();
}
else
MessageBox.Show("Please try to keep within range!", "ArrayList Demo", MessageBoxButtons.OK, MessageBoxIcon.Information);
}
private void btnDisplay_Click(object sender, System.EventArgs e) { int i;
if (txtIndex.Text == "") i = 0;
else
i = Convert.ToInt32(txtIndex.Text); if (i >= 0 && i < al.Count) {
MessageBox.Show("Element " + txtIndex.Text + " of the ArrayList is "
+
al[i].ToString() + ".", "ArrayList Demo", MessageBoxButtons.OK, MessageBoxIcon.Information);
txtIndex.Clear();
}
else
MessageBox.Show("Please try to keep within range!", "ArrayList Demo", MessageBoxButtons.OK, MessageBoxIcon.Information);
}
private void btnDisAll_Click(object sender, System.EventArgs e) { for (int i = 0; i < al.Count; i++)
lstDisplay.Items.Add(al[i]);
lstDisplay.Items.Add("ARRAY COUNT IS: " + al.Count.ToString());
}
...
Run the application and play with it to verify that the ArrayList is resizing dynamically (Figure 7.12).

Figure 7.12: It's easy to dynamically resize ArrayLists.
Dictionaries
Dictionaries are structures that implement the IDictionary interface providing for a collection of keys and values-the key is used to access the value. There are several dictionary classes that can be used, such as HashTable and SortedList in the System.Collections namespace and HybridDictionary, ListDictionary, and StringDictionary in the System.Collections
.Specialized namespace.
The SortedList Class
One of the more useful classes that implements IDictionary is SortedList. SortedList is actually kind of a cross-breed because it implements both dictionary key/value access and also array-style access by index.
The demonstration example will show you how to save a text string and a color to a SortedList using key/value pairing. The text and color will then be retrieved from the SortedList and used to populate the Text and BackColor properties, respectively, of a form. I'll show you how to retrieve these values using indices as well as key/value pairs.
The user interface consists of a TextBox for the user to enter the text, a button that opens the Color common dialog-explained in Chapter 4-for the user to select a color, another button to save the choices to the SortedList, and a third button to retrieve the values and use them to populate the properties of a new form (this user interface is shown in Figures 7.13 and 7.14 at the end of this section).
As a preliminary, add a new Form to the project by selecting Project ? Add Windows Form, selecting Windows Form in the Add New Item dialog, and clicking Open.