- •Microsoft C# Programming for the Absolute Beginner
- •Table of Contents
- •Microsoft C# Programming for the Absolute Beginner
- •Introduction
- •Overview
- •Chapter 1: Basic Input and Output: A Mini Adventure
- •Project: The Mini Adventure
- •Reviewing Basic C# Concepts
- •Namespaces
- •Classes
- •Methods
- •Statements
- •The Console Object
- •.NET Documentation
- •Getting into the Visual Studio .Net Environment
- •Examining the Default Code
- •Creating a Custom Namespace
- •Adding Summary Comments
- •Creating the Class
- •Moving from Code to a Program
- •Compiling Your Program
- •Looking for Bugs
- •Getting Input from the User
- •Creating a String Variable
- •Getting a Value with the Console.ReadLine() Method
- •Incorporating a Variable in Output
- •Combining String Values
- •Combining Strings with Concatenation
- •Adding a Tab Character
- •Using the Newline Sequence
- •Displaying a Backslash
- •Displaying Quotation Marks
- •Launching the Mini Adventure
- •Planning the Story
- •Creating the Variables
- •Getting Values from the User
- •Writing the Output
- •Finishing the Program
- •Summary
- •Chapter 2: Branching and Operators: The Math Game
- •The Math Game
- •Using Numeric Variables
- •The Simple Math Game
- •Numeric Variable Types
- •Integer Variables
- •Long Integers
- •Data Type Problems
- •Math Operators
- •Converting Variables
- •Explicit Casting
- •The Convert Object
- •Creating a Branch in Program Logic
- •The Hi Bill Game
- •Condition Testing
- •The If Statement
- •The Else Clause
- •Multiple Conditions
- •Working with The Switch Statement
- •The Switch Demo Program
- •Examining How Switch Statements Work
- •Creating a Random Number
- •Introducing the Die Roller
- •Exploring the Random Object
- •Creating a Random Double with the .NextDouble() Method
- •Getting the Values of Dice
- •Creating the Math Game
- •Designing the Game
- •Creating the Variables
- •Managing Addition
- •Managing Subtraction
- •Managing Multiplication and Division
- •Checking the Answers
- •Waiting for the Carriage Return
- •Summary
- •Chapter 3: Loops and Strings: The Pig Latin Program
- •Project: The Pig Latin Program
- •Investigating The String Object
- •The String Mangler Program
- •A Closer Look at Strings
- •Using the Object Browser
- •Experimenting with String Methods
- •Performing Common String Manipulations
- •Using a For Loop
- •Examining The Bean Counter Program
- •Creating a Sentry Variable
- •Checking for an Upper Limit
- •Incrementing the Variable
- •Examining the Behavior of the For Loop
- •The Fancy Beans Program
- •Skipping Numbers
- •Counting Backwards
- •Using a Foreach Loop to Break Up a Sentence
- •Using a While Loop
- •The Magic Word Program
- •Writing an Effective While Loop
- •Planning Your Program with the STAIR Process
- •S: State the Problem
- •T: Tool Identification
- •A: Algorithm
- •I: Implementation
- •R: Refinement
- •Applying STAIR to the Pig Latin Program
- •Stating the Problem
- •Identifying the Tools
- •Creating the Algorithm
- •Implementing and Refining
- •Writing the Pig Latin Program
- •Setting Up the Variables
- •Creating the Outside Loop
- •Dividing the Phrase into Words
- •Extracting the First Character
- •Checking for a Vowel
- •Adding Debugging Code
- •Closing Up the code
- •Summary
- •Introducing the Critter Program
- •Creating Methods to Reuse Code
- •The Song Program
- •Building the Main() Method
- •Creating a Simple Method
- •Adding a Parameter
- •Returning a Value
- •Creating a Menu
- •Creating a Main Loop
- •Creating the Sentry Variable
- •Calling a Method
- •Working with the Results
- •Writing the showMenu() Method
- •Getting Input from the User
- •Handling Exceptions
- •Returning a Value
- •Creating a New Object with the CritterName Program
- •Creating the Basic Critter
- •Using Scope Modifiers
- •Using a Public Instance Variable
- •Creating an Instance of the Critter
- •Adding a Method
- •Creating the talk() Method for the CritterTalk Program
- •Changing the Menu to Use the talk() Method
- •Creating a Property in the CritterProp Program
- •Examining the Critter Prop Program
- •Creating the Critter with a Name Property
- •Using Properties as Filters
- •Making the Critter More Lifelike
- •Adding More Private Variables
- •Adding the Age() Method
- •Adding the Eat() Method
- •Adding the Play() Method
- •Modifying the Talk() Method
- •Making Changes in the Main Class
- •Summary
- •Introducing the Snowball Fight
- •Inheritance and Encapsulation
- •Creating a Constructor
- •Adding a Constructor to the Critter Class
- •Creating the CritViewer Class
- •Reviewing the Static Keyword
- •Calling a Constructor from the Main() Method
- •Working with Multiple Files
- •Overloading Constructors
- •Viewing the Improved Critter Class
- •Adding Polymorphism to Your Objects
- •Modifying the Critter Viewer in CritOver to Demonstrate Overloaded Constructors
- •Using Inheritance to Make New Classes
- •Creating a Class to View the Clone
- •Creating the Critter Class
- •Improving an Existing Class
- •Introducing the Glitter Critter
- •Adding Methods to a New Class
- •Changing the Critter Viewer Again
- •Creating the Snowball Fight
- •Building the Fighter
- •Building the Robot Fighter
- •Creating the Main Menu Class
- •Summary
- •Overview
- •Introducing the Visual Critter
- •Thinking Like a GUI Programmer
- •Creating a Graphical User Interface (GUI)
- •Examining the Code of a Windows Program
- •Adding New Namespaces
- •Creating the Form Object
- •Creating a Destructor
- •Creating the Components
- •Setting Component Properties
- •Setting Up the Form
- •Writing the Main() Method
- •Creating an Interactive Program
- •Responding to a Simple Event
- •Creating and Adding the Components
- •Adding an Event to the Program
- •Creating an Event Handler
- •Allowing for Multiple Selections
- •Choosing a Font with Selection Controls
- •Creating the User Interface
- •Examining Selection Tools
- •Creating Instance Variables in the Font Chooser
- •Writing the AssignFont() Method
- •Writing the Event Handlers
- •Working with Images and Scroll Bars
- •Setting Up the Picture Box
- •Adding a Scroll Bar
- •Revisiting the Visual Critter
- •Designing the Program
- •Determining the Necessary Tools
- •Designing the Form
- •Writing the Code
- •Summary
- •Chapter 7: Timers and Animation: The Lunar Lander
- •Introducing the Lunar Lander
- •Reading Values from the Keyboard
- •Introducing the Key Reader Program
- •Setting Up the Key Reader Program
- •Coding the KeyPress Event
- •Coding the KeyDown Event
- •Determining Which Key Was Pressed
- •Animating Images
- •Introducing the ImageList Control
- •Setting Up an Image List
- •Looking at the Image Collection
- •Displaying an Image from the Image List
- •Using a Timer to Automate Animation
- •Introducing the Timer Control
- •Configuring the Timer
- •Adding Motion
- •Checking for Keyboard Input
- •Working with the Location Property
- •Detecting Collisions between Objects
- •Coding the Crasher Program
- •Getting Values for newX and newY
- •Bouncing the Ball off the Sides
- •Checking for Collisions
- •Extracting a Rectangle from a Component
- •Getting More from the MessageBox Object
- •Introducing the MsgDemo Program
- •Retrieving Values from the MessageBox
- •Coding the Lunar Lander
- •The Visual Design
- •The Constructor
- •The timer1_Tick() Method
- •The moveShip() Method
- •The checkLanding() Method
- •The theForm_KeyDown() Method
- •The showStats() Method
- •The killShip() Method
- •The initGame() Method
- •Summary
- •Chapter 8: Arrays: The Soccer Game
- •The Soccer Game
- •Introducing Arrays
- •Exploring the Counter Program
- •Creating an Array of Strings
- •Referring to Elements in an Array
- •Working with Arrays
- •Using the Array Demo Program to Explore Arrays
- •Building the Languages Array
- •Sorting the Array
- •Designing the Soccer Game
- •Solving a Subset of the Problem
- •Adding Percentages for the Other Players
- •Setting Up the Shot Demo Program
- •Setting Up the List Boxes
- •Using a Custom Event Handler
- •Writing the changeStatus() Method
- •Kicking the Ball
- •Designing Programs by Hand
- •Examining the Form by Hand Program
- •Adding Components in the Constructor
- •Responding to the Button Event
- •Building the Soccer Program
- •Setting Up the Variables
- •Examining the Constructor
- •Setting Up the Players
- •Setting Up the Opponents
- •Setting Up the Goalies
- •Responding to Player Clicks
- •Handling Good Shots
- •Handling Bad Shots
- •Setting a New Current Player
- •Handling the Passage of Time
- •Updating the Score
- •Summary
- •Chapter 9: File Handling: The Adventure Kit
- •Introducing the Adventure Kit
- •Viewing the Main Screen
- •Loading an Adventure
- •Playing an Adventure
- •Creating an Adventure
- •Reading and Writing Text Files
- •Exploring the File IO Program
- •Importing the IO Namespace
- •Writing to a Stream
- •Reading from a Stream
- •Creating Menus
- •Exploring the Menu Demo Program
- •Adding a MainMenu Object
- •Adding a Submenu
- •Setting Up the Properties of Menu Items
- •Writing Event Code for Menus
- •Using Dialog Boxes to Enhance Your Programs
- •Exploring the Dialog Demo Program
- •Adding Standard Dialogs to Your Form
- •Using the File Dialog Controls
- •Responding to File Dialog Events
- •Using the Font Dialog Control
- •Using the Color Dialog Control
- •Storing Entire Objects with Serialization
- •Exploring the Serialization Demo Program
- •Creating the Contact Class
- •Referencing the Serializable Namespace
- •Storing a Class
- •Retrieving a Class
- •Returning to the Adventure Kit Program
- •Examining the Room Class
- •Creating the Dungeon Class
- •Writing the Game Class
- •Writing the Editor Class
- •Writing the MainForm Class
- •Summary
- •Chapter 10: Chapter Basic XML: The Quiz Maker
- •Introducing the Quiz Maker Game
- •Taking a Quiz
- •Creating and Editing Quizzes
- •Investigating XML
- •Defining XML
- •Creating an XML Document in .NET
- •Creating an XML Schema for Your Language
- •Investigating the .NET View of XML
- •Exploring the XmlNode Class
- •Exploring the XmlDocument Class
- •Reading an Existing XML Document
- •Creating the XML Viewer Program
- •Writing New Values to an XML Document
- •Building the Document Structure
- •Adding an Element to the Document
- •Displaying the XML Code
- •Examining the Quizzer Program
- •Building the Main Form
- •Writing the Quiz Form
- •Writing the Editor Form
- •Summary
- •Overview
- •Introducing the SpyMaster Program
- •Creating a Simple Database
- •Accessing the Data Server
- •Accessing the Data in a Program
- •Using Queries to Modify Data Results
- •Limiting Data with the SELECT Statement
- •Using an Existing Database
- •Adding the Capability to Display Queries
- •Creating a Visual Query Builder
- •Working with Relational Databases
- •Improving Your Data with Normalization
- •Using a Join to Connect Two Tables
- •Creating a View
- •Referring to a View in a Program
- •Incorporating the Agent Specialty Attribute
- •Working with Other Databases
- •Creating a New Connection
- •Converting a Data Set to XML
- •Reading from XML to a Data Source
- •Creating the SpyMaster Database
- •Building the Main Form
- •Editing the Assignments
- •Editing the Specialties
- •Viewing the Agents
- •Editing the Agent Data
- •Summary
- •List of Figures
- •List of Tables
- •List of Sidebars
Figure 11.5: The user can add and modify specialties. You never know when explosives and doilies will be needed on a mission.
Creating a Simple Database
It pays to start small. You’ll begin with a more modest version of the spy database. Although you can write programs to generate a database, it’s often easier to use a database management system to create the original database. Microsoft includes a very powerful subset of the SQL Server database program as part of the visual studio editor. If you have any experience with Microsoft access (or pretty much any other relational database package) you’ll find the tools for data design to be pretty standard.
Hint Not all installations of Visual Studio.NET include the SQL Server extensions. If you do not have this functionality, you can follow the same steps outlined in this chapter in Microsoft Access or nearly any other modern database program, and then you can use the steps outlined in the “Working with Other Databases” section later in this chapter to connect to the database. Nearly every modern data package will have some variation of the tools I describe in this section, although the exact techniques for accessing these tools varies.
Accessing the Data Server
The toolbar tab on the left side of the IDE has been hiding some important secrets from you. The Server Explorer tab at the bottom−left of the toolbar brings to focus an entirely new set of tools you might never have seen before. Being the international spymaster you are, you can master these new tools quickly. The server explorer enables you to examine many kinds of tools available on the server or servers your computer is currently connected to. The term server is used to describe a
321
computer that provides information, and also to the software on the computer that distributes information. You may be familiar with network servers, which provide a foundation for a local area network, or Web servers, which is where Web pages are stored and accessed. There are many other types of servers available as well, including data servers, which are used to manage databases. When you installed Visual Studio, a simplified version of SQL Server, Microsoft’s powerful data server, was also installed on your machine. You can use this relational database package within the Visual Studio IDE to develop your own databases, and integrate them into your programs.
Creating a New Database
If you look at the servers tag, you’ll see a list of servers you are connected to. As a default, only your own machine name is listed.
Hint When I installed Windows 2000 on my work machine, I went with the default machine name that Microsoft suggested. That was a really bad idea, because I can hardly even type that monster, let alone remember it. In the following code and screen shots, replace andy−mpecr6vc86 with your own machine’s name. If you haven’t yet installed Windows 2000 or XP, make sure you choose a machine name that’s easier to remember than mine.
My server is listed, so I clicked on the corresponding plus sign to see the various parts of the server that are available. SQL servers are near the bottom of the list. SQL (Structured Query Language) is the name of a powerful database manipulation language. You get a brief introduction to it in this chapter. If you expand the SQL Servers item, you see your machine name indicated again. Finally, you see a list of the actual databases registered to your machine. Even if you haven’t attached any databases yet, there will still be a few placed there as prototypes. Right−click on your machine name under SQL Servers and you are given an opportunity to create a new database. Do so, and name it “SimpleSpy.” When you are finished, the IDE adds the SimpleSpy database and several related elements to your server list. It should look like Figure 11.6.
322
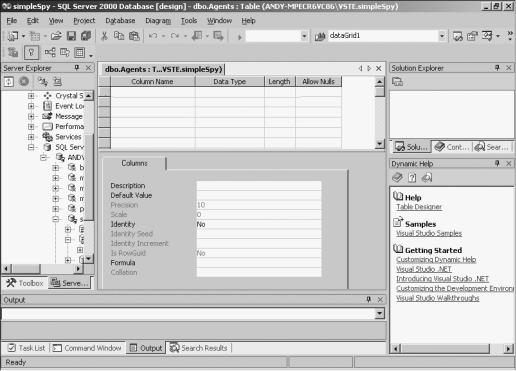
Figure 11.6: The hierarchy tree on the left−hand side shows my machine with my machine listed as an SQL Server. The SimpleSpy database is listed as an element of my SQL Server.
Adding a Table
Databases use a construct called a table as the core entity for storing data. A table holds information about a specific element. Each table consists of a number of fields, which each have a value and a type. To make a new table for the simple spy database, right−click on Tables under simpleSpy in the server explorer tab, and choose Add New Table. The main panel of your editor changes so it looks like Figure 11.7.
Figure 11.7: A table editor reminiscent of Microsoft Access pops up.
If you have any experience with Microsoft Access (Microsoft’s very popular entry−level database) the table design screen probably looks very familiar to you. The table designer prompts you for field names and types. The Agents table is designed to describe a list of secret agents. Each agent (at least in this current simple form) has three characteristics. Figure 11.8 illustrates the first stage of table design for the Agents table.
323
Figure 11.8: Each agent has a code name, an assignment, and a specialty field.
For each field, you must determine a field type and length. The field types are much like the variable types you are already used to, but there are a few differences. Fortunately, all the legal field types are available in the drop−down list. Note that text values are listed as char rather than string. This is because data definition has a different tradition and nomenclature than programming. If a field is defined as a text field, you are required to list the length of the field in characters. The software determines where one record ends and another begins by counting the number of bytes in each record. Every record in a table must be the same length. If you define a field to be 10 characters long, any values longer than ten characters will be truncated, and trailing spaces will be added to any values shorter than ten characters. Field names should be single words, like variable names. (Many database packages allow multiple word field names, but they usually make working with the data much more complex.)
Trap The Simple Spy database has some serious problems in its design, as you’ll see. I’ll show you how to improve the database throughout the chapter, but first I want to explore attaching this simplistic database to a form and displaying it in a C# program.
Creating a Primary Key
Notice that the first field in the Agents table is called SpyID. This field is meant to provide an index for the Agents table. It is much easier to work with large and complicated data sets if each table has a special field identified as its primary key. You have already encountered primary keys many times. Every time you make a call to your insurance company, the bank, your credit card company, or any other bureaucracy, somebody asks you for an account number. They are rarely concerned about your name as long as they have that account number. An account number is usually a primary key to the data about you in their database. The primary key is used to find all the other information about you in the database. It would theoretically be possible to use your name as a primary key, but this doesn’t work very well, because of spelling and capitalization problems. There are also people with duplicate names. Account numbers—and primary keys—are designed to avoid these problems. A primary key should be unique—the key should be different for each record in the database. Primary keys should also be universal—each record must have one. Finally, primary keys should be
324
non−null. (This seems obvious, but in many databases, you have to specify that a field is non−null explicitly, so it’s worth mentioning). The best keys are integers, because you don’t have to worry about spelling or capitalization.
In most of my tables, I create a primary key as the first field in the table, and I usually end the field name with ID. To specify in Visual Studio that a field should be used as a primary key, select the entire field by clicking on the triangle to the left of the field, and click the key icon of the database toolbar at the top of the screen. A small key icon appears beside the field in the definition table, as shown in Figure 11.9. Notice that when you set a field as the primary key, the allow nulls check box is automatically deselected.
Figure 11.9: The AgentID field is now the primary key of the Agents table.
Hint It’s very smart to add a primary key to every table, even though you might not feel it’s necessary. When you start to build relational databases later in this chapter, you’ll see that primary keys are critical to building well−formed data structures. If in doubt, add an integer field, call it an ID field, and designate it as a primary key. It never hurts to have one.
To finalize your design of the table, close the window containing the table definition. A dialog pops up asking you the name of the table. Call the new table Agents.
Adding Agents to the Table
After you have created the Agents table, look again at the server explorer. You see that the Agents table is registered to your server, as illustrated in Figure 11.10.
325