


If either fighter’s strength drops to 0 or below, the other fighter wins. In either case, I set keepGoing to false so that the program would exit the next time through the Main loop.
In the Real World
Sometimes you describe something in English that turns out to be very difficult to convert into programming terms. In the snowball fight, saying “Check whether somebody has won the game” in your algorithm is easy, but the actual condition is much more difficult to write because winning is not really defined in this game. Instead, a player wins only if the opponent loses. Sometimes you must modify your algorithm so that it still retains its meaning. Seeing whether anybody has won is difficult, but finding out whether somebody has lost is easy, and the meaning is the same.
Displaying the Menu
The code for displaying the main menu is straightforward. The main menu consists of two parts: the scoreboard describing various statistics and the list of choices facing the human player. Both are accomplished through a set of Console.WriteLine() statements, as shown in the following code:
public int displayMenu(){ int choice;
Console.WriteLine("Stats:"); Console.WriteLine(" distance: \t{0}", range);
Console.WriteLine(" snowballs: \t{0}", player.snowballs); Console.WriteLine(" {0}: \t{1}", player.name, player.strength); Console.WriteLine(" {0}: \t{1}", opponent.name, opponent.strength); Console.WriteLine();
Console.WriteLine("0. Quit"); Console.WriteLine("1. Make a snowball"); Console.WriteLine("2. Move closer"); Console.WriteLine("3. Run away"); Console.WriteLine("4. Throw"); Console.WriteLine();
Console.Write("Indicate your choice: "); choice = Convert.ToInt32(Console.ReadLine()); Console.WriteLine();
Console.WriteLine(); return choice;
} // end dispayMenu
I needed to change the string value that comes from a Console.ReadLine() call to the integer value that displayMenu has to send out.
Summary
This chapter has led you through some of the most important ideas in modern computer programming. You have learned how to customize the creation of your classes through constructors. You have learned how to overload constructors by adding multiple constructors with different parameter sets. You have used inheritance to create new types of classes that inherit characteristics of existing classes. You have learned how polymorphism can be used to customize methods for new classes. All these new skills together give you the ability to create powerful new objects and manipulate them in interesting ways.
125

Challenges
∙Create your own new forms of the Critter class, inherited from the original critter.
∙Add a trick method to your critter so that it can do various types of tricks. Perhaps the happier a critter is, the better trick it can perform.
∙Make a two−player version of the snowball fight. You won’t need the RoboFighter class, but you will need two copies of the Fighter class. You’ll need to modify the main menu code a little, but two player games (at least, on the same computer) are easier to write than artificial intelligence.
∙Improve the performance of the robot fighter. Perhaps have it throw snowballs only when it is closer than five units away, or have it always run away after being hit so it can build more snowballs.
∙Make a tournament. Allow the user to choose human and computer players. Then build a tournament that pairs various fighters together, ultimately choosing a champion. Hint: You can reuse the existing program almost in its entirety. The main difference will be adding another program outside of it to control the tournament. Each individual snowball fight will invoke the Snowball Fight program.
126

Chapter 6: Creating a Windows Program: The Visual
Critter
Overview
The first programs in this book are much like the programs in the early high−level languages, such as COBOL and FORTRAN. These programs work primarily on the command line and begin with straight−line logic. As you have progressed in your own programming, you have used more complex logical structures, such as loops and branching statements, and you have played around with more complex data structures, such as variables. The history of programming follows the same progression. In the past two chapters, you looked at object−oriented programming, which represents the current thinking in program design, but your programs still do not seem very modern because they are written on the ugly and unfriendly console. In the next few chapters, you will look at how C# is used in Windows programming. The programs you will write feature the capabilities of the Windows operating system, with all the graphical features you have come to expect from such a system.
Now you will explore how to build a program with a Windows interface. In this chapter you will
∙Learn the basic concepts of a graphical user interface (GUI).
∙Use the IDE to build an interface.
∙Navigate the System.Drawing and System.Windows namespaces.
∙Add the most common GUI elements (text boxes, labels, images, scroll bars, and multiple selection elements) to your forms.
∙Write event−handling code.
∙Use event−driven programming.
Introducing the Visual Critter
As the final exercise for this chapter, you will build a critter program that has a graphical interface. This program will look and feel more like the programs you encounter on the Windows operating system. As usual, an image or two of the program is more helpful than just a description. Figure 6.1 demonstrates the Visual Critter in its default state.
127
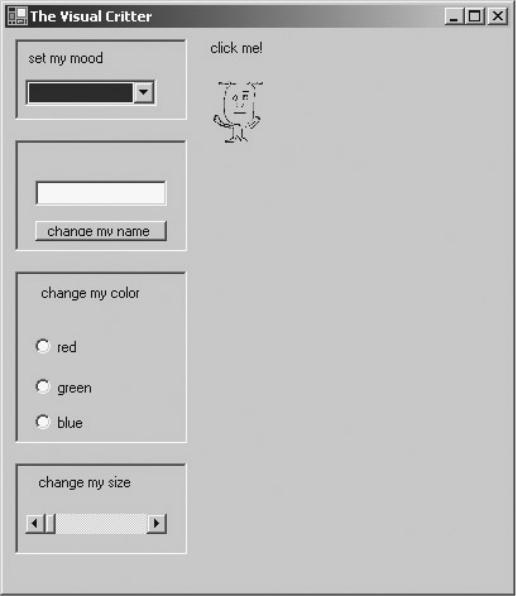
Figure 6.1: This critter has a picture and some Windows−style controls.
You can see from Figure 6.1 that the newest version of the critter has much more visual appeal than the older versions. Modern users have become used to the convenience of a graphical interface, with all the various components such as text boxes, scroll bars, and command buttons. This version of the Visual Critter features several standard graphical controls.
Before diving into how all these controls work, you should play around with the program and see what it does. This is a highly interactive program, so you should open it from the CD−ROM and look at it live. I’ll show you a few of the highlights now in case you aren’t near a computer.
Figure 6.2 demonstrates what happens when you click the critter image.
128

Figure 6.2: When the user clicks the image, the critter speaks.
I have attached code to the image so that when it is clicked, a message appears. The critter asks the user to change the critter’s name. Take a look at Figures 6.3 and 6.4 to see how the user can edit the name in the rectangle on the left side of the form.
129

Figure 6.3: The user can rename the critter by typing in the little box.
130
Figure 6.4: After the user clicks the Change My Name button, the critter reports its new name. Any subsequent clicks on the critter will return the new name.
You can do other interesting things with the critter. You can change its mood by clicking the drop−down list of various temperaments. Figure 6.5 illustrates the critter after the user chooses a different mood.
131

Figure 6.5: When the user chooses a new mood from the drop−down list, the image changes accordingly.
The user can also change the critter’s size, by manipulating the scroll bar. Changing the location of the rectangle inside the elevator shaft changes the size of the critter image. Figures 6.6 and 6.7 illustrate this phenomenon.
132
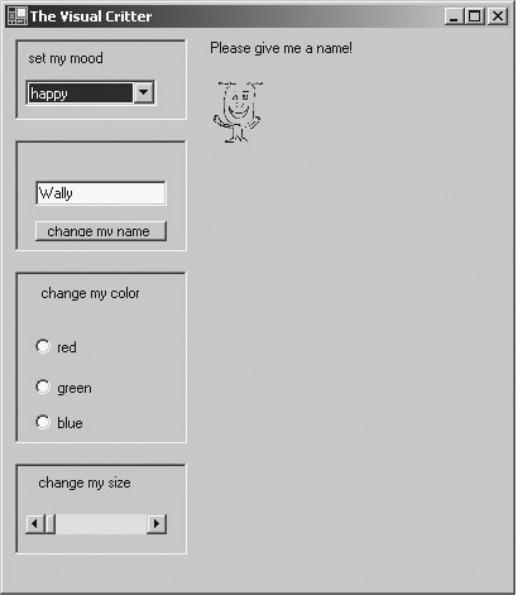
Figure 6.6: The elevator shaft is near the top, and the critter image is very small.
133

Figure 6.7: When the user moves the scroll bar down, the critter grows.
You can also change the color of the background on which the critter resides. Illustrating these color changes on a black−and−white page is impossible, so you need to experiment with the program to see this phenomenon.
Creating a Windows−Style Program with a GUI
The Windows operating system, like most modern computer operating systems, provides a graphical user interface (GUI). The GUI, pronounced “gooey,” (I love it when technical terms sound silly) has several purposes. It is intended to make the user’s life easier. Manipulating a mouse and clicking screen elements is presumably easier than typing commands from a text−based menu. Visual elements on the screen are more aesthetically interesting than the kinds of programs you have seen so far in this book. Graphical elements, such as text boxes, list boxes, and scroll bars, also have practical benefits. Many of them are designed to limit user input. This prevents the user from entering invalid data and minimizes the error−checking code the programmer must write. Also, most graphical elements are already familiar to computer users. If you use only standard components in your programs, most of your users will already know the basic operation of these objects. Finally, the visual components are predefined by the Windows operating system, so you don’t have to write all the code for them every time. All the visual elements are available as objects.
134