


Writing the Event Handlers
The event handlers for the Font Chooser are very simple. Essentially, all of them defer control to the AssignFont() method:
private void lstFontName_SelectedIndexChanged(object sender, System.EventArgs e) {
AssignFont();
}
private void chkBold_CheckedChanged(object sender, System.EventArgs e) {
AssignFont();
}
private void chkItalic_CheckedChanged(object sender, System.EventArgs e) {
AssignFont();
}
private void rad10_CheckedChanged(object sender, System.EventArgs e) {
fontSize = 10; AssignFont();
}
private void rad20_CheckedChanged(object sender, System.EventArgs e) {
fontSize = 20; AssignFont();
} // end AssignFont
I started to write complete code for each event, until it became clear that the event methods would be almost identical. Any time you find yourself writing repetitive code is a good time to consider encapsulation, so I moved all the code that is common to all the methods to the AssignFont() method and had each event handler call that method. If I decide later to change my logic, I’ll have to change it in only one place. The radio buttons are the only event handlers that have additional code. If a radio button is pressed (which is what causes the CheckChanged event to trigger), that button’s checked property is true, and all the others are false. I set the fontSize variable in the event handler because in the event handler you know what the correct size will be. If you wait for the AssignFont() method to check for the font size, you have to check each radio button to see which was pressed.
I could not use this technique in the check boxes because the state of the font style depends on all the checkboxes, not just the currently selected one.
Working with Images and Scroll Bars
The selection elements you learned in the preceding section are great when you want some kind of text input from the user. However, often you are interested in numeric or spatial information from the user. Also, if the interface is graphical, you should be able to incorporate custom graphics into your programs. In this section you will learn how to do both these things.
157

Changing an Image’s Size
The Sizer program demonstrates how to incorporate custom graphics into your C# programs using the picture box control. It also illustrates the scroll bar control, which is handy when you want the user to choose an integer value from a specified range (even if the user doesn’t know what an integer is). Figures 6.20 and 6.21 demonstrate the Sizer in all its impressive glory.
Figure 6.20: In its default state, the picture is small, and the scroll bar is all the way to the left.
Figure 6.21: When the user drags the scroll bar, the image becomes larger.
This program has only one line of custom code. Most of the work went into setting up the form. Figure 6.22 shows my diagram of the form and its objects.
158

Figure 6.22: My initial sketch of the Sizer program.
When I had some idea of what I wanted to do, I could find the right objects to build the form and the right properties to manipulate the objects.
Setting Up the Picture Box
The picture box control is cleverly named because it is a box that holds a picture. It is a very convenient way to add graphics to your programs. You can create an image in any image−editing software and attach that image to the picture box control. You can then manipulate the image by adjusting the control’s properties. The image property is used to assign an image to the picture box. Picture boxes can take many standard image types, including Windows bitmaps (.bmp files), Graphical Interchange Format (.gif) files, and Joint Picture Experts Group (.jpg) format files. Generally, I like to use a compressed format such as .gif or .jpg, but the choice is up to you.
Trick If you are going to be doing much graphics work, you need a powerful image−editing tool. Many quality commercial packages are available, but in case you’re on a budget, an excellent freeware package called the Gimp is included on the CD−ROM accompanying this book. The Gimp is an open−source program originally written for the Linux family of operating systems, but the version included on the CD works in Windows. This program features most of the high−end tools you need in an image editor, including layers, transparency, channels, masking, paths, Bèzier selection, and so on. I used it to prepare all the screen shots for this book.
Adding an Image to the Picture Box
You can add an image to the picture box by clicking the image property in the Properties window while a picture box control is selected. You will see the ellipsis button indicating that a special editor is available for initializing the property. When you click the ellipsis button, you see a dialog box that lets you pick an image file from your hard drive. You can use an image stored in the most common image formats used in Windows and on the Web, including raster formats such as .bmp, .gif, .jpg,
159
and .png and the vector formats .wmf and .emf. You can use an image you already have access to or create your own.
In the Real World
Many images are copyrighted, so you must get permission before using an image somebody else has created. If you plan to release your software, get permission to use art work, create it yourself, or purchase it (select a finished product or hire an artist). Most of the time, I create crude graphics, and if they need to be improved (they usually do), I bring in a professional artist. Still, it’s good to have sketches so that you can indicate what you’re trying to accomplish.
Manipulating the Image’s SizeMode Property
Images almost never come in the size you need for your programs. If your picture box is exactly the same size as the picture it is showing, everything is fine. This rarely happens, so the SizeMode property of the Image object gives you several ways to resolve this conflict.
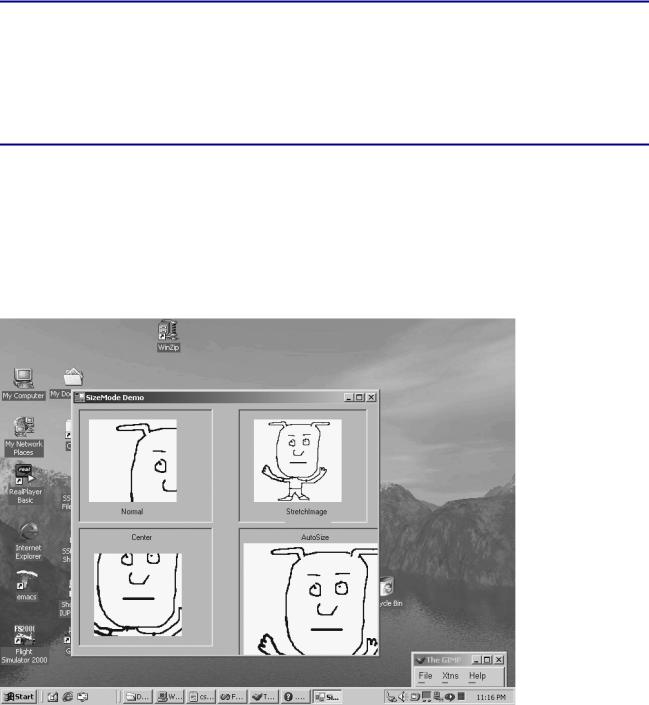
Figure 6.23 demonstrates the various settings of the SizeMode property.
Figure 6.23: All the picture boxes are the same, except for the setting of SizeMode.
Trick I did not include a source code listing for this program because I added no event logic at all. The visual layout of the program illustrates what I’m describing in this section. The actual program with source code is available on the CD−ROM, so you can look at it there.
The default setting for the SizeMode property is Normal. The image will be loaded into the picture box at its normal scale, but if the picture box is too small, the bottom and right segments of the image will be trimmed. Setting SizeMode to StretchImage causes the image to be stretched and squashed so that it fits the size and shape of the picture box. This can cause distortion if the image and the picture boxes are not the same general shape. For example, if the image is square and the
160