- •Microsoft C# Programming for the Absolute Beginner
- •Table of Contents
- •Microsoft C# Programming for the Absolute Beginner
- •Introduction
- •Overview
- •Chapter 1: Basic Input and Output: A Mini Adventure
- •Project: The Mini Adventure
- •Reviewing Basic C# Concepts
- •Namespaces
- •Classes
- •Methods
- •Statements
- •The Console Object
- •.NET Documentation
- •Getting into the Visual Studio .Net Environment
- •Examining the Default Code
- •Creating a Custom Namespace
- •Adding Summary Comments
- •Creating the Class
- •Moving from Code to a Program
- •Compiling Your Program
- •Looking for Bugs
- •Getting Input from the User
- •Creating a String Variable
- •Getting a Value with the Console.ReadLine() Method
- •Incorporating a Variable in Output
- •Combining String Values
- •Combining Strings with Concatenation
- •Adding a Tab Character
- •Using the Newline Sequence
- •Displaying a Backslash
- •Displaying Quotation Marks
- •Launching the Mini Adventure
- •Planning the Story
- •Creating the Variables
- •Getting Values from the User
- •Writing the Output
- •Finishing the Program
- •Summary
- •Chapter 2: Branching and Operators: The Math Game
- •The Math Game
- •Using Numeric Variables
- •The Simple Math Game
- •Numeric Variable Types
- •Integer Variables
- •Long Integers
- •Data Type Problems
- •Math Operators
- •Converting Variables
- •Explicit Casting
- •The Convert Object
- •Creating a Branch in Program Logic
- •The Hi Bill Game
- •Condition Testing
- •The If Statement
- •The Else Clause
- •Multiple Conditions
- •Working with The Switch Statement
- •The Switch Demo Program
- •Examining How Switch Statements Work
- •Creating a Random Number
- •Introducing the Die Roller
- •Exploring the Random Object
- •Creating a Random Double with the .NextDouble() Method
- •Getting the Values of Dice
- •Creating the Math Game
- •Designing the Game
- •Creating the Variables
- •Managing Addition
- •Managing Subtraction
- •Managing Multiplication and Division
- •Checking the Answers
- •Waiting for the Carriage Return
- •Summary
- •Chapter 3: Loops and Strings: The Pig Latin Program
- •Project: The Pig Latin Program
- •Investigating The String Object
- •The String Mangler Program
- •A Closer Look at Strings
- •Using the Object Browser
- •Experimenting with String Methods
- •Performing Common String Manipulations
- •Using a For Loop
- •Examining The Bean Counter Program
- •Creating a Sentry Variable
- •Checking for an Upper Limit
- •Incrementing the Variable
- •Examining the Behavior of the For Loop
- •The Fancy Beans Program
- •Skipping Numbers
- •Counting Backwards
- •Using a Foreach Loop to Break Up a Sentence
- •Using a While Loop
- •The Magic Word Program
- •Writing an Effective While Loop
- •Planning Your Program with the STAIR Process
- •S: State the Problem
- •T: Tool Identification
- •A: Algorithm
- •I: Implementation
- •R: Refinement
- •Applying STAIR to the Pig Latin Program
- •Stating the Problem
- •Identifying the Tools
- •Creating the Algorithm
- •Implementing and Refining
- •Writing the Pig Latin Program
- •Setting Up the Variables
- •Creating the Outside Loop
- •Dividing the Phrase into Words
- •Extracting the First Character
- •Checking for a Vowel
- •Adding Debugging Code
- •Closing Up the code
- •Summary
- •Introducing the Critter Program
- •Creating Methods to Reuse Code
- •The Song Program
- •Building the Main() Method
- •Creating a Simple Method
- •Adding a Parameter
- •Returning a Value
- •Creating a Menu
- •Creating a Main Loop
- •Creating the Sentry Variable
- •Calling a Method
- •Working with the Results
- •Writing the showMenu() Method
- •Getting Input from the User
- •Handling Exceptions
- •Returning a Value
- •Creating a New Object with the CritterName Program
- •Creating the Basic Critter
- •Using Scope Modifiers
- •Using a Public Instance Variable
- •Creating an Instance of the Critter
- •Adding a Method
- •Creating the talk() Method for the CritterTalk Program
- •Changing the Menu to Use the talk() Method
- •Creating a Property in the CritterProp Program
- •Examining the Critter Prop Program
- •Creating the Critter with a Name Property
- •Using Properties as Filters
- •Making the Critter More Lifelike
- •Adding More Private Variables
- •Adding the Age() Method
- •Adding the Eat() Method
- •Adding the Play() Method
- •Modifying the Talk() Method
- •Making Changes in the Main Class
- •Summary
- •Introducing the Snowball Fight
- •Inheritance and Encapsulation
- •Creating a Constructor
- •Adding a Constructor to the Critter Class
- •Creating the CritViewer Class
- •Reviewing the Static Keyword
- •Calling a Constructor from the Main() Method
- •Working with Multiple Files
- •Overloading Constructors
- •Viewing the Improved Critter Class
- •Adding Polymorphism to Your Objects
- •Modifying the Critter Viewer in CritOver to Demonstrate Overloaded Constructors
- •Using Inheritance to Make New Classes
- •Creating a Class to View the Clone
- •Creating the Critter Class
- •Improving an Existing Class
- •Introducing the Glitter Critter
- •Adding Methods to a New Class
- •Changing the Critter Viewer Again
- •Creating the Snowball Fight
- •Building the Fighter
- •Building the Robot Fighter
- •Creating the Main Menu Class
- •Summary
- •Overview
- •Introducing the Visual Critter
- •Thinking Like a GUI Programmer
- •Creating a Graphical User Interface (GUI)
- •Examining the Code of a Windows Program
- •Adding New Namespaces
- •Creating the Form Object
- •Creating a Destructor
- •Creating the Components
- •Setting Component Properties
- •Setting Up the Form
- •Writing the Main() Method
- •Creating an Interactive Program
- •Responding to a Simple Event
- •Creating and Adding the Components
- •Adding an Event to the Program
- •Creating an Event Handler
- •Allowing for Multiple Selections
- •Choosing a Font with Selection Controls
- •Creating the User Interface
- •Examining Selection Tools
- •Creating Instance Variables in the Font Chooser
- •Writing the AssignFont() Method
- •Writing the Event Handlers
- •Working with Images and Scroll Bars
- •Setting Up the Picture Box
- •Adding a Scroll Bar
- •Revisiting the Visual Critter
- •Designing the Program
- •Determining the Necessary Tools
- •Designing the Form
- •Writing the Code
- •Summary
- •Chapter 7: Timers and Animation: The Lunar Lander
- •Introducing the Lunar Lander
- •Reading Values from the Keyboard
- •Introducing the Key Reader Program
- •Setting Up the Key Reader Program
- •Coding the KeyPress Event
- •Coding the KeyDown Event
- •Determining Which Key Was Pressed
- •Animating Images
- •Introducing the ImageList Control
- •Setting Up an Image List
- •Looking at the Image Collection
- •Displaying an Image from the Image List
- •Using a Timer to Automate Animation
- •Introducing the Timer Control
- •Configuring the Timer
- •Adding Motion
- •Checking for Keyboard Input
- •Working with the Location Property
- •Detecting Collisions between Objects
- •Coding the Crasher Program
- •Getting Values for newX and newY
- •Bouncing the Ball off the Sides
- •Checking for Collisions
- •Extracting a Rectangle from a Component
- •Getting More from the MessageBox Object
- •Introducing the MsgDemo Program
- •Retrieving Values from the MessageBox
- •Coding the Lunar Lander
- •The Visual Design
- •The Constructor
- •The timer1_Tick() Method
- •The moveShip() Method
- •The checkLanding() Method
- •The theForm_KeyDown() Method
- •The showStats() Method
- •The killShip() Method
- •The initGame() Method
- •Summary
- •Chapter 8: Arrays: The Soccer Game
- •The Soccer Game
- •Introducing Arrays
- •Exploring the Counter Program
- •Creating an Array of Strings
- •Referring to Elements in an Array
- •Working with Arrays
- •Using the Array Demo Program to Explore Arrays
- •Building the Languages Array
- •Sorting the Array
- •Designing the Soccer Game
- •Solving a Subset of the Problem
- •Adding Percentages for the Other Players
- •Setting Up the Shot Demo Program
- •Setting Up the List Boxes
- •Using a Custom Event Handler
- •Writing the changeStatus() Method
- •Kicking the Ball
- •Designing Programs by Hand
- •Examining the Form by Hand Program
- •Adding Components in the Constructor
- •Responding to the Button Event
- •Building the Soccer Program
- •Setting Up the Variables
- •Examining the Constructor
- •Setting Up the Players
- •Setting Up the Opponents
- •Setting Up the Goalies
- •Responding to Player Clicks
- •Handling Good Shots
- •Handling Bad Shots
- •Setting a New Current Player
- •Handling the Passage of Time
- •Updating the Score
- •Summary
- •Chapter 9: File Handling: The Adventure Kit
- •Introducing the Adventure Kit
- •Viewing the Main Screen
- •Loading an Adventure
- •Playing an Adventure
- •Creating an Adventure
- •Reading and Writing Text Files
- •Exploring the File IO Program
- •Importing the IO Namespace
- •Writing to a Stream
- •Reading from a Stream
- •Creating Menus
- •Exploring the Menu Demo Program
- •Adding a MainMenu Object
- •Adding a Submenu
- •Setting Up the Properties of Menu Items
- •Writing Event Code for Menus
- •Using Dialog Boxes to Enhance Your Programs
- •Exploring the Dialog Demo Program
- •Adding Standard Dialogs to Your Form
- •Using the File Dialog Controls
- •Responding to File Dialog Events
- •Using the Font Dialog Control
- •Using the Color Dialog Control
- •Storing Entire Objects with Serialization
- •Exploring the Serialization Demo Program
- •Creating the Contact Class
- •Referencing the Serializable Namespace
- •Storing a Class
- •Retrieving a Class
- •Returning to the Adventure Kit Program
- •Examining the Room Class
- •Creating the Dungeon Class
- •Writing the Game Class
- •Writing the Editor Class
- •Writing the MainForm Class
- •Summary
- •Chapter 10: Chapter Basic XML: The Quiz Maker
- •Introducing the Quiz Maker Game
- •Taking a Quiz
- •Creating and Editing Quizzes
- •Investigating XML
- •Defining XML
- •Creating an XML Document in .NET
- •Creating an XML Schema for Your Language
- •Investigating the .NET View of XML
- •Exploring the XmlNode Class
- •Exploring the XmlDocument Class
- •Reading an Existing XML Document
- •Creating the XML Viewer Program
- •Writing New Values to an XML Document
- •Building the Document Structure
- •Adding an Element to the Document
- •Displaying the XML Code
- •Examining the Quizzer Program
- •Building the Main Form
- •Writing the Quiz Form
- •Writing the Editor Form
- •Summary
- •Overview
- •Introducing the SpyMaster Program
- •Creating a Simple Database
- •Accessing the Data Server
- •Accessing the Data in a Program
- •Using Queries to Modify Data Results
- •Limiting Data with the SELECT Statement
- •Using an Existing Database
- •Adding the Capability to Display Queries
- •Creating a Visual Query Builder
- •Working with Relational Databases
- •Improving Your Data with Normalization
- •Using a Join to Connect Two Tables
- •Creating a View
- •Referring to a View in a Program
- •Incorporating the Agent Specialty Attribute
- •Working with Other Databases
- •Creating a New Connection
- •Converting a Data Set to XML
- •Reading from XML to a Data Source
- •Creating the SpyMaster Database
- •Building the Main Form
- •Editing the Assignments
- •Editing the Specialties
- •Viewing the Agents
- •Editing the Agent Data
- •Summary
- •List of Figures
- •List of Tables
- •List of Sidebars
Table 10.2 demonstrates a few key properties and methods of the XmlDocument class.
Note that the CreateElement() and CreateAttribute() methods create the specified structures but do not specifically add them to the document.
Use the XmlNode.AppendNode(), XmlNode.InsertBefore(), or XmlNode.InsertAfter() method to add a node and the XmlElement.SetAttributeNode() method to set an attribute to a node.
Table 10.2: Selected Members of the XmlDocument Class
Member |
Type |
Description |
Example |
Example |
|
|
|
|
Description |
DocumentElement |
Property |
Sets or gets the |
MessageBox.Show |
Displays the root |
|
|
root XML |
(doc.DocumentElement); |
element for an |
|
|
element for the |
|
XmlDocument |
|
|
document |
|
named doc |
CreateAttribute |
Method |
Creates a new |
doc.CreateAttribute |
Creates a new |
|
|
attribute for an |
(name) ("type"); |
attribute but |
|
|
element with |
|
does not add it |
|
|
the specified |
|
|
|
|
name |
|
|
CreateElement |
Method |
Creates a new |
doc.CreateElement |
Creates a new |
(name) |
|
element |
("question"); |
element but |
|
|
|
|
does not add it |
Load(filename) |
Method |
Loads an XML |
doc.Load |
Loads the |
|
|
document from |
("myStuff.xml"); |
specified file into |
|
|
the given file |
|
the document |
|
|
name |
|
|
LoadXml |
Method |
Interprets a |
doc.LoadXml |
Loads the text |
(xmlString) |
|
string value as |
("<simpleXml>this is |
value as a |
|
|
XML |
simple</simpleXml>"); |
simple XML |
|
|
|
|
document |
Save |
Method |
Saves the |
doc.Save |
Saves thecurrent |
(filename) |
|
document to |
("myStuff.xml"); |
document to a |
|
|
the specified |
|
file named |
|
|
file |
|
myStuff.xml |
Reading an Existing XML Document
The only way to make sense of all this information is to build a program that puts it to use. The XML Viewer program will help you see how exactly C# reads an XML document and how to get around in it. The XML Viewer is more than a programming exercise. It is a tool you can use to analyze and explore the structure of any XML document. After you see how it describes the data in an XML document, you will be ready to get inside the engine and see how the program does its work. Figure 10.7 illustrates the XML Viewer as it first loads the quiz document.
287
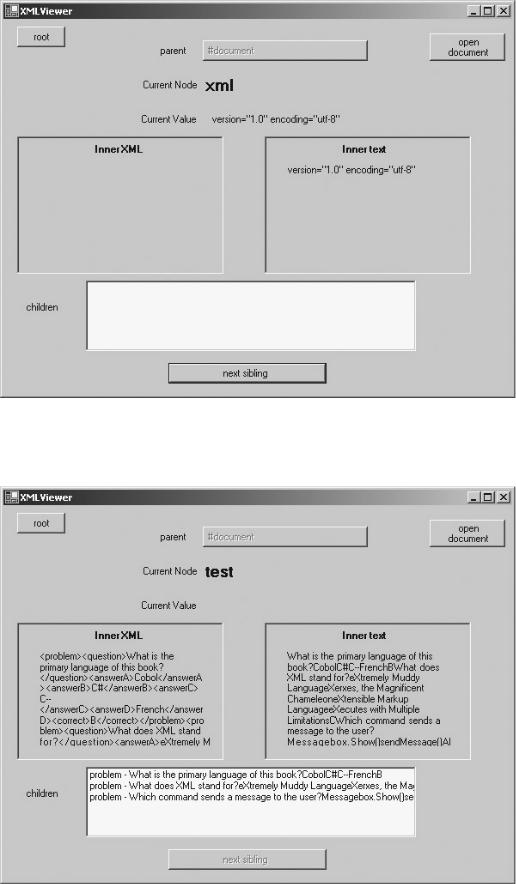
Figure 10.7: The starting node is named xml, but it isn’t very interesting.
The root node is the xml tag itself. It usually provides some background information, but it doesn’t have any children and doesn’t contain a lot of other data. To get to the interesting parts of the file, you click the Next Sibling button (see Figure 10.8).
Figure 10.8: The test node has a lot more information. (Almost too much!)
288
The test node is much more interesting. All the interesting data in the quiz file was somehow related to the test node, so it isn’t surprising that the test node shows much more information. All the screen elements in the XML Viewer program describe properties of the current node. The Parent button refers to the test node’s parent node, which is the document itself. I disabled the Parent button in this particular case because the document is the top layer. The node field refers to the Name property of the current node. In this case, the name of the current node is test. The value label refers to the Value property of the current node. You might be surprised that the test node has no value at all. That is because all the information of the test is actually stored in its children. As you will see, the InnerText property often turns out to be more useful than the Value property.
The InnerXml property returns all the XML associated with the current node. When test is the current node, all the XML between the <test> and </test> tags in the original XML show up as the InnerXml property. The InnerText property simply strips out the XML tags from the InnerXml property and returns the resulting text. Notice that the Next Sibling button is disabled because the program has detected that the test element does not have a next sibling.
A node can have several child nodes, as you can see from the test node. In this particular file, the test has three problems, and you can see a list box with three problem nodes. To view one of the child nodes, double−click it. I chose the first problem, which results in Figure 10.9.
Figure 10.9: I have clicked the first problem, and the viewer is now looking at the problem node.
All the screen elements have changed to reflect that the problem node has the focus. The test node is now listed as the parent node, and you can click the button to return to the parent node. (That’s why I made the parent node a button instead of a label.) The problem node still doesn’t have a value because it is mainly a container for other nodes. You can see that the InnerXml and InnerText properties have narrowed their scope considerably. Also, the list of ChildNodes shows the question, possible answers, and correct answer. The Next Sibling button is activated because this question has siblings. Click the Next Sibling button a couple times until it becomes disabled. It will do so at the last question, which gives you a screen like Figure 10.10.
289
Figure 10.10: Now the viewer is pointed at the last child of the test node.
It’s time to investigate the children of the problem node. Click the first child (the question), and you will see something like Figure 10.11.
Figure 10.11: You might be surprised that there still isn’t anything useful in the value field.
It would seem as though the question is the lowest level of the XML document, but it isn’t. The InnerText and InnerXml of the question (and all its siblings) are useful information, but you will see
290
that the question has one child, marked as #text. Not until you get to the #text node do you finally have actual data in the value field. The XML Viewer program is particularly interesting because it can be used to analyze any legal XML document. This points out one of XML’s advantages. The format of the data describes the data’s meaning, so a program can work with data in a new format with some hope of deciphering it.
Figure 10.12 illustrates how the .NET framework sees the quiz document.
291
Figure 10.12: This diagram more accurately reflects how .NET sees an XML document.
Trick
292