2.1. Moving the Cursor
Move the cursor by using the arrow buttons on the keyboard or positioning the mouse and clicking the left button. The keyboard shortcuts listed below are also helpful when moving through the text of a document:
Move Action |
Keystroke |
Beginning of the line |
<HOME> |
End of the line |
<END> |
Top of the document |
<CTRL> + <HOME> |
End of the document |
<CTRL> + <END> |
Try that!
2.2. Selecting Text
To change any attributes of text it must be highlighted first.
Select the text by dragging the mouse over the desired text while keeping the left mouse button depressed, or hold down the SHIFT key on the keyboard while using the arrow buttons to highlight the text.
The following table contains shortcuts for selecting a portion of the text:
Selection |
Technique |
Whole word |
double-click within the word |
Whole paragraph |
triple-click within the paragraph |
Several words or lines |
drag the mouse over the words, or hold down <SHIFT> while using the arrow keys |
Entire document |
choose Editing | Select | Select All from the Ribbon, or press <CTRL>+A |
Deselect the text by clicking anywhere outside of the selection on the page or press an arrow key on the keyboard.
Try that!
2.3. Nonprinting Characters
Certain characters, called nonprinting characters, do not print and will not appear in your printed document but do affect your document layout. You can elect to see these characters on the screen as you type or you can elect to have them remain invisible. This table describes some of them:
Character |
Denotes |
|
A tab |
. |
A space |
¶ |
The end of a paragraph |
|
Hidden text |
Make nonprinting characters visible, and then hide them again:
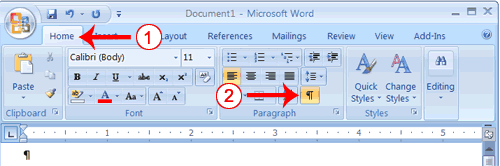
Choose the Home tab.
Click the Show/Hide button
 in
the Paragraph group .
in
the Paragraph group .
The Show/Hide button appears in a contrasting color, when it is selected.
2.4. Formatting Text
2.4.1. Formatting Font Size
Select the text you wish to modify.
Left-click the drop-down arrow next to the font size box on the Home tab. The font size drop-down menu appears.
Move your cursor over the various font sizes. A live preview of the font size will appear in the document.
Left-click the font size you wish to use. The font size will change in the document.
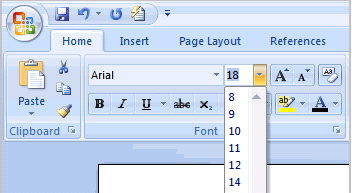
Change the font size of the text under p. 2.4.1.
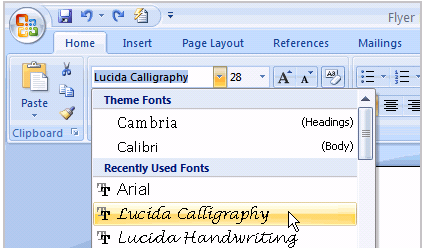
2.4.2. Formatting Font Style
Select the text you wish to modify.
Left-click the drop-down arrow next to the font style box on the Home tab. The font style drop-down menu appears.
Move your cursor over the various font styles. A live preview of the font will appear in the document.
Left-click the font style you wish to use. The font style will change in the document.