

Visual Web Developer™ 2005 Express Edition For Dummies - Alan Simpson
.pdf210 Part III: Personalization and Databases
Figure 10-11:
Using skins in pages.
The control to which you apply a skin won’t actually take on the skin’s appearance immediately. (That’s why the Submit button doesn’t look any different from the Reset button in Figure 10-11.) Keep in mind that so far we’ve only taken the first step to adding themes to the site. There’s still plenty more to do here.
There are many ways to implement themes. But it seems to me the most likely scenario would be that you want each member to be able to choose their own theme, which means to be able to store each user’s theme preference as a profile property. So let’s start with that.
Letting Members Choose a Theme
If the goal is to allow members to choose a theme, the first thing you’ll want to do is create a profile property — say, named PreferredTheme — in which you store each user’s preferred theme. To ensure that each new user has some theme selected, you can give the profile property the name of your default theme.
You can add the profile property to the Web.config file as described in Chapter 9. In my example where I already created profile properties, I would just add a new property named PreferredTheme, give it a default value of DefaultTheme, and a data type of System.String as shown in the following code:

Chapter 10: Using Themes 211
<profile>
<properties>
<add name=”FirstName” /> <add name=”LastName” /> <add name=”Address1” /> <add name=”Address2” /> <add name=”City” />
<add name=”StateProvince” /> <add name=”ZIPPostalCode” />
<add name=”Country” defaultValue=”USA” />
<add name=”PreferredTheme” defaultValue=”DefaultTheme”/> </properties>
</profile>
That takes care of having a place to store each user’s preferred theme. In code, you can use Profile.PreferredTheme whenever you want to get, or set, the current user’s preferred theme.
Next, you need some means of allowing users to explore themes and choose one, which means some sort of interactive form.
Creating a page for viewing themes
Next, you’d need a page where a user can go and take a look at various themes, and then choose a preferred theme. On my site, this page would go in my MemberPages folder because I’d only allow authenticated users to choose themes. So it’s just a matter of right-clicking the MemberPages folder and choosing Add New Item. I’d choose Web Form as the template, enter ChooseTheme.aspx as my page, choose Visual C# as the language, and check both the check boxes for choosing a Master Page and using a code-behind page. Nothing new or different there.
To allow users to choose a theme, you’ll need a control that allows users to choose any one of several mutually exclusive options — such as a drop-down list, a list box, or perhaps a set of option buttons (although you could just as easily use buttons or links).
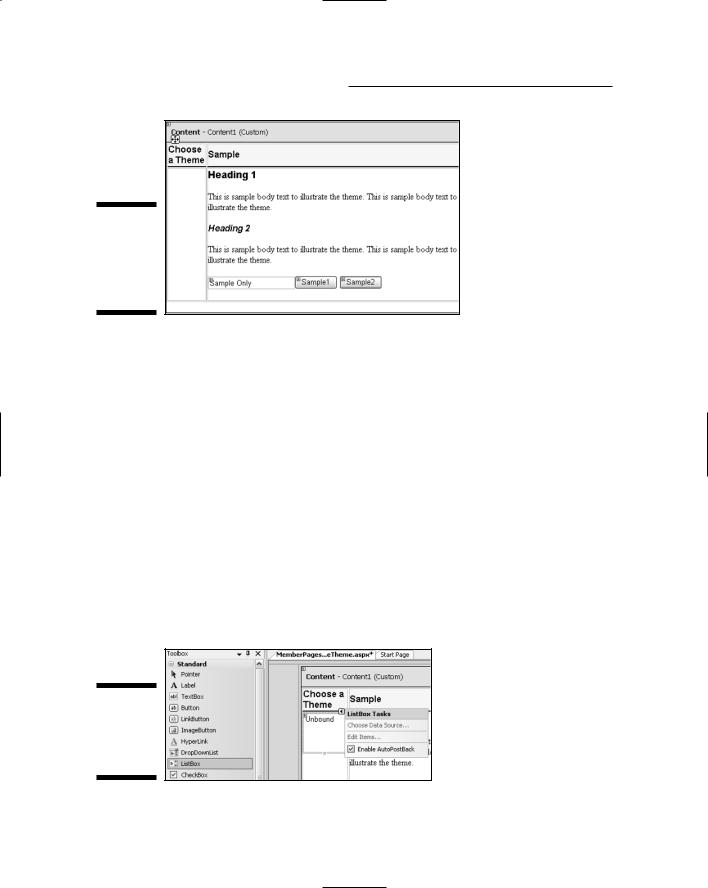
The page also needs some content that uses styles defined in the themes. That way, when the user chooses a theme, you can simply apply the theme to show the user how the theme looks. How you design the page is entirely up to you, of course. As an example, I started off with the page shown in Figure 10-12.
212 Part III: Personalization and Databases
Figure 10-12:
A page that uses elements styled by themes.
Okay, at this point there’s nothing special about the page. It’s just a table with some text, a Textbox control, and a couple of buttons that do nothing. (The Sample2 button has its SkinID property set to Bold to test the Bold skin in my Button.skin themes.) The two top table cells have their Class properties set to ColHead to test the TD.ColHead style in my themes.
Creating a control for choosing a theme
Next comes the tricky part where I need a control that allows users to choose a theme. The trickiness comes from the fact that as soon as the user chooses a theme, we need to do a postback to the server to update the user’s profile and also to apply the theme to the page. But let’s start with the control itself.
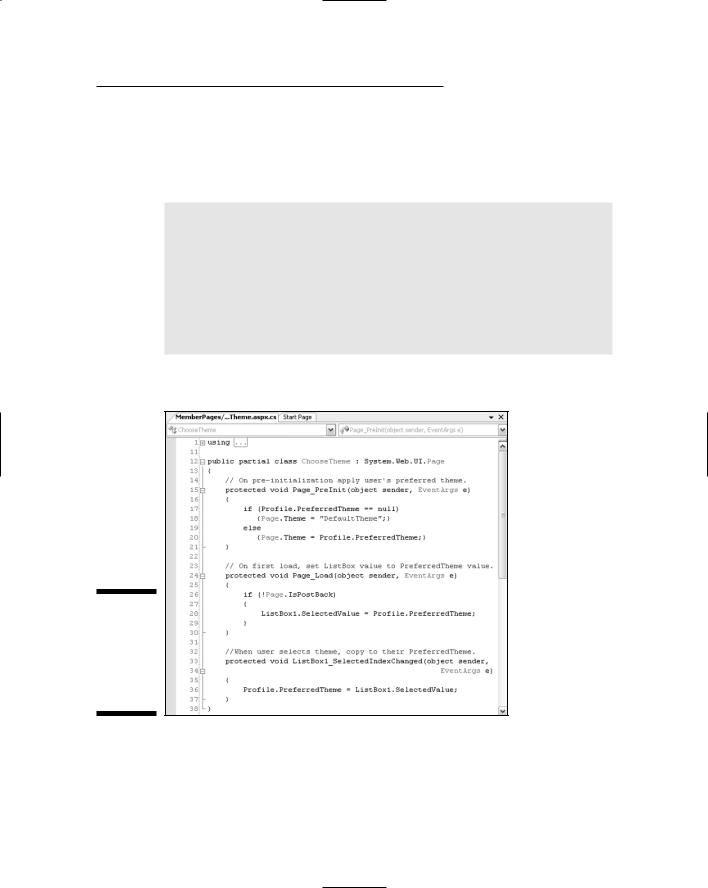
I’ll use a ListBox control for this example. Drag a ListBox control from the Standard controls in the Toolbox onto the page. Then choose Enable AutoPostBack from its common tasks menu (as in Figure 10-13), so a postback occurs as soon as the user chooses a theme.
Figure 10-13:
A ListBox control added to the page.

Chapter 10: Using Themes 213
Next you populate the ListBox with some options. Click Edit Items and use the ListItem Collection Editor (Figure 10-14) to list options to appear in the control. For each option, enter two things:
Text: The text that appears in the box. This can be any text you want.
Value: The value that the selection returns. This must exactly match the name of a Theme folder in the App_Themes folder.
Figure 10-14:
The ListItem
Collection
Editor.
Each time you click the Add button, you’re prompted to enter another item. In Figure 10-14, I’ve added an option for each theme. I left the highlighter on the No Squint option to illustrate that it’s okay to show “No Squint” as two words in the list. However, the value of that option must be NoSquint to match the name of the Theme folder.
When you click OK in the ListItem Collection Editor, you’ll be returned to the page and the options are visible. You can then set the height of the control by dragging its bottom edge (or by setting the Height property in the control’s Properties dialog box).
Storing the preferred theme
When the user makes a selection from the ListBox, that control’s SelectedValue property will equal the Value of the selected item. For starters, we need some code to copy the value to the user’s PreferredTheme property. To get to the code-behind file, first double-click the ListBox control. The event handler for the ListBox is named ListBox1_SelectedIndexChanged.

214 Part III: Personalization and Databases
The C# code needed to copy the selected value to the user’s profile is simply this:
Profile.PreferredTheme = ListBox1.SelectedValue;
Another detail to think about here is the fact that when the user first opens the page, she will already have a theme name selected in her profile. Then the ChooseTheme page first opens; the ListBox control should show that current theme as the selected theme. So in the Page_Load event, you need some code to set the SelectedValue of the ListBox control to whatever is currently in the user’s PreferredTheme property. Hence, the Page_Load event needs this statement:
ListBox1.SelectedValue = Profile.PreferredTheme;
But, as is often the case with page loads, we have to take postbacks into consideration. Every time the user clicks the ListBox control, that’s going to cause a postback, as we really only want to load the preferred theme when the user first opens the page. So once again, we need some “if not postback” logic in the Page_Load event handler, as shown here (in C#):
if (!Page.IsPostBack)
{
ListBox1.SelectedValue = Profile.PreferredTheme;
}
Applying a theme
Given our whole approach to themes in this chapter, it stands to reason that whenever a page loads, its theme must be set to the user’s preferred theme. To get that done in your code, simply set Page.Theme to the user’s preferred theme. In C#, the code looks like this:
Page.Theme = Profile.PreferredTheme;
But, you can’t set a theme in the Page_Load event because the theme has to be applied before content and controls are rendered on the page. The Page_Load event fires after all that stuff is done, which is too late to apply a theme. So use the Page_PreInitI() event handler instead.
You won’t necessarily find a predefined pre-init handler in the page. But you can just copy and paste one of the existing handlers into the code and change its name to Page_PreInit. Then type in the code to apply the preferred theme, as given here:
protected void Page_PreInit(object sender, EventArgs e)
{
Page.Theme = Profile.PreferredTheme;
}
Chapter 10: Using Themes 215
In the above code, I’m assuming that every user will have something in their PreferredTheme profile, mainly because I gave that property a default value in Web.config. Just to play it safe, you could build a little logic into the code so if the PreferredTheme is “nothing,” then DefaultTheme is used as the preferred theme, as given here (again in C#):
protected void Page_PreInit(object sender, EventArgs e)
{
if (Profile.PreferredTheme == null)
{
Page.Theme = “DefaultTheme”;
}
else
{
Page.Theme = Profile.PreferredTheme;
}
}
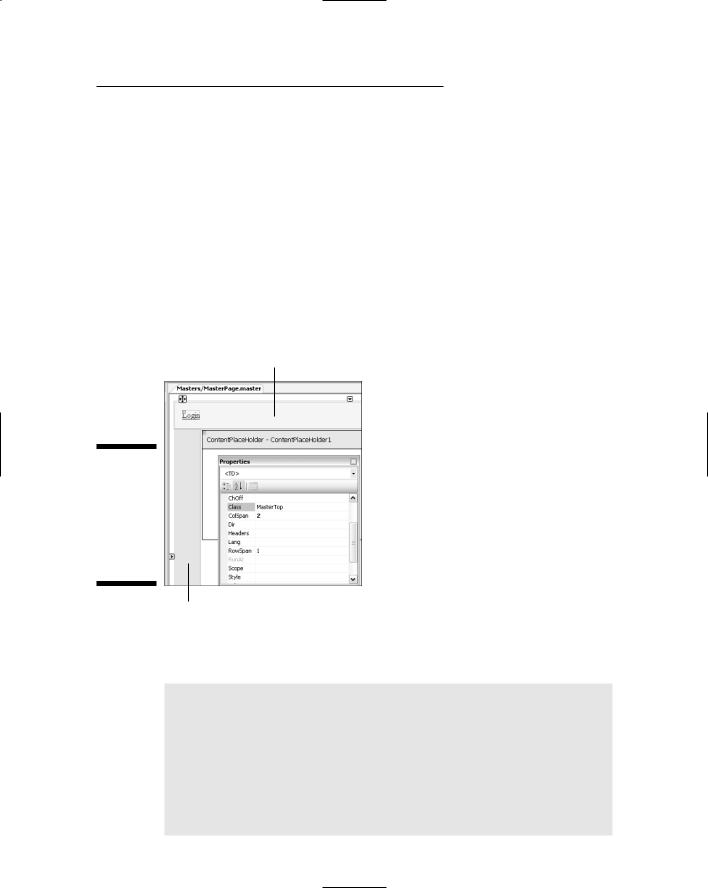
The final C# code for the ChooseTheme.aspx page looks like Figure 10-15.
Figure 10-15:
Here’s the C# codebehind page for Choose
Theme.
aspx.
All well and good — save for one little problem unique to this page: The PreInit event fires before the postback — which doesn’t allow for the theme to be applied to the current page the first time you choose an option from the list box. To get around that, you can add a Preview button to the page beneath the ListBox, and provide some sort of instruction telling the user to click a theme name, then click Preview.

216 Part III: Personalization and Databases
You don’t have to program the button to do anything, because if you just drag a button from the Standard tools into the page, it will automatically do a postback when clicked later, in the browser. So basically you’d end up with something like Figure 10-16. The only control on that page that has an event handler is the
ListBox control, which is handled by the ListBox1_SelectedIndexChanged shown in Figure 10-15.
Figure 10-16:
AChoose Theme. aspx
example.
A theme tester page
The ChooseTheme page simply allows a user to choose a theme. The theme won’t actually be applied to any pages unless you specifically apply it. Then the theme of choice is the current user’s preferred theme. So you need a PreInit handler on every page that will apply the theme.
To test it out, create a page named ThemeTester.aspx, and provide a link to it from the ChooseTheme.aspx page, as I did in Figure 10-16. In ThemeTester you can put any text or controls you want. But — most importantly — your code must apply the theme, like this:
protected void Page_PreInit(object sender, EventArgs e)
{
if (Profile.PreferredTheme == null)
{Page.Theme = “DefaultTheme”; }
else
{Page.Theme = Profile.PreferredTheme; }
}
That should be all that’s required in the code-behind page of any page to which you want to apply user’s preferred themes. After you get things working in ChooseTheme.aspx and ThemeTester.aspx, then it’s just a matter of copying that same Page_PreInit handler to any page that needs to apply a user-selected theme.
Chapter 10: Using Themes 217
Applying Themes to Master Pages
You can apply themes to Master Pages in same way you apply themes to an
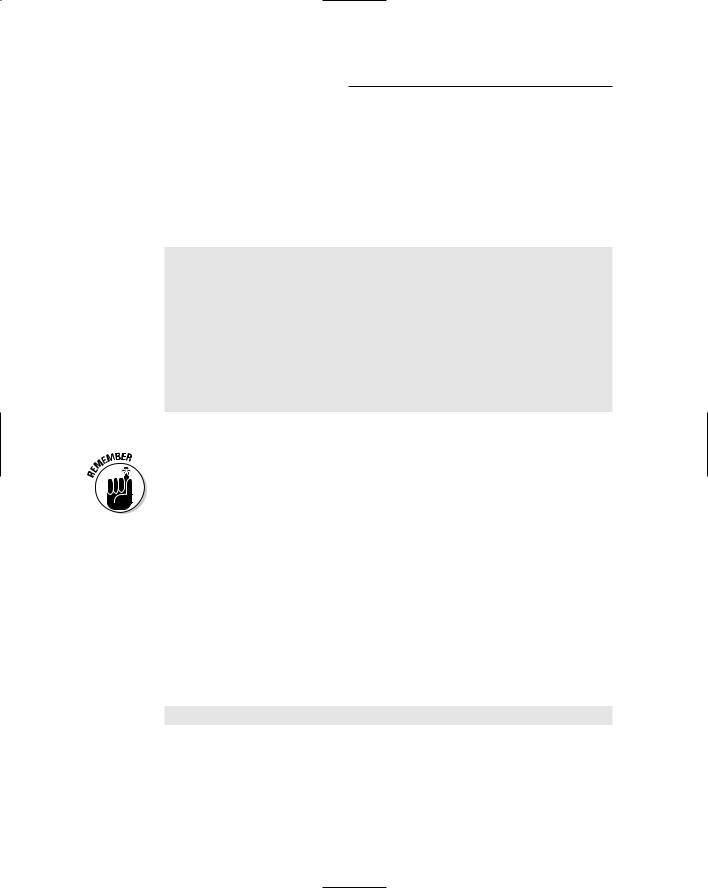
.aspx page. For example, you could allow users to choose background colors for the various table cells that make up a Master Page layout. Step 1 would be to open the Master Page and set the Style property of each table cell to a class name. Remove any explicitly-set Style properties that would conflict with the theme.
In Figure 10-17, for example, I removed the Style properties for the top table cell, and changed the Class property to a MasterTop. And though they’re not visible in the figure, I removed the Style properties from the left column as well, and set its Class property to MasterLeft.
TD.MasterTop
Figure 10-17:
Master
Page.
master with CSS classes applied to table cells.
TD.MasterLeft
Close and save the Master Page. Then in your main style sheet (if you have one), set a default style for both elements as in the examples given here:
TD.MasterTop
{
background-color: e0ffff; border-bottom: #483d8b thin solid;
}
TD.MasterLeft
{
background-color: #fffff0; border-right: #483d8b thin solid;
}
218 Part III: Personalization and Databases
You’ll need the similar style rules in each theme folder’s StyleSheet.css page, though the colors and other stylistic options you choose would vary from one theme folder to the next.
In the code-behind file for the Master Page (MasterPage.master.cs in my example), add Page_PreInit code to apply the user’s preferred theme. The code is no different from the code you’d use in an .aspx page. So, in my example, it would look like this:
public partial class MasterPage : System.Web.UI.MasterPage
{
// On pre-initialization apply user’s preferred theme. protected void Page_PreInit(object sender, EventArgs e)
{
if (Profile.PreferredTheme == null)
{Page.Theme = “DefaultTheme”; } else
{Page.Theme = Profile.PreferredTheme; }
}
}
Whether to allow users to customize Master Pages is really something you have to decide for yourself.
There’s no rule that says a site can only have one Master Page. The fact is, a site can have as many Master Pages as you like.
As an alternative to allowing users to customize “the” Master Page for your site, you could have two Master pages. Use one fixed-and-unchanging Master Page for general pages. Then create a second Master Page for privileged content only, and allow users to set styles within that Master Page only.
Other Ways to Apply Themes
In all of the above examples of applying themes, you used the syntax
Page.theme=Profile.PreferredTheme to apply the user’s preferred theme to a page. Here’s another syntax you can use as an alternative:
Page.StyleSheetTheme = Profile.PreferredTheme;
The difference between using Page.Theme and using Page.StyleSheetTheme is as follows:

Chapter 10: Using Themes 219
Page.Theme: The theme’s style settings override any local style settings.
Page.StyleSheetTheme: Behaves more like a Cascading Style Sheet — local style settings still take precedence over styles defined in themes.
Choosing one option or the other is largely a matter of personal taste. The advantage of using Page.Theme is that you know that whatever is defined in the theme “rules.” You won’t get any unpleasant surprises when a control or a chunk of text ignores the theme because you previously set some style that’s now overriding your theme.
The disadvantage to using Page.Theme is that if ever there was a need to override a theme-defined style for a particular control, there wouldn’t be any way to do it, other than to create a special style rule for that one control.
In the long run, you’re probably better off sticking to the Page.Theme approach and allowing themes to take precedence. You don’t want to end up with hundreds of controls on hundreds of pages, all doing their own things and ignoring your themes. That can just make using (not to mention maintaining) the site all the more confusing and more laborious.
Defining a Site-Wide Default Theme
In the code samples above, themes are applied to pages programmatically in the sense that code defines which theme is used for any given page based on the user’s PreferredTheme property. At a higher level, you can define a default theme to be used by all the pages in your site. You do so in the Web.config file for your site using either of the following syntaxes:
<pages theme=”ThemeName” />
<pages styleSheetTheme =”ThemeName” />
where ThemeName is the name of a theme folder. For example, if you create a theme folder named DefaultTheme, and want to apply that theme to all pages in the site, you add the following line to your Web.config file:
<pages theme=”DefaultTheme” />
Be sure to put the tag between the <system.web> and </system.web> tags in Web.config (as in Figure 10-18).