

Visual Web Developer™ 2005 Express Edition For Dummies - Alan Simpson
.pdf150 Part II: Building Your Web Site
To relax the password rules, you need to edit the Web.config file in your site’s root folder. To edit the Web.config file, just double-click its name at (or near) the bottom of Solution Explorer. Initially the file contains some XML tags that look something like this:
<?xml version=”1.0” encoding=”utf-8”?>
<configuration xmlns=”http://schemas.microsoft.com/.NetConfiguration/v2.0”>
<system.web>
<roleManager enabled=”true” />
<authentication mode=”Forms” />
</system.web>
</configuration>
You need to add some new tags above the closing </system.web> tag. You must type carefully because even the slightest mistake will prevent your site from working. (In fact, I’ll post the exact text in the Chapter 7 section of my Web site at www.coolnerds.com/vwd so you can copy-and-paste rather than type). The exact lines to add above the </system.web> tag are as follows:
<membership>
<providers>
<remove name=”AspNetSqlMembershipProvider”/> <add name=”AspNetSqlMembershipProvider”
type=”System.Web.Security.SqlMembershipProvider”
connectionStringName=”LocalSqlServer”
minRequiredPasswordLength=”5”
minRequiredNonalphanumericCharacters=”0”
passwordStrengthRegularExpression=””
/>
</providers>
</membership>
The minRequredPasswordLength setting determines the minimum number of characters required for a password to be valid. I set that to five characters in the example. You can use a different minimum length if you prefer.
The minRequiredNonalphanumericCharacters setting determines how many non-alphanumeric characters (punctuation marks) are required. I set that to zero so no punctuation marks are required.
The passwordStrengthRegularExpression setting defines a regular expression that could require that the password contain (or not contain) certain characters. By setting that to nothing (“”), as in the example, you allow “normal” passwords that can contain only text.
Figure 7-22 shows how the Web.config file should look after adding the appropriate lines to the file. Notice how the new lines are all together within the <system.web> and </system.web> tags.

Chapter 7: Working with ASP.NET Controls 151
Figure 7-22:
Web.config file with code to relax password restrictions.
Make sure you close and save the Web.config file after making any changes. To test the change, view the CreateAcct.aspx page (described earlier in this chapter) in a browser. (If you get an error message rather than the page, you typed something wrong in the Web.config file). You should be able to add a new test user account using a five-character (or more) password that contains no punctuation marks.

152 Part II: Building Your Web Site

Chapter 8
Easy Site Navigation
In This Chapter
Getting organized, staying organized
Creating custom site-navigation controls
Using Menu, TreeView, and SiteMenuPath controls
Make life easier with Web User Controls
If your site is to be successful, it must be easy to navigate. If people can’t easily find and get to what they need, they might quickly lose interest and
move on to another site. If yours is a large Web site, navigating between pages using nothing but hyperlinks can be tedious for the user. But for you, the developer, managing a large site with too many links can also be a nightmare.
Visual Web Developer’s Site Navigation controls provide a great way to provide an easy, consistent navigational structure for your site. Furthermore, you can define all the links in one place. That way, when you add a new page to the site (or delete a page), you don’t have to worry about going back to tweak the links in a bunch of different pages in your site — you just have to keep the links straight in one file. This chapter gives you the goods on how to manage your sites with Site Navigation controls.
Getting Organized
At some point, you have to think about how you’re going to organize your Web site’s content. Exactly how you do that depends on your content, the size of your site, and your definition of the word organized. But if you intend for your site to have major areas that people can navigate to, it would be good to create a file for each of those major areas. You can even put a blank
.aspx page in each one as a placeholder to link to when you’re developing your site navigation.

154 Part II: Building Your Web Site
In Figure 8-1, for example, I’ve created some folders within my PublicPages folder. I’ve put a blank .aspx page in each folder. You don’t have to include all your site’s folders in your navigation structure. In the interest of keeping this example to a reasonable size, I’ll just focus on the AboutUs, Help, Products, and Services folders in my PublicPages folder.
Figure 8-1:
Some folders and pages in the PublicPages folder.
Using Site-Navigation Controls
The two main VWD controls for site navigation are Menu and TreeView. The Menu control offers a simple drop-down menu of navigational links, as shown at the left of Figure 8-2. When the Menu control is first displayed on the page in a browser, only the Home link and arrow symbol are visible. The menu of links doesn’t appear until the user clicks the arrow button. The Menu control is good for a small menu that you want to keep out of the way most of the time.
Figure 8-2:
Menu
(left) and
TreeView
(right)
examples.

Chapter 8: Easy Site Navigation 155
The TreeView control shows the navigational structure in a collapsible tree, as in the example at right in Figure 8-2. The user can click + and – signs to (respectively) expand and collapse categories. I’m sure you’ve seen a gazillion similar collapsible trees; in VWD, both the Toolbox and Solution Explorer are collapsible trees. The TreeView control is best for handling larger navigational tasks.
Both the Menu and TreeView commands can be used with either static data or dynamic data. When using a control with static data, the navigational structure of the site is defined as part of the control. The method is easier in that you can define the whole menu structure just by filling in the blanks in dialog boxes.
With dynamic data, you store data about the site’s structure in a file, called a site map, that’s external to the control. The advantage to this approach is that the site’s navigational structure is stored in one place. So if you need to change the navigational structure of the site, you just have to change the external file, not every control on every page.
In the sections that follow, I’ll look at using both controls with static data and with dynamic, external data.
Using the TreeView and Menu Controls
The TreeView and Menu server controls are both in the Navigation category of the Toolbox. They’re so similar that reading one set of instructions is sufficient for you to use either. In this section, I describe how to use the controls with static data (without a site map that’s defined in an external file). This is the easiest way to create a map, especially if it’s a small map that’s not likely to change often. (That’s especially true if, like a lot of us, you know nothing about XML and can’t type worth beans.)
The only real drawback to this method is that it’s tedious. And if you put the control on a specific Web page, you’d have to re-create the control on (or copy and paste the control to) other pages. (Unless you put the control in a Master Page, in which case it will appear on all pages that use the Master Page — which may not be what you’re looking for.)
If you don’t want to put the navigation control on a Master Page, you could put it in a Web User Control and use it as needed on pages throughout your site. I’ll talk about Web User Controls later in this chapter.
So the first step is to open the page on which you want to place the Menu or
TreeView control. Make sure you’re in Design view. Then follow these steps:
156 Part II: Building Your Web Site
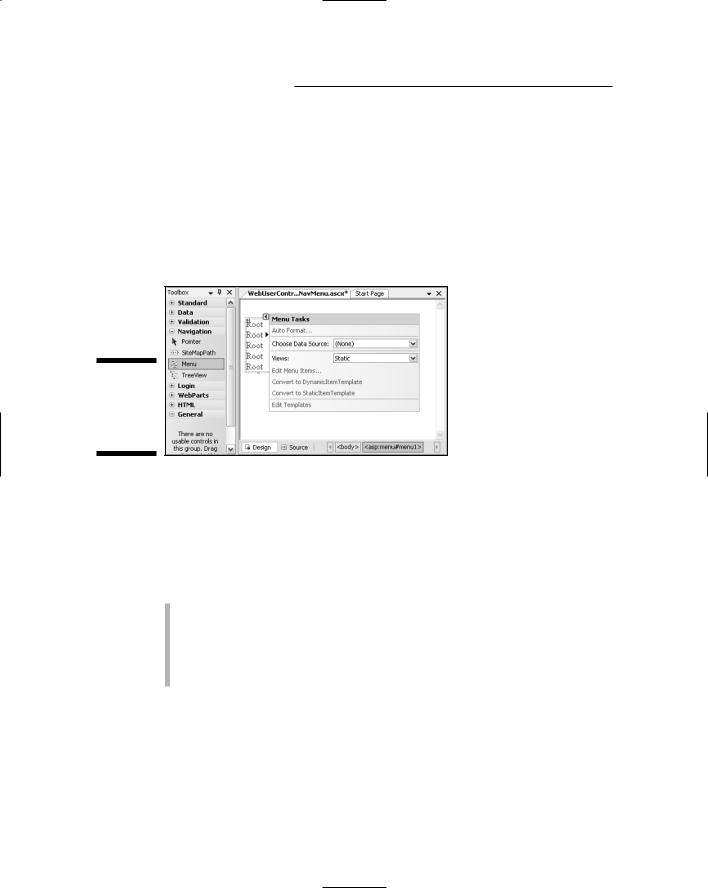
1.Drag either a Menu or TreeView control from the Toolbox onto the page as shown in Figure 8-3.
2.On the Common Tasks menu, click Edit Menu Items.
The Menu Item Editor dialog box opens.
3.Use the Menu Item Editor to define each menu item.
More on this rather hefty step in a moment.
4.Click OK.
Figure 8-3:
Menu control added to the page.
To use the Menu Item Editor, use toolbar buttons at the top of the Items list to insert options to appear on your menu. You’ll need a root element first, so click the Add Root Item button in the toolbar to add a new root. At first, the item is just named New Item.
Next you have to set the following properties in the Properties column of the dialog box:
NavigateUrlL: Click this property, and then click the Build button that appears. Use the Select URL dialog box that opens to navigate to the page that the link should open, and then click OK.
Text: Type the text of the menu item.
ToolTip: Type the ToolTip text for the item.
Figure 8-4 shows an example where I’ve added one root element. I’ve set its NavigateURL property to ~/Default.aspx. The ~ character always refers to the root folder of the site (C:\...\MyVWDSite in Figure 8-1). So ~/Default. aspx means “the default.aspx page in the site’s root folder.” I changed the Text property to Home (which also changed the text of the Value property). And I added a little ToolTip that reads Go to home page.

Chapter 8: Easy Site Navigation 157
Figure 8-4:
One item
added to
Menu Item
Editor.
To add a child page item under the root item, click the Home item at the top of the left column, and then click the Add a Child Item button in the toolbar (second button from the left). Another New Item appears, indented under the first item.
As before, you want to set the NavigateUrl property to the page the menu item opens, the Text to the item as you want it to appear in the menu, and optionally a ToolTip. Just keep repeating the process until you’ve defined all your items.
Use other buttons in the toolbar to work with items you’ve already put in the menu. Click on the item you want to change, and then use the Delete (X), up, down, left, or right arrow buttons to reposition the item, if necessary.
Figure 8-5 shows an example. I’ve just created the last child element, and changed its Text property to show “About us.” You can’t see the entire NavigateUrl. It’s the path to the AboutUsHome.aspx page from the site’s root folder, as given here:
~/PublicPages/AboutUs/AboutUsHome.aspx
You can see both Default.aspx and AboutUsHome.aspx in Figure 8-1.
Remember, the same technique works whether you’re creating a Menu control or TreeView control. If you ever need to change the control, just open the page on which you placed the control. From the control’s Common Tasks menu, choose Edit MenuItems again. In the dialog box, click the + sign next to the root item to expand the menu.
Both the Menu and TreeView controls have an Auto Format option on their
Common Tasks menu. Be sure to check out each one.

158 Part II: Building Your Web Site
Figure 8-5:
All items in the Menu Editor.
As mentioned, using static data with a Menu or TreeView control is just one way to create a site-navigation menu. The other is to store all the site-navigation info in site map file, and then bind the control to the site map.
Creating a Site Map
There are several ways to create site maps. The easiest is to just create a Web.sitemap file in the root of your folder. Then edit the resulting XML file to define your site’s navigation structure. Here are the steps to get started:
1.Right-click your site name at the top of Solution Explorer and choose Add New Item.
2.In the Add New Item dialog box, click Site Map.
3.Click the Add button.
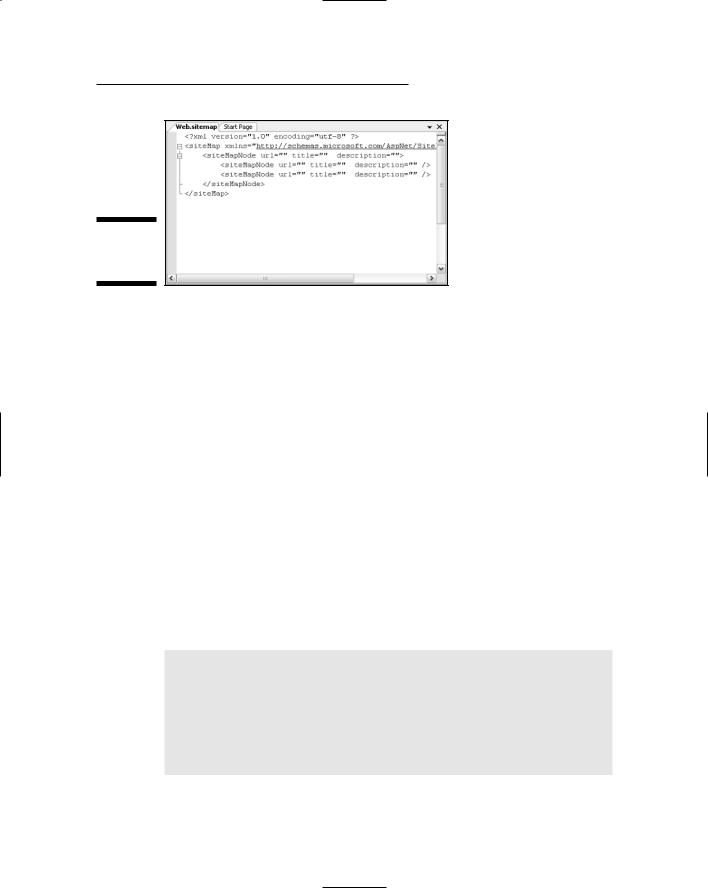
In Solution Explorer, you see the Web.sitemap name at or near the bottom of the folder hierarchy. On the Design surface, you see an almost-empty site map file with some placeholders for typing text, like in Figure 8-6. (There is no Design view for the Web.sitemap file.)
The trickiest thing about using the site map file is keeping track of parents and children. It’s all done with nesting (indentations have nothing to do with it). Basically, any element that has child elements must enclose its child elements in a pair of <siteMapNode>...</siteMapNode> tags. An element that has no children can be expressed in a single <siteMapNote /> tag (note the /> rather than just > at the end of the tag).
Chapter 8: Easy Site Navigation 159
Figure 8-6:
A new Web. sitemap file.
The organization of the XML tags defines the organization of options displayed in a Menu or TreeView control. In XML, it’s all about nesting. Children of elements must be nested within their parent element. To illustrate, let’s start with a simple example.
At the top of Figure 8-7 you see a Web.sitemap file. The outermost <site MapNode>...</siteMapNode> tags define the root element — that is, the item that appears above all others — of the menu. That root element is the parent to several child elements within the tags. Each of those represents a single link on a “submenu” below the parent. (I removed the url= and description= elements that normally appear in the siteMapNode tags for clarity.)
At the bottom of Figure 8-7 I show how that SiteMap file looks in a Menu control (left) and a TreeView control (right). In both cases, the Home link is the root element at the top of the heap. Each child element is an option “beneath” the root element (and to the right in the case of the Menu control).
In real life, you couldn’t just omit the url= attribute, as that’s what binds the link to a page in your site. The description= attribute just defines the ToolTip that appears when the user points to the menu item. Here’s a sample Web.sitemap with all the attributes in place:
<sitemap... >
<siteMapNode url=”~/Default.aspx” title=”Home” description=”Go home”>
<siteMapNode url=”~/PublicPages/Services/ServicesHome.aspx” title=”Products” description=”Product catalog” />
<siteMapNode url=”~/PublicPages/Products/ProductsHome.aspx” title=”Services” description=”Service options” />