

Visual Web Developer™ 2005 Express Edition For Dummies - Alan Simpson
.pdf160 Part II: Building Your Web Site
Figure 8-7:
A Web. sitemap file (top) in
Menu and
TreeView
controls.
<siteMapNode url=”~/PublicPages/Help/HelpHome.aspx” title=”Help” description=”Site help” />
<siteMapNode url=”~/PublicPages/AboutUs/AboutUsHome.aspx”
title=”About Us” description=”Contact us” />
</siteMapNode>
</siteMap>
Web.sitemap file
Parent
Children
Menu control |
Treeview control |
Bound controls |
|
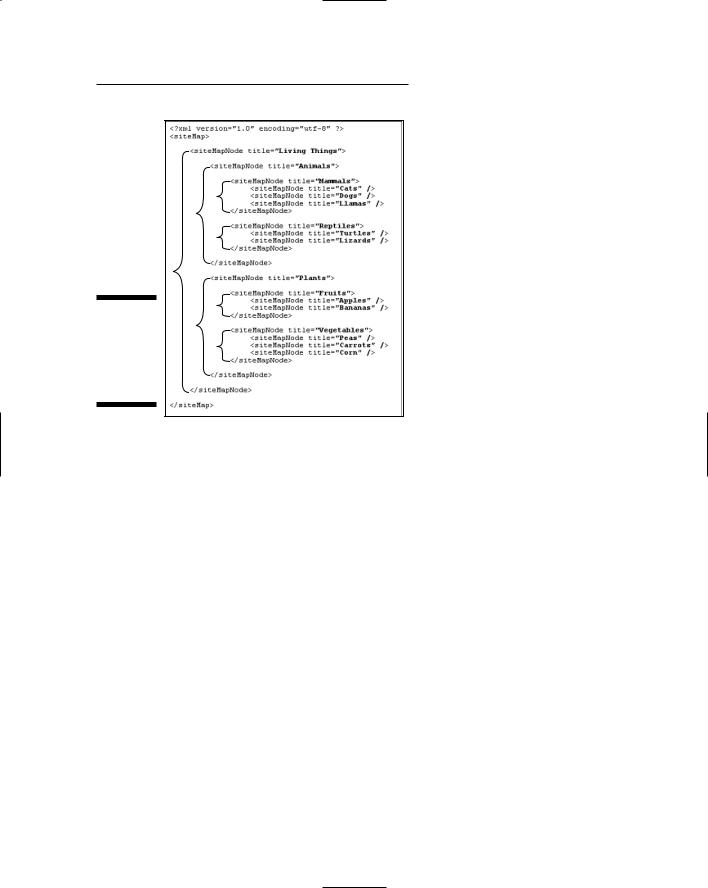
As you might imagine, the more complicated the navigational structure of your site, the more complicated the Web.sitemap file. For example, Figure 8-8 shows the Web.sitemap file (again using only title= attributes for brevity) I used to make the TreeView control back in Figure 8-2. The braces won’t be visible on your screen. I added those to highlight the nesting levels.
The nesting levels in the Web.sitemap file define the nesting levels (or show/ hide levels) in the Menu or TreeView control to which you bind the site map.
Typing site maps isn’t exactly fun. There’s not much in the way of IntelliSense support or other user-friendly features. Writing a Web.sitemap file probably involves as much copying and pasting as it does typing.
Chapter 8: Easy Site Navigation 161
Figure 8-8:
Web.site map file with three nesting levels.
The + and – signs at the left side of the editing window expand and collapse nodes within the site map. With a little practice, you can use those buttons to help make sure things are nested properly in your file.
The upside to creating a Web.sitemap file is that the site’s navigation structure is defined in one file. You don’t have to worry about broken hyperlinks all over your site whenever you make a change. When you change your site, you need only change the navigation structure in the Web.sitemap file to match the new structure.
Customizing navigation for roles
If your site has members and roles, you may want different navigation maps for different types of users. For example, the navigation options for an anonymous user might include links to public information only. The options on the navigation menu for an authenticated user, or user in a specific role, might include links to members-only content.
Hiding navigational options from anonymous users is called security trimming, because you “trim things out” of a menu by making some options available only to people in specific roles.
162 Part II: Building Your Web Site
Using security trimming in your site menus is a two-step process. First, you have to enable security trimming for your site as a whole. That involves specifically defining Web.sitemap as your site’s default site map file, and then enabling security trimming on that file by manually editing your site’s Web.config file. Here are the necessary steps:
1. Open (double-click) the Web.config file in your site’s root folder.
Don’t confuse Web.config with Web.sitemap. They’re two separate files that play two separate roles.
2.Scroll down to the bottom of the Web.config file, and get the cursor to a blank line just above the closing </system.web> tag.
3.Type the following tags exactly as shown:
<siteMap defaultProvider=”XmlSiteMapProvider” enabled=”true”> <providers>
<add name=”XmlSiteMapProvider” description=”Default SiteMap provider.” type=”System.Web.XmlSiteMapProvider “ siteMapFile=”Web.sitemap” securityTrimmingEnabled=”true” />
</providers>
</siteMap>
Type carefully because typing something that’s sorta like the above won’t cut it. Use the IntelliSense menus as much as possible to minimize typos.
4. Close and save the Web.config file.
All you’ve done so far is change your site’s overall configuration a bit to support security trimming in the Web.sitemap file. To take advantage of that new feature, you have to specify who can see what in the Web.sitemap file. You do so by adding the following attribute to any tag that’s to be viewed by members of a specific role only:
roles=”roleName”
The roleName must be the name of a role you’ve previously defined for your site using the Web Site Administration Tool. For example, in Chapter 3, I created a role named SiteMembers. So, in my Web.sitemap folder, I’d add
roles=”SiteMembers”
to the sitemapnode tag of any menu item that should be visible only to logged-in SiteMembers. The following is an example of a Web.sitemap file, where three of the menu items are visible only to people in the SiteMembers role. I’ve boldfaced the title attributes and new roles=”SiteMembers” attributes for clarity:
Chapter 8: Easy Site Navigation 163
<?xml version...> <siteMap xmlns...>
<siteMapNode url=”~/Default.aspx” title=”Home” description=”Go home” >
<siteMapNode url=”~/PublicPages/Services/ServicesHome.aspx” title=”Products” description=”Product catalog” />
<siteMapNode url=”~/PublicPages/Products/ProductsHome.aspx” title=”Services” description=”Service options” />
<siteMapNode url=”~/MemberPages/MemberServices/MemberServices.aspx”
title=”My Page” description=”Member Services” roles=”SiteMembers”/>
<siteMapNode url=”~/MemberPages/Forums/ForumsHome.aspx” title=”Forums” description=”Discussions” roles=”SiteMembers”/>
<siteMapNode url=”~/MemberPages/Downloads/DownloadsHome.aspx” title=”Download” description=”Download stuff” roles=”SiteMembers” />
<siteMapNode url=”~/PublicPages/Help/HelpHome.aspx” title=”Help” description=”Site help” />
<siteMapNode url=”~/PublicPages/AboutUs/AboutUsHome.aspx” title=”About Us” description=”Contact us” />
</siteMapNode>
</siteMap>
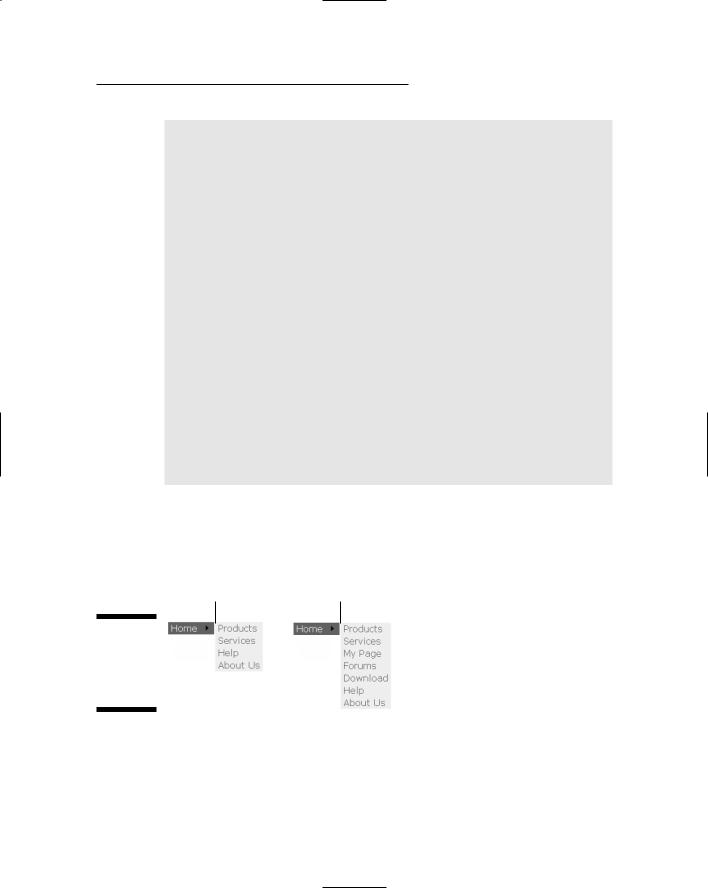
When that Web.sitemap file is bound to a navigation Menu control, anonymous users see the drop-down menu at the left in Figure 8-9. Authenticated users in the SiteMembers role see the navigation menu shown at the right in that same figure.
Anonymous users menu SiteMembers menu
Figure 8-9:
Asecuritytrimmed
navigation menu.
Binding a control to Web.sitemap
After you’ve created a Web.sitemap file in your site’s root folder, you can bind it to either a Menu or TreeView control. “Binding” just means that the control gets its information from the Web.sitemap file rather than properties defined

164 Part II: Building Your Web Site
within the control. First, in Design view, you open the Master Page (or .aspx page) on which you want to put the control. Then follow these steps:
1.Drag a Menu or TreeView control onto the page.
2.From the Data Source drop-down list on the Common Tasks menu, choose <New Data Source...>.
3.In the Data Source Configuration Wizard that opens, click Site Map.
4.Click OK.
That’s it. To see the results, close and save the page. Then view the page in a Web browser. (Or, if you put the control on a Master Page, open any page that uses that master.) A Menu control initially shows only its root link. When you point to that item, the submenu items appear. To go to any page, click its link.
If there’s a problem with your Menu or TreeView control, the most likely culprit is the Web.sitemap file: possibly something as minor as a missing quotation mark or improperly nested tags. If you enabled security trimming, the problem could be in the Web.config file.
Adding an Eyebrow Menu
A breadcrumb or eyebrow menu is a short navigational path back to the home page, usually shown at the top of a page. You see examples of them at many large Web sites, including the Microsoft Developer Network Web site (www. msdn.com). Such a menu usually looks something like this:
MSDN Home > ASP.NET Home > Get Visual Web Developer
The path provides a quick view of where the user is in the navigational hierarchy, as well as quick links up the navigational hierarchy.
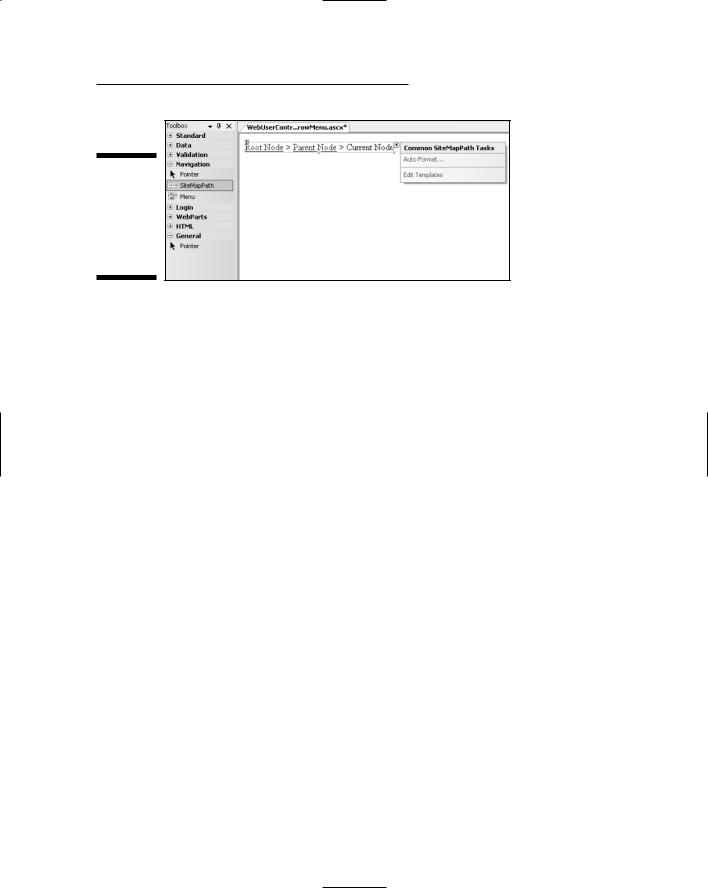
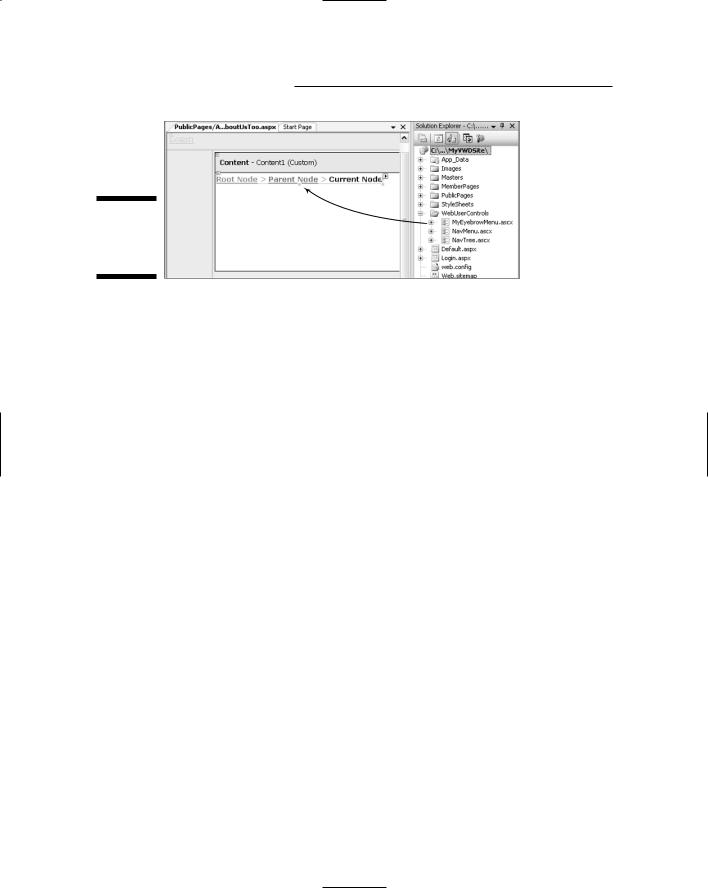
If your site has a Web.sitemap file, you can easily add a breadcrumb menu to the top of any page in your site. Just drag a SiteMapPath tool from the Toolbox onto your page. It appears as a generic eyebrow menu in Design view as in the example shown in Figure 8-10.
Like all server controls, SiteMapPath has a Common Tasks menu with an easy AutoFormat option. It also has an extensive Properties sheet where you can change things like font, color, and so forth. But you don’t have to do anything to it if you don’t want. Just close and save the page.
Chapter 8: Easy Site Navigation 165
Figure 8-10:
Use a
SiteMap
Path control for eyebrow menus.
Creating Web User Controls
Though not directly relevant to site navigation, I’d be remiss in my duties if I didn’t make you aware of Web User Controls. Here’s why: In any given Web site there’s likely to be stuff you want to show on every page. That stuff you can put in a Master Page. On the other hand, there may also be stuff that you want to put on some, but not all, pages. An eyebrow menu would be a good example, because such a menu doesn’t really make sense on pages that are at the top of a navigational hierarchy.
If you drag-and-drop a control straight from the Toolbox onto a page, you create a whole new control. If you want consistency across your site, you’ll have to style the control exactly the same on every page in your site. If you ever change your mind about that style, you’ll have to make the change to every page that uses the control. Bummer.
The simple solution to the problem is a Web User Control. Getting back to the eyebrow menu example, you could put the SiteMapPath control in a Web User Control, and design it as you see fit, and then close and save the Web User Control.
Then, any time you want an eyebrow menu on the page you’re editing, drag the Web User Control from Solution Explorer onto the page (which I named MyEyebrowMenu.ascx in Figure 8-11). Don’t use the generic SiteMapPath control from the Toolbox anymore, as that one won’t have the same style as the one in the Web User Control.
When you drop the Web User Control onto your page, you won’t have to design it because it’s already been designed. And, if you ever decide to change the appearance of the control that’s inside the Web User Control, no problem. Just open the Web User Control in Design view, make your changes, and close and save the page. The change is automatically reflected in every page on which you’ve placed the Web User Control.
166 Part II: Building Your Web Site
Figure 8-11: |
Drag |
|
Drag a Web |
||
|
||
User Control |
|
|
onto a page. |
|
And remember, the eyebrow menu is just an example. Web User Controls are perfect for anything that you might want to show on some, but not all, pages throughout your site.
A good starting point might be to create a folder for the controls. To do so, just right-click the site name at the top of Solution Explorer and choose Add Folder Regular Folder. Give the folder a name (I’ll name mine WebUserControls) and press Enter.
Creating a Web User Control
Creating a Web User Control is almost identical to creating a regular Web Form page. Here are the steps:
1.In Solution Explorer, right-click the folder in which you want to store the control and choose Add New Item.
2.In the Add New Item dialog box, click Web User Control.
3.Enter a filename of your choosing.
I named mine MyEyebrowMenu.ascx in Figure 8-12.
4.Choose language options to taste.
I chose the usual in Figure 8-12.
5.Click Add.
The new control opens looking just like an empty Web page (in Design view). And basically, it is just an empty page in the sense that you can put whatever you want into it. In the eyebrow menu example, you’d drag a SiteMapPath control from the Toolbox onto the page. But any server control from any Toolbox category would be fine as well.

Chapter 8: Easy Site Navigation 167
Figure 8-12:
Creating a
Web User
Control.
You can style the item using its Common Tasks and Properties menus. Or you can leave it as-is. Then just close and save the page. Its filename extension,
.ascx, identifies it as a Web User Control.
Unlike a page, you can’t view a Web User Control in a Web browser. You first have to put the Web User Control on a page, and then open that page in a Web browser.
Using a Web User Control
Any time you want to display a Web User Control on one of your pages, just drag its filename from Solution Explorer onto your page, as in the example shown back in Figure 8-11. Nothing else is required. To see the control, close and save the page on which you placed the control. Then view that page in a Web browser.
Should you decide to change the style of the control that’s inside the Web
User Control, here’s the drill:
1.Open the Web User Control by double-clicking its name in Solution Explorer.
2.Edit the control in Design view as you normally would.
3. Close and save the control.
All pages that use the Web User Control display the control with your current format settings.
168 Part II: Building Your Web Site
Don’t be shy with Web User Controls
You can also create different Web User Controls for different types of site visitors. For example, you could create a Web User Control named Anon.ascx (or whatever), and put whatever you want in that control. Create another Web User Control named Authenticated.ascx
(or whatever), and put whatever you want in that one. Close and save both controls.
Then, on any page where you want to show one control or the other, first drag a LoginView
control onto the page. Then drag Anon.ascx into the Anonymous Template of that control. Switch to the Logged In template, and drag the Authenticated.ascx file into that template on the LoginView control. Anonymous users will see only what’s in Anon.ascx. Authenticated users will see only what’s in
Authenticated.ascx.
Part III
Personalization
and Databases