

Visual Web Developer™ 2005 Express Edition For Dummies - Alan Simpson
.pdf130 Part II: Building Your Web Site
Figure 7-6:
Common Tasks menu’s Template Editing Mode.
You can treat the template like a Web page in the sense that you can type text in the template or add controls to the template. If you’re not sure where a template appears in a control, type in some random descriptive text. If you’re editing a Header template, for example, type in “I am the Header Template.” Then choose End Template Editing from the Common Tasks menu for the template. Afterwards, you’ll see the control in its normal appearance, and the text you typed into the template appears within that control.
A big part of using server controls in a Web site is knowing how the control looks and acts in a Web browser. And to do that, use some controls in some pages. Because you went to great trouble in Chapter 4 of this book to configure your Web site to support member logins, I’ll start by looking at some of the Login controls that you can use with that foundation.
ASP.NET Login Controls
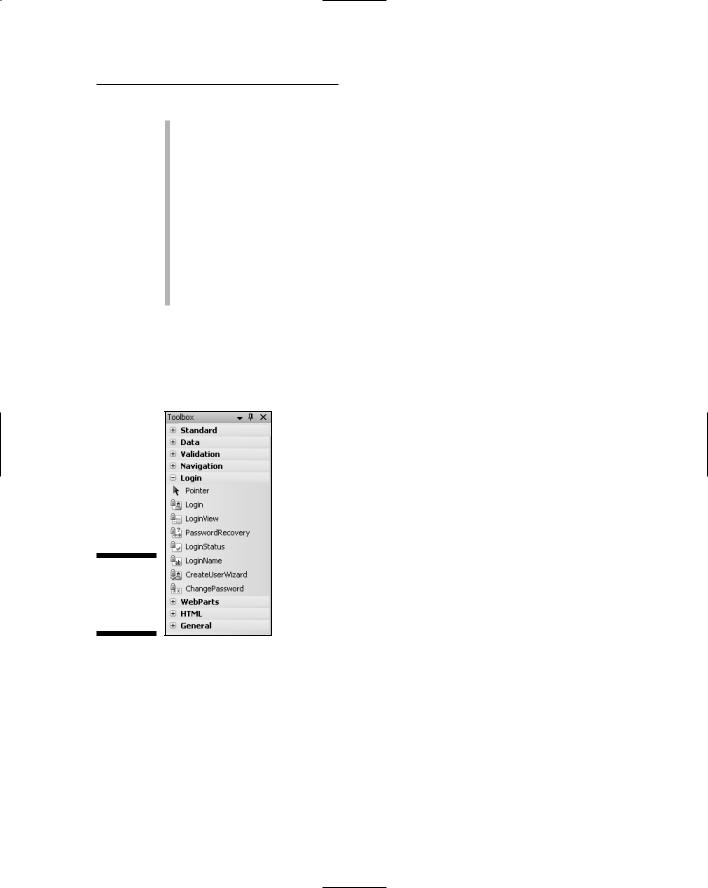
Visual Web Developer supports several ASP.NET 2.0 controls that you can use to manage logins through your Web pages. They only work if you’ve already configured your site to support membership, as discussed in Chapter 4. You can use them in any Web Form (.aspx page). In the Toolbox for an .aspx page, you’ll find all the Login controls under the Login heading, as in Figure 7-7.
Here’s a quick overview of what each Login control is for:
Pointer: Not really a Login control. If you click a control and then change your mind and want to get back to the normal mouse pointer, click this Pointer item.
Login: Presents a control that allows users to log into their accounts with their user name and password.
LoginView: Lets you show different stuff to different users based on whether they’re anonymous or logged in.
Chapter 7: Working with ASP.NET Controls 131
PasswordRecovery: As the name implies, presents fields that allow a user to recover a forgotten password.
LoginStatus: Displays a Login link to anonymous users, or a Logout link to authenticated users.
LoginName: Displays nothing to an anonymous user; displays an authenticated user’s login name.
CreateUserWizard: Provides a fill-in-the-blanks form for creating a new user account. Use it in your Web sites to allow people to create their own accounts.
ChangePassword: Provides a form that allows a user to change his or her password.
You can use all of these controls anywhere in any .aspx page, any Master Page, as well as in the Content placeholder of a page that uses a master. The next few sections discuss these controls more fully. I’ll start with the
CreateUserWizard control.
Figure 7-7:
Login server controls in the Toolbox.
Allowing Users to Create an Account
If your site will allow anyone to create an account, you need a page that allows users to enter the appropriate data. The CreateUserWizard control is just the ticket to do this because it displays on a Web page all the fields needed for a user to create an account.
132 Part II: Building Your Web Site
To create a new page for the control, right-click the site folder or subfolder in Solution Explorer and choose Add New Item. Choose Web Form and fill in the blanks as you see fit. I named mine CreateAcct.aspx. The other options are entirely up to you. I chose Visual C# as the language, as I routinely have in the other examples in this book, and selected the Place Code In Separate File option. I also used the Master Page described in Chapter 4 in my example.
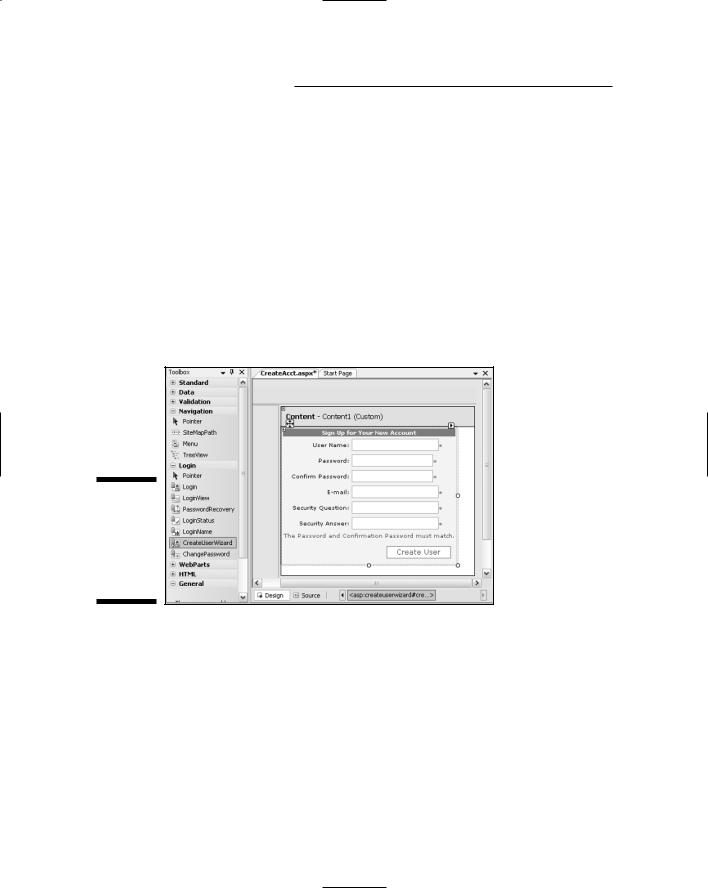
Anyway, after you’ve created (or opened) a page, just drag a CreateUserWizard tool from the Login category of the Toolbox onto the page (or drag it into the Content placeholder in a Master Page). If you like, use the Auto Format option on the Common Tasks menu to style the form.
Figure 7-8 shows an example in which I’ve added a CreateUserWizard control to the Content placeholder on a page. I also used Auto Format on the Common Tasks menu to set the scheme to Classic, making the control easier to see.
Figure 7-8:
Create
User
Wizard control in Design view.
If you want to keep life simple, just close and save the page. You don’t really have to do anything else to the control, all the stuff it needs to validate the user’s entries, store the user’s data in the SQL Server database, and so forth, is already done.
If you want to customize the control later, you can do so at any time. It has a Common Tasks menu, templates, and so forth. You can press Help (F1) for help while customizing the control.

Chapter 7: Working with ASP.NET Controls 133
Assigning new users to a role
The CreateUserWizard control doesn’t automatically assign a new user to a role. If you want to put all the people who sign up through the CreateUser Wizard control into a specific role, add a little code. I know I haven’t talked about code in this book, and now is not the time to get into details of writing code. However, for this example, I can just show you what to type.
This technique only works if you’ve already enabled Roles in the Web Site Administration Tool as discussed in Chapter 3. Also, you’ll have to remember exactly how you spelled your role name, as it won’t appear in any IntelliSense menu.
If you want your CreateUserWizard control to automatically assign every new user to a specific role in your site, follow these steps:
1.In design view, select the CreateUserWizard control.
Its name appears in the Properties sheet when selected.
2.In the Properties sheet, click the Events (lightning bolt) button.
3.Double-click the CreatedUser event.
You’re taken to the code-behind page for the page you’re designing; the cursor is already in the event procedure, right where you type its code.
4.Type the following at the cursor position, substituting your own data for the italics, as follows:
Roles.AddUserToRole(ctrlName.UserName,”roleName”);
ctrlName refers to the name of your CreateUserWizard control. That would likely be CreateUserWizard1 if you let VWD name the control. When you type a roleName, make sure you spell it exactly as you did when creating the role in the Web Site Administration Tool.
The code given here shows what my example looked like after adding a line of code to add the new user to my SiteMembers role.
protected void CreateUserWizard1_CreatedUser(object sender, EventArgs e)
{
Roles.AddUserToRole(CreateUserWizard1.UserName,”SiteMembers”);
}
Typing code isn’t like typing in English. In code you have to get every dot, comma, parenthesis, quotation mark, and semicolon exactly right. Spelling and blank spaces count a lot too. The code won’t work if you don’t type the line exactly right.
5. Close and save the code-behind page.

134 Part II: Building Your Web Site
A coupla’ CreateUserWizard tips
If you take a look at the whole Properties sheet for the CreateUserWizard control, you’ll see it has many properties. You can figure out what most properties are just by looking at their names and values.
A couple of noteworthy properties include
ContinueDestinationPageURL and Login CreatedUser. You can set the Continue
DestinationPageURL property to whatever page you want to have open when the user clicks Continue after successfully creating an account. The LoginCreatedUser property determines whether or not the user is logged in automatically after creating the account. The default is True, the user is logged in.
Testing the control
After you close and save the new page, you can take the CreateUserWizard control for a test drive. Just right-click the page’s name (CreateAcct.aspx in my example) in Solution Explorer, and choose View in Browser. When the page opens, you should be able to create a new user account You’ll have to remember the user name and password to test the account later.
Figure 7-9 shows an example of a user account (in the Web browser) with the user name Testy. The hypothetical data you enter needs to be realistic enough to pass all the tests that the control imposes. For example, if the passwords don’t match, you’ll get an error message in the control and won’t be able to create the account.
Don’t forget that your password needs to be at least seven characters long, and must include a non-alphanumeric character. For example, password! (with the exclamation point) is an acceptable (if rather obvious) choice.
Figure 7-9:
Create
User
Wizard control in the Web browser.
When the control contains reasonable data for a hypothetical user account, click the Create User button. You should see a “Your account has been successfully created” message and a Continue button. At this point there’s no place to continue to, so you can just close the Web browser to return to VWD.

Chapter 7: Working with ASP.NET Controls 135
To verify that the process worked, you can choose Website ASP.NET Configuration from the menu bar to open the Web Site Administration Tool. Click the Security tab, and then click Manage Users. The new user should be listed. If you added code to add the user to a role, click the Edit Roles link for that user. The check box should be filled already, indicating that the user is in the role.
When you have a way for users to create an account on your site, the next thing they need is a way to log in with their user names and passwords. That’s where the Login control comes into play.
Creating a Login Page
People who have already created accounts at your site need a place to sign in. Some of the other Login controls assume that page is in the site’s root folder and named Login.aspx. So if you haven’t already done so, you should create that page now by following the usual steps:
1.In Solution Explorer, right-click the site folder at the top of the folder hierarchy and choose Add New Item.
2.In the Add New Item dialog box, choose Web Form.
3.Name the page Login.aspx.
4.Choose C# as the language and choose Place Code In Separate File.
Whether or not you choose to use a Master Page is entirely up to you.
5.Click the Add button.
If you opted to use a Master Page, click the Master Page’s folder, and then click the Master Page filename and click OK.
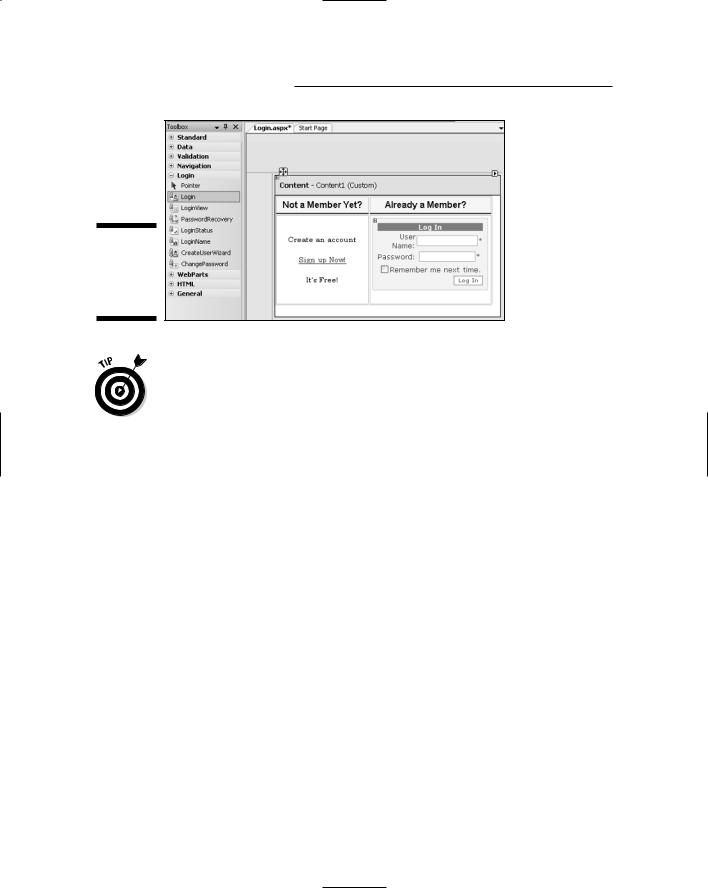
I created my Login page using a table with two rows and two columns, and typed in a couple column headings as described in Chapter 5. I dragged the Login control from the Toolbox into the lower-right cell. I used its Common Tasks menu to apply the Classic scheme. Figure 7-10 shows the Login tool (highlighted in the Toolbox) and a Login control placed under the “Already a Member?” heading in a table.
In the cell to the left of the Login control, I typed the Sign Up Now! text and selected it. Then I used the Convert to Hyperlink button in the toolbar to browse to the CreateAcct.aspx page I created previously. (In the Hyperlink dialog box, the Type appears as (other) and the URL as the name of the page.) Click OK, and the page offers non-members a way to create an account right now.
136 Part II: Building Your Web Site
Figure 7-10:
Login control added to a page.
To align text in a table cell, right-click the cell and choose Style. Click Text in the Style Builder, set the Horizontal and Vertical Alignment, and click OK. To widen a column beyond what you can do by dragging, right-click some empty space in a cell in the column and choose Resize Resize Column. Then, increase the current width, choose All Cells, and click OK.
Like all ASP.NET controls, the Login control has a Common Tasks menu, as you saw earlier in this chapter. However, everything there is optional. All you really have to do is close and save the page on which you placed the control.
To test the login page, right-click its name Login.aspx in Solution Explorer and choose View in Browser. To verify that the control works, type in a valid user name and password. An invalid user name and password is rejected. A valid entry takes you to the default page for the site. But that’s fine for now; there’s no way to verify right now if you’re logged in or not anyway. This brings me to some other Login controls. (Don’t forget to close the Web browser.)
Providing a Login Link
There’s no telling which page in your site a user might first encounter. A link from a search engine could take a user to any page. To make your site easy to use, you need a login link on every page. An easy way to provide this is to put a link to the Login.aspx page into the Master Page for your site.
But a regular link that always showed Login would be confusing for people who have already logged in. The link should show Logout or something else for people who are already logged in. That’s where the LoginStatus control comes in.

Chapter 7: Working with ASP.NET Controls 137
You must create a page named Login.aspx in your site’s root folder before you can actually use the controls described in this section. Otherwise, when you try to test the control in a Web browser, you’ll get an error message indicating that the Login.aspx page cannot be found.
The LoginStatus control
The easiest way to provide a Login/Logout link is to drag a LoginStatus control to a Master Page. That’s all you really have to do, besides close and save the Master Page.
Then, right-click any page that uses the Master Page and choose View in Browser. In the browser, clicking the Login link should take you to Login. aspx. If you enter a valid user name and password, as in Figure 7-11, and click Log In, you’ll be logged in. If your Default.aspx page uses the Master Page, you’ll see that the link has changed from Login to Logout, because you’re logged in.
Figure 7-11:
Putting
Login. aspx to the test.
If you see a Logout link, click it to log out. You won’t be taken to another page. You’ll simply be logged out and the control will again show Login. Close the Web browser. If all of that works, you have all the basic stuff for a membership site: a way to sign up for an account, a way to log in, and site-wide Login and Logout links. Other stuff to follow in this section is optional stylistic stuff.
By default, Logged Out users see a Login link, and authenticated users see a Logout link. In Design view, the LoginStatus control has all the usual design accoutrements, including a Properties sheet and Common Tasks menu (Figure 7-12). You can change the text of either link using the LoginText and LogoutText properties.
As an alternative to using text links, you can choose a pair of graphic images to show. One image to show to anonymous users, and another to show to authenticated users. When those pictures are placed in your site’s folders, use the LoginImageURL property of the control to specify the picture to show to anonymous users. Set the LogoutImageUrl to the picture that authenticated users should see.

138 Part II: Building Your Web Site
Figure 7-12:
Login
Status
control
Common
Tasks and
Properties.
The Views menu on the LoginStatus control’s Common Tasks menu lets you switch between what anonymous (Logged Out) users will see, and what authenticated (Logged In) users will see. You can change the text of either link just by editing the text.
If you want something a little fancier than what the LoginStatus control has to offer, consider the LoginName and LoginView controls, discussed in the next two sections.
The LoginName control
The LoginName control is about as easy to use as a control can be. It shows nothing to anonymous users. For authenticated users, the control displays the user’s login name. Typically you use the LoginName control with the
LoginView control.
The LoginView control
Like the LoginStatus control, the LoginView control can tell the difference between anonymous and authenticated users. But it’s not limited to showing text or a picture. You can use it to show just about anything, even ASP.NET server controls. To use the control, just drag it to the Web page or Master Page.

Chapter 7: Working with ASP.NET Controls 139
After the control is placed on the page, the control is shaped as a box. The box has two different views, but you only see one view at a time. You can choose which view you want to see (and design) by choosing one of the following from the View option on the LoginView control’s Common Tasks menu:
Anonymous Template: Content that anonymous users see.
LoggedIn Template: Content that only authenticated users see.
What you put into either template is entirely up to you. It can be text, a table, a picture, an ASP.NET control, whatever. Think of the box as a mini-page that can contain anything that a big page can contain.
During this stage of the site-building project, your best bet would be to create a simple LoginView control that shows a Login link to anonymous users. For authenticated users, the control shows the user’s name and a Logout link.
This comes in very handy when you’re testing your site, because you can always see whether you’re currently testing as an anonymous user or as an authenticated user. Putting the control on a Master Page is especially helpful because you’ll be able to see it on every page that uses the Master.
So, given that general advice, let’s take a look at the steps required to make it happen:
1.In Solution Explorer, double-click your Master Page to open it in Design view.
In Chapter 4, I created a MasterPage.master file in a folder named Masters. So I’ll use that one as a working example here.
2.Drag a LoginView control from the Login category of the Toolbox to the top (or left) pane of the Master Page so that it will be visible on all pages that use the master.
By default, the control will be named LoginView1.
3.From the control’s Common Tasks menu, choose Anonymous Template.
Whatever you add to the LoginView control now will be visible only to anonymous users.
4.Drag a LoginStatus control from the Toolbox into the LoginView1 control.
The LoginStatus control appears as a Login link, and its Common Tasks menu might open automatically. You don’t need to change anything on the LoginStatus control, so just click the larger LoginView1 control to hide that Common Tasks menu.