

Visual Web Developer™ 2005 Express Edition For Dummies - Alan Simpson
.pdf200 Part III: Personalization and Databases
In Solution Explorer, you now have a folder named App_Themes. It contains a subfolder with the name you entered in Step 2. The subfolder is empty; it’s just a container in which you’ll store the files that define the theme.
Creating Theme Folders
The whole idea behind themes is to offer the user several themes to choose from. Each theme you create will have its own subfolder within the App_Themes folder. So if you already have some ideas for themes you might create, you can create the Theme folders right now. To create a Theme folder, follow these steps:
1.Right-click the App_Themes folder and choose Add ASP.NET Folder
Theme.
2.Type a name for the new theme and press Enter.
In Figure 10-1, I’ve added a few theme folders named Antique, ArtDeco, HeavyMetal, Nerdy, NoSquint, and Pastels.
Figure 10-1:
New App_ Themes folder and Theme folders.
So now you have a bunch of empty theme folders, which, so far, have no effect whatsoever on the look and feel of the Web site. Each folder is just a container for things to come.
You can rename and delete Theme folders like anything else. Just right-click and choose Rename or Delete.

Chapter 10: Using Themes 201
What’s in a Theme?
Depends on your point of view. From a user’s perspective, a theme is the “look and feel” of the pages in a site. For you, the Web developer, a theme is a folder that contains files. Those files, in turn, define the look and feel of pages in the site. There are three types of files you can put into a Theme folder:
Pictures: If a theme uses its own pictures for things like page backgrounds and icons, store those pictures in the Theme folder.
Cascading Style Sheets: Use a standard Cascading Style Sheet to define things like font color, size, and other stylistic properties you define with the Style Builder.
Skins: A skin defines the appearance of a type of control. For example, you can create a skin for all Textbox controls, another skin for all buttons, and yet another for all TreeView controls.
In a sense, themes are just a way of forcing you to get organized and stay organized. Because each theme has its own unique set of files, changing a theme is easy. You just open the theme folder and make your changes.
Using Pictures in Themes
With themes, you can use pictures to define things like the page background, the appearance of buttons and icons, and so forth. Any pictures that you intend to use as part of a theme need to be stored in the Theme folder. Assuming you already have the pictures, it’s just a simple matter of dragging each picture’s icon into the appropriate Theme folder in Solution Explorer.
In Figure 10-2, I created some page-background images for my site’s Antique, ArtDeco, HeavyMetal, Nerdy, and Pastels themes. DefaultTheme and NoSquint just use plain white backgrounds, so no pictures are necessary. I dragged each image into its appropriate folder. Though it’s not entirely necessary to do so, I renamed each image PageBkg.gif. I renamed them so each filename defines the picture’s role in the theme, rather than the picture’s content. But that’s not something VWD requires you to do. You can name your own pictures however you like.

202 Part III: Personalization and Databases
Figure 10-2:
Some themes use a pagebackground image.
Creating a Theme Style Sheet
To define the look and feel of pages in terms of font, text color, text size, background colors, border colors, and so forth, create a theme style sheet. A theme style sheet is just a normal Cascading Style Sheet stored within the theme folder. If you already have a style sheet, you can just copy that one into a theme folder. Then edit the copy that’s in the theme folder to define what’s different in this particular theme.
If you already have a Cascading Style Sheet that defines all the design elements of your site, you can keep that sheet and continue to use it in all your pages. In theme style sheets, you can define only those elements that are different from what the default style sheet specifies. That way you still have all your site-wide styles in one place, and themes define the styles of only those items that vary from the default style sheet.
Because of the way theme folders are organized, it makes more sense to name files by their role within the theme than by their content. So you might want to start by copying your default style sheet to a theme folder. Rename the copy in the theme folder to StyleSheet.css. Then double-click that style sheet to open and use as your starting point for creating the theme style sheet.
If you don’t already have a style sheet for your site (or just prefer to start the theme style sheet from scratch), follow these steps:
1.Right-click the Theme folder to which you want to add a style sheet, and choose Add New Item.
2.In the Add New Item dialog box, click Style Sheet.

Chapter 10: Using Themes 203
3.Click the Add button.
VWD adds a page named StyleSheet.css to the theme folder, and opens the page for editing.
Technically, you don’t have to name the theme style sheet StyleSheet.css. But again, given the way theme folders are organized, it seems to make more sense to name files by their role in the theme rather than the specific file content.
Whether you create a style from scratch, or start with a copy of an existing sheet, you create and edit themes using the tools and techniques described in Chapter 6 to define your styles. To recap quickly:
To create a new style, right-click some empty place in the style sheet, and choose Add Style Rule.
To define a style using the Style Builder, right-click between the opening and closing curly braces of the style name, and choose Build Style.
After you create a StyleSheet.css page for one theme, and close it, you can then copy it to all your other theme folders to use as the starting point in designing those other themes.
The idea is to have a style sheet for each theme, as in the example shown in Figure 10-3. In that example, each StyleSheet.css page defines things like body text, font, and color; heading text font and colors; and so forth.
Figure 10-3:
Each theme folder has a
StyleSheet. css file
204 Part III: Personalization and Databases
Excluding DefaultTheme and NoSquint, which don’t use background pictures, each StyleSheet.css file defines a picture background. For example, the style rule for the body tag in the Antique theme’s folder might look something like this:
body
{
font-family: ‘Bookman Old Style’ , Serif;
font-size: medium;
color: #8b4513;
background-image: url(App_Themes/Antique/PageBkg.gif);
}
You don’t have to type the style rule manually, of course. You can use the
Style Builder to define everything in every style sheet.
After you’ve defined pictures and style sheets for themes, you can take it a step further and define styles for ASP.NET controls within each theme. However, I don’t refer to the styles for ASP.NET controls as style sheets — I call them skins.
Creating Skins
Exactly how far you want to take themes is up to you. You can design just about any page element using CSS styles and images. If you want to take it a step further and style ASP.NET controls likes text boxes, buttons, and
TreeView controls, you can do that, too. You use skin files to design ASP.NET controls.
A skin, like a style, is just the visual appearance of an item on a Web page. Most ASP.NET controls are skinnable, meaning you can define multiple styles for any given control. The way you define skins, though, is different from the way you define CSS styles.
Creating a skin file
The easiest way to create a skin is to start with a new instance of the type of control you want to style: a text box, for example, or a button. Then style that control using its Properties sheet or the Style Builder (or both). Then copy the resulting <asp:...>...</asp:> tags to a skin file, and remove any tag attributes that aren’t stylistic and wouldn’t be applied to all controls. For example, remove the ID= attribute because that’s unique to each control
you create and not relevant to the control’s visual appearance.
Let’s take it from the top and look at an example. First, create a Web Form page to use as an artist’s canvas. Here’s how.
Chapter 10: Using Themes 205
1.Right-click the site name at the top of Solution Explorer and choose Add New Item.
2.Choose Web Form.
3.Deselect the “Use master page” check box because you don’t need one here.
4.Name the page anything you like.
I’ll use Temp.aspx for my page.
5.Click the Add button, and a new empty page opens up.
If the page opens in Source view, click the Design button to switch to Design view.
Next create an instance of the type of control you want to style. The following steps show you how:
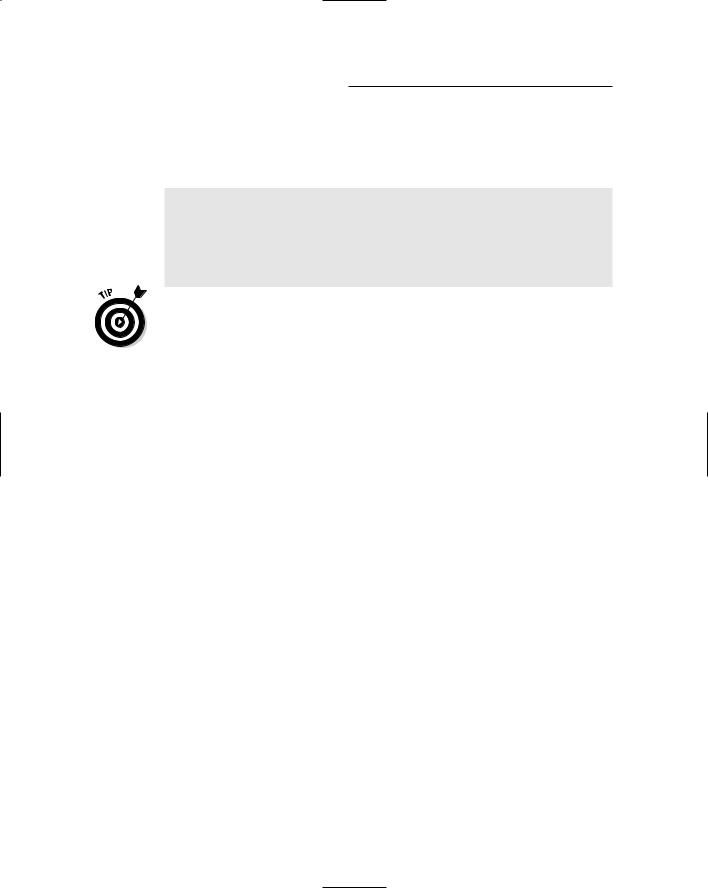
1.In the interest of keeping it simple, drag a Textbox control from the Standard controls in the Toolbox onto the page.
2.To style the control, right-click it and choose Style (or choose Options from the control’s Properties sheet to define styles).
Figure 10-4 shows an example where I’ve right-clicked a Textbox control. You can also see the Properties sheet for the control.
3.View the page in a Web browser to see how the control will really look in a page. Then close the browser.
Figure 10-4:
A Textbox
control with
styled
Properties.
206 Part III: Personalization and Databases
4.When you’re happy with the way the control looks, switch to Source view.
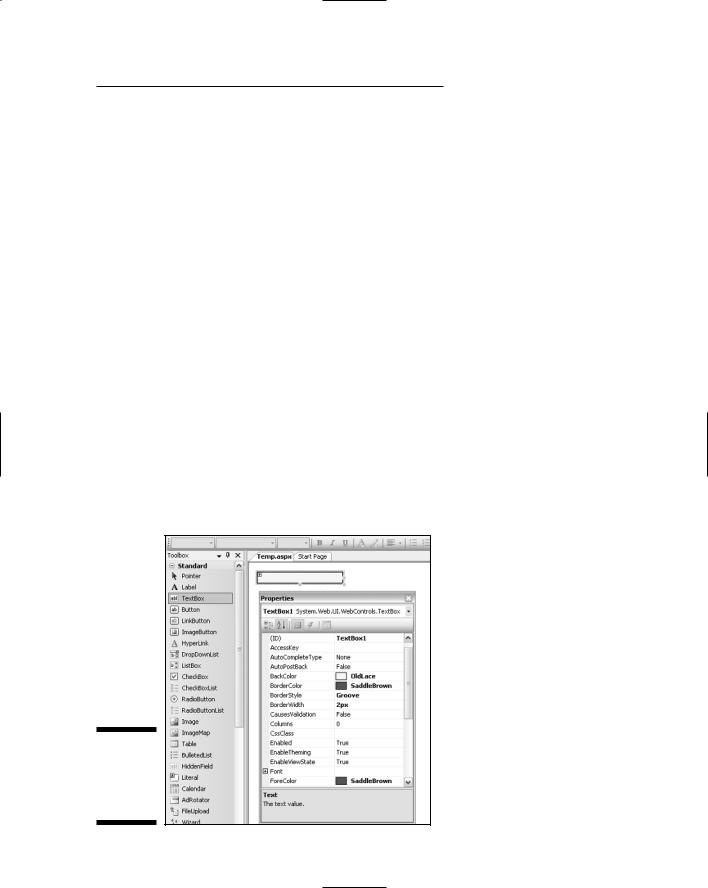
5.Select the entire control, including the opening and closing <asp:>...</asp:> tags, nothing more, nothing less, as shown in the example in Figure 10-5.
6.Press Ctrl+C (or right-click and choose Copy) to copy the selected tag to the clipboard.
Figure 10-5:
A styled
Textbox control’s tag selected in Source view.
7.In Solution Explorer, right-click the theme file in which you want to create your skin file and choose Add New Item.
8.In the Add New Item window, choose Skin File and type a filename for the file.
I’d name the one I just created Textbox.skin.
9.Click the Add button.
10.Press Ctrl+V to paste the tags from the clipboard into the skin file.
There may be some comments (green text) in the skin file already. That’s just a large comment that you can delete. It serves no purpose other than to tell you about naming skins.
11.Delete the ID=... attribute and control name (TextBox1 in this example).
If you’re designing a control that has other non-stylistic attributes in its tag, those should be eliminated to. For example, when designing a generic TreeView control, you wouldn’t want to define a specific Source attribute in the skin. The skin is only about visual attributes.
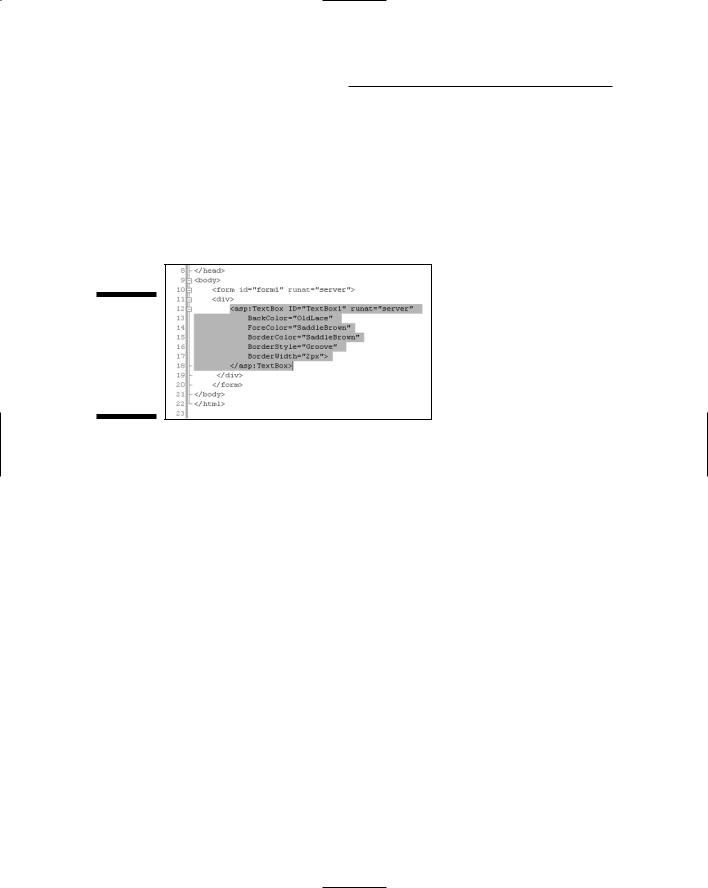
Figure 10-6 shows how my Textbox.skin file looks after pasting in the tags, removing the green comment text, and removing the ID=”Textbox1” attribute. As you can also see in the figure, this Textbox.skin file is in my DefaultSkin theme folder.
Chapter 10: Using Themes 207
Figure 10-6:
Sample
Textbox.skin
skin file.
Default vs. named skins
Any skin you create can be treated as either a default skin or a named skin.
Here’s the difference:
Default skins: Apply automatically to all controls of the same type. For example, Textbox.skin would apply to all Textbox controls in all pages if treated as a default skin.
Named skins: Apply only to controls in pages that specifically identify the skin by SkinID in their Properties sheet.
If you want to create a default skin, don’t give the skin a SkinID attribute. The skin is applied to all controls that use the theme, except controls that request a specific skin by name. Most likely you’ll want to create one default skin that applies to all instances of the control you’ve styled.
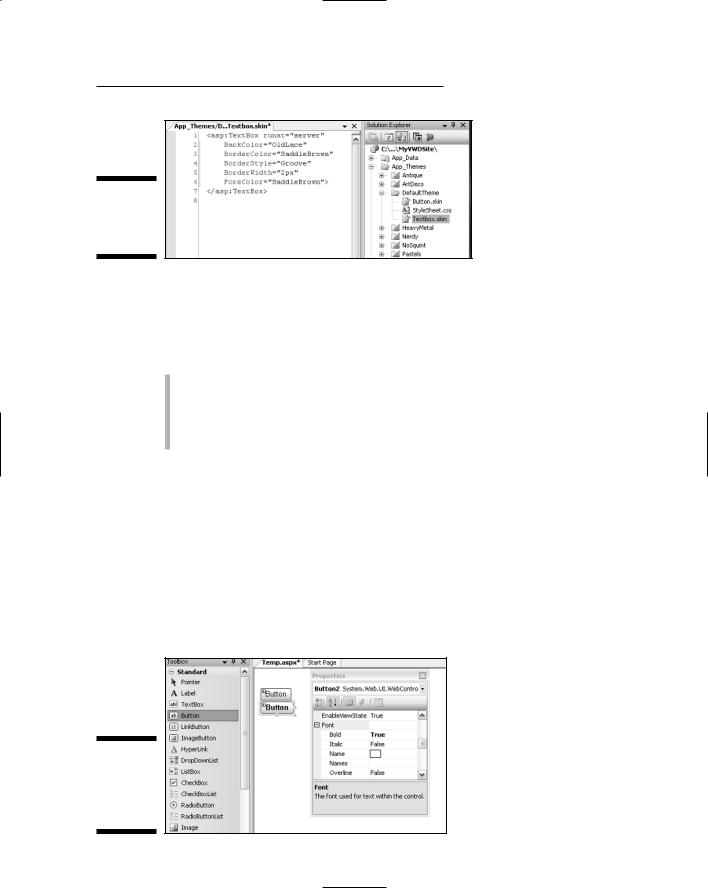
To define a specific skin that controls can use, give the skin a SkinID attribute. For example, suppose you want to have two styles of buttons in your site, a regular button as shown at the top of Figure 10-7, and a bold button like the one at the bottom of that same figure. In that figure, the bottom button is selected, and you can see where I’ve set its Bold property to True.
Figure 10-7:
Two Button controls, one boldfaced.
208 Part III: Personalization and Databases
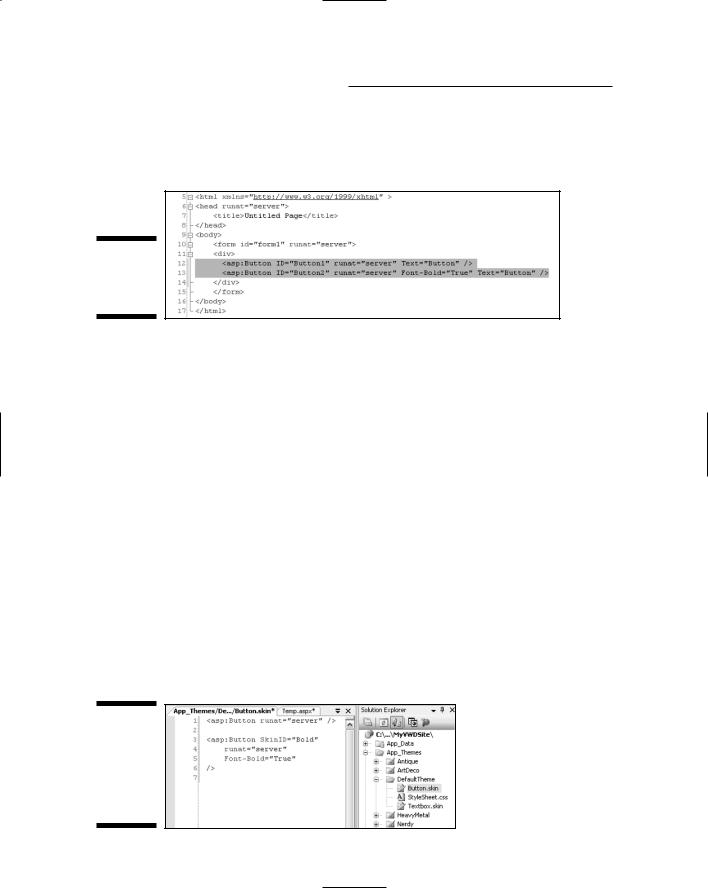
Changing from Design view to Source view reveals the ASP tags for the two buttons, as shown in Figure 10-8. In the figure, I’ve already selected the tags for the two buttons, so I can copy them to a skin file.
Figure 10-8:
Tags for buttons selected.
Next, just copy both tags to a new skin file. Because these are for ASP Button controls, you’d right-click a theme folder and choose Add New Item. Choose Skin File in the Add New Item dialog box, name the file Button.skin and click Add. Then paste the tags into the skin file.
Recall that you always need to remove from the skin file any attribute that will vary from one control to the next. That means you always have to take out the ID= attribute. In the case of a Button control, you also want to remove the Text= attribute because that defines the text that appears on the button. That will vary from one button to the next. (OK buttons, Cancel buttons, Submit buttons, and so forth, all have unique text.)
Finally, add a SkinID=”yourName” attribute to all but the default skin. The yourName part can be anything you like. In the case of my bold button, I’d probably use something like SkinID=”Bold”.
In my own Button.skin file I replaced the comment text with the
<asp:Button> tags. I removed the ID=”name” and Text=”Button” attributes from both tags. Then I added a SkinID=”Bold” to the second button style to differentiate it from the default button style, just above in the same skin file. The result is shown in Figure 10-9 where the Button.skin file in DefaultTheme contains a default skin for buttons, and a Bold skin for buttons.
Figure 10-9:
New
Button.skin
file in
Default-
Theme
theme.

Chapter 10: Using Themes 209
I’ve intentionally kept these skin examples small and simple, so as not to obscure the basic facts with lots of details. But you can style your controls however you see fit.
As with background pictures and style sheets, you’ll need to create skin files for all your themes. (As you can imagine, one could end up putting a lot of time into this sort of thing.) The result would be as in Figure 10-10, which shows some of my sample theme folders. Though you can’t tell from looking at the figure, the Stylesheet.css, Textbox.skin, and Button.skin files in each folder provide a style that’s unique to that theme.
Figure 10-10:
Each theme can contain its own skin files.
Using Themes in Pages
To take advantage of themes while creating and editing pages, you really don’t have to do anything special; as always, style-sheet themes are applied automatically. Default skins are also applied automatically to ASP controls. For example, every Textbox control automatically takes on the appearance of the currently selected theme’s Textbox.skin file.
If you want a control on a page to use a non-default skin file, just set the control’s SkinID property to the name of the skin you want to use. For example, suppose you’re creating a new page and you want to add some buttons to it.
One of the buttons should use the Bold skin. After you add the button to your page, set its SkinID property to Bold (as in Figure 10-11).