

Visual Web Developer™ 2005 Express Edition For Dummies - Alan Simpson
.pdf120 Part II: Building Your Web Site
Figure 6-21:
Applying
TD.ColHead
to multiple
cells.
Using DIV styles
It’s worth mentioning the HTML <div>...</div> tags at this point, because they’re relevant to CSS styles. A div is a box or “division” of text, set off from the normal flow of body text.
The <div> tag is to block styles what <span> is to inline styles. An empty pair of <div>...</div> tags creates a new box in which you can place text, tables, pictures, or whatever. However, text inside the box inherits its font and virtually everything else from its parent element, most likely the <body> tag for the page.
The main reasons I mention the <div> element is because many of the old ways of aligning things — for instance, the align= attribute — are being phased out in favor of using <DIV> tags.
As an alternative to manually creating and formatting a pair of <div>...</div> tags each time you put a centered element on a page, you could create a CSS style that already defines how you want centered elements to appear on the page. For example, the CSS style below, named DIV.Centered, ensures that any element between its tags is centered on the page, and that no text flows around the centered element.
DIV.Centered
{
background-color: transparent; text-align: center;
width: 100%; float: none; clear: both;
}
Chapter 6: Designing with Styles 121
In the Style Builder you’d choose the following categories and options:
Background: Choose Transparent.
Text: Choose Horizontal, Centered.
Position: Choose Width property and set it to 100%.
Layout: Set Allow Text To Flow to Don’t Allow Text On Sides. Set Allow Floating Objects to Do Not Allow.
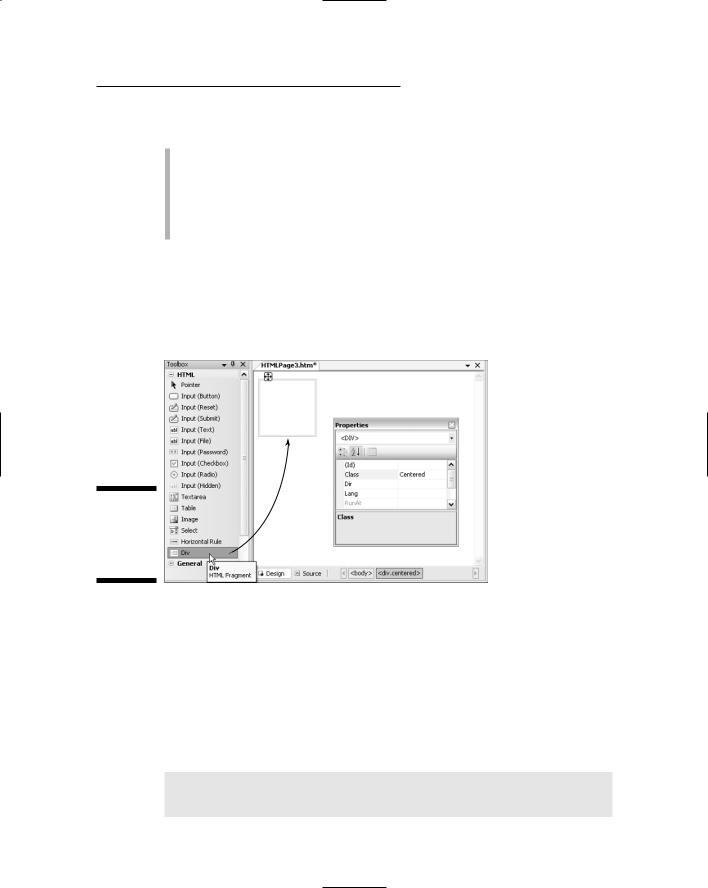
To use the style in a linked page, first make sure the page you’re editing is linked to the style sheet. Then drag the HTML Div control from the toolbox onto the page. An empty box appears and <DIV> appears at the top of the Properties sheet. Type the class name into the Class property, and press Tab. The box won’t change immediately. Figure 6-22 illustrates the procedure.
Figure 6-22: |
Drag |
Adding |
|
a Div. |
|
Centered |
|
box. |
|
To center an image on the page, drag its icon from Solution Explorer into the box. To center a table on the page, click inside the box before you choose Layout Insert Table from the menu bar. Then create the table normally.
In the VWD Design view, the <DIV> box will be visible as gray lines around the object inside. But in the Web browser, no such lines are visible and the item is just centered on the page.
In the HTML for the page, a picture appears as an <img> tag within <div> tags as in the following example:
<div class=”Centered”>
<img src=”Images/Laugh.gif” alt=”Ha Hah” /> </div>

122 Part II: Building Your Web Site
The CSS 2.1 Specification
This chapter has been about using CSS style sheets in VWD, presuming you’re at least vaguely familiar with CSS already. There’s not enough room in this book to cover the entire CSS specification. That’s a topic in itself you could learn in a class, from a book, or from the online specification and tutorials.
Like the HTML specs, the CSS specs are available at the World Wide Web Consortium Web site at www.w3c.org/. The following short list shows pages specifically relevant to CSS 2.1. Check them out. Any time you invest in learning CSS is time well spent.
Starting with HTML + CSS: www.w3.org/Style/Examples/011/ firstcss
Introduction to CSS 2.1: www.w3.org/TR/CSS21/intro.html
CSS 2.1 Specification: www.w3.org/TR/CSS21/
Chapter 7
Working with ASP.NET Controls
In This Chapter
What is ASP.NET, anyway?
Using server controls in your pages
Allowing users to create their own accounts
Creating a login page
Letting users change their passwords
The big difference between creating a regular Web site with HTML and a dynamic Web site with Visual Web Developer mostly boils down to
ASP.NET controls. ASP stands for Active Server Pages. The .NET refers to the Microsoft .NET Framework, the home of thousands of controls for all types of programmers, not just Web developers.
Some readers may already know what all that means and what it’s all about; some may not. For those who don’t, we start this chapter with a quick overview of ASP.NET and why it’s important for Web developers.
What Is ASP.NET?
Glad you asked. ASP.NET is essentially a set of controls for a building dynamic, data-driven Web site. To understand what that means, let’s start with a (hopefully familiar) example of searching the Web using a search engine like Google.
Suppose you go to www.google.com, type in something like 1966 Ford Mustang convertible parts, and press Enter. A moment later, Google sends back a page with links to a bunch of Web sites that contain those words (not to mention quite a few relevant ads). Where did that page come from? How does that work?
124 Part II: Building Your Web Site
Certainly Google didn’t have a Web page already made up and waiting, just in case someone happened to search for “1966 Ford Mustang convertible parts”. There are a near infinite number of word combinations that people might search for. And there’s no way to create a near infinite number of Web pages to cover every conceivable combination of words people might search for.
Instead, Google’s Web server has to take whatever words a user submits, search its database of 8 billion or so links for pages that contain those words, then create a page that contains appropriate links to send to the user’s Web browser.
In other words, Google’s Web server had to take an active role in creating the page it sent to your Web browser.
That is the very essence of a dynamic, data-driven Web site. The pages that Google sends out from its Web server are dynamic in that each page contains only links that match the words the user searched for. Those results are datadriven in that all those links are stored in a database at Google’s site.
I’m not saying the Google was created with Visual Web Developer. Google was created long before Visual Web Developer existed. But the concept of having the Web server take an active role in creating a Web page is all that matters for this analogy. Likewise, we won’t be building a search engine in this book. The only analogy that matters is the fact that Google’s Web server plays an active role in creating the Web pages that get sent to people who conduct searches.
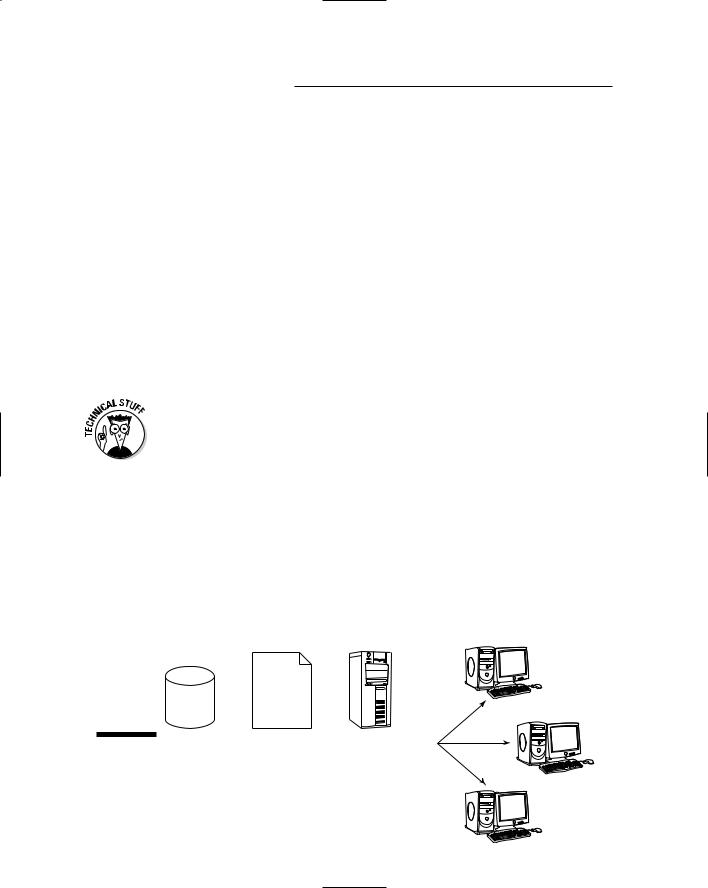
Making your Web server take an active role in creating the pages it sends is what ASP.NET is all about. Active Server Pages (Web pages with an .aspx extension) are basically Web pages that contain Active Server Controls. But you can’t send pages that contain server controls directly to clients; clients can’t execute server controls. The server uses data from the database and information in the .aspx page to determine exactly what HTML is needed on the client PC. Then the server creates the appropriate page and sends it to the client. Figure 7-1 illustrates the basic idea.
Figure 7-1: |
Data |
+ |
ASPX |
+ |
Web = HTML |
|
|
page |
|
server |
|
Using data |
|
|
|
||
|
|
|
|
|
|
and .aspx |
|
|
|
|
|
pages to |
|
|
|
|
|
create |
|
|
|
|
|
HTML. |
|
|
|
|
|
|
|
|
|
|
|
|
|
|
|
|
|
Chapter 7: Working with ASP.NET Controls 125
The .NET Framework is an enormous collection of tools for programmers (and, like “the world and all it contains,” not a subject we have to get into right now). Suffice it to say that all ASP.NET Web server controls you find in VWD are members of the .NET Framework. And as such, complete documentation about any server control is available from the .NET Framework online documentation.
In Visual Web Developer, the Toolbox shows the names of commonly used
.NET Server controls, categorized into groups like Data, Validation, Navigation, Login, and so forth. These tools are visible only when you’re editing a Web form (.aspx page). The server controls are hidden when you’re editing an
.HTML page.
Adding a Server Control to a Page
Adding a server control to a page is pretty simple: You drag its name from the Toolbox onto your page. You can put server controls on a blank .aspx page, in Master Pages, or in the content placeholder in a page that uses a Master Page.
The size and complexity of server controls ranges from a tiny link on a page with a few properties to multipage wizards consisting of many smaller controls and many properties, and every size in between. Despite the differences among server controls, there are some commonalities in how you work with them. Those commonalities are what this chapter is mostly about.
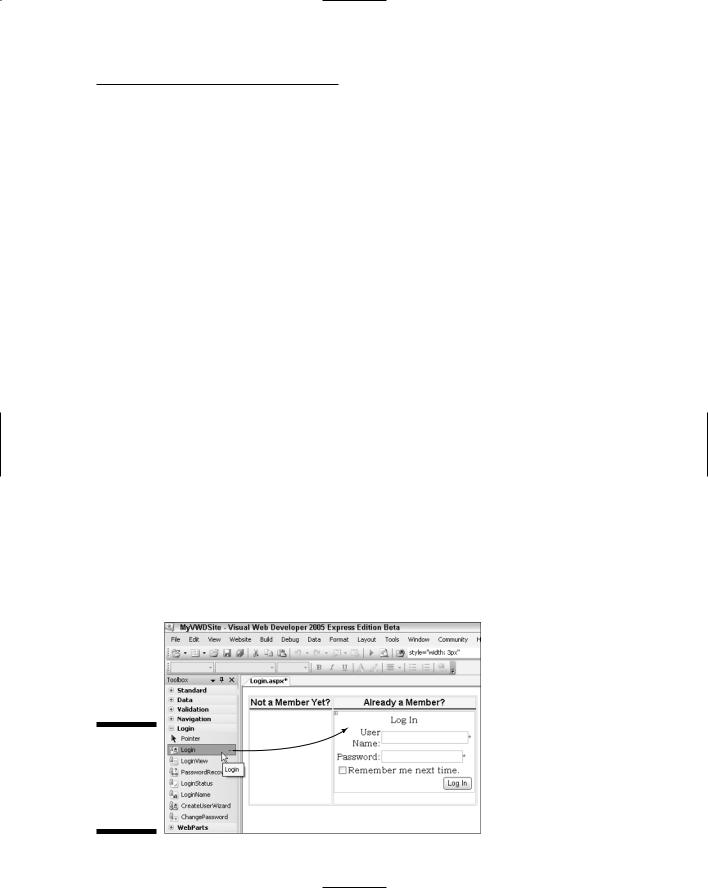
As mentioned, adding a server control to a page is simple: You just drag its name from the Toolbox to wherever you want to place it on the page. In Figure 7-2, for example, I’ve created a page named Login.aspx and placed a table (along with some text) on the page. In the figure, I’ve just dragged a Login control from the Toolbox into the lower-right cell of the table.
Figure 7-2: |
|
|
Using data |
Drag |
|
and .aspx |
||
|
||
pages to |
|
|
create |
|
|
HTML. |
|
126 Part II: Building Your Web Site
Tweaking server controls in Design view
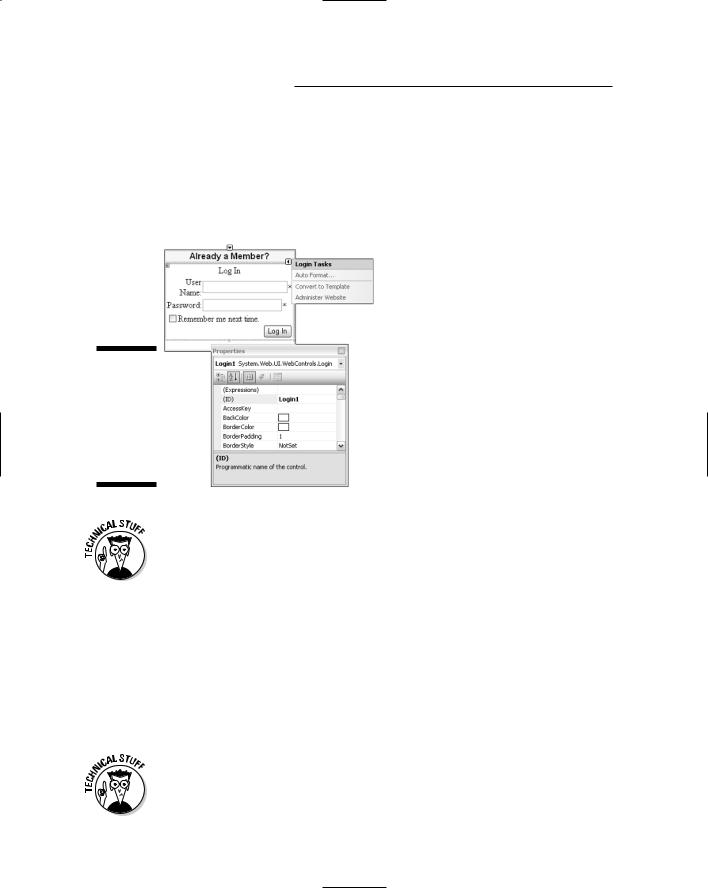
In Design view, clicking an ASP.NET control selects the control. The Properties sheet shows the name and properties of the control. The Properties sheet in Figure 7-3 shows an example in which a Login control is selected. The name of the control is Login1.
Figure 7-3:
The Login Tasks menu, showing Properties for an ASP.NET control.
Controls in the .NET Framework are organized into a hierarchical namespace, a place to keep them that works much the same way as the hierarchical organization of the folders on your hard disk that keep your files. In the Properties sheet of Figure 7-3, System.Web.UI.WebControls.Login is the full name of the Login control within the .NET Framework namespace.
You can design some elements of an ASP.NET control using the Style Builder. Just right-click the control and choose Style, or click the control so its name shows at the top of the Properties sheet. Then click the Style property and the Build button that appears. The Style Builder opens, and you can choose items as you would for any normal HTML control.
For example, to change the size of the text in the Login1 control, scroll down its properties list and click the + sign next to the Font property. Then click the Size property and choose a relative size like Medium.
ASP.NET controls are converted to HTML before they’re sent to the server. Element styles like TABLE and TD (for table cells) are applied to the HTML automatically. So don’t knock yourself out trying to design an ASP.NET control in Design view until you’ve had a chance to see how it looks in a Web browser.
Chapter 7: Working with ASP.NET Controls 127
The Style Builder won’t work for all parts of an ASP.NET control. If you want to fine-tune every single element in a control, you have to convert it to a template first. This is done on the Common Tasks menu you’ll find on ASP.NET server controls. This menu is explored more fully in the next few sections.
Using the Common Tasks menu
In Design view, when you select (click) a server control, you see a tiny arrow button somewhere on its border. Clicking that tiny button opens the control’s Common Tasks menu. In Figure 7-3, for example, I’ve clicked the little arrow button for a Login control on a page in Design view.
The exact options on a Common Tasks menu vary from one server control type to the next. But some options, such as
Auto Format
Convert to Template
Administer Website
Edit Templates
are so common they deserve further mention. The next few sections discuss these options in greater detail.
Using Auto Format
The easiest option on the Common Tasks menu is Auto Format. Clicking that button takes you to an Auto Format dialog box, where you see a list of scheme names and a preview window. When you click a scheme name, the preview shows you how the scheme looks.
If you find a scheme you like, just click OK to select it. Or, if you don’t want to use a scheme and just want to use the default control appearance, click Remove Formatting, then click OK.
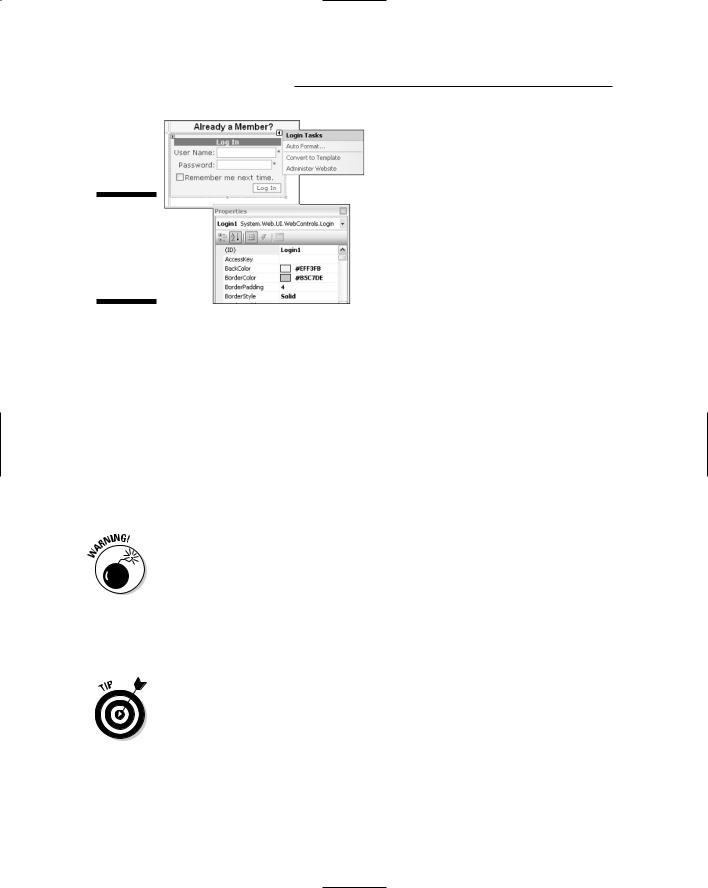
In Figure 7-4, I chose Auto Format Classic scheme, and clicked OK. The Login control takes on the Classic scheme (it’s blue on the screen, not gray). The change is also reflected in the control’s BackColor, BorderColor, and other properties.
In the Properties sheet, values in boldface are recent. This serves as a good reminder that you can Undo them with Ctrl+Z or Edit Undo.
128 Part II: Building Your Web Site
Figure 7-4:
Classic scheme applied to the Login1 control.
Converting a control to a template
By looking at the Login control shown back in Figure 7-4, you can conclude that it must be made of several smaller controls. After all, it contains text, boxes, and a button, all neatly aligned. Where are those individual controls, and what if you want to change one?
The answer lies in converting the control from an individual control to a template. As its name implies, the template defines the exact content and position of each item that makes up the control.
When you choose Convert to Template, a complex visual control like Login is divided into its individual components. Then, the “Convert to Template” option on the Common Tasks menu is replaced with a Reset option.
The Reset option undoes changes you’ve made to the template before converting it back to a single control. Don’t click Reset if you intend to keep changes you’ve made in a template.
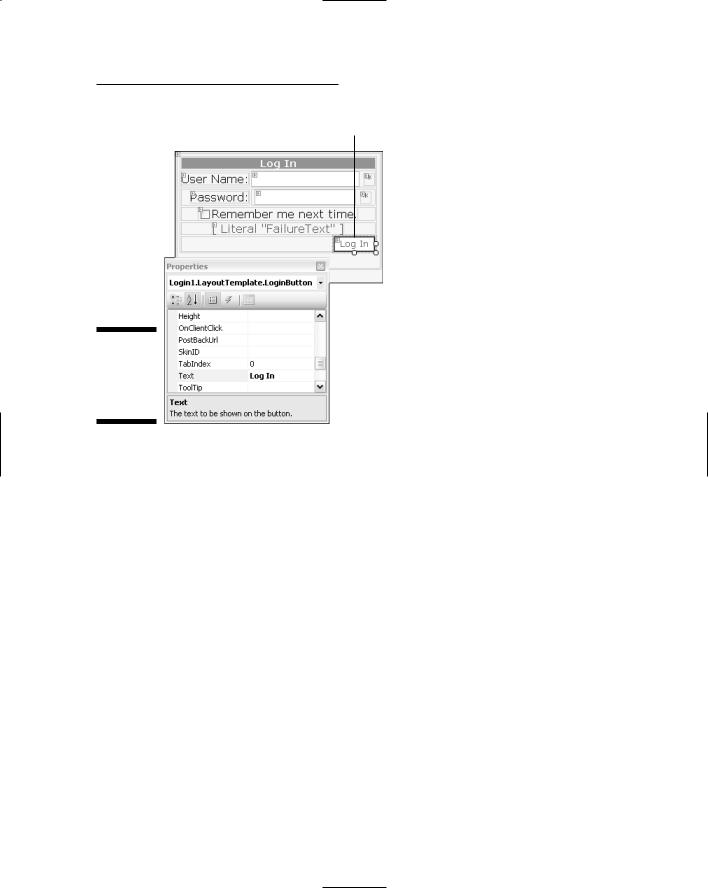
Within the template, each control has its own tiny arrow button — so tiny you practically need a microscope to see it. Fortunately, you don’t have to click the tiny button. It’s just there to identify the upper-left corner of each control in the template. Click anywhere on a control to select it. Figure 7-5 shows an example in which I’ve clicked the Log In button in the template.
To select multiple controls, click the first one, then hold down the Ctrl key as you click others.
The Properties sheet, as always, shows the name and properties of the selected control. Because it’s a server control, it won’t have the usual HTML tag name in angle brackets. You can change any property of the control in the usual manner. For example, to change the text that appears on the selected button, change the button’s Text property.
Chapter 7: Working with ASP.NET Controls 129
Selected control
Figure 7-5:
Log In button selected in a template.
Red text in a template represents text that appears in the browser only under special circumstances, such as when the user fails to fill in a required text box. You don’t have to change any of the red text, it’s just a temporary placeholder for normal text that will appear in the Web browser.
Administering the Web site
The Administer Website option on the Common Tasks menu is just a shortcut to the Web Site Administration Tool discussed in Chapter 3. There’s really no need to switch to that tool, though. The link is only there as a convenience in case you want to check, or maybe change, current user accounts, roles, or access rules.
Editing templates
The Common Tasks menu of some server controls includes an Edit Templates option. For example, the multipage CreateUserWizard template described a little later in this chapter has an Edit Templates option on its Common Tasks menu. Clicking that option takes you to a template-editing window that has its own Common Tasks menu. From the Templates Common Tasks menu, you can choose which template (that is, which portion of the control) you want to style. Figure 7-6 shows an example where I chose Edit Templates from its common tasks menu after dragging a CreateUserWizard control onto a page.