

Beginning ASP.NET 2.0 With CSharp (2006) [eng]
.pdfChapter 1
ASP.NET 2.0 is part of the .NET 2.0 Framework. The .NET Framework is a brand of Microsoft that sets software standards for Internet connectivity using web services and XML. Many Microsoft products conform to the .NET standard, including various server software, data-management systems, and desktop applications. ASP.NET 2.0 is the subset of .NET 2.0 that offers software for generating dynamic web sites. The software is published in a set of classes holding various controls that execute their behavior on the web server. In our day-to-day designing of pages, we work with these server-side controls. Because ASP.NET 2.0 is a subset of the .NET 2.0 Framework, this book sometimes uses features of ASP.NET 2.0 and sometimes uses features of the .NET 2.0 Framework. Use of these various features will be essentially seamless.
As a Microsoft product, ASP.NET 2.0 runs on Windows. For development, it works on the desktop with Windows 2000 or later (including both XP Home and XP Pro). At deployment, the normal OS is Windows Server 2003 or another Windows OS version designed for higher loads. Within Windows, ASP.NET 2.0 works with the Internet Information Server to read pages from disk and send them to requestors. Alternatively, on the development desktop, ASP.NET 2.0 can be tested with a lightweight web server named the ASP.NET Development Server that is distributed with development tools such as VWD.
When a designer uses the ASP.NET 2.0 controls to connect with data, two more levels of interaction are introduced. The data controls use a technology named ActiveX Data Objects (ADO.NET), but fortunately the use of ADO.NET is behind the scenes for us. Those ADO.NET objects, in turn, interact with the source of data. The source of data can be Microsoft SQL Server (as used in this book) or almost any other source of data including relational databases such as Oracle or MySQL, and non-relational sources such as XML or text files.
Microsoft offers tools for several levels of developers to build ASP.NET 2.0 web sites. The most comprehensive product is Visual Studio, which contains tools for building applications for Windows and applications for the web. The web construction part is named Visual Web Developer. A free (but less capable) alternative is the Visual Web Developer Express. Front Page can work, but it focuses more on static HTML pages and thus lacks the set of tools that makes designing the dynamic, data-intensive ASP.NET 2.0 pages such a pleasure. Creating pages in Notepad was long the preferred method of ASP developers and is still theoretically possible; however, the necessary management of web sites and web pages make this impractical, laborious, and far more prone to errors.
Enough of the theory — let’s see ASP.NET 2.0 in action. During the course of this book you will build a complete web site for a hapless football (soccer) team named Wrox United. A completed example is hosted at www.wroxunited.net, which you explore in the next section to observe the range of features ASP.NET 2.0 supports. Then in the remainder of the book, you will build the same site on your desktop. For this exercise, you do not have to install software on your machine. The remainder of the book, however, relies on your completion of the setup outlined in Appendix B.
Exploring the Wrox United Application
This section explores the site as built by the authors, which you will build as well. It is hosted at www
.wroxunited.net. Open your browser and direct it to that address.
Master pages and site map (discussed in Chapter 2): Click through several pages to observe the uniform layout across the top and left side of the page. This design consistency derives from an easy-to-implement feature called Master Pages. Second, note the maroon box in the lower-right of each page that indicates your current page and its relationship to parent pages back to the home page. This feature was created with the ASP.NET 2.0 Site Map and Navigation controls.
8

An Introduction to ASP.NET 2.0 and the Wrox United Application
Server-side controls (discussed in Chapter 3): Go to the Players page. All of the data comes from two server-side controls — a data source control to connect to the database and a databound control to display the information. Most of the behavior of ASP.NET 2.0 pages is encapsulated in server-side controls. These include links like the shopping cart at the bottom-left, images such as the logo at the top-left, and text boxes such as the logon section at the lower-left.
Login and security system (discussed in Chapter 4): On the home page, log in as User Name
Lou and Password lou@123. Then log out. Authentication systems can require a tremendous amount of work to create and even then frequently contain security holes. ASP.NET 2.0 offers a very simple system based on several server-side controls including the login and password verification schemes, and a system to e-mail a clue for forgotten passwords.
Events (discussed in Chapter 6): Browse to the Shop page, click an item, and add the item to your cart (of course, this is not a real shopping site, just a demo). An event occurred as you clicked the Add to Cart button and that event was handled by custom code that created an order and added the item to the order.
Data reads (discussed in Chapter 7): Browse to the Players page where the names and joining dates are read from a SQL Server Express database. Many kinds of information on the site are held in data stores that are read by ASP.NET 2.0 server-side controls on the page. Browse back to the home page and observe the menu. Even these menu choices are read from an XML file that holds a map of the site.
Data writes (discussed in Chapter 8): Browse to Shop, click the car sticker, and click Add to Cart. You have just written a value to a database. The behavior of writing your order to the database was implemented by two ASP.NET 2.0 server-side controls. The designer of the site did not have to do any custom code.
Code behind the controls (discussed in Chapter 9): From the home page, click Shopping Cart at the lower-left of the page. We have written custom code that executes when the page is loaded, checks if there are currently any items in the shopping cart, and renders a page appropriate for the cart contents: either empty or a list of contents. Although the capabilities of the ASP.NET 2.0 server-side controls are impressive, they cannot cover every possible case. An ASP.NET 2.0 site offers numerous places that a designer can add custom code.
Components (discussed in Chapter 10): Browse to the Fixtures page. Although the data is stored in a SQL Server database, the ASP.NET 2.0 page does not read it directly. There is a component that reads that data and then sends it on to the ASP.NET 2.0 page. That component can be reused by other web sites or by Windows applications that run on a local network without the Internet.
Roles (discussed in Chapter 11): If you had administrative rights, you could log in and see different screens. After you have installed the site on your local machine, you will experiment with this feature in Chapter 4. ASP.NET 2.0 goes beyond just logging in visitors. They can be authorized to have sets of privileges called roles. The public site does not allow non-authors to log in as administrators, so there is no need to take action at this point.
E-commerce (discussed in Chapter 13): From the menu, go to Shop, and click a few items to add to your cart. Now on the bottom of the menu, click Shopping Cart and view its contents. The most complex part of the site is the shopping cart. ASP.NET 2.0 does not have a pre-built e- commerce solution, but because so much behavior is built into the ASP.NET 2.0 controls, designers can develop features such as e-commerce much more quickly than in the past.
Performance (discussed in Chapter 14): Under the covers, the data is being cached where appropriate and objects are being disposed as early as feasible. The site also uses Generics to improve the performance of lists.
9

Chapter 1
Errors and exception handling (discussed in Chapter 15): As you navigate the site, you can try entering data of the wrong type or clicking to save data without entering any information. In these cases, the mistake is handled gracefully.
Deployment (discussed in Chapter 16): At this point, you will not walk through a deployment. However, keep in mind that for ASP.NET 2.0, the transfer for a site from a development machine to a deployment machine generally entails only a few steps that copy the databases to the data server and then perform a simple file copy of the site folder and its subfolders to the new server.
This walkthrough gave you a taste of what you will learn to create in this book. Most of the features explored were implemented with very little code that we wrote. The behavior was performed by code that Microsoft baked into a set of server-side controls that are the components of ASP.NET 2.0. We merely placed these controls on pages and set various properties.
Getting Started with Your Wrox United Site
Now that you have observed the finished site as publicly hosted, you can begin creating the same site on your desktop. If you have not installed Visual Web Developer Express, SQL Express, the sample database, and the sample site (outlined in Appendix B) then do so now. Start by reading the overview at the beginning of the appendix and then work your way through each step. You can be sure of your installation by performing the check at the end of each section.
This chapter and the next chapter set up the basic framework of the site as you learn how to use VWD and establish some design parameters for the site. Because VWD offers drag-and-drop solutions to most tasks, you will be able to create the entire site with a minimum of typing. In the cases where some typing is necessary, you can cut and paste from text files in this book’s download at www.wrox.com. All pages are in the download in their final form, but creating ASPX pages yourself is a better way to learn ASP than merely copying completed pages from our reference set.
VWD Express — A Development Environment
A fundamental difference between most animals and humans is the ability to use tools. In the early days of programming, the tools to write programs were very primitive. Today we enjoy the benefits of very sophisticated tools for software development. Engineers have taken almost every area of human weakness (primarily related to the capacity of memory and the brain’s interface to the world) and created compensating tools. These tools are pulled together into a type of software called an Integrated Development Environment (IDE). The IDE used in this text is Visual Web Developer Express (VWD).
VWD contains a number of development tools. First is an editor in which you can build a web page. This editor is enhanced with IntelliSense, a tool that finishes typing commands and offers appropriate choices for the developer. In addition, a toolbar contains icons that can be dragged to the editor and automatically type a block of code into the editor. Another way to automatically get code into a page is with the many wizards that pop up when you attempt a more complex task. VWD also contains a mini File Manager to organize ASPX and associated files and folders. Similarly, there is a Data Explorer that offers navigation through the data sources of the web site. A suite of troubleshooting tools is also included. Finally, VWD ships from Microsoft with a web server for testing named ASP.NET
10

An Introduction to ASP.NET 2.0 and the Wrox United Application
Development Server, which is covered in the next section. If you go beyond the scope of this book, you can discover tools for more complex scenarios, including the management of code versions among a team of developers.
Introducing the ASP.NET Development Server
ASP.NET Development Server was mentioned earlier as the lightweight web server that comes with VWD. This is the lightweight server that was known as Cassini during the Beta releases of VWD. Both ASP.NET Development Server and IIS (included with the .NET Framework) can serve all ASPX and associated pages, so at deployment there is no need to make changes to your site. But a number of differences exist between the servers.
The two servers use different security models. IIS is a service, and every service in Windows requires a user. The special user for IIS is named ASPNET. ASP.NET Development Server runs as an application that uses the currently logged-in Windows user. That makes ASP.NET Development Server easier to install because there is no need to create a specific ASPNET account in Windows. In fact, the installation of ASP.NET Development Server is transparent when VWD is installed.
ASP.NET Development Server has three downsides. First, it is a tool for designers to test pages on their development machine and thus it does not scale to more than one user. Second, because of the simplifications to the user model, ASP.NET Development Server cannot support a robust security scheme.
ASP.NET Development Server should run only in a closed environment or behind a robust firewall. Third, when you run a page in ASP.NET Development Server, it locks the page back in VWD. In order to unlock the page, you must close the browser, which can be inconvenient when you’re making and testing many changes to a site. Therefore, many developers use IIS even on their development machines so they do not have to close a page in the browser before working on it in VWD. The downside is that you have to configure your development machine to provide IIS, set up the appropriate authorizations, establish security controls, and create a virtual root. You learn how to set this up in Appendix B. If you don’t want to go through the IIS setup, you can still use ASP.NET Development Server and just close the browser between modifications.
VWD’s Solution Explorer
An ASP.NET 2.0 web site is stored as a family of files. You need to be able to organize these files, including the tasks of viewing their names and relationships, copying, creating, and deleting. You can view and manipulate them in Windows Explorer, but it is inconvenient to switch between VWD and Windows Explorer. VWD includes an explorer-like tool called the Solution Explorer, shown in Figure 1-2. The Solution Explorer is displayed by default on the right of the screen, or you can redisplay it by pressing Ctrl+Alt+L. Think of it as a Windows Explorer that considers your web root to be the highest level and does not require you to switch out of VWD. Note that the Toolbox may be placed behind the Solution Explorer, as illustrated in Figure 1-2.
The layout of Solution Explorer is instantly familiar to anyone who uses Windows Explorer. Click the plus and minus icons to expand or contract folders. The icons in the toolbar start from the left with a tool that switches from the Solution Explorer to a view of properties (more on that later in this chapter). The double horizontal arrows perform a refresh. The double file icon automatically hides or expands nested subfiles. The next two icons open the selected files to display either their user interface (design) or their code. The double browser icon is used to copy the entire site to the deployment machine. The right-most icon, with the hammer, opens a Web Administrator tool to manage features of the site.
11

Chapter 1
Figure 1-2
At the bottom of the Solution Explorer may be a small task bar that shows tabs for the Solution Explorer, Toolbox, Data Explorer, and/or Properties windows. To conserve monitor real estate these four tools are frequently stacked and the tabs offer quick switching. For example, in Figure 1-2, the Toolbox is also open (albeit hidden behind the Solution Explorer) and clicking the Toolbox tab would hide the Solution Explorer behind it. They are not strictly part of the Solution Explorer, but rather the pane that holds the four stacked tools.
In the main pane of the Solution Explorer is the list of files that make up your site. At the top is the root, generally in C:\websites\MyWebSiteName. In the case of WroxUnitedCS, C:\BegASPNET2\ WroxUnitedCS is used. The files are displayed in their subfolders. Using the same techniques as
Windows Explorer, you can expand, collapse, cut, copy, and paste files among folders. Solution Explorer recognizes the implied link between an .aspx file and its .aspx.cs file (more on these in Chapters 6 and 9). If you copy the .aspx file, the code file moves with it.
You can also right-click a folder and select Add Existing Item. The resulting dialog box enables you to navigate anywhere on your computer and network (including FTP sites) to bring in files. For example, when you begin to build your project, there are times you are asked to use an image or text file from this book’s download at www.wrox.com. You can use Solution Explorer to add the item to your web site from your download folder.
During development, ASP.NET 2.0 sites do not contain a special system of file registration. The files, including ASPX pages, code files, data files, and images are all contained in a normal Windows folder and subfolder structure. If you do not have VWD open, you can cut, copy, and paste your site files directly from Windows Explorer.
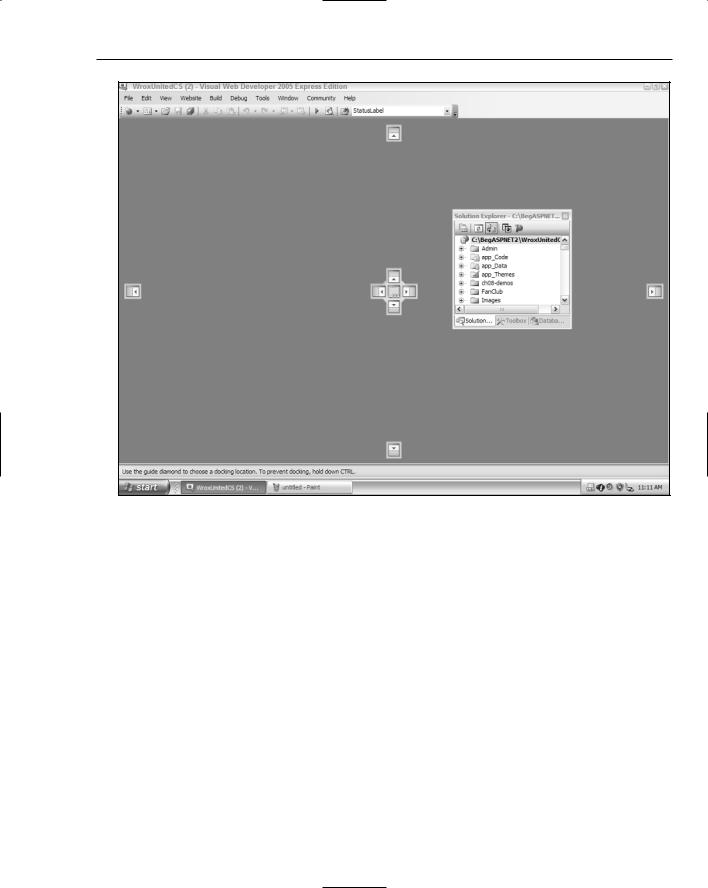
The Solution Explorer, like the Toolbar, Data Explorer, and Properties window discussed in the next section, can be placed on the page in one of two modes: floating or dockable. Floating allows the window to be placed anywhere on the screen, similar to a normal window of a base size (not maximized). The dockable mode automatically places the window in one of five locations: top, bottom, left, right, or stacked on another window. Change the mode by selecting one of the windows, and click through Window Floating or dockable in the menu. In dockable mode you will see some translucent positioners when you drag the window’s title bar, (see Figure 1-3). Drag the title bar onto one of these positioners, and the window automatically sizes and places itself in the correct dock.
12
An Introduction to ASP.NET 2.0 and the Wrox United Application
Figure 1-3
Now that you have learned to modify the VWD Express IDE, you can move on to the techniques of creating web sites and pages within those sites.
Creating, Opening, and Using Web Sites and Pages with VWD
To create a new site, you only have to open VWD and click Menu File New Site. From the wizard, select an ASP.NET web site. Assuming you will create a local copy for development, set the location to File System and browse to the path. Normally this would be C:\BegASPNET2\MyWebsiteName (our practice site allows backward compatibility with earlier books by using C:\BegASPNET2\WroxUnited). This book uses the C# choice in the Language list. VWD automatically creates a folder, a default page, and a subfolder for data.
ASP.NET 2.0 introduces a very simple model for file organization and code registration for a web site. All files for the site are stored in a folder and its subfolder. At the time of deployment, that entire group is copied from the development machine to the host. Therefore, you are not required to create a virtual root as in former versions of ASP. Deployment is further simplified by VWD: if you select Menu Website Copy Website, VWD opens an FTP screen that you can use to send new or updated files to your host.
13

Chapter 1
To edit an existing site, choose Menu File Open Web Site. If you are working locally, you can browse to the folder. On the left side of the screen, VWD presents a menu with options to work directly on pages via FTP or through a local IIS installation.
After you create the web site, you can add pages. We usually start by adding some folders to organize the pages. Right-click an existing folder and click the option to add a folder. The options are a regular folder or one of the folder names that are reserved in ASP.NET, including ones for Code, Themes, and Web References.
To add a page, right-click a folder and click Add New Item. A wizard presents many choices. For now, you simply need to create a Web Form, but take a look at the other options to get a feel for the capability of VWD and ASP.NET 2.0. Give your new page a name and set its language. Later chapters discuss the two checkboxes. Having introduced you to creating web sites and pages, the following Try It Out puts that knowledge to use, asking you to create the Wrox United site and a couple of practice pages.
The Sample Code (Download) Directories
To make things easy, each chapter has its own code, and there are two directories for each chapter, held under one of two higher-level directories. There is a Begin directory, which contains the samples ready for you to work through — it’s the samples without any changes. The End directory contains the samples with the Try It Outs completed, so you can use these as a reference as you are working through the examples, or to cut and paste code if the example directs you to do this.
The Begin and End directories appear under a Chapters directory, with each chapter having its own directory. So the starting set of samples for this chapter is under Chapters\Begin\Chapter01, and the finished code for this chapter is under Chapters\End\Chapter01. Some chapters work on the main WroxUnitedCS application, and will therefore contain a copy of the WroxUnitedCS directory, whereas others have non-WroxUnitedCS samples. The reason for this is that some techniques are easier to digest in smaller samples, rather than in a fully working application. All of the techniques, however, are used in the main application.
Because each chapter has a separate directory, some with complete copies of WroxUnitedCS, the samples are quite large. However, the advantage is that each chapter is kept separate from the others, which allows you to work through chapters without mixing up which code came from which chapter.
In addition to the code for the chapters, there is a WroxUnitedCS application that contains the final application. This may differ slightly from the samples, but only in that the data may be more complete, and some of the pages look a little nicer.
Try It Out |
Creating the Wrox United Site and Two Practice Pages |
1.Open VWD. Choose Menu File New Web Site. Select the template for an ASP.NET web site and locate it in the File System at C:\Websites\WroxUnitedCS (you can use the Browse button to navigate to this directory). Make sure the Language choice is set to Visual C#. Click OK. You should see your folder on the right side of the screen in the Solution Explorer. If not, choose View Solution Explorer. Note that VWD automatically builds three items: a folder named App_Data, a page named Default.aspx, and (if you expand Default.aspx) a file named Default.aspx.cs, which will hold code for the default page.
14

An Introduction to ASP.NET 2.0 and the Wrox United Application
2.In the center of VWD, you will see a space for editing pages with the Default.aspx page opened. Note in the bottom-left a choice of Design and Source. Click each in turn to observe the code and the results of the code. In Design View, click the page and type the simple text Home Page. Press Ctrl+S to save.
3.Create a folder for images by going to your Solution Explorer and right-clicking the root of your site (this will probably show as C:\...\Chapter01, as the Solution Explorer hides part of the path) and then clicking Add Folder of the regular type. Name the nascent folder Images.
4.You can manipulate your site’s files and folders outside of VWD. Open Windows Explorer and navigate to C:\BegASPNET2\Chapters\Begin\Chapter01 to see the same set of folders and files as you see in VWD’s Solution Explorer.
5.Returning to VWD, right-click the nascent Images folder and click Add an Existing Item. Browse to the folder where you stored the download for this book, probably named C:\BegASPNET2\WroxUnitedCS. Open the Images folder and select all the images. Click Add to actually copy those images from the download folder to your site’s image folder.
6.Staying in VWD, now create your next page, the history of Wrox United. Right-click the site’s root (C...\Chapter01 at the top of the Solution Explorer) and select Add New Item from the menu. Select the Web Form template and give it the name History. Accept the other default settings. Click Add and switch to Design View. Rather than typing text on the page, you can copy a short history of the team from a file included in the download. Switch to Windows Explorer and navigate to your downloaded Chapter01\Begin\Chapter01 folder. Look for the file named History.txt, open it, and select the paragraphs. Switch back to VWD and paste the text into the page. Click the diskette icon on the toolbar to save.
7.Repeat step 6 for a Mishaps page, whose contents come from Mishaps.txt.
How It Works
In this exercise, you created your site and the first few pages. By using the menu choices in VWD to create a site, you automatically get some standard folders and files. You followed the Microsoft recommendation of storing the site in the C:\Websites directory. As you saw with the Images folder, it is easy to add subfolders to the root to organize your files.
When you created a page in VWD, you were offered a few dozen templates. You selected Web Form as the standard plain ASP.NET 2.0 web page. By using cut and paste, you have no problems bringing in text from other files.
You also learned that there is no requirement for a special file indexing or storage mechanism in VWD. The files sit in the folders organized by Windows on the hard drive. However, it is better to create and add files in VWD when possible to keep the Solution Explorer view and other VWD features immediately up-to-date with your changes.
Running a Page
After a page is created, it can be served to a user. Because the server actually executes code in the serverside controls to create the final HTML page, this serving of the page is also called running the page, as if you were running a program. VWD has a green triangle tool icon to initiate a run or you can press F5 or choose Menu Debug Run. VWD then performs several steps:
15

Chapter 1
1.All pages in the site are compiled to the Microsoft Intermediate Language (MSIL) that is then stored with supporting files in an assembly. At this point, development language differences (for example VB and C#) disappear because the result is in MSIL. However, there is no optimization for the hardware that will serve the page.
2.The assembly is Just In Time (JIT) — compiled from MSIL to Native Code that is optimized for the serving machine.
3.A lock is placed on the page that prevents changes in VWD Design View while the page is opened by ASP.NET Development Server.
4.VWD starts ASP.NET Development Server and your browser is opened with a request to ASP.NET Development Server for the page.
A common mistake for beginners is to attempt to change a page in VWD’s Design View while it is still open in a browser served by ASP.NET Development Server.
As your site gets larger, you’ll find that the compilations take longer. You can press Ctrl+F5 to run a page with a compilation of only that page. In the following Try It Out, you practice running the History and Mishaps pages created in the previous Try It Out.
Try It Out |
Running a Page |
1.In VWD’s Solution Explorer, double-click the History.aspx file to open it (if it is not already open).
2.Click the Run icon (green arrow) on the toolbar. If there is a message to add a Web.config with a Debug, accept the suggestion. Note that your browser opens and displays the History page.
3.In the Windows tray, the icon of a yellow page with a gear indicates that ASP.NET Development Server is running. Double-click it and you will see that it is pointing to your web site. Close your browser so ASP.NET Development Server unlocks the page.
4.Return to VWD and open the Mishaps page. This time, watch the lower-left corner of VWD as you start to run the page. You will see a message that the build has started and a brief display of an error list box. After seeing the Mishaps page in your browser, switch back to VWD. Note that the page (in Design View) is locked while it is served.
How It Works
This Try It Out focused on running pages from VWD. You can start the run by clicking the green arrow. This action starts ASP.NET Development Server. It also opens your browser and sends a request to ASP.NET Development Server for the page. When ASP.NET Development Server is running, you can see the icon for the server in the Windows system tray.
Design Surface
The center of the VWD interface is occupied by the large Design Surface. This is the area where you will do most of your work of adding content to ASP.NET 2.0 pages. You can switch between Design View, which displays a simile of the final page in a browser-like display, or you can switch to Source View,
16

An Introduction to ASP.NET 2.0 and the Wrox United Application
which displays code in a text screen (see Figure 1-4). In general, the Design View is easier and faster for most work because it supports more drag-and-drop features. You can switch to Source View when you need to make those minor changes that are beyond the capability of the VWD drag-and-drop interface.
Figure 1-4
When you add a control to a page in Design View, a Common Tasks Menu may pop up. This mini menu contains the most frequently used setup features for the control. Not all controls have smart task panels, but if it is available, it can be opened and closed using the small black triangle at the top corner (shown in Figure 1-5) of a control that is selected.
Figure 1-5
You can change several default settings in the Design Surface by opening the Tools menu and selecting Options. These options change the way the pages appear to you, as the programmer, when they are opened for editing in VWD. These are not the settings for the appearance of the page to the web site visitor. You can select to start pages in Design View or Source View, as well as the automatic opening of the smart task panel. Being able to revise the number of spaces for tabs and indents helps your projects conform to your company’s specifications for web page code.
At the bottom edge of the Design Surface is a navigation tool that is useful in large and complex documents. You can read the navigation tags to find out where the insertion bar (cursor) is currently setting. The current setting is highlighted, as depicted in Figure 1-6. You can also click a tag and the entire tag will be selected in the Design Surface.
Figure 1-6
The designer is, in many ways, like a word processor. But VWD also offers the two alternatives to viewing a page (Design and Source) as well as enhancements for navigating through the page. The next section discusses how VWD helps you to add features to the page.
17