


Chapter 9
Working with XML
Solutions in this chapter:
■Introduction to XML
■Working with XML DOM
■Working with XML and Relational Data
■Working with XPath and XSL Transformations
;Summary
;Solutions Fast Track
;Frequently Asked Questions
431

432 Chapter 9 • Working with XML
Introduction
The popularity of the Internet took off with the advent of the World Wide Web. Suddenly, a world of information was available using a Web browser and dial-up access to the Internet.Without diverse content, however, the World Wide Web would be of little interest.
The wide availability of Hypertext Markup Language (HTML) editors allowed people with little technical knowledge to publish their content on the Web for the world to see.The proliferation of personal Web sites that display family pictures and lists of hobbies is testament to this. HTML is an excellent language for defining the presentation of data, but it is not very useful in describing the data itself. As the Web matured, it became apparent that separation of presentation from content was highly desirable.This separation allowed people such as graphic artists to concentrate on presentation and allowed people such as programmers to concentrate on creating and manipulating data.
Extensible Markup Language (XML) has emerged as the Web standard for representing and transmitting data over the Internet. XML is a generic, platformindependent data description language and as such has gained great popularity in the computer industry, adopted by many of the largest companies in the computer industry.The World Wide Web Consortium (W3C) has produced standards for several XML-related technologies.
Microsoft has realized the importance of XML and has been providing XML support within their products for the past several years. Internet Explorer has continually added new support for XML with each release. XML support is taken to a new level within the .NET Framework. In fact, use of XML is prevalent throughout the .NET Framework including use in configuration files, C# source code comments, and Web services.This chapter teaches you to work with XML and related technologies provided within .NET using C#.
Before we delve into XML support within .NET, we take a brief look at XML and related technologies.You will then be ready to see how .NET provides first-class support for working with XML.
Introduction to XML
There has been a lot of confusion regarding what XML really is.When XML was first covered in the trade press, there was a tremendous amount of hype surrounding it. XML was touted as the “next big thing” in the computer industry. It was the savior of all things computer-related. It followed in a long line of saviors,
www.syngress.com

Working with XML • Chapter 9 |
433 |
such as structured programming, artificial intelligence, case tools, object-oriented programming, design patterns, and so on. Given this coverage in the press, XML had little chance to live up to the expectations placed upon it. XML is, however, an important and viable technology when considered with appropriate expectations.
So what is XML? A very simplified explanation is that it is structured text. If you don’t currently know much about XML, you may be thinking,“That’s it? What is the big deal?”The simplicity of XML is what makes it a big deal.Text is supported on every computing platform. So, if you can represent your data in text, people on every other computer platform can read your data without need for specialized conversions from one format to another.This makes it easy for a manufacturer to share data with his suppliers, for example.
Let’s take a look at a simple example of an XML document:
<?xml version="1.0" standalone="yes"?>
<Employees>
<Employee EmployeeID="1">
<FirstName>John</FirstName>
<MiddleInit>M</MiddleInit>
<LastName>Smith</LastName>
<Salaried>true</Salaried>
<Wage>40000</Wage>
<Active>false</Active>
</Employee>
</Employees>
The data in an XML document is described by elements and attributes. Elements have a start tag and an end tag, like HTML, enclosed in angle brackets. For instance <Employees> is the start tag and </Employees> is the end tag for the <Employees> element.The “/” character indicates an end tag.The <Employees> element is the first element in the XML document and is known as the root element. An element can also have attributes. In this example, EmployeeID is an attribute with a value of 1.
Elements can also contain sub-elements. In the example, the <Employee> element is a sub-element of the <Employees> element.This is an important item to note. XML documents are structured in a hierarchical format. An XML document can be known as well-formed. A simplified explanation of a well-formed XML document is that it has one root node, each element must have both start
www.syngress.com

434 Chapter 9 • Working with XML
and end tags, and element tags must be nested properly.The following example shows improper nesting:
<?xml version="1.0" standalone="yes"?> <Employees>
<Employee EmployeeID="1"> <FirstName>John</FirstName> <MiddleInit>M</MiddleInit> <LastName>Smith</LastName> <Salaried>true</Salaried> <Wage>40000</Wage> <Active>false
</Employee>
</Active>
</Employees>
In this example, the <Active> elements end tag comes after the <Employee> elements end tag. Because the <Employee> element is the parent element of the <Active> element, the <Active> element’s end tag should precede it.
You could write your own program to read a well-formed XML document. But, because a well-formed document is a hierarchical representation of data, generic programs have been written to read XML documents. A program that can read an XML document is known as an XML parser. Several different types of parsers are available in .NET. Programmer’s access XML data read in by a parser using an application programming interface (API) the parser exposes. One popular API is the Document Object Model (DOM), which we describe next.
Explaining XML DOM
The W3C has standardized an API for accessing XML documents known as XML DOM.The DOM API represents an XML document as a tree of nodes. Because an XML document is hierarchical in structure, you can build a tree of nodes and subnodes to represent an entire XML document.You can get to any arbitrary node by starting at the root node and traversing the child nodes of the root node. If you don’t find the node you are looking for, you can traverse the grandchild nodes of the root node.You can continue this process until you find the node you are looking for.
www.syngress.com

Working with XML • Chapter 9 |
435 |
The DOM API provides other services in additional to document traversal. You can find the full W3C XML DOM specification at www.w3.org/DOM. The following list shows some of the capabilities provided by the DOM API:
■Find the root node in an XML document.
■Find a list of elements with a given tag name.
■Get a list of children of a given node.
■Get the parent of a given node.
■Get the tag name of an element.
■Get the data associated with an element.
■Get a list of attributes of an element.
■Get the tag name of an attribute.
■Get the value of an attribute.
■Add, modify, or delete an element in the document.
■Add, modify, or delete an attribute in the document.
■Copy a node in a document (including subnodes).
The DOM API provides a rich set of functionality to programmers as is shown in the previous list.The .NET Framework provides excellent support for the XML DOM API, which you will see later in this chapter.The DOM API is well suited for traversing and modifying an XML document. But, it provides little support for finding an arbitrary element or attribute in a document. Fortunately another XML technology is available to provide this support: XML Path Language (XPath).
Explaining XPath
XPath is another XML-related technology that has been standardized by the W3C. XPath is a language used to query an XML document for a list of nodes matching a given criteria. An XPath expression can specify both location and a pattern to match.You can also apply Boolean operators, string functions and arithmetic operators to XPath expressions to build extremely complex queries against an XML document. XPath also provides functions to do numeric evaluations, such as summations and rounding.You can find the full W3C XPath specification at www.w3.org/TR/xpath.The following list shows some of the capabilities of the XPath language:
www.syngress.com

436Chapter 9 • Working with XML
■Find all children of the current node.
■Find all ancestor elements of the current context node with a specific tag.
■Find the last child element of the current node with a specific tag.
■Find the nth child element of the current context node with a given attribute.
■Find the first child element with a tag of <tag1> or <tag2>.
■Get all child nodes that do not have an element with a given attribute.
■Get the sum of all child nodes with a numeric element.
■Get the count of all child nodes.
The preceding list just scratches the surface of the capabilities available using XPath. Once again, the .NET Framework provides support for XPath queries against XML DOM documents and read-only XPath documents.You will see examples of this later in this chapter.
Explaining XSL
According to the W3C, XSL is a catchall phrase that encompasses three different W3C-based specifications. It includes XPath, XSL Transformations (XSLT), and XSL Formatting Objects (XSL-FO). XSL-FO is an XML-based grammar applied to an XML document using stylesheets that affect the presentation of the document. XSL-FO is still a work-in-progress, so in this chapter we focus on XPath and XSLT.
XSLT is an XML-based language for transforming XML documents. XSLT stylesheets applied to an XML document transform the XML to another form. You can use XSLT stylesheets to convert XML documents to other file formats such as HTML, RTF, PDF, etc. XSLT can also be used transform XML to XML. For instance, if a manufacturer creates XML in one format, but his suppliers assume they will receive XML in another format, an XSLT stylesheet can be applied to the XML document to convert it to the format expected by the suppliers. XPath expressions can be used by XSLT stylesheets during the transformation process.You can find more information about XSL at www.w3.org/TR/xslt.
XSLT support is built into the .NET Framework. Later in the chapter, we show examples that apply XSLT stylesheets to XML documents.
www.syngress.com

Working with XML • Chapter 9 |
437 |
Explaining XML Schemas
As previously mentioned, XML is a good format for exchanging data between diverse groups. However, if groups cannot agree on a specific format for XML that they share, it will be of no help.The data in an XML document itself does not provide the information that defines the structure of an XML document.
Document Type Definitions (DTDs) are one way to describe the structure of an XML document. A DTD specifies the elements and attributes in an XML document. It also indicates the position of elements and the number of times they occur. DTDs are the traditional way the structure of an XML document has been expressed.
If an XML document has a DTD associated with it, an XML parser can read the DTD and determine if the XML document conforms to the DTD. If the XML conforms to the DTD, it is known as a valid XML document. If a document is valid, the receiver of a document knows that the data in it conforms to the structure expected. Not every XML parser performs validation however. Parsers that do perform validation are known as validating parsers.
One limitation of DTDs is that they do not give any indication of the data type associated with the elements and attributes in an XML document. For instance, if an XML document has an element with a tag <OrderID>, it is unclear if order ID is a string, numeric, or something else.
XML schemas pick up where DTDs leave off. XML schemas provide all of the same support in defining the structure of an XML document as DTDs. In addition, XML schemas also let you define data types for elements and attributes, specify minimum and maximum values for numerics, specify maximum lengths for strings, and define enumerations.
Very few validating parsers validate against XML schemas at this time. However, the .NET Framework does provide parsers that can validate XML documents against XML Schema Definition (XSD) schemas as well as DTDs.You can find more information about XML schemas at www.w3.org/XML/Schema.
That completes our brief look at XML and related technologies.We are now ready to delve into the XML support provided by the .NET Framework.
XML Classes in the .NET Framework
Table 9.1 contains a list of the most important classes used to manipulate XML documents in the .NET Framework.You will see many of them used in the examples in the following sections of this chapter.
www.syngress.com
438 Chapter 9 • Working with XML
Table 9.1 Frequently Used XML Classes in the .NET Framework
Class Name |
Namespace |
Description |
|
|
|
XmlReader |
System.Xml |
Abstract class for reading an |
|
|
XML document. |
XmlTextReader |
System.Xml |
A nonvalidating XmlReader- |
|
|
derived parser that provides |
|
|
forward and read-only access to |
|
|
an XML document. This is the |
|
|
fastest way to read an XML |
|
|
document. |
XmlValidatingReader |
System.Xml |
A validating XmlReader-derived |
|
|
parser that validates using both |
|
|
DTDs and XML schemas. |
XmlNodeReader |
System.Xml |
An XmlReader for a DOM XML |
|
|
document node set. |
XmlWriter |
System.Xml |
Abstract class for writing an |
|
|
XML document. |
XmlTextWriter |
System.Xml |
An XmlWriter implementation |
|
|
that provides forward-only gen- |
|
|
eration of an XML document. |
|
|
This is the fastest way to write |
|
|
an XML document. |
XmlDocument |
System.Xml |
A W3C XML DOM document. |
XmlDataDocument |
System.Xml |
An XmlDocument implementa- |
|
|
tion that allows data to be |
|
|
accessed via relational represen- |
|
|
tation or via XML DOM. |
XPathDocument |
System.Xml.XPath |
An XML document class opti- |
|
|
mized for use with XPath |
|
|
navigation. |
XPathNavigator |
System.Xml.XPath |
Provides XPath navigation over |
|
|
an XML document. |
XmlSchema |
System.Xml.Schema |
W3C XSD schema |
|
|
implementation. |
XslTransform |
System.Xml.Xsl |
W3C XSLT implementation. |
|
|
|
www.syngress.com
Working with XML • Chapter 9 |
439 |
Working with XML DOM
In the Introduction, you learned that the XML DOM API is used to create, modify, and traverse XML documents. In the .NET Framework, the classes most often used to work with XML DOM documents are contained in the System.Xml namespace.Table 9.2 lists the classes in System.Xml that you will most likely work with the most when writing C# programs that manipulate XML DOM documents.
Table 9.2 Frequently Used XML DOM Classes
Class Name |
Description |
XmlDocument A W3C DOM document (note that XmlDocument is derived from XmlNode).
XmlNode A single node in an XML document. Typically an element, text node, CDATA section, processing instruction, or comment.
XmlNodeList A list of XmlNode objects. Each node in the list may contain child nodes, which in turn may contain their own child nodes. Traversing an XmlDocument object walks a tree of
XmlNodeList objects.
XmlElement An element in the document.
XmlAttribute An attribute of an element in the document.
The best way to learn something is by example. So, let’s get right into a sample program that exercises the XML DOM support built into the .NET Framework. Imagine a small company whose size may not require the full power of a commercial database to maintain information about employees. Spreadsheets or even flat files are viable alternatives for maintaining company records in this scenario.
Another solution is to use XML documents as a database.The XML DOM sample shows you how you can use the .NET Framework to construct an XML document, save to and load the document from disk, and make updates to the document.This, in effect, uses XML as a database.
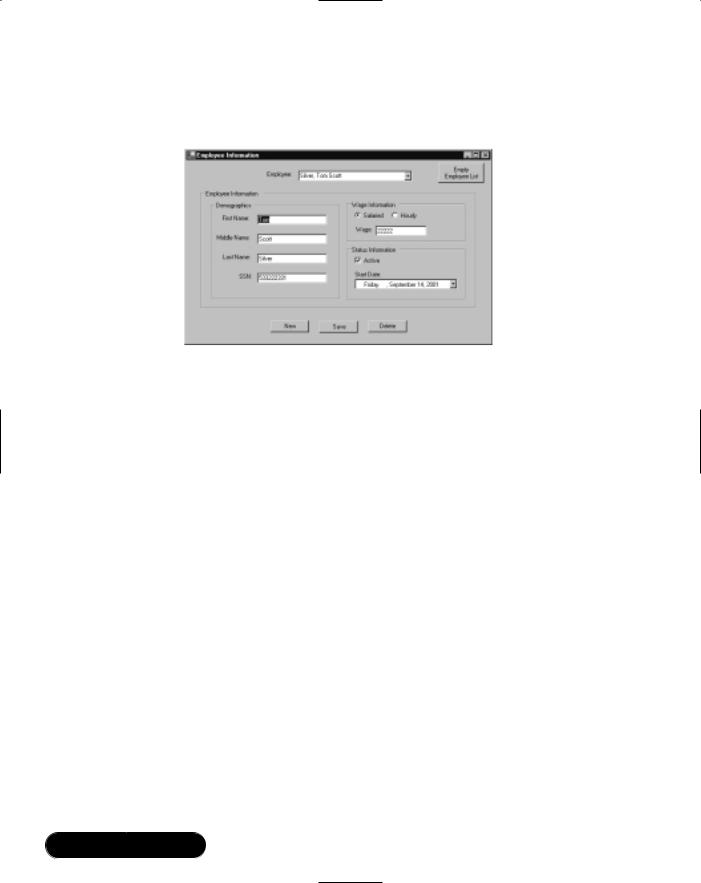
The XML DOM sample is a Windows Forms–based program. Figure 9.1 shows the output from the XML DOM sample program.The sample program uses XML files as an employee database. Using the program, you can add, edit, and delete employees from the database. Figure 9.1 shows the one form the program displays for editing employee data. Although the sample program shows a
www.syngress.com
440 Chapter 9 • Working with XML
limited amount of employee data, you can easily expand it to include additional information.
Figure 9.1 The XML DOM Sample Program
We supply you with a short explanation of program operation and then take a look at the source code.The full source code is on the CD that accompanies this book, in a file named DOMForm.cs in the DOM directory.
When the program starts, it looks for an XML file named employees.xml in the current directory that contains employee information. If the file doesn’t exist, you are starting with an empty employee database. If the file exists, it loads the XML file into an XML DOM document.The program traverses the XML document in memory. As it encounters employees, the program adds an entry for each employee in the Employee combo box.
Once the program has finished loading you can begin editing your employee database. Clicking New clears the form and allows you to enter a new employee. Clicking Save saves the currently displayed employee to the XML document. If the employee displayed on the form is a new employee, it adds the employee to the document. If it is an existing employee, it updates that employee’s information. Clicking Delete deletes the currently displayed employee from the XML document. Selecting a new employee from the Employee combo box populates the form with that employee’s information.The program does not ask you to save any edits made to the current employee displayed on the form prior to displaying the selected employee. Finally, clicking Empty Employee List deletes all employees out of the XML document, in effect initializing the database.
One thing to note is that the document on disk is updated every time you click Save or Delete.This works fine for a small number of employees, but could cause performance problems with a larger number.
www.syngress.com

Working with XML • Chapter 9 |
441 |
Let’s take a look at what the employees.xml file looks like after two employees.This will you give an idea of how the fields on-screen relate to the XML file. It is shown in Figure 9.2.
Figure 9.2 Employees.xml after Adding Two Employees
<?xml version="1.0" standalone="yes"?> <Employees>
<Employee EmployeeID="1"> <FirstName>Joe</FirstName> <MiddleName>Arthur</MiddleName> <LastName>Smith</LastName> <Salaried>true</Salaried> <Wage>45000</Wage> <Active>true</Active> <SSN>555-55-5555</SSN> <StartDate>2001-09-12</StartDate>
</Employee>
<Employee EmployeeID="2"> <FirstName>Betty</FirstName> <MiddleName>Ann</MiddleName> <LastName>Butler</LastName> <Salaried>false</Salaried> <Wage>22.00</Wage> <Active>false</Active> <SSN>666-66-6666</SSN> <StartDate>2001-09-15</StartDate>
</Employee>
</Employees>
At the top of the file, you see the XML declaration. Immediately after that you see the root element, <Employees>. Each time you add a new employee using the New button, a new <Employee> element is added as the last child element of the <Employees> element. An <Employee> element has one attribute, EmployeeID.The EmployeeID attribute is generated by the program and has no form field associated with it.The rest of the child elements of the <Employee>
www.syngress.com

442 Chapter 9 • Working with XML
element have a one-to-one correspondence with fields on the form. Let’s take a look at how we create the XML document.
Creating an Empty XML DOM Document
When you run the program the first time, it creates an empty XML document. It also creates an empty XML document when you click Empty Employee List. Here is the C# code to do this:
private void createEmptyXMLDocument()
{
//Create a new DOM-based XML document m_xmlDocument = new XmlDocument();
//Add the XML declaration XmlDeclaration dec =
m_xmlDocument.CreateXmlDeclaration("1.0", "", "yes"); m_xmlDocument.PrependChild ( dec );
//Add the root element
XmlElement nodeElem = m_xmlDocument.CreateElement( TagEmployees );
m_xmlDocument.AppendChild( nodeElem );
}
Here, you can see a new System.Xml.XmlDocument object.The XmlDocument object is the representation of a W3C XML DOM document.The XmlDocument class is derived from the System.Xml.XmlNode and is therefore considered a node in the document.
After creating the document, the XML declaration node is created with the CreateXmlDeclaration method of the XmlDocument class and inserted before the root node of the document using the PrependChild method of XmlNode.The PrependChild method adds a node to the document before the root node of the document.The CreateXmlDeclaration method takes three parameters: the version, which must be 1.0; the encoding, which is left blank resulting in the default encoding (UTF-8); and whether the document is a standalone document, which in this case is set to “yes”.
Next, the root element of the document object is created using the CreateElement method passing the tag of the root element, in our case
www.syngress.com

Working with XML • Chapter 9 |
443 |
“Employees”. Finally, the root node is appended to the document using the
AppendChild method of XmlDocument.
Adding the XML declaration and the root element are typical examples of adding to an XML DOM document.Typically you create the type of node you want to add from the XmlDocument object.Then you add it to the document by inserting it before or after an existing node.This will normally be done by using one of the following methods of the XmlNode class: AppendChild, InsertAfter,
InsertBefore, PrependChild, or ReplaceChild. Here is what the XML document looks like after executing the previous code:
<?xml version="1.0" standalone="yes"?>
<Employees />
Adding an Element to the XML Document
You now have an empty XML document. Once you have entered all of the information for an employee on the form and clicked Save, a new <Employee> element is added to the XML document. Here is the source code to accomplish this:
private void addEmployee( XmlDocument doc, int nEmployeeID, string strFirstName, string strMiddleName, string strLastName, string strSalaried, string strWage, string strActive,
string strSSN, string strStartDate )
{
//Create a new employee element. Append it as a child of the
//root element.
XmlElement nodeParent = doc.DocumentElement;
XmlElement elemEmployee = doc.CreateElement( TagEmployee ); elemEmployee.SetAttribute( TagEmployeeID,
nEmployeeID.ToString() ); nodeParent.AppendChild( elemEmployee );
// Add the child elements that make up the employee element addTextElement( doc, elemEmployee, TagFirstName,
strFirstName );
addTextElement( doc, elemEmployee, TagMiddleName,
www.syngress.com

444 Chapter 9 • Working with XML
strMiddleName );
addTextElement( doc, elemEmployee, TagLastName, strLastName ); addTextElement( doc, elemEmployee, TagSalaried, strSalaried ); addTextElement( doc, elemEmployee, TagWage, strWage ); addTextElement( doc, elemEmployee, TagActive, strActive ); addTextElement( doc, elemEmployee, TagSSN, strSSN ); addTextElement( doc, elemEmployee, TagStartDate,
strStartDate );
}
private XmlElement addTextElement( XmlDocument doc, XmlElement nodeParent, string strTag, string strValue )
{
//Create a new element with tag passed in XmlElement nodeElem = doc.CreateElement( strTag );
//Create a text node using value passed in
XmlText nodeText = doc.CreateTextNode( strValue );
//Add the element as a child of parent passed in nodeParent.AppendChild( nodeElem );
//Add the text node as a child of the new element nodeElem.AppendChild( nodeText );
return nodeElem;
}
The addEmployee method takes the XML document, an employee ID generated by the program, and all of the data on the form as arguments. First, it retrieves the root node of the document, the <Employees> element using the DocumentElement property of XmlDocument. Remember that all <Employee> elements are added as child elements of the root <Employees> element. An empty <Employee> element is created using the CreateElement method.The employee ID attribute is added to the new element by calling the SetAttribute method.
www.syngress.com
Working with XML • Chapter 9 |
445 |
Finally, the empty <Employee> element is appended as the last child element of the <Employees> element via the AppendChild method.
Developing & Deploying…
DOM Extensions in .NET: The InnerText Property
Microsoft has provided some extensions to the W3C DOM API in the XmlDocument class. One of these extensions is the InnerText property. You saw code similar to the following when an element with a text node was created:
XmlElement elem = doc.CreateElement( "LastName" );
XmlText nodeText = doc.CreateTextNode( "Jones" );
elem.AppendChild( nodeText );
The InnerText property of the XmlElement class is used to create and add text to the text node of an element. This code could have been rewritten as follows:
XmlElement elem = doc.CreateElement( "LastName" );
elem.InnerText = "Jones"
The addTextElement helper method is called to add elements to the <Employee> element that correspond to each field on the form.The method takes the element tag and the string value associated with the element as arguments.The addTextElement method performs a familiar set of operations. First, it creates an empty element that uses the tag passed in by calling CreateElement. It then creates a new text node that will contain the information associated with one field on the form via the CreateTextNode method.The CreateTextNode method takes the string data retrieved from the screen as an argument.Then, the new <Employee> element is appended to the <Employees> element, which was passed in as a parameter. Finally, the new text node containing the data from the form is appended to the new <Employee> element by calling AppendChild.
Here is what the XML document looks like after adding one new employee:
<?xml version="1.0" standalone="yes"?>
<Employees>
www.syngress.com

446 Chapter 9 • Working with XML
<Employee EmployeeID="1">
<FirstName>Joe</FirstName>
<MiddleName>Arthur</MiddleName>
<LastName>Smith</LastName>
<Salaried>true</Salaried>
<Wage>45000</Wage>
<Active>true</Active>
<SSN>555-55-5555</SSN>
<StartDate>2001-09-12</StartDate>
</Employee>
</Employees>
Updating an Element in the XML Document
Once you create an employee and save it to the document by clicking Save, you can update the employee by changing the employee information on-screen and clicking Save again.When you click Save, the XML document will be updated with the employee information retrieved from the form. Here is the relevant source code to update an employee:
private void updateEmployee( XmlDocument doc, int nEmployeeID, string strFirstName, string strMiddleName, string strLastName, string strSalaried, string strWage, string strActive,
string strSSN, string strStartDate )
{
// Find the employee
XmlElement empElement = findEmployee( m_xmlDocument, nEmployeeID.ToString() );
if ( empElement == null ) return;
//Get a list of all the child nodes of the employee XmlNodeList nodeList = empElement.ChildNodes;
//For each element, get the element tag. Based on the tag,
//set the text data that will be added.
www.syngress.com

Working with XML • Chapter 9 |
447 |
for ( int i = 0; i < nodeList.Count; i++ )
{
XmlNode node = nodeList.Item( i );
if ( node is System.Xml.XmlElement ) // sanity check
{
XmlElement element = (XmlElement) node; string strTag = element.Name;
string strData = "";
if ( strTag == TagFirstName ) strData = strFirstName;
else if ( strTag == TagMiddleName ) strData = strMiddleName;
else if ( strTag == TagLastName ) strData = strLastName;
else if ( strTag == TagWage ) strData = strWage;
else if ( strTag == TagSSN ) strData = strSSN;
else if ( strTag == TagSalaried ) strData = strSalaried;
else if ( strTag == TagActive ) strData = strActive;
else if ( strTag == TagStartDate ) strData = strStartDate;
else continue;
//Create a new text node with the appropriate data and
//replace the current text node, effectively updating. XmlText nodeText = doc.CreateTextNode( strData ); element.ReplaceChild( nodeText, element.FirstChild );
}
www.syngress.com
448 Chapter 9 • Working with XML
}
}
private XmlElement findEmployee( XmlDocument doc, string strEmployeeID )
{
XmlElement nodeFound = null;
XmlElement root = doc.DocumentElement;
// Get all employee elements in a document XmlNodeList nodeList =
root.GetElementsByTagName( TagEmployee );
foreach ( XmlNode nodeEmployee in nodeList )
{
if ( nodeEmployee is System.Xml.XmlElement )
{
//Get the EmployeeID attribute. If it matches the one
//we are looking for, save the node for later removal. XmlElement elemEmployee = (XmlElement) nodeEmployee; String strIDFound =
elemEmployee.GetAttribute( "EmployeeID" );
if ( strIDFound != null && strIDFound == strEmployeeID )
{
nodeFound = elemEmployee; break;
}
}
}
return nodeFound;
}
www.syngress.com

Working with XML • Chapter 9 |
449 |
The updateEmployee method takes the XML document, the employee ID of the employee to update, and the data retrieved from the form as arguments.The first thing it does is call the helper method findEmployee, passing the XML document and the employee ID as parameters.
The findEmployee method gets a list of all of the <Employee> elements by calling GetElementsByTagName on the <Employees> element, passing the tag
Employee. GetElementsByTagName returns an object of type
System.Xml.XmlNodeList.The list contains all of the elements in the document that have the tag passed in and all of their child nodes. In this case, this means you will get a node list containing all of the <Employee> elements including the child elements such as last name, first name, and so on.
You now have list of all the Employee elements.You need to traverse the list until you find the employee with the employee ID that was passed in to findEmployee.The foreach syntax of C# is used to iterate through the node list. This is not part of the DOM API, but provides a nice clean shortcut for us.You will see the standard DOM syntax used to iterate through a node list shortly.
The code does a quick sanity check on the nodes in the node list you retrieved by checking the type of the nodes using the code:
if ( nodeEmployee is System.Xml.XmlElement )
If the node is an element, you get the employee ID by calling GetAttribute, passing the tag EmployeeID.The ID returned is compared with the ID of the employee you are looking for. If it matches, you found the employee and return it. Otherwise, keep looping through the nodes.
Back in updateEmployee, you check to see if you found the <Employee> element. If it was found, you loop through each of the child elements and update the data associated with each element using the data retrieved from the form.
First, you get all of the child nodes of the <Employee> element using the
ChildNodes property:
XmlNodeList nodeList = empElement.ChildNodes;
Next, you loop through each node in the node list, doing a quick check to make sure each child is an element. If so, retrieve the tag of the element.This is the more traditional DOM processing that was mentioned before when discussing the foreach keyword:
for ( int i = 0; i < nodeList.Count; i++ )
{
XmlNode node = nodeList.Item( i );
www.syngress.com

450 Chapter 9 • Working with XML
if ( node is System.Xml.XmlElement ) // sanity check
{
XmlElement element = (XmlElement) node;
string strTag = element.Name;
Finally, based on the tag of the element encountered, a string variable named strData is set with the data retrieved from the form corresponding to the tag. A new text node is created containing the data and the current data associated with the element is replaced with the new data using the ReplaceChild method of
System.Xml.XmlNode:
string strData = "";
if ( strTag == TagFirstName ) strData = strFirstName;
//Other cases snipped here
//Create a new text node with the appropriate data and
//replace the current text node, effectively updating. XmlText nodeText = doc.CreateTextNode( strData ); element.ReplaceChild( nodeText, element.FirstChild );
}
Deleting an Element in the XML Document
An employee is deleted from the XML document by clicking Delete on the form while viewing information for an employee. Deleting an element is relatively straightforward. Here is the relevant code from the sample:
private void deleteEmployee( XmlDocument doc, string strEmployeeID )
{
// Find the employee in the XML file
XmlElement element = findEmployee( m_xmlDocument, strEmployeeID );
// Not found, do nothing
www.syngress.com
Working with XML • Chapter 9 |
451 |
if ( element == null ) return;
// Remove from the XML document
XmlElement root = m_xmlDocument.DocumentElement; root.RemoveChild( element );
}
First, you call findEmployee to find the <Employee> element. If the element is found, the root element of the document is retrieved because the <Employee> element is a child of the root element.The RemoveChild method of System.Xml.XmlNode is called to remove the employee from the document.
Loading and Saving the XML Document
In the sample, you load and save the XML document to a disk file using the Load and Save methods of the XmlDocument class. Here are examples of this.
m_xmlDocument.Load( XMLFileName );
m_xmlDocument.Save( XMLFileName );
Developing & Deploying…
XML APIs: What About SAX?
Possibly the most frequently asked question regarding XML support in the .NET Framework is if there is support for the Simple API for XML (SAX). SAX is an API that is used to access XML documents like DOM. The advantage of SAX programs over DOM is that DOM parsers typically read the whole XML tree into memory. This can be very slow and just not possible with extremely large XML files. SAX provides a streaming forwardonly event-based push model. To write a SAX program, you register a series of callbacks that are called by the parser when events occur, such as the beginning of an element, the end of an element, and so on. SAX itself is not supported in the .NET Framework. The XmlReader class implements a forward/read-only pull model that allows you to write SAXlike programs. Instead of registering callbacks, you continually issue Read calls to the parser and examine the type of node that is returned, then
Continued
www.syngress.com

452 Chapter 9 • Working with XML
take some action based on the type of node. In the .NET Framework, XmlReader-derived classes offer a very fast streaming model to parse an XML document. So, although it doesn’t support SAX per se, the .NET Framework allows you to write programs that use a streaming model like SAX. In fact, if you really wanted to, you could write a SAX parser on top of the XmlReader class. It is probably only a matter of time before someone does.
Both the Load and Save methods have four different overloads to allow maximum flexibility in the underlying data source of the XML document.The Load method takes a Stream, a String (filename), a TextReader or an XmlReader as an argument.The Save method takes a Stream, a String (filename), a TextWriter, or an XmlWriter as an argument.This flexibility allows an XML document to be created from several different data sources, including disk files, memory buffers, and Uniform Resource Locators (URLs).
Working with XML and Relational Data
As you learned in Chapter 8 regarding ADO.NET, the System.Data.DataSet class of the .NET Framework is used to manipulate relational data in memory using tables, rows, and columns.The DataSet class is disconnected, meaning it does not maintain an active connection to a database.The information in a DataSet is held in memory, which can later be written back to a database by getting a connection to the database. Because a DataSet does not maintain a connection to a database, other data sources can be used to load a DataSet. XML is one such data source.You will see the relationship between XML documents and the DataSet class in this section.
The sample program used in the section requires the files employee1.xml, wagehistory.xml, employee.xsd, and wagehistory.xsd to be in the same directory the sample is run from.You can find the files on the CD that accompanies this book in the Relational directory.You may need to copy the files to the directory you run the sample from.The full source code for the sample is in the Relational directory as well.The two files that contain the source code are named RelationalForm.cs and TraversalForm.cs.
Figure 9.3 shows a portion of the employee1.xml file, and Figure 9.4 shows a portion of the wagehistory.xml file.You can see in these figures that an
<Employee> element has an attribute named EmployeeID, and the <WageChange> element also has an attribute named EmployeeID. The EmployeeID attribute establishes a parent-child relationship between the two XML documents. Each
www.syngress.com

Working with XML • Chapter 9 |
453 |
<Employee> element in employee1.xml has one or more <WageChange> elements in wagehistory.xml.This relationship is used in the sample program to display all pay raise information for an arbitrary employee.
Figure 9.3 The <Employee Element> (employee1.xml)
<?xml version="1.0" standalone="yes"?> <Employees>
<Employee EmployeeID="1"> <FirstName>John</FirstName> <MiddleName>M</MiddleName> <LastName>Smith</LastName> <Salaried>true</Salaried> <Wage>40000</Wage> <Active>false</Active> <SSN>555-55-55555</SSN> <StartDate>1999-04-01</StartDate>
</Employee>
Figure 9.4 The <Employee Element> (wagehistory.xml)
<?xml version="1.0" standalone="yes"?> <WageHistory>
<WageChange EmployeeID="1"> <Date>1999-04-01</Date> <Wage>33000</Wage>
</WageChange>
<WageChange EmployeeID="2"> <Date>2001-04-01</Date> <Wage>22.75</Wage>
</WageChange>
The sample program performs three separate operations. First, it loads two XML documents without using XML schema files and establishes a relation between the two files.This is shown in Figure 9.3. Second, it loads two XML documents using XML schema files and establishes a relation between the two
www.syngress.com
454 Chapter 9 • Working with XML
files.This is shown in Figure 9.4. Finally, it loads the two XML documents using XML schema files and programmatically traverses the documents using the established relation.This is shown in Figure 9.5.
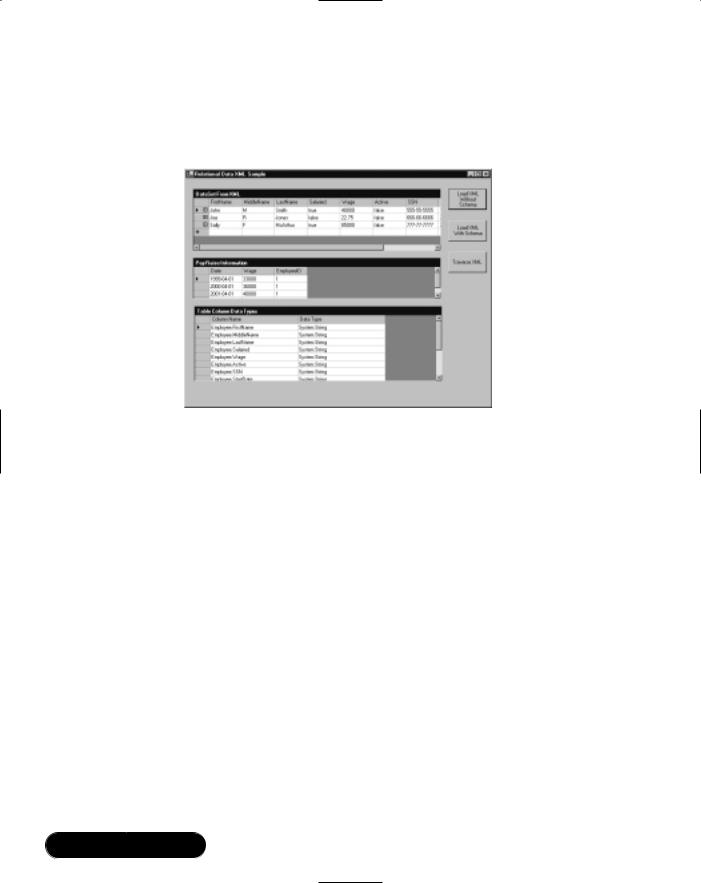
Figure 9.5 The Relational Sample—Load XML without Schema
Figure 9.5 shows the sample after you click Load XML Without Schema. The program reads the employee1.xml file and the wagehistory.xml files into a DataSet class object.This results in an Employee table and a WageChange table being added to the DataSet. A relation between the two tables is established.
The Employee table is bound to the top grid and the WageChange table is bound to the middle grid. Each grid is of type System.Windows.Forms.DataGrid and therefore is a databound control.This means that the grid automatically knows how to display the data in the Dataset and understands the relation without having to do any additional programming.You can click on any row in the top grid and the middle grid will be populated with information from the WageChange table using the employee in the selected Employee table row. No additional work is done to accomplish this.
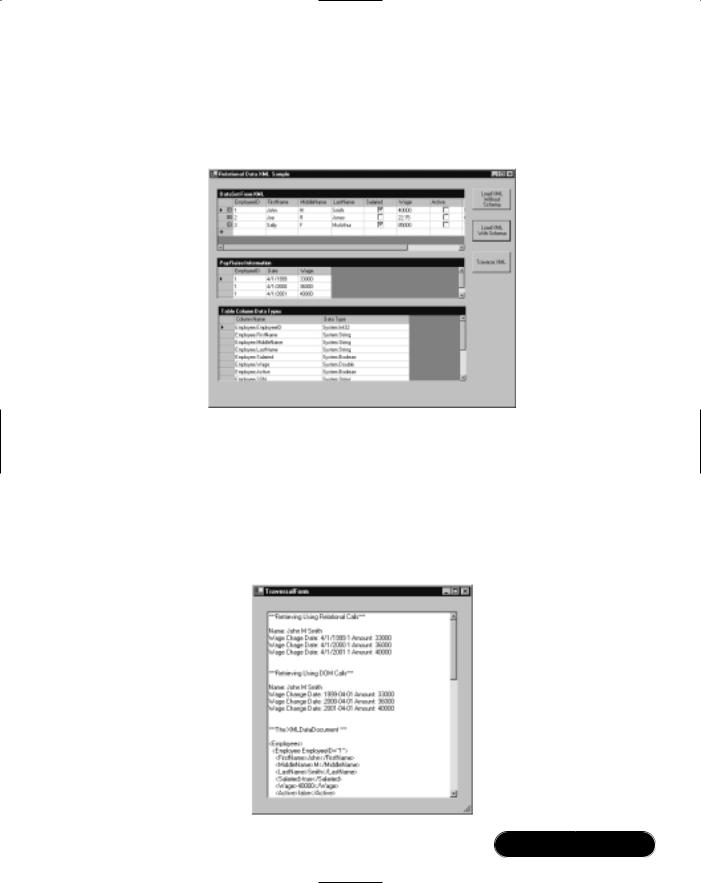
The bottom grid shows the data type of each column in both the Employee table and the WageChange table.You can see in Figure 9.5 that the data type for every column is System.String. In Figure 9.6, generated after clicking Load XML With Schema, some columns have different data types.This shows the effect of using an XSD schema when reading in the XML from disk into the DataSet object.The schema file establishes the data type for each element and attribute in the XML document.These data types are carried over to the DataSet tables. Note
www.syngress.com
Working with XML • Chapter 9 |
455 |
that the grid control recognizes the data types as well. Notice that the Salaried and Active columns have become check boxes instead of text fields as shown in Figure 9.5.
Figure 9.6 The Relational Sample—Load XML with Schema
Figure 9.7 shows the results of traversing the DataSet manually when you click Traverse XML.You can see that the DataSet is traversed twice, once using relational calls and once using DOM calls.This is possible when the DataSet is contained within an object of the System.Xml.XmlDataDocument class.The XmlDataDocument class lets you treat the data in the document as a relational
DataSet or as an XML DOM XmlDocument.
Figure 9.7 The Relational Sample—Traversing XML
www.syngress.com

456 Chapter 9 • Working with XML
XML and the DataSet Class
Let’s take a look at the code that loads the XML documents and sets up the relation when you click Load XML Without Schema. Figure 9.5 shows the results of clicking the button.The code that is executed when you click the button is shown in Figure 9.8.
Figure 9.8 Loading a Dataset without Using a Schema (RelationalForm.cs)
///<summary>
///Called when Load XML Without Schema button is clicked
///</summary>
private void button1_Click(object sender, System.EventArgs e)
{
Cursor currentCursor = Cursor.Current;
try
{
Cursor.Current = Cursors.WaitCursor;
//Create two new datasets and load them from XML files
//on disk
DataSet dsEmployees = new DataSet( "Employees" ); DataSet dsWageHistory = new DataSet( "WageHistory" ); loadAndDisplayDatasets( dsEmployees, dsWageHistory );
}
catch ( Exception exception )
{
MessageBox.Show( exception.Message );
}
finally
{
Cursor.Current = currentCursor;
}
}
Continued
www.syngress.com

Working with XML • Chapter 9 |
457 |
Figure 9.8 Continued
///<summary>
///Loads XML files from disk into a dataset and displays the
///data contained in them on-screen
///</summary>
///<param name="dsEmployees">The employees dataset</param>
///<param name="dsWageHistory">The wage history dataset</param> private void loadAndDisplayDatasets( DataSet dsEmployees,
DataSet dsWageHistory )
{
//Load the dataset from XML files on disk dsEmployees.ReadXml( "employee1.xml" ); dsWageHistory.ReadXml( "wagehistory.xml" );
//Copy the WageChange table into the Employees dataset dsEmployees.Tables.Add(
dsWageHistory.Tables["WageChange"].Copy() );
DataTable tblEmp = dsEmployees.Tables["Employee"];
DataTable tblWageHistory = dsEmployees.Tables["WageChange"];
//Create a relation between the two tables based on employee
//ID
DataRelation relation = new DataRelation( "EmpWageHistory",
new DataColumn[] {tblEmp.Columns["EmployeeID"]},
new DataColumn[] {tblWageHistory.Columns["EmployeeID"]}, false);
dsEmployees.Relations.Add( relation );
// Bind the dataset to the grid, so we can see it m_gridEmployees.SetDataBinding( dsEmployees, "Employee" ); m_gridRaises.SetDataBinding( dsEmployees,
Continued
www.syngress.com
458 Chapter 9 • Working with XML
Figure 9.8 Continued
"Employee.EmpWageHistory" );
//Save the schema to disk dsEmployees.WriteXmlSchema( "employees2.xsd" );
//Create a third dataset to hold the names of the columns
//and their datatypes so we can display this information in
//the third grid to see the effect of using a schema when
//reading in the XML files.
DataSet dsDataTypes = new DataSet( "DataTypes" );
DataTable tblDataTypes = new DataTable( "DataTypes" );
DataColumn colName = new DataColumn( "Column Name" );
DataColumn colType = new DataColumn( "Data Type" );
tblDataTypes.Columns.Add( colName ); tblDataTypes.Columns.Add( colType ); dsDataTypes.Tables.Add( tblDataTypes );
foreach ( DataTable table in dsEmployees.Tables )
{
string strTableName = table.TableName;
foreach ( DataColumn column in table.Columns )
{
string strName = strTableName + "." + column.ColumnName; string strDataType = column.DataType.ToString();
DataRow row = tblDataTypes.NewRow(); row["Column Name"] = strName; row["Data Type"] = strDataType; tblDataTypes.Rows.Add( row );
}
}
Continued
www.syngress.com

Working with XML • Chapter 9 |
459 |
Figure 9.8 Continued
// Bind the column and data type information to the grid
m_gridDataTypes.PreferredColumnWidth = 200;
m_gridDataTypes.SetDataBinding( dsDataTypes, "DataTypes" );
}
The button1_Click method is called when you click Load XML Without Schema. It creates two empty DataSet objects, one for employee information and one for wage history information. It then calls the loadAndDisplayDatasets method, passing in the newly created DataSet objects.
The loadAndDisplayDatasets method is where the real work gets done. First the DataSet objects are loaded from XML files on disk by calling the ReadXml method of the DataSet object.Then the wage history information is copied from the wage history DataSet to the employee DataSet by the following code:
// Copy the WageChange table into the Employees dataset
dsEmployees.Tables.Add( dsWageHistory.Tables["WageChange"].Copy() );
This step is necessary because the ReadXml method of the DataSet class can be called only once to load XML from a disk file. So, you load each file into a separate DataSet object and then copy the wage information to the employee DataSet object. Now both XML files have been loaded into the dsEmployees DataSet object. Next, you need to establish a relationship between the employee and wage data information. Here is the code to accomplish this:
DataTable tblEmp = dsEmployees.Tables["Employee"];
DataTable tblWageHistory = dsEmployees.Tables["WageChange"];
//Create a relation between the two tables based on employee
//ID
DataRelation relation = new DataRelation( "EmpWageHistory",
new DataColumn[] {tblEmp.Columns["EmployeeID"]},
new DataColumn[] {tblWageHistory.Columns["EmployeeID"]}, false);
dsEmployees.Relations.Add( relation );
www.syngress.com

460 Chapter 9 • Working with XML
First, create two variables that hold references to the Employee table and WageChange table in the dsEmployees DataSet object.This is done for convenience in passing them to the constructor of the DataRelation object.
Next, create the new relation by instantiating a new System.Data.DataRelation object.The first parameter of the constructor is the name of the new relation, EmpWageHistory in this case.The second parameter indicates the table and column that constitute the parent of the relation. In this case, it is the EmployeeID column of the Employee table.The third parameter indicates the table and column that constitute the child of the relation. In this case, it is the EmployeeID column of the WageChange table.The last parameter indicates whether the relation enforces any constraints, such as uniqueness or foreign keys. In this case, the data is read-only, so you will not enforce any constraints.
After the new DataRelation is created, you need to add it to the DataSet object.You accomplish this by the call to Relations.Add method of the dsEmployees object.
Finally, you bind the top grid the Employee table of the dsEmployees DataSet. This results in the employee information shown in the top grid.You bind the middle grid to the new relation that was just created.Wage information is now shown in the middle grid. As an aid in demonstrating the capabilities of the XmlDataDocument class, the XML schema currently in use by the DataSet is written to a disk file. A DataSet always has a schema in use. It is either explicitly specified or is inferred by the DataSet class.
The remaining code builds a new DataSet, which contains each column name and data type in the two tables in the dsEmployees DataSet. It then binds this DataSet to the bottom grid, which displays the column name and data type of all tables in the dsEmployees Dataset in the bottom grid.
Notice that every column has a data type of System.String, as depicted in Figure 9.5.The DataSet object will infer a schema for the XML document if one is not provided.The schema that it creates assigns every element and attribute in the XML document a type of System.String. For it to do otherwise would be difficult. It had no way of knowing what the data type should be because all data in an XML document is text.This is generally not what you would like.You want the columns in the DataSet to represent the actual data type of the information. Fortunately, you can tell the DataSet what XSD schema to use when loading an XML document.
www.syngress.com

Working with XML • Chapter 9 |
461 |
XML Schemas and the DataSet Class
You can specify an XML XSD schema file that establishes the data types of elements and attributes loaded into a DataSet object. If you use a schema file, the columns in the tables will match the data types supplied by the schema. Here is the code from our sample application that uses a schema.This code is called when you click Load XML With Schema (you can see the results of clicking the button in Figure 9.6):
///<summary>
///Called when Load XML With Schema button is clicked
///</summary>
private void button2_Click(object sender, System.EventArgs e)
{
Cursor currentCursor = Cursor.Current;
try
{
Cursor.Current = Cursors.WaitCursor;
//Create two new datasets and load them from XML files
//on disk using XML schemas
DataSet dsEmployees = new DataSet( "Employees" );
DataSet dsWageHistory = new DataSet( "WageHistory" );
dsEmployees.ReadXmlSchema( "employee.xsd" ); dsWageHistory.ReadXmlSchema( "wagehistory.xsd" ); loadAndDisplayDatasets( dsEmployees, dsWageHistory );
}
catch ( Exception exception )
{
MessageBox.Show( exception.Message );
}
finally
{
Cursor.Current = currentCursor;
www.syngress.com
462 Chapter 9 • Working with XML
}
}
The only difference from the code that loads the files without a schema are the two calls to the ReadXmlSchema method of the DataSet class.This is all that is necessary to establish the data types of the table columns in a DataSet. Figure 9.9 shows the schema file defined for the Employees DataSet, employee.xsd. Figure 9.10 shows the schema file defined for the WageHistory DataSet, wagehistory.xsd.
Figure 9.9 The XML Schema File (employee.xsd)
<?xml version="1.0" standalone="yes"?> <xsd:schema id="Employees" targetNamespace=""
xmlns="" xmlns:xsd="http://www.w3.org/2001/XMLSchema" xmlns:msdata="urn:schemas-microsoft-com:xml-msdata"> <xsd:element name="Employees" msdata:IsDataSet="true">
<xsd:complexType>
<xsd:choice maxOccurs="unbounded"> <xsd:element name="Employee">
<xsd:complexType>
<xsd:sequence>
<xsd:element name="FirstName" type="xsd:string" minOccurs="0" />
<xsd:element name="MiddleName" type="xsd:string" minOccurs="0" />
<xsd:element name="LastName" type="xsd:string" minOccurs="0" />
<xsd:element name="Salaried" type="xsd:boolean" minOccurs="0" />
<xsd:element name="Wage" type="xsd:double" minOccurs="0" />
<xsd:element name="Active" type="xsd:boolean" minOccurs="0" />
<xsd:element name="SSN" type="xsd:string" minOccurs="0"
/>
<xsd:element name="StartDate" type="xsd:date" minOccurs="0" />
Continued
www.syngress.com
Working with XML • Chapter 9 |
463 |
Figure 9.9 Continued
</xsd:sequence>
<xsd:attribute name="EmployeeID" type="xsd:int" /> </xsd:complexType>
</xsd:element>
</xsd:choice>
</xsd:complexType>
</xsd:element>
</xsd:schema>
Figure 9.10 The XML Schema File (wagehistory.xsd)
<?xml version="1.0" standalone="yes"?> <xsd:schema id="Employees" targetNamespace=""
xmlns="" xmlns:xsd="http://www.w3.org/2001/XMLSchema" xmlns:msdata="urn:schemas-microsoft-com:xml-msdata"> <xsd:element name="Employees" msdata:IsDataSet="true">
<xsd:complexType>
<xsd:choice maxOccurs="unbounded"> <xsd:element name="WageChange">
<xsd:complexType>
<xsd:sequence>
<xsd:element name="Date" type="xsd:date" minOccurs="0" />
<xsd:element name="Wage" type="xsd:double" minOccurs="0" />
</xsd:sequence>
<xsd:attribute name="EmployeeID" type="xsd:int" /> </xsd:complexType>
</xsd:element>
</xsd:choice>
</xsd:complexType>
</xsd:element>
</xsd:schema>
www.syngress.com

464 Chapter 9 • Working with XML
If you compare the information in the schema files with the output shown in Figure 9.6, you can see that the data types specified in the schema files match the data types displayed in bottom grid control. One example of this is the <Wage> element. In the employees.xsd file, it has a data type of xsd:double. In Figure 9.6, the table column Employee.Wage is of type System.Double.
Traversing Relations in the DataSet Class
Because the grid control is a data bound control, it understands relations defined by a DataSet object and can display data based on those relations. So, in the previous examples, you didn’t get to see code that actually traverses the parent-child relationship.You will see that in this section.The code that we look at in this section is called when you click Traverse XML.You can see the results of clicking the button in Figure 9.7.
The .NET Framework supplies a class System.Xml.XmlDataDocument.The XmlDataDocument class is interesting because it allows you to access the data in an XML document by using relational methods or by using XML DOM methods. The XmlDataDocument class has a DataSet object as one of its member variables, which allows you to make relational calls against the DataSet member.The DataDocument class is derived from the XmlDocument class, so you can make XML DOM method calls against it as well.The sample program shows both methods of accessing the document. First, let’s take a look at the source code that loads an
XmlDataDocument instance:
///<summary>
///Loads two XML documents from disk into a XMLDataDocument and
///establishes a relation between the two.
///</summary>
///<returns>The XMLDataDocument</returns>
private XmlDataDocument loadXML()
{
// Load the employees XML file
DataSet dsEmployees = new DataSet( "Employees" ); dsEmployees.ReadXmlSchema( "employee.xsd" ); dsEmployees.ReadXml( "employee1.xml" ); dsEmployees.Tables[0].TableName = "Employee";
// Load the wage history XML file
www.syngress.com

Working with XML • Chapter 9 |
465 |
DataSet dsWageHistory = new DataSet( "WageHistory" ); dsWageHistory.ReadXmlSchema( "wagehistory.xsd" ); dsWageHistory.ReadXml( "wagehistory.xml" ); dsWageHistory.Tables[0].TableName = "WageChange";
// Copy the WageChange table into the Employees dataset dsEmployees.Tables.Add(
dsWageHistory.Tables["WageChange"].Copy() );
DataTable tblEmp = dsEmployees.Tables["Employee"]; DataTable tblWageHistory = dsEmployees.Tables["WageChange"];
//Create a relation between the two tables based on employee
//ID
DataRelation relation = new DataRelation( "EmpWageHistory",
new DataColumn[] {tblEmp.Columns["EmployeeID"]},
new DataColumn[] {tblWageHistory.Columns["EmployeeID"]}, false);
//Set as nested. If an XML document is written to disk it
//will now contain <WageChange> elements as children of
//<Employee> elements.
relation.Nested = true;
//Add the relation dsEmployees.Relations.Add( relation );
//Instantiate the document
XmlDataDocument doc = new XmlDataDocument( dsEmployees ); return doc;
}
Most of this code is similar to the code you saw earlier in Figure 9.8.The two XML files are loaded into separate DataSet objects, and then wage information is copied to the employee DataSet.The relation is then created and added to
www.syngress.com

466 Chapter 9 • Working with XML
the DataSet. Finally, a new XmlDataDocument object is created whose constructor takes the DataSet object we created.
One interesting piece of code is the line that sets the Nested property of the relation to true. By doing this, you enforce the parent-child relationship. If the XmlDataDocument is written to disk, the <WageChange> elements will be children of the associated <Employee> element. If the Nested property was set to false (the default), all of the <WageChange> elements would come after the last <Employee> element in the document.
Now let’s take a look at the code that traverses the document using relational method calls:
///<summary>
///Uses relational calls to traverse the XML document and
///display one employee on-screen.
///</summary>
///<param name="doc">The XML document</param>
private void retrieveAsData( XmlDataDocument doc )
{
string strFirstName; string strMiddleName; string strLastName; string strDate; string strWage;
// Use the Select method to retrieve data relationally DataTable tblEmp = doc.DataSet.Tables["Employee"]; DataRelation relation =
doc.DataSet.Relations["EmpWageHistory"]; DataRow[] rows = tblEmp.Select( "EmployeeID = 1" );
for( int i = 0; i < rows.Length; i ++ )
{
// Get the Employee information retrieved DataRow rowEmp = rows[i];
strFirstName = rowEmp[1].ToString();
www.syngress.com

Working with XML • Chapter 9 |
467 |
strMiddleName = rowEmp[2].ToString(); strLastName = rowEmp[3].ToString();
m_strOutput += "Name: " + strFirstName; m_strOutput += " " + strMiddleName; m_strOutput += " " + strLastName + "\r\n";
//Now get the Wage history information, it is a child
//of the Employee row.
DataRow[] rowsWage = rowEmp.GetChildRows( relation ); for( int j = 0; j < rowsWage.Length; j++ )
{
DataRow rowWage = rowsWage[j]; strDate = rowWage[1].ToString(); strWage = rowWage[2].ToString();
m_strOutput += "Wage Chage Date: " + strDate.Substring( 0, 10);
m_strOutput += " Amount: " + strWage + "\r\n";
}
}
}
First, call the Select method against the Employee DataTable with the following code:
DataTable tblEmp = doc.DataSet.Tables["Employee"];
DataRow[] rows = tblEmp.Select( "EmployeeID = 1" );
In this case, you will get back one DataRow that contains the column information of the employee with EmployeeID = 1.We retrieve the first, middle, and last names and get the wage history information by executing the following code:
DataRow[] rowsWage = rowEmp.GetChildRows( relation );
The relation object was set earlier in the source code as follows:
DataRelation relation = doc.DataSet.Relations["EmpWageHistory"];
www.syngress.com
468 Chapter 9 • Working with XML
In effect, this code says “find all children of this employee that are defined by the EmpWageHistory relation of the DataSet.”The EmpWageHistory relation establishes a relation between an employee and that employee’s wage history using EmployeeID. Issuing the call to GetChildRows will return all employee wage history rows in WageChange DataTable of the employee XmlDataDocument.DataSet object. Loop through all of the rows and save the result for later display onscreen.
You’ve now seen relational calls used to traverse the data in an XmlDataDocument object. As mentioned, you can also use DOM calls to traverse the document. Most of the code to traverse the document using DOM calls is very similar to code you saw in the “Working with XML DOM” section of this chapter, so we don’t present it here. As previously mentioned, the full source code for the sample is on the CD.The key thing to note is that the output when traversing the document using relational calls is exactly the same when traversing the document using DOM calls.This is shown in Figure 9.7.
The relationship between XML and relational data is very powerful. It allows you to treat data as XML when it is best suited, and as relational database data when that is more appropriate. For instance, let’s say that your employee information is contained in a SQL Server database. Suppose you need to transfer some of that employee data to a remote location that does not have access to the SQL Server database. Because the XmlDataDocument class contains a DataSet member, you can use ADO.NET to retrieve the data into an XmlDataDocument.Then, you can write the data contained in the XmlDataDocument to an XML file on disk using the WriteXml method of the DataSet class and transfer that file to the remote location.The remote location can read it back into an XmlDataDocument using the ReadXml method of the DataSet class and then manipulate it using XML DOM calls to generate reports using XSL, for instance. Or it could be written back to a local relational database, possibly Access, and generate reports via Access. Using the information you learned in this chapter and in Chapter 8 about ADO.NET, accomplishing this task becomes quite easy, whereas in the past it may have been quite difficult. By providing the DataSet class the ability to read and write XML and providing the XmlDataDocument class the ability to use DOM calls as well as relational calls against the DataSet member of XmlDataDocument, Microsoft has given you the tools to accomplish this.
www.syngress.com

Working with XML • Chapter 9 |
469 |
Working with XPath and
XSL Transformations
In the introduction of this chapter, we introduced XPath. XPath is used to find a set of nodes in an XML document based on a location qualifier and a pattern to match. In the XML DOM, sample you saw that it was tedious to find a specific element.You had to walk the DOM tree in memory until the node was encountered.You couldn’t get directly to an element with a given set of characteristics. The XPath language provides this capability.
XSLT also makes use of XPath expression. XSLT is used to transform XML documents from one format to another.The resulting format can be another XML document, HTML, or some other file format. XSLT stylesheets often use XPath statements to locate nodes in an XML document during transformation. In the following sections, you will see examples of XPath used as a generalized query language against XML documents.You will also see XPath used in XSL stylesheets as part of an XSL transformation.
Working with XPath
The first example you will see of XPath in action uses XPath statements to query against an XML document.The sample requires the file personnel.xml to be in the same directory the sample is run from.You can find the file on the CD in the XPath directory.You may need to copy it to the directory you run the sample from.The full source code for the sample is in the XPath directory as well.The file that contains the source code is named XPathForm.cs. Figure 9.11 shows the XPath Sample program.
Figure 9.11 The XPath Sample Program
www.syngress.com

470 Chapter 9 • Working with XML
Figure 9.11 shows the program after you click Run XPath Queries.When you click the button, the program does a number of queries against the personnel.xml file and writes the results into the listbox on the form. Figure 9.12 shows a portion of the XML contained in the personnel.xml file used to generate the queries.
Figure 9.12 Generating Queries (personnel.xml)
<?xml version="1.0" standalone="yes"?> <Employees>
<Employee EmployeeID="1"> <FirstName>John</FirstName> <MiddleInit>M</MiddleInit> <LastName>Smith</LastName> <Salaried>true</Salaried> <Wage>40000</Wage> <Active>true</Active> <Title>Jr. Programmer</Title> <Location>
<Address>103 N.72nd</Address> <City>Seattle</City> <State>WA</State> <Zip>98103</Zip>
</Location>
</Employee>
<Employee EmployeeID="2"> <FirstName>Joe</FirstName> <MiddleInit>R</MiddleInit> <LastName>Jones</LastName> <Salaried>false</Salaried> <Wage>22.75</Wage> <Active>true</Active> <Title>Graphic Artist</Title> <Location>
<Address>13222 S. 1st Avenue</Address> <City>Portland</City>
Continued
www.syngress.com

Working with XML • Chapter 9 |
471 |
Figure 9.12 Continued
<State>OR</State>
<Zip>97206</Zip>
</Location>
</Employee>
Figure 9.13 contains the relevant portions of the source code for the XPath sample. Source code inserted by the Visual Studio.NET designer has been omitted.
Figure 9.13 Relevant Portions of Source Code (XPathForm.cs)
using |
System; |
using |
System.Drawing; |
using |
System.Collections; |
using |
System.ComponentModel; |
using |
System.Windows.Forms; |
using |
System.Data; |
using |
System.Xml; |
using |
System.Xml.XPath; |
using |
System.IO; |
namespace XPath
{
///<summary>
///Summary description for Form1.
///</summary>
public class Form1 : System.Windows.Forms.Form
{
///<summary>
///Required designer variable.
///</summary>
private System.ComponentModel.Container components = null; private System.Windows.Forms.TextBox textBox1;
private System.Windows.Forms.Button button1;
Continued
www.syngress.com

472 Chapter 9 • Working with XML
Figure 9.13 Continued
private string m_strOutput;
public Form1()
{
InitializeComponent();
}
///<summary>
///The main entry point for the application.
///</summary>
[STAThread]
static void Main()
{
Application.Run(new Form1());
}
///<summary>
///Called when Run XPath Queries is pressed
///</summary>
private void button1_Click(object sender, System.EventArgs e)
{
Cursor currentCursor = Cursor.Current;
try
{
Cursor.Current = Cursors.WaitCursor;
//Do XPath queries on both XPath Documents and
//DOM-based XML documents doXPathDocumentQueries(); doXmlDocumentQueries();
//Show results on-screen
Continued
www.syngress.com

Working with XML • Chapter 9 |
473 |
Figure 9.13 Continued
textBox1.Text = m_strOutput;
}
catch ( Exception exception )
{
MessageBox.Show( exception.Message );
}
finally
{
Cursor.Current = currentCursor;
}
}
///<summary>
///Do XPath queries against a read-only XPathDocument
///</summary>
private void doXPathDocumentQueries()
{
m_strOutput =
"*** Beginning XPathDocument Queries ***\r\n\r\n";
//Load the XML document into a read-only XPathDocument
//and instantiate a navigator for queries.
XPathDocument doc = new XPathDocument( "personnel.xml" );
XPathNavigator navigator = doc.CreateNavigator();
m_strOutput += "*** Show All Wages ***\r\n\r\n";
//Find all Employee/Wage elements in the document and
//display the wage information on-screen XPathNodeIterator iterator =
navigator.Select( "descendant::Employee/Wage" );
Continued
www.syngress.com

474 Chapter 9 • Working with XML
Figure 9.13 Continued
while ( iterator.MoveNext() )
{
m_strOutput += iterator.Current.Name + ": "; m_strOutput += iterator.Current.Value + "\r\n";
}
m_strOutput +=
"\r\n\r\n*** Show All Employees in Seattle ***\r\n\r\n";
//Find all employees in the Seattle office and display
//their names on-screen
iterator = |
|
|
|
navigator.Select( "//Employee[Location/Zip='98103']" |
); |
||
while ( iterator.MoveNext() ) |
|
|
|
{ |
|
|
|
XPathNavigator nav2 = iterator.Current; |
|
|
|
nav2.MoveToFirstChild(); |
|
|
|
m_strOutput += nav2.Value; |
// |
First |
name |
nav2.MoveToNext(); |
|
|
|
m_strOutput += ". " + nav2.Value; |
// |
Middle |
init |
nav2.MoveToNext();
m_strOutput += " " + nav2.Value + "\r\n"; // Last name
}
m_strOutput +=
"\r\n\r\n*** Salaried Employee Average Wage ***\r\n\r\n";
//Calculate the average salary for all salaried employees
//in the company and display on-screen
Int32 nAverage =
(Int32)(Double)navigator.Evaluate(
"sum(//Employee[Salaried='true']/Wage) div
Continued
www.syngress.com

Working with XML • Chapter 9 |
475 |
Figure 9.13 Continued
count(//Employee[Salaried='true'])" );
m_strOutput += "Average Salary: $" + nAverage.ToString();
}
///<summary>
///Do an XPath queries against a DOM-based XML document and
then
///modify the document.
///</summary>
private void doXmlDocumentQueries()
{
m_strOutput +=
"\r\n\r\n*** Beginning XML Document Query ***\r\n\r\n";
//Load the XML document into a DOM-based XML document XmlDocument doc = new XmlDocument();
doc.Load( "personnel.xml" );
//Get a list of the Active element nodes for each employee
//in Portland
XmlNodeList nodeList = doc.SelectNodes( "//Employee[Location/Zip='97206']/Active");
foreach ( XmlNode node in nodeList )
{
// Mark each Portland employee as inactive node.InnerText = "false";
}
// Display the modified document on-screen StringWriter writerString = new StringWriter();
XmlTextWriter writer = new XmlTextWriter( writerString );
Continued
www.syngress.com

476 Chapter 9 • Working with XML
Figure 9.13 Continued
writer.Formatting = Formatting.Indented;
doc.WriteTo( writer );
writer.Flush();
m_strOutput += writerString.ToString();
}
}
}
The program runs through two sets of XPath queries against the personnel
.xml file.The first set of queries is against XML loaded into an object of type
System.Xml.XPath.XPathDocument.The XPathDocument class has been optimized to work with XPath queries. It supports read-only access to the document. An XPathNavigator class object is used to perform queries against an XPathDocument document. Here is the code that instantiates and loads an XPathDocument with XML from a disk file. An XPathNavigtor class object is instantiated to perform XPath queries against the document:
XPathDocument doc = new XPathDocument( "personnel.xml" );
XPathNavigator navigator = doc.CreateNavigator();
The Select method of the XPathNavigator class is used to perform a query against the XML document. It takes an XPath statement as an argument.The following query returns all of the <Wage> elements in the XML document:
XPathNodeIterator iterator =
navigator.Select( "descendant::Employee/Wage" );
while ( iterator.MoveNext() )
{
m_strOutput += iterator.Current.Name + ": "; m_strOutput += iterator.Current.Value + "\r\n";
}
The select statement takes an XPath expression as an argument and returns an XPathNodeIterator object, which is used to traverse the node list returned.The Current property of XPathNodeIterator points to the current position in the node list returned form the Select method call.The position is undefined until the first
www.syngress.com

Working with XML • Chapter 9 |
477 |
call to the MoveNext method. As each <Wage> element is encountered in the returned node list, the element tag and value are saved for later display in the listbox on-screen.The Name property of Current returns the element tag and the Value property of Current returns the text contained within the <Wage> element.
Developing & Deploying…
XPath Expressions
A brief explanation of XPath statements is in order. XPath expressions use what is termed a location path, which is made up of one or more location steps that are separated by a “/” or by a “//”. The “/” character indicates an absolute path, and the “//” characters indicate a relative path from the current node. A location step contains an axis and a node test, and it may contain predicates. The axis indicates the direction of the query from the current node. Examples are child, ancestor, and descendent. The node test is either the name of a node in the document, the wildcard character(*), or one of several node tests such as node() and text(). The predicate is used to filter the node test to pinpoint a specific set of nodes. A predicate is contained within brackets. Here are two examples of XPath expressions:
■In the XPath expression descendent::Employee/Wage, descendent indicates the axis and Employee/Wage indicates the node test. There is no predicate in this case. The expression returns the Employee/Wage descendents of the current node.
■In the XPath expression “//Employee[Location/Zip=’98103’], the “//” indicates the axis, Employee indicates the node test and [Location/Zip=’98103’] indicates the predicate. The expression returns the Employee elements with a Location/Zip element whose value is “98103”.
These are relatively simple examples. You can combine extremely complex combinations of axes, node tests, and predicates to create extremely powerful queries against XML documents using XPath.
The second query against the XPathDocument returns all the employees in the Seattle office and displays their names. Here is the code to accomplish this:
www.syngress.com
478Chapter 9 • Working with XML
iterator =
navigator.Select( "//Employee[Location/Zip='98103']" );
while ( iterator.MoveNext() )
{
XPathNavigator nav2 = iterator.Current;
nav2.MoveToFirstChild();
m_strOutput |
+= |
nav2.Value; |
// |
First name |
nav2.MoveToNext(); |
|
|
||
m_strOutput |
+= |
". " + nav2.Value; |
// |
Middle init |
nav2.MoveToNext();
m_strOutput += " " + nav2.Value + "\r\n"; // Last name
}
The only real difference with this query is that you need to use a second instance of XPathNavigator. Each node in the node list is an <Employee> element.The second XPathNavigator object is needed so that you can maintain your position in the node list of <Employee> elements.
The last query against the XPathDocument object does a summary query. It returns a result, not a node list. Here is the code, which calculates the average salary of all salaried employees:
Int32 nAverage =
(Int32)(Double)navigator.Evaluate(
"sum(//Employee[Salaried='true']/Wage) div
count(//Employee[Salaried='true'])" );
When performing summary queries, the Evaluate method is used instead of the Select method. It also takes an XPath expression as an argument.You can see from this example that the XPath expressions can get quite complex.
The second set of queries is done against an XmlDocument object. As we mentioned earlier, an XPathDocument is read-only. So, if you want to use XPath directly against an XML document and update the document, you will need to use an XmlDocument object. Here is the relevant code from the sample:
XmlDocument doc = new XmlDocument(); doc.Load( "personnel.xml" );
// Get a list of the Active element nodes for each employee
www.syngress.com
Working with XML • Chapter 9 |
479 |
// in Portland XmlNodeList nodeList =
doc.SelectNodes( "//Employee[Location/Zip='97206']/Active");
foreach ( XmlNode node in nodeList )
{
// Mark each Portland employee as inactive node.InnerText = "false";
}
This example simulates shutting down the Portland office.The <Active> element is set to false for all employees in the Portland office. First, a new XmlDocument object is instantiated and then loaded using the Load method. Next, the XPath query against the document is executed using the SelectNodes method of the System.Xml.Node class. It takes an XPath expression as an argument and returns an XmlNodeList object. In this case, it is a node list containing each <Active> element for each employee in the Portland office.The node list is traversed using the foreach statement, and the text value associated with the <Active> element is set to false. Assigning the string “false” to the InnerText property accomplishes this.
Working with XSL
The previous section shows how XPath is used as a general query tool. In this section, you will see XSLT used to transform XML documents to a different format. XSL stylesheets will use XPath expressions to select node lists for transformation.
Our sample simulates a real-world scenario.The scenario is that the human resources division of a company named EntegraTech maintains personnel data in an XML file named personnel.xml. Another division of the company maintains a Web site that includes some reports based on personnel information.The Web site uses XSL stylesheets to build HTML Web pages from personnel information contained in XML files. Unfortunately, the Web site stylesheets expect the XML to be in a different format than the format in the personnel.xml file supplied by the HR department.The sample code transforms the XML into the format that the Web site stylesheets expect and then builds one of the HTML reports. XSL stylesheets are used both to transform the XML and to create the HTML.
The sample requires the files personnel.xml, salariedpersonnel.xsl, and salariedreport.xsl to be in the same directory the sample is run from.You can find
www.syngress.com
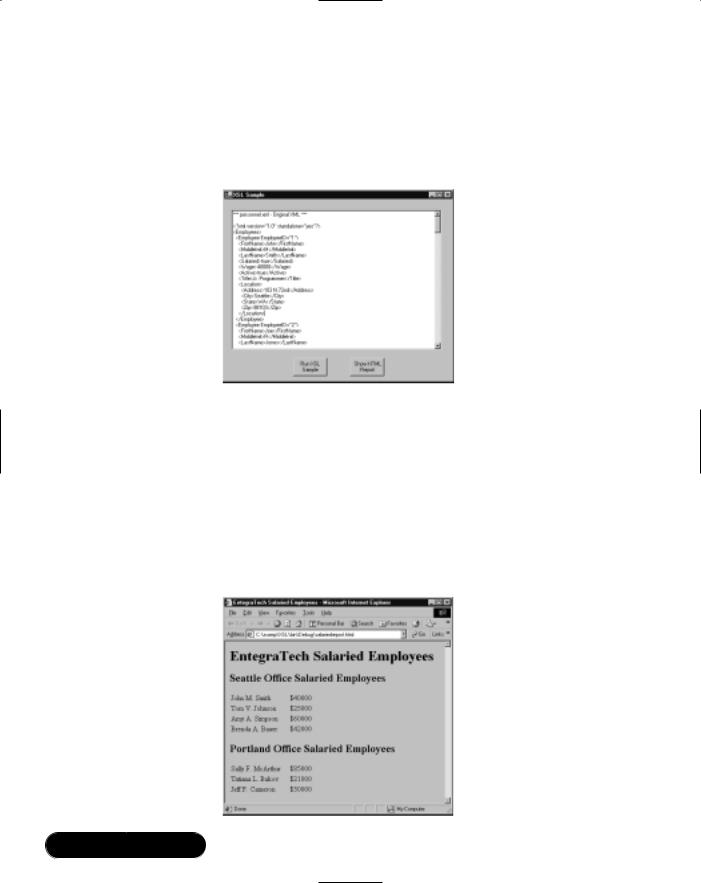
480 Chapter 9 • Working with XML
the files on the CD that accompanies this book, in the XSL directory.You may need to copy the files to the directory you run the sample from.The full source code for the sample is in the XSL directory as well.The file that contains the source code is named XSLForm.cs. Figure 9.14 shows the running program.
Figure 9.14 The XSL Sample Program
Figure 9.14 shows the program after you click Run XSL Sample.When you click the button, it transforms the personnel.xml file by using an XSL stylesheet, displays the original XML file and the transformed XML file in the listbox, and writes the transformed XML to another file on disk.The Show HTML Report button then becomes active. Clicking the button runs a second XSLT stylesheet, which creates a HTML document from the newly transformed XML. Internet Explorer is then launched and displays the HTML report. Figure 9.15 shows the report displayed in Internet Explorer.
Figure 9.15 The EntegraTech HTML Report
www.syngress.com

Working with XML • Chapter 9 |
481 |
You have seen the structure of the personnel.xml file already. Figure 9.16 shows it again for comparison with the format expected by the Web site. Figure 9.17 shows the format of the XML expected by the Web site. Comparing these two will help in understanding what the XSL stylesheet must do.
Figure 9.16 Partial Contents of the personnel.xml File
<Employees>
<Employee EmployeeID="1"> <FirstName>John</FirstName> <MiddleInit>M</MiddleInit> <LastName>Smith</LastName> <Salaried>true</Salaried> <Wage>40000</Wage> <Active>true</Active> <Title>Jr. Programmer</Title> <Location>
<Address>103 N.72nd</Address> <City>Seattle</City> <State>WA</State> <Zip>98103</Zip>
</Location>
</Employee>
Figure 9.17 XML Format Expected by the Web Site
<Salaried>
<Employee>
<Name>John M. Smith</Name>
<Wage>40000</Wage>
<Location>98103</Location>
</Employee>
As you can see, the XSL stylesheet needs to combine the <FirstName>, <MiddleInit>, and <LastName> elements into a single <Name> element. It also needs to copy the <Wage> element verbatim. Finally, it needs to copy the contents of the <Zip> element into a <Location> element.
www.syngress.com

482 Chapter 9 • Working with XML
The file salariedpersonnel.xsl is the stylesheet that is used to convert from the first XML representation to the second. It is shown in Figure 9.18.
Figure 9.18 The Stylesheet (salariedpersonnel.xsl)
<xsl:stylesheet version="1.0" xmlns:xsl="http://www.w3.org/1999/XSL/Transform">
<xsl:template match="/"> <Salaried>
<xsl:apply-templates/> </Salaried> </xsl:template>
<xsl:template match="Employees">
<xsl:apply-templates select="Employee[Salaried='true']"/> </xsl:template>
<xsl:template match="Employee[Salaried='true']"> <Employee>
<Name>
<xsl:value-of select="FirstName"/><xsl:text> </xsl:text> <xsl:value-of select="MiddleInit"/><xsl:text>. </xsl:text> <xsl:value-of select="LastName"/>
</Name>
<Wage>
<xsl:value-of select="Wage"/> </Wage>
<Location>
<xsl:value-of select="Location/Zip"/> </Location>
</Employee>
</xsl:template>
</xsl:stylesheet>
www.syngress.com

Working with XML • Chapter 9 |
483 |
An XSL stylesheet uses pattern matching to process an XML document.The XSLT processor begins processing the XML document and looks for statements in the XSL script, called rules, which match nodes encountered in the XML document. Near the top is the rule for the root element of the document:
<xsl:template match="/">
<Salaried>
<xsl:apply-templates/>
</Salaried>
</xsl:template>
When the root element of the original XML document is encountered, the previous statements are executed. In this case, a <Salaried> element is created and the child nodes of the root element are processed by the <xsl:apply-templates/> statement.When the <Employees> element is encountered, execute the following statements:
<xsl:template match="Employees">
<xsl:apply-templates select="Employee[Salaried='true']"/>
</xsl:template>
The select attribute of an <xsl:apply-templates> statement contains the pattern to match in an XML document.The pattern matching string can be an XPath expression.This is where XPath comes into play in XSL stylesheet processing.
The preceding XSL script statements ignore any <Employee> elements that do not contain a child element <Salaried> with a text node whose value is “true”. In effect, you execute a rule that returns all <Employee> elements that represent salaried employees and ignore all other nodes encountered in the XML document. The following statements process the matching salaried employee elements:
<xsl:template match="Employee[Salaried='true']">
<Employee>
<Name>
<xsl:value-of select="FirstName"/><xsl:text> </xsl:text> <xsl:value-of select="MiddleInit"/><xsl:text>. </xsl:text> <xsl:value-of select="LastName"/>
</Name>
<Wage>
<xsl:value-of select="Wage"/>
www.syngress.com

484 Chapter 9 • Working with XML
</Wage>
<Location>
<xsl:value-of select="Location/Zip"/>
</Location>
</Employee>
</xsl:template>
These statements convert all salaried <Employee> elements in the original XML document to the format required in the new XML document.This is where the meat of the transformation takes place. Let’s take a look in Figure 9.19 at the relevant portions of the source code that perform the XSLT transformation.
Figure 9.19 XML-to-XML Transformation in the Source Code (XSLForm.cs)
private void doXMLToXMLTransform()
{
// Show the original document on-screen
m_strOutput = "*** personnel.xml - Original XML ***\r\n\r\n";
showXMLDocument( "personnel.xml" );
//Load the new document, apply an XSL tranformation to
//it and save the new document to disk
XPathDocument docXPath =
new XPathDocument( "personnel.xml" );
XslTransform xslTransform = new XslTransform();
XmlTextWriter writer =
new XmlTextWriter( "salaried.xml", null );
xslTransform.Load( "salariedpersonnel.xsl" ); xslTransform.Transform( docXPath, null, writer ); writer.Close();
m_strOutput +=
"*** salaried.xml - Transformed XML ***\r\n\r\n";
// Show the transformed document
Continued
www.syngress.com

Working with XML • Chapter 9 |
485 |
Figure 9.19 Continued
showXMLDocument( "salaried.xml" );
}
private void showXMLDocument( string strXMLFileName )
{
XmlDocument docDOM = new XmlDocument(); docDOM.Load( strXMLFileName );
StringWriter writerString = new StringWriter(); XmlTextWriter writer2 = new XmlTextWriter( writerString ); writer2.Formatting = Formatting.Indented;
docDOM.WriteTo( writer2 ); writer2.Flush();
m_strOutput += writerString.ToString() + "\r\n\r\n";
}
In the doXMLToXMLTransform method, an XPathDocument object is instantiated and loaded with XML contained in the personnel.xml file.Then, an XslTransform object is instantiated.The XslTransform object is the engine used to perform XSLT transformations on XML documents in the .NET Framework.
After the transformation is complete, the results are written to a new XML file on disk. An XmlTextWriter object is created that writes the transformed file to disk.The file that is created is named salaried.xml, which is the first parameter passed to the XmlTextWriter constructor.
The Load method of the XslTransform class loads the XSL stylesheet from disk. Finally, the transform is executed by calling the Transform method of the XslTransform class object. The Transform method takes the XML document object and the text writer objects as parameters.The second parameter of the Transform method is used to pass additional runtime arguments that are used in the stylesheet. Because you have no runtime arguments, it is left null. After the transform is complete, the XmlTextWriter object is closed to complete the writing of the new XML document file to disk.
The showXMLDocument method is a helper function that reads an XML document from disk and formats it with indenting for display purposes.The showXMLDocument method illustrates how the XmlDocument, XmlTextWriter, and
www.syngress.com

486 Chapter 9 • Working with XML
StringWriter classes work together to convert an XML document on disk to an in-memory string.
As you can see, very little source code is necessary to perform the complex task of transforming an XML document to another format.You have now converted the original document to the new format that is needed to generate the HTML reports. Let’s take a look in Figure 9.20 at the XSL stylesheet used to transform the converted XML to HTML.
Figure 9.20 The Stylesheet (salariedreport.xsl)
<xsl:stylesheet version="1.0" xmlns:xsl="http://www.w3.org/1999/XSL/Transform">
<xsl:template match="/"> <html>
<head>
<title>EntegraTech Salaried Employees</title> </head>
<body bgcolor="#C0C0C0">
<h1 align="left">EntegraTech Salaried Employees</h1> <p></p>
<xsl:apply-templates /> </body>
</html>
</xsl:template>
<xsl:template match="Salaried">
<h2 align="left">Seattle Office Salaried Employees</h2> <table border="0" width="100%">
<xsl:apply-templates select="Employee[Location='98103']" /> </table>
<p></p>
<h2 align="left">Portland Office Salaried Employees</h2> <table border="0" width="100%">
<xsl:apply-templates select="Employee[Location='97206']" /> </table>
</xsl:template>
Continued
www.syngress.com

Working with XML • Chapter 9 |
487 |
Figure 9.20 Continued
<xsl:template match="Employee[Location='98103']"> <tr>
<td width="28%">
<xsl:value-of select="Name" /> </td>
<td width="72%">
$<xsl:value-of select="Wage" /> </td>
</tr>
</xsl:template>
<xsl:template match="Employee[Location='97206']"> <tr>
<td width="28%">
<xsl:value-of select="Name" /> </td>
<td width="72%">
$<xsl:value-of select="Wage" /> </td>
</tr>
</xsl:template>
</xsl:stylesheet>
Briefly, this stylesheet creates an HTML document for display in a Web browser.You can see the familiar pattern matching statements that we saw in the previous stylesheet.This stylesheet creates two HTML tables that display the names of employees and their wages.The first table shows the employees in the Seattle office, and the second shows the employees in Portland. Figure 9.21 shows the C# source code used to perform the transformation from XML to HTML.
www.syngress.com
488 Chapter 9 • Working with XML
Figure 9.21 XML to HTML Transformation in the Source Code (XSLForm.cs)
private void doXMLToHTMLTranformation()
{
//Load the XML document, apply an XSL transformation to it,
//resulting in HTML which is written to disk.
XPathDocument docXPath = new XPathDocument( "salaried.xml" ); XslTransform xslTransform = new XslTransform();
XmlTextWriter writer =
new XmlTextWriter( "salariedreport.html", null );
xslTransform.Load( "salariedreport.xsl" ); xslTransform.Transform( docXPath, null, writer ); writer.Close();
btnShowHTML.Enabled = true;
}
The code looks very similar to the code you saw that performed the XML- to-XML transformation earlier in Figure 9.19 earlier in this section.The only noticeable difference is that the XmlTextWriter object now takes the name of the HTML file as a parameter.When the doXMLToHTMLTransformation method is complete, a new HTML file exists named salariedreport.html, which contains the report. Here is the source code that launches Internet Explorer and displays the report in the Web browser:
private void btnShowHTML_Click_1(object sender, System.EventArgs e)
{
System.Diagnostics.Process.Start("salariedreport.html");
}
The Start method of the System.Diagnostics.Process class executes a program. This overloaded version of the Start method takes a document name. If the document type has a file association established with a program on the computer, it will invoke that program. In our case, HTML files are associated with Internet Explorer. So, when the Start method is called with an HTML filename as the parameter, Internet Explorer is launched and the HTML file passed in is displayed.
www.syngress.com
Working with XML • Chapter 9 |
489 |
Debugging…
XSLT: Debugging Stylesheets
XSLT is a powerful technology for transforming XML documents. The XPath expressions used in XSL stylesheets to match nodes in an XML document can be very complex. It can become difficult to debug what is happening in stylesheet when the output is not what you expect. To aid in debugging problems in XSL stylesheets, it is often helpful to develop the stylesheet in small increments rather than creating the complete stylesheet at one time. Write one rule at a time and run your transformation, verifying that the node list returned is what you expect. When you do encounter output that is not what you expect, you can be relatively sure the problem lies in the last rule you added. This can save you valuable time.
www.syngress.com

490 Chapter 9 • Working with XML
Summary
XML has emerged as the Web standard for representing and transmitting data over the Internet.The W3C has worked to establish standards for XML and related technologies including XML DOM, XPath, XSL, and XML schemas. XML DOM is an API that is used to create, modify, and traverse XML documents. XPath is a language that is used to query XML documents. XSL translates XML documents from one format to another format. XML schemas define the structure and data types of the nodes in an XML document. All of these technologies are industry standards backed by the W3C.
Microsoft has embraced XML and provides implementations in the .NET Framework for many of the technologies standardized by the W3C.The XML DOM API is fully supported in the .NET Framework by the XmlDocument class. The XmlDocument class allows you to create XML documents from scratch, persist them to a number of different data stores and read them back into memory from those data stores. Once in memory, an XML document can be traversed and modified including adding, updating, and deleting nodes in the document.
In conjunction with ADO.NET and the XML support in the .NET Framework, the ability to work with data as XML or as relational data is available using C#.The XmlDataDocument class is used to read data into a DataSet class object from an XML disk file or from a database. Once the XmlDataDocument is created, the data is available for access relationally as table and columns or as XML through the DOM API. XML schema support is provided by the .NET Framework to specify the structure and data types of the data in XML documents including the XmlDataDocument class.The relationship between the ADO.NET DataSet class and the XML API provides a powerful foundation to develop end-to-end applications storing data in databases on both ends of a business process and using XML to transmit the data between.
The .NET Framework supports XPath queries against XML DOM documents or the highly optimized XPathDocument class.The XPathNavigator class works in conjunction with the XPathDocument to issue XPath queries against XML documents in read-only mode. XPath queries can also be issued against the XmlDocument class providing a convenient method to locate a specific node in a document and then modify it. XPath queries are also instrumental in XSL transformations.The .NET Framework fully supports XSL transformations as implemented in the XslTransform class. XML-to-XML transformations as well as XML to other formats are implemented with a minimum of source code.
www.syngress.com

Working with XML • Chapter 9 |
491 |
Use of XML is found throughout the .NET Framework and is instrumental in the implementation of Web Services, as you will find out in Chapter 11. Because XML is critical to .NET, developers benefit by first class, standards-based support for XML in the .NET Framework.This chapter provided you with the information you need to start taking advantages of that support in your own XML-based applications.
Solutions Fast Track
Introduction to XML
;XML has emerged as the Web standard for representing and transmitting data over the Internet.
;The W3C has standardized XML and related technologies including XML DOM, XPath, XSL, and XML Schemas.
;The .NET Framework provides first class support for W3C-backed XML standards.
;XML is prevalent throughout the .NET Framework including use in configuration files, C# source code comments, and Web Services.
Working with XML DOM
;An XML document can be represented as a tree of nodes in memory, which can be traversed and modified using an implementation of the XML DOM API.
;The XmlDocument class is the .NET implementation of XML DOM.
;The XmlDocument class provides the ability to create an XML document, add elements and attributes to a document, update nodes in the document, delete nodes from the document, save the document to persistent storage, and load the document into memory from persistent storage.
www.syngress.com

492 Chapter 9 • Working with XML
Working with XML and Relational Data
;The DataSet class is an in-memory representation of relational data using tables, columns, and rows.
;The XmlDataDocument class has a DataSet object as a member variable. XML documents can be read into an XmlDataDocument object instance and can then be manipulated using XML DOM method calls or by relational method calls against the DataSet member variable.
;In conjunction with ADO.NET, the XML support in the .NET Framework can be used to build powerful applications that access data as XML or relational database data when appropriate.The conversion between the two types of data is trivial to implement.
Working with XPath and XSL Transformations
;XPath support is built into the .NET Framework for use as a generalpurpose query tool or as part of XSL stylesheets.
;XPath queries can be performed against the read-only XPathDocument class using the XPathNavigator class.The XmlDocument class can also be queried using XPath to locate a node in a document, which can then be modified if desired.
;XSL Transformations are implemented using the XslTransform class of the
.NET Framework allowing transformation of XML documents to other formats including XML and HTML.
www.syngress.com
Working with XML • Chapter 9 |
493 |
Frequently Asked Questions
The following Frequently Asked Questions, answered by the authors of this book, are designed to both measure your understanding of the concepts presented in this chapter and to assist you with real-life implementation of these concepts. To have your questions about this chapter answered by the author, browse to www.syngress.com/solutions and click on the “Ask the Author” form.
Q:What W3C level of support is provided in the XML classes supplied with the
.NET Framework?
A:The XmlDataDocument class supports W3C DOM Core Level 1 and Core Level 2 specifications.The XmlSchema class supports W3C XML Schemas for Structures and the XML Schemas for Data Types specifications.The XslTransform class supports the XSLT 1.0 specification. See the W3C Web site for details on the specifications at: www.w3c.org.
Q: Which set of XML classes should I use to implement my project?
A:That depends on your needs and can be difficult to say. Here though are some rules of thumb. If you need fast-forward, read-only access to the data, use one of the XmlReader-derived classes, such as XmlTextReader. If you need to do extensive updates to the document, use the XmlDocument class. If you want fast query capabilities, use the XPathDocument class. If you want to read and write from a database and then manipulate the results as XML, use the
XmlDataDocument class.
Q:I have two tables in a DataSet and have added a DataRelation, which establishes a parent-child relationship.When I write the XML file to disk, the parent-child relationship isn’t represented.What is wrong?
A: Most likely you did not set the Nested property of the DataRelation to true. If it is false, the elements associated with the child in the relationship will all appear after the parent elements in the XML file.
www.syngress.com

494 Chapter 9 • Working with XML
Q: How do I create an XmlDocument instance from a string?
A: Here are two methods. One method is to use this:
doc.Load( new XmlTextReader( new StringReader( myString ) ) )
Another is to write this:
doc.InnerXml = myString
www.syngress.com