
Chapter 10
ASP.NET
Solutions in this chapter:
■Introducing the ASP.NET Architecture
■Working with Web Forms
■Working with ADO.NET
;Summary
;Solutions Fast Track
;Frequently Asked Questions
495

496 Chapter 10 • ASP.NET
Introduction
ASP.NET is Microsoft’s upgrade to Active Server Pages (ASP). ASP.NET architecture is very well woven into the .NET Framework to provide a powerful event-driven programming model.The new feature of code-behind allows true separation of code and design. Also, you can write ASP.NET pages in any of the managed languages, and the code is compiled to give high performance.
This chapter acquaints you with writing Web Forms and database-driven Web applications.You will see how you can leverage the use of XML data in the
.NET Framework within ASP.NET applications, through “real world” examples (a shopping cart and a message board).We also explain how to e-mail from ASP.NET, which includes an example of a simple e-mail ASP.NET page.
In all the examples, we cover a broad range of new features in ASP.NET. One of these is the capability to have custom validation embedded into the pages from JavaScript (.js) files, which originate from the root on the server; ASP.NET has a whole host of validation controls to use. Also the backbone of the .NET architecture is built on XML.The use of XSL/Transforms on XML data from DataSets provide the developer with the ability to create custom content for various clients with minimal program logic overhead.We demonstrate this in the message board example included in this chapter.
ASP.NET is a more robust way to bring applications to the Web. Gone are the endless lines of “spaghetti code” and with it the ambiguous debugging.With ASP.NET, you will be able to create cross-browser, cross-platform applications that you can port across the Web.
Introducing the ASP.NET Architecture
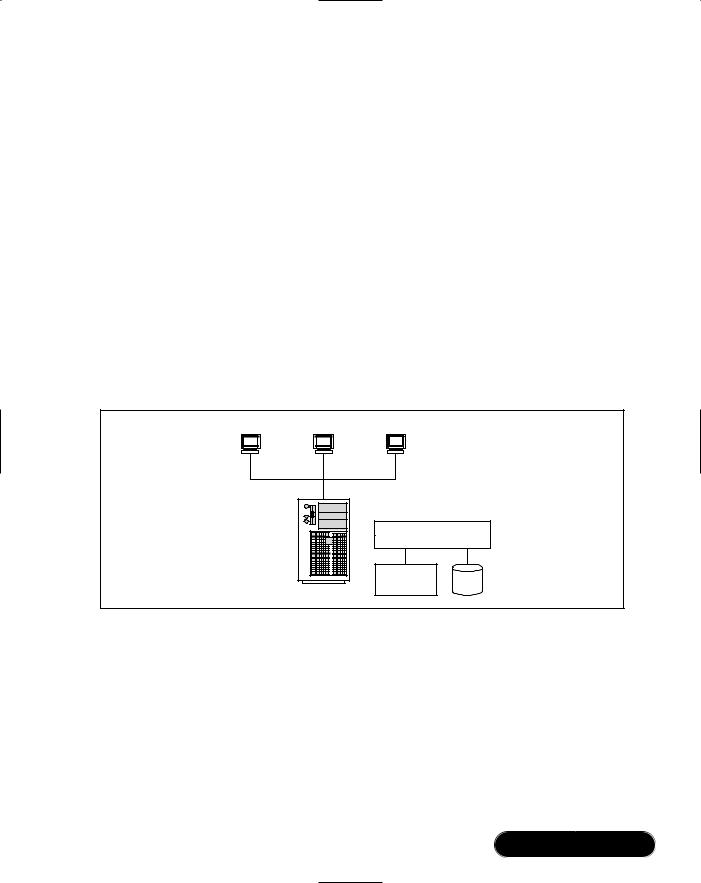
In the ASP.NET architecture, the .NET Framework works with the OS. A Web client requests a Web Form (ASPX) resource, which is delivered through the Internet Information Server (IIS) combining all additional resources, which may include a database,Web Service, COM component, or a component class. All of these are delivered through a compiled assembly (DLL) from the Web application, which sits in the bin directory within IIS’s Web root. See Figure 10.1 for a conceptual overview of the ASP.NET architecture. ASP.NET includes some new file extensions for the different types of pages you can create in your solutions.The new extensions allow ASP.NET to sit alongside ASP 3.0 on the same server with no filename conflicts. Here is a list of the four most commonly used extensions:
www.syngress.com
ASP.NET • Chapter 10 |
497 |
■.aspx Used for Web Forms and is the replacement for the standard .asp extension used in ASP 3.0.
■.ascx Used to denote a reusable page components or control.
■.asmx Used to denote a Web Service.
■.asax Used for the Global file and is the replacement for the .asa extension.
Each of these page types can have a code-behind page where you can store program logic. Note that using code-behind pages makes your code more modular and helps to hide the program logic from prying eyes, because the codebehind pages are not stored individually on the server but are part of the compiled assembly (DLL).
The corresponding code-behind pages would be .aspx.vb, .ascx.vb, .asmx.vb, and .asax.vb respectively if the project was a VB.NET project, or .aspx.cs, .ascx.cs,
.asmx.cs, and .asax.cs respectively if the project was a C# project.
Figure 10.1 Overview of ASP.NET Architecture
Web Client |
Web Client |
Web Client |
ASP.NET Appllication
.NET Framework
Additional
Resources Data
IIS NT/2000
ASP.NET Server Controls
You can add three main sets of controls to your Web Form (ASPX page): HTML server controls,Web server controls, and validation controls.
■HTML server controls Allow you to work with all the properties of the standard HTML elements within your server-side code (in your code-behind page or in inline server scripting on the ASPX page itself). This will expose them for all server-side processing and for content delivery, which you can provide a specific style sheet to comply with NS
www.syngress.com
498 Chapter 10 • ASP.NET
4 or Opera.To provide HTML form elements with the programming power of server-side processing, you must add at least two attributes to the tag in question.The HTML control needs to have the runat attribute set to “server” (runat=“server”) and an ID. By doing this, the control is made available to the server for processing instead of being passed as text to the browser. See Table 10.1 for a list of HTML elements that can be easily converted into HTML server controls.The following is an example of a HTML button server control:
<INPUT type="button" id="button1"
value="clickme" runat="server">
Table 10.1 HTML Server Controls
Server Control |
Description |
|
|
HtmlAnchorControl |
Access the <a> tag in server processing |
HtmlButtonControl |
Access the <button> tag in server processing |
HtmlFormControl |
Access the <form> tag in server processing |
HtmlGenericControl |
Access the <span>,<div>, <body>, <font> |
|
tag in server processing |
HtmlImageControl |
Access the <img> tag in server processing |
HtmlInputButtonControl |
Access the <input type=”submit”>, <input |
|
type=”reset”>, <input type=”button”>, |
|
tag in server processing |
HtmlCheckBoxControl |
Access the <input type=”checkbox”> tag in |
|
server processing |
HtmlInputFileControl |
Access the <input type=”file”> tag in server |
|
processing |
HtmlInputRadioButtonControl |
Access the <input type=”radio”> tag in |
|
server processing |
HtmlSelectControl |
Access the <select> tag in server processing |
HtmlTableControl |
Access the <table> tag in server processing |
HtmlTableCellControl |
Access the <td>, and <th> tag in server |
|
processing |
HtmlTableRowControl |
Access the <tr> tag in server processing |
HtmlTextAreaControl |
Access the <textarea> tag in server |
|
processing |
|
|
www.syngress.com

ASP.NET • Chapter 10 |
499 |
■Web server controls A completely new set of controls designed to interact with the .NET environment by the additional properties and events included, most notably the ability to do a postback.The tags are XML-based, so they all appear in the same manor as XML elements for ease of use.Web server controls are defaulted to render HTML 3.2 for cross browser compliance.Web server controls inherit the System.Web.UI
.Control namespace, which predefines their attributes.Table 10.2 shows a list of Web server controls.We discuss a number of these in the examples ahead.The following shows a Button Web server control and a Textbox Web server control as they would appear on a Web Form (ASPX page):
<asp:button id="button1" runat="server"></asp:button>
<asp:text id="text1" runat="server"></asp:text>
Table 10.2 ASP.NET Web Server Controls
Web Server Controls
AdRotator |
Button |
Calendar |
CheckBox |
CheckBoxList |
DataGrid |
DataList |
DropDownList |
HyperLink |
Image |
ImageButton |
Label |
LinkButton |
ListBox |
Literal |
Panel |
PlaceHolder |
RadioButton |
RadioButtonList |
Repeater |
Table |
TableCell |
TableRow |
TextBox |
XML |
|
|
|
|
|
■Validation controls You can have customized validation run on the client generated by the server through a JS (external JavaScript) file. Table 10.3 shows a list of validation controls.When working with validation server controls, you must set a couple of attributes.To specify the control to validate, set the controltovalidate attribute to the ID of the Web server control you want to validate. If you set the display attribute to static, the validation control will occupy that space permanently. (The position of the control will be held even when the error message is not visible.This works just like setting the Cascading Style Sheet [CSS] attribute visibility to hidden), but if you set the display attribute to dynamic, you can have multiple error messages listed in the same space (the position of the control is not held when the error message is not visible.This works like setting the CSS attribute display to none). Also, the errormessage attribute is the error message that will be shown when the validation fails.We use these in the following examples.
www.syngress.com
500 Chapter 10 • ASP.NET
Table 10.3 ASP.NET Validator Controls
Validator Control |
Description |
|
|
CompareValidator |
Compares a value entered into a Web server |
|
control against another set value. |
CustomValidator |
Can create your own custom validation for |
|
specific data. |
RangeValidator |
Finds the range between two values on a Web |
|
server control. |
RegularExpressionValidator |
Uses regular expressions to validate a value |
|
entered into a Web server control. |
RequiredFieldValidator |
Ensures that all items are supplied data in a Web |
|
server control. |
ValidationSummary |
Groups the result set of validation control error |
|
messages into a summary for viewing. |
|
|
Debugging…
ASP.NET Server Controls Do Not
Display Correctly in Netscape 4.x
A lot has happened over the last few years with Netscape and the open source Mozilla project. Although the newer versions of Mozilla version
.094 and above should handle this fine, Netscape still has a significant 4.x user base. When we develop Web front-ends for our clients, we strive to ensure at least Netscape 4.72 will display and function correctly.
What’s the issue? It seems that most of the examples showing you how to use server controls in Visual Studio.NET have you drag and drop the control to where you want it on the screen. In HTML, this creates span tags with inline style attributes containing “absolute positioning.” Those of us that have dealt with cross-browser Dynamic HTML (DHTML) issues know that this can cause problems in Netscape. The solution: Use “FlowLayout” and good old fashioned HTML elements and tricks for positioning. To do this, simply right-click on a page in either Design or HTML view and switch the pageLayout property to FlowLayout.
www.syngress.com

ASP.NET • Chapter 10 |
501 |
Working with User Controls
If you have some very useful code written in a current Web Form, and you want to reuse that code in another Web Form, you can do that with a user control. This is the same as using a server-side include but with all the programming power of an embedded server control.You can access all the properties of the User control within your new Web Form page.This allows you to reuse your code and maintain total control of all the properties in the page.
Making your own custom user control is very easy. Simply take out the code that is between the body tags of your current ASPX page, open a new file in VS.NET, and select Web User Control (this will have an .ascx extension), and paste in the code between the form tags of the control page. If you have any code-behind in your ASPX page, you must add that also.This will be placed in the code-behind page for the user control. Look at this example:
<DIV style="Z-INDEX: 100; LEFT: 10px; WIDTH: 300px; POSITION: relative; TOP: 10px; HEIGHT: 400px">
<TABLE cellSpacing="1" cellPadding="1" width="300" border="0"> <TR>
<TD>From:</TD> <TD colspan="2">
<asp:TextBox id="txtFrom" runat="server" AutoPostBack="False"> </asp:TextBox>
</TD>
</TR>
<TR>
<TD>To:</TD>
<TD colspan="2">
<asp:TextBox id="txtTo" runat="server" AutoPostBack="False"> </asp:TextBox>
</TD>
</TR>
<TR>
<TD>CC:</TD>
<TD colspan="2">
<asp:TextBox id="txtCC" runat="server" AutoPostBack="False"> </asp:TextBox>
www.syngress.com

502 Chapter 10 • ASP.NET
</TD>
</TR>
<TR>
<TD colspan="3"> </TD> </TR>
<TR>
<TD colspan="3">Subject:</TD> </TR>
<TR>
<TD colspan="3">
<asp:TextBox AutoPostBack="False" id="txtSubject" runat="server" Width="288px" Height="24px"></asp:TextBox>
</TD>
</TR>
<TR>
<TD colspan="3">Message:</TD> </TR>
<TR>
<TD colspan="3">
<asp:TextBox id="txtMessage" AutoPostBack="False" Rows="10" runat="server" Width="313px" Height="160px"></asp:TextBox>
</TD>
</TR>
<TR>
<TD colspan="3">
<asp:Button id="btnEmail" runat="server" Text="Send Email"> </asp:Button>
</TD>
</TR>
</TABLE>
</DIV>
<DIV style="Z-INDEX: 101; LEFT: 352px; WIDTH: 264px; POSITION: absolute; TOP: 24px; HEIGHT: 400px">
<TABLE cellSpacing="1" cellPadding="1" width="300" border="0"
www.syngress.com

ASP.NET • Chapter 10 |
503 |
style="WIDTH: 300px; HEIGHT: 80px"> <TR>
<TD>
<asp:RequiredFieldValidator id="rfvTxtfrom" runat="server" ControlToValidate="txtFrom"
Display="Dynamic"
Font-Name="Verdana"
Font-Size="10pt">* please provide an e-mail address </asp:RequiredFieldValidator>
<asp:RegularExpressionValidator id="revTxtfrom" runat="server" ControlToValidate="txtFrom" ValidationExpression="^.*\@.*\..*$"
Display="static"
Font-Name="verdana"
Font-Size="10pt">
Please enter a valid e-mail address </asp:RegularExpressionValidator>
</TD>
</TR>
<TR>
<TD>
<asp:RequiredFieldValidator id="rfvTxtto" runat="server" ControlToValidate="txtTo"
Display="Dynamic"
Font-Name="Verdana"
Font-Size="10pt">
* please provide an e-mail address </asp:RequiredFieldValidator>
<asp:RegularExpressionValidator id="revTxtto" runat="server" ControlToValidate="txtTo" ValidationExpression="^.*\@.*\..*$"
Display="static"
Font-Name="verdana"
Font-Size="10pt">
Please enter a valid e-mail address
www.syngress.com

504 Chapter 10 • ASP.NET
</asp:RegularExpressionValidator>
</TD>
</TR>
<TR>
<TD>
<asp:RegularExpressionValidator id="revTxtcc" runat="server" ControlToValidate="txtCC" ValidationExpression="^.*\@.*\..*$"
Display="static"
Font-Name="verdana"
Font-Size="10pt">
Please enter a valid e-mail address </asp:RegularExpressionValidator>
</TD>
</TR>
</TABLE>
</DIV>
Here you have cut out the HTML code from your ASPX page. Now, you need to paste this into your user control page. Here is what it will look like when you have done this (there is a new directive declared called @Control):
<%@ Control Language="c#" AutoEventWireup="false" Codebehind="WebUserControl1.ascx.cs" Inherits="simpleMail.WebUserControl1"%>
<TABLE cellSpacing="1" cellPadding="1" width="300" border="0"> <TR>
<TD>From:</TD> <TD colspan="2">
<asp:TextBox id="txtFrom" runat="server" AutoPostBack="False"> </asp:TextBox>
</TD>
</TR>
<TR>
<TD>To:</TD>
<TD colspan="2">
www.syngress.com

|
|
|
|
ASP.NET • Chapter 10 |
505 |
|
<asp:TextBox |
id="txtTo" |
runat="server" AutoPostBack="False"> |
|
|||
</asp:TextBox> |
|
|
|
|
||
</TD> |
|
|
|
|
|
|
</TR> |
|
|
|
|
|
|
<TR> |
|
|
|
|
|
|
<TD>CC:</TD> |
|
|
|
|
|
|
<TD |
colspan="2"> |
|
|
|
|
|
<asp:TextBox |
id="txtCC" |
runat="server" AutoPostBack="False"> |
|
|||
</asp:TextBox> |
|
|
|
|
||
</TD> |
|
|
|
|
|
|
</TR> |
|
|
|
|
|
|
<TR> |
|
|
|
|
|
|
<TD |
colspan="3"> </TD> |
|
|
|
||
</TR> |
|
|
|
|
|
|
<TR> |
|
|
|
|
|
|
<TD |
colspan="3">Subject:</TD> |
|
|
|
||
</TR> |
|
|
|
|
|
|
<TR> |
|
|
|
|
|
|
<TD |
colspan="3"> |
|
|
|
|
|
<asp:TextBox |
id="txtSubject" |
AutoPostBack="False" |
runat="server" |
|
||
|
Width="288px" Height="24px"></asp:TextBox> |
|
|
|||
</TD> |
|
|
|
|
|
|
</TR> |
|
|
|
|
|
|
<TR> |
|
|
|
|
|
|
<TD |
colspan="3">Message:</TD> |
|
|
|
||
</TR> |
|
|
|
|
|
|
<TR> |
|
|
|
|
|
|
<TD |
colspan="3"> |
|
|
|
|
|
<asp:TextBox |
id="txtMessage" |
AutoPostBack="False" |
Rows="10" |
|
||
runat="server" |
Width="313px" |
Height="160px"> |
|
|
||
</asp:TextBox> |
|
|
|
|
||
</TD> |
|
|
|
|
|
|
</TR> |
|
|
|
|
|
|
<tr> |
|
|
|
|
|
|
<td |
colspan="3"> |
|
|
|
|
|
www.syngress.com

506 Chapter 10 • ASP.NET
<asp:Button id="btnEmail" runat="server" Text="Send Email"> </asp:Button>
</td>
</tr>
</TABLE>
<DIV style="Z-INDEX: 101; LEFT: 352px; WIDTH: 264px; POSITION: absolute; TOP: 24px; HEIGHT: 400px">
<TABLE cellSpacing="1" cellPadding="1" width="300" border="0" style="WIDTH: 300px; HEIGHT: 80px">
<TR>
<TD>
<asp:RequiredFieldValidator id="rfvTxtfrom" runat="server" ControlToValidate="txtFrom"
Display="Dynamic"
Font-Name="Verdana"
Font-Size="10pt">
* please provide an e-mail address </asp:RequiredFieldValidator>
<asp:RegularExpressionValidator id="revTxtfrom" runat="server" ControlToValidate="txtFrom" ValidationExpression="^.*\@.*\..*$"
Display="static"
Font-Name="verdana"
Font-Size="10pt">
Please enter a valid e-mail address </asp:RegularExpressionValidator>
</TD>
</TR>
<TR>
<TD>
<asp:RequiredFieldValidator id="rfvTxtto" runat="server" ControlToValidate="txtTo"
Display="Dynamic"
Font-Name="Verdana"
www.syngress.com

ASP.NET • Chapter 10 |
507 |
Font-Size="10pt">
* please provide an e-mail address </asp:RequiredFieldValidator> <asp:RegularExpressionValidator id="revTxtto" runat="server"
ControlToValidate="txtTo"
ValidationExpression="^.*\@.*\..*$"
Display="static"
Font-Name="verdana"
Font-Size="10pt">
Please enter a valid e-mail address </asp:RegularExpressionValidator>
</TD>
</TR>
<TR>
<TD>
<asp:RegularExpressionValidator id="revTxtcc" runat="server" ControlToValidate="txtCC" ValidationExpression="^.*\@.*\..*$"
Display="static"
Font-Name="verdana"
Font-Size="10pt">
Please enter a valid e-mail address </asp:RegularExpressionValidator>
</TD>
</TR>
</TABLE>
</DIV>
Remember that you also need to bring over all the code-behind code as well into the new user control CS page This is what you should have:
namespace simpleMail
{
using System;
using System.Data;
using System.Drawing;
www.syngress.com
508 Chapter 10 • ASP.NET
using System.Web;
using System.Web.UI.WebControls; using System.Web.UI.HtmlControls; using System.Web.Mail;
///<summary>
///Summary description for WebUserControl1.
///</summary>
public abstract class WebUserControl1 : System.Web.UI.UserControl
{
protected System.Web.UI.WebControls.TextBox txtFrom; protected System.Web.UI.WebControls.TextBox txtTo; protected System.Web.UI.WebControls.TextBox txtCC; protected System.Web.UI.WebControls.TextBox txtSubject; protected System.Web.UI.WebControls.Button btnEmail;
protected System.Web.UI.WebControls.RequiredFieldValidator fvTxtfrom; protected System.Web.UI.WebControls.RegularExpressionValidator
revTxtfrom;
protected System.Web.UI.WebControls.RequiredFieldValidator rfvTxtto; protected System.Web.UI.WebControls.RegularExpressionValidator revTxtto; protected System.Web.UI.WebControls.RequiredFieldValidator rfvTxtcc; protected System.Web.UI.WebControls.RegularExpressionValidator revTxtcc; protected System.Web.UI.WebControls.TextBox txtMessage;
public WebUserControl1()
{
this.Init += new System.EventHandler(Page_Init);
}
private void Page_Load(object sender, System.EventArgs e)
{
// Put user code to initialize the page here
}
private void Page_Init(object sender, EventArgs e)
{
www.syngress.com

ASP.NET • Chapter 10 |
509 |
//
//CODEGEN: This call is required by the ASP.NET Web Form
//Designer.
InitializeComponent();
}
#region Web Form Designer generated code
///Required method for Designer support - do not modify
///the contents of this method with the code editor.
///</summary>
private void InitializeComponent()
{
this.btnEmail.Click += new System.EventHandler(this.btnEmail_Click);
this.Load += new System.EventHandler(this.Page_Load);
}
#endregion
private void btnEmail_Click(object sender, System.EventArgs e)
{
MailMessage mail = new MailMessage(); mail.From = txtFrom.Text;
mail.To = txtTo.Text; mail.Cc = txtCC.Text;
mail.Subject = txtSubject.Text; mail.Body = txtMessage.Text; mail.BodyFormat = MailFormat.Text; SmtpMail.Send(mail);
}
}
You should build this and make sure you do not have any errors. Next, you need to take your new custom user control and add it to a new Web Form page. This is what it the code should look like:
<%@ Page language="c#" Codebehind="WebForm2.aspx.cs"
AutoEventWireup="false" Inherits="simpleMail.WebForm2" %>
www.syngress.com

510Chapter 10 • ASP.NET
<%@ Register TagPrefix="simpleEmail" TagName="Email" Src="WebUserControl1.ascx" %>
<!DOCTYPE HTML PUBLIC "-//W3C//DTD HTML 4.0 Transitional//EN" > <html>
<head>
<meta name="GENERATOR" Content="Microsoft Visual Studio 7.0"> <meta name="CODE_LANGUAGE" Content="C#">
<meta name="vs_defaultClientScript" content="JavaScript (ECMAScript)">
<meta name="vs_targetSchema" content="http://schemas.microsoft.com/intellisense/ie5">
</head>
<body MS_POSITIONING="GridLayout">
<form id="WebForm2" method="post" runat="server" > <simpleEmail:Email id="myEmail" runat="server" />
</form>
</body>
</html>
This includes a new page directive @Register that will register your control based on the information you supply.What you need to supply is the property values: TagPrefix is set to simpleEmail. TagName is set to Email, and, most importantly, the Src is set to the path of your user control where it is a relative path in the same directory. Set this Web Form as a start page and run the application— your custom User Control will be there and fully functional.
Custom Controls
Custom controls are created in much the same way as the user controls, the difference being that they are autonomous from any Web Form and that you can use them anywhere within the application.When applying a custom control, you must use the @Register directive along with the TagPrefix, but in this example, where the Src is used for the user control, you use the Namespace=“CustomCon” and supply the Assembly attribute, as shown here:
<%@ Page language="c#"
Codebehind="WebForm1.aspx.cs"
AutoEventWireup="false"
www.syngress.com

ASP.NET • Chapter 10 |
511 |
Inherits="simpleMail.WebForm1"
%><%@ Register
TagPrefix="simpleEmail"
Namespace="customCon"
Assembly="conEamil"
%>
NOTE
The @Register directive must appear after or below the @Page directive.
Understanding the Web.config File
The Web.config file will be placed in the application folder in each Web solution project created.This is an XML file that you can edit with any text editor, and it holds key configuration information for your application.You can also add to this file with custom configuration settings. Let’s take a look at one and go over some of the settings within:
<?xml version="1.0" encoding="utf-8" ?> <configuration>
<system.web>
<!— DYNAMIC DEBUG COMPILATION—> <compilation
defaultLanguage="c#"
debug="true"/>
<!— CUSTOM ERROR MESSAGES—> <customErrors
mode="Off"/>
<!— AUTHENTICATION—> <authentication mode="None" />
<!— APPLICATION-LEVEL TRACE LOGGING—>
www.syngress.com

512 Chapter 10 • ASP.NET
<trace
enabled="false"
requestLimit="10"
pageOutput="false"
traceMode="SortByTime"
localOnly="true"/>
<!— SESSION STATE SETTINGS—> <sessionState
mode="InProc"
stateConnectionString="tcpip=127.0.0.1:42424" sqlConnectionString="data source=127.0.0.1;user id=sa;password=" cookieless="false"
timeout="20"/>
<!— PREVENT SOURCE CODE DOWNLOAD—> <httpHandlers>
<add verb="*" path="*.vb" type="System.Web.HttpNotFoundHandler,System.Web" />
<add verb="*" path="*.cs" type="System.Web.HttpNotFoundHandler,System.Web" />
<add verb="*" path="*.vbproj" type="System.Web.HttpNotFoundHandler,System.Web" />
<add verb="*" path="*.csproj" type="System.Web.HttpNotFoundHandler,System.Web" />
<add verb="*" path="*.webinfo" type="System.Web.HttpNotFoundHandler,System.Web" />
</httpHandlers>
<!— GLOBALIZATION—> <globalization
requestEncoding="utf-8" responseEncoding="utf-8"/>
</system.web>
</configuration>
www.syngress.com

ASP.NET • Chapter 10 |
513 |
One of the first settings in the Web.config file is the <compilation> tag. In that tag, you can set the source language of the application and the debug property.When you deploy your application, set this property to False to speed up server performance. Also, if you are unable to get debugging working on your server, check to see if the attribute is set to False.
You can turn custom error messages on or off by setting the attribute within the tag. Every time the application is run, the new setting will take effect, much like a Global.asp page would do for an ASP application.
Using the Global.asax Page
In the upcoming examples, you will set many variables within your Global.asax page.Two of these variables are set in the Application_Start and Session_Start methods. In this situation, you can use the Global.asax page much the same way as you would use the Global.asa file for your ASP application, the one difference being that you can run the Global.asax file across a Web farm of servers. Both of these methods belong to the HttpApplication base class.
You can make changes to the Global.asax file, and when the application starts, the page will be parsed and the settings acted upon. Also, you do not need to have a Global.asax file in your Web application. If you do not supply one, you will not have any supported application settings or session settings.
Working with Web Forms
Web Forms (ASPX pages) are the replacement for ASP pages in ASP.NET. All controls and UI functionality will be placed within your Web Forms.Web Forms inherit all the methods and properties of the Page class, which belongs to the
System.Web.UI namespace.
Creating a Simple Web Form
Let’s look at some real-world examples of ASP.NET Web applications.We first need to open VS.NET Beta 2 and create a new C# ASP.NET Web application (see Figure 10.2).
Name the project simpleMail and have the Location set as localhost. By default, one Web Form will be created.You can leave its name as WebForm1.aspx. In the example, you want to create a form that will send an e-mail.You first
need to include the namespace System.Web.Mail.This will enable you to use all the Mail methods within the SMTP mail service. In the Solutions Explorer window, select Show all files from the title bar. Now, you will have a plus sign
www.syngress.com
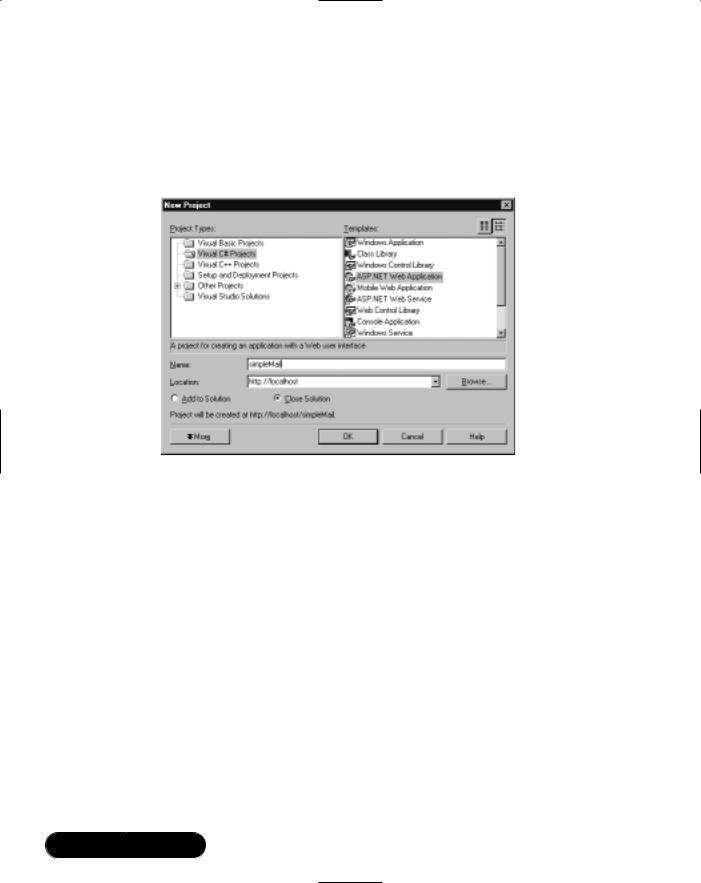
514 Chapter 10 • ASP.NET
in front of your ASPX page. Click on the plus sign and select the code-behind page (cs). At the top of the cs page, you will see the using directives; this is where you need to add your using directive for mail:
using System.Web.Mail;
Figure 10.2 Opening a New C# Web Application in VS.NET Beta 2
Now you will have all the methods and properties of this class. Let’s open the ASPX file and go to HTML view by selecting the HTML tab at the bottom of the window.You are going to need some text boxes and a submit button for your form, which you can get by dragging them from the Toolbox.The code should look something like this:
<div style="Z-INDEX: 100; LEFT: 10px; WIDTH: 300px; POSITION: relative; TOP: 10px; HEIGHT: 400px">
<TABLE cellSpacing="1" cellPadding="1" width="300" border="0"> <TR><TD>From: </TD><TD colspan="2">
<asp:TextBox id="txtFrom" runat="server" ></asp:TextBox> </TD>
</TR><TR><TD> To:</TD><TD colspan="2">
<asp:TextBox id="txtTo" runat="server" AutoPostBack= "False"></asp:TextBox>
</TD></TR><TR><TD> CC:</TD><TD colspan="2">
www.syngress.com

|
ASP.NET • Chapter 10 |
515 |
<asp:TextBox |
id="txtCC" runat="server" ></asp:TextBox> |
|
</TD></TR><TR><TD colspan="3"></TD></TR><TR> |
|
|
<TD colspan="3">Subject:</TD></TR><TR><TD colspan="3"> |
|
|
<asp:TextBox |
id="txtSubject" runat="server" Width="288px" |
|
Height="24px"></asp:TextBox>
</TD></TR><TR>
<TD colspan="3">Message:</TD></TR><TR><TD colspan="3">
<asp:TextBox id="txtMessage" Rows="10" runat="server" Width="313px" Height="160px"></asp:TextBox>
</TD></TR><tr><td colspan="3">
<asp:Button id="btnEmail" runat="server" Text="Send Email"></asp:Button> </td></tr></TABLE>
Double-click on the button; this will open up the .aspx.cs page and present you with a method for the OnClick event for the button.This is where you will add in your mail function code:
MailMessage mail = new MailMessage(); mail.From = txtFrom.Text; mail.To = txtTo.Text; mail.Cc = txtCC.Text;
mail.Subject = txtSubject.Text; mail.Body = txtMessage.Text; mail.BodyFormat = MailFormat.Text; SmtpMail.Send(mail);
Here you are setting the values of the separate textboxes equal to the listed mail properties. Lastly, the Send method of the SmtpMail class is used to send the e-mail message. But how can you make sure that the user will input the correct data? Easy—use Validation controls. But first, you must set up an area for them to be displayed outside of the table. Add a <div> tag with a table next to the table for your e-mail form. It should look something like this:
<DIV style="Z-INDEX: 101; LEFT: 352px; WIDTH: 264px; POSITION: absolute;
TOP: 24px; HEIGHT: 400px">
<TABLE style="WIDTH: 300px; HEIGHT: 80px" cellSpacing="1" cellPadding= "1" width="300" border="0">
<TR><TD>
www.syngress.com

516Chapter 10 • ASP.NET
<asp:RequiredFieldValidator id="rfvTxtfrom" runat="server" ControlToValidate="txtFrom" Display="Dynamic" Font-Name="Verdana" Font-Size="10pt">* please provide an e-mail address
</asp:RequiredFieldValidator>
<asp:RegularExpressionValidator id="revTxtfrom" runat="server" ControlToValidate="txtFrom" ValidationExpression="^.*\@.*\..*$" Display="static" Font-Name="verdana" Font-Size="10pt">
Please enter a valid e-mail address </asp:RegularExpressionValidator> </TD></TR><TR><TD>
<asp:RequiredFieldValidator id="rfvTxtto" runat="server" ControlToValidate="txtTo" Display="Dynamic" Font-Name="Verdana" Font-Size="10pt">* please provide an e-mail address
</asp:RequiredFieldValidator> <asp:RegularExpressionValidator id="revTxtto" runat="server"
ControlToValidate="txtTo" ValidationExpression="^.*\@.*\..*$" Display="static" Font-Name="verdana" Font-Size="10pt">
Please enter a valid e-mail address </asp:RegularExpressionValidator> </TD></TR><TR><TD><asp:RegularExpressionValidator id="revTxtcc"
runat="server" ControlToValidate="txtCC" ValidationExpression= "^.*\@.*\..*$" Display="static" Font-Name="verdana" Font-Size="10pt">Please enter a valid e-mail address
</asp:RegularExpressionValidator>
</TD></TR></TABLE></DIV>
Here you are using two separate validation controls: RequiredFieldValidator verifies that something has been entered, and RegularExpressionValidator verifies that the data entered is valid based on the regular expression you have set. Each one of these controls are dragged and dropped into place from the toolbox. Remember that you must supply the ControlToValidate attribute with the control you want to validate. Here is the regular expression used in the example to validate the e-mail field:
ValidationExpression="^.*\@.*\..*$".
To translate, this means from the beginning of the string look for any number of any characters followed by the @ sign, followed by any number of any characters, followed by a period (.), followed by any number of any characters to the end
www.syngress.com

ASP.NET • Chapter 10 |
517 |
of the string.This will allow for extremely long e-mail addresses that may contain more than one dot (period) before or after the @ sign.This is common for government or public institution mail servers, as well as in some large corporations. See Table 10.4 for a breakdown of the regular expression symbols used in this example.
Table 10.4 Regular Expression Symbols
Symbol Meaning
^The start of a string.
$ |
The end of a string. |
. |
Any character. |
*Zero or more occurrences of the preceding.
\Escape used for special characters or when searching for a specific character that has another meaning in regular expression syntax. For example, to search for the period character, you would have to use “\ .” because the period means any character in regular expression syntax.
Compile the project and run the application by setting the start page and pressing F5.
Building an XML Poll
In this section, you will be building a simple polling page.You will create two polling topics each containing three voting options.The user will click on the radio buttons that reflect their answers to the poll.This data will then be added to an XML document that will act as your data source.You will then post back the updated statistics for the poll. (You can find the files for this example on the CD, see XMLpoll.aspx, XMLpoll.aspx.cs, poll.xml, and stats.xslt.)
1.Start a new Web application project in VS.NET.
2.Rename WebForm1.aspx as XMLpoll.aspx.
3.In design mode, right-click on the page and select Properties. Change the Page Layout drop-down to FlowLayout and click Apply.Then click OK.This will help with display in Netscape browsers (see the sidebar “ASP.NET Server Controls Do Not Display Correctly in Netscape 4.x” earlier in this chapter).
4.You are now going to create the polling table layout in your Web Form, XMLpoll. Choose Table | Insert | Table.The Insert Table dialog appears.
www.syngress.com
518Chapter 10 • ASP.NET
5.Select 9 rows and 1 column, clear the Width property, and then click OK.You can handle the display options later with CSS.
6.In the first cell, type Programmers Poll.
7.In the second cell, type My Focus is on:.
8.In the third cell, drag RadioButton (from the toolbox under Web Forms) into this cell.
9.Next to the radio button (in the same cell), type Desktop.
10.Click in the cell, press Ctrl+A to select all, and press Ctrl+C to copy.
11.Click in the next cell and press Ctrl+V to paste.
12.Do this for the next cell, skip one (this cell will contain a subtitle), then do this for the next three.
13.In the cell that you skipped, type in My Primary Dev Tool is:.
14.Change the text next to each of the RadioButton controls to Web,
Mobile, VSNET, XmlSpy, and Other, respectively.
15.Your page should now look something like the table shown in Figure 10.3.
Figure 10.3 Adding RadioButtons to the XMLpoll Web Form
www.syngress.com
ASP.NET • Chapter 10 |
519 |
Now you can go into HTML mode and adjust some of your code. Rename your RadioButton controls as shown in Table 10.5. Remember, to rename a control, simply view it in HTML mode and change its ID; by default VS.NET will number them consecutively, as shown in the left column of Table 10.5.
Table 10.5 RadioButton Control Name Change
Current Control Name |
Change To: |
|
|
RadioButton1 |
focus_Desktop |
RadioButton2 |
focus_web |
RadioButton3 |
focus_mobile |
RadioButton4 |
IDE_VSNET |
RadioButton5 |
IDE_XmlSpy |
RadioButton6 |
IDE_other |
In HTML, RadioButtons with the same ID are used to create an array so that only one can be selected at a time.The RadioButton control requires unique names, hence focus_Desktop, focus_web, focus_mobile, and so on.The RadioButton control provides the attribute GroupName to generate this HTML RadioButton array. So in each of your “focus” RadioButton controls, add GroupName=“focus”, and for each of your “IDE” RadioButton controls, add GroupName=“IDE”. This will create two radio button arrays in your rendered HTML.
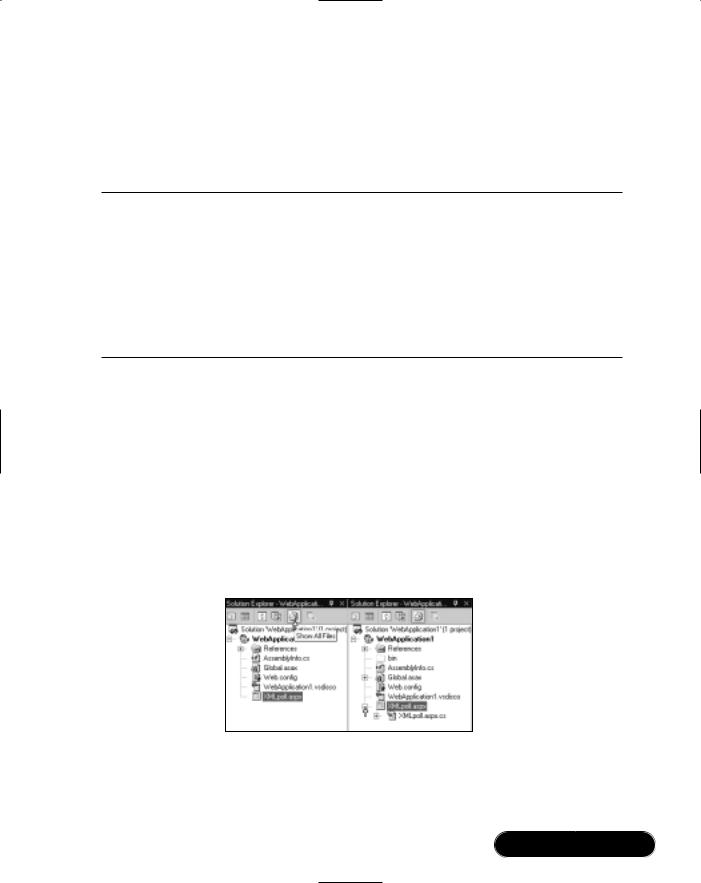
Open XMLpoll.aspx.cs. If you can’t find this page listed in your Solution Explorer, click the icon for Show All Files, then click the plus sign that appears next to XMLpoll.aspx (see Figure 10.4).
Figure 10.4 Displaying the Code-Behind File in the Solutions Explorer
When you drop your first RadioButton control on the page,VS.NET adds the following two lines to your code-behind page:
www.syngress.com
520 Chapter 10 • ASP.NET
using System.Web.UI.WebControls;
using System.Web.UI.HtmlControls;
This is the namespace that defines all the properties and methods of all Web controls. As you added each radio button control to the page,VS.NET also added a reference for it within your page class:
protected System.Web.UI.WebControls.RadioButton focus_web; protected System.Web.UI.WebControls.RadioButton focus_Desktop; protected System.Web.UI.WebControls.RadioButton focus_mobile; protected System.Web.UI.WebControls.RadioButton IDE_VSNET; protected System.Web.UI.WebControls.RadioButton IDE_other; protected System.Web.UI.WebControls.RadioButton IDE_XmlSpy;
Now, you can go back to XmlPoll.aspx and view it in design mode:
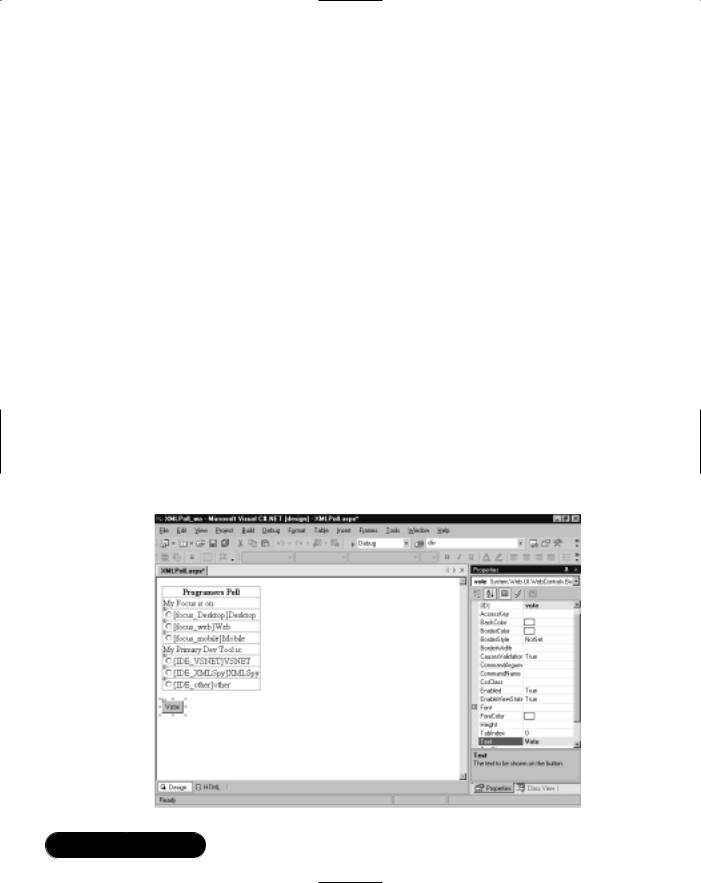
1.From the toolbar, drag a Button control below the table.
2.Either switch back to HTML mode and rename the control vote with a Text value of Vote. Or, from design mode, right-click the Button control and select Properties.
3.When the properties window opens, change the ID value to vote and the Text value to Vote (see Figure 10.5).
Figure 10.5 Setting the Button Control’s Properties
www.syngress.com

ASP.NET • Chapter 10 |
521 |
4.Switch to design view.
5.Double-click the vote button to add an event handler for the button’s
OnClick event.
Notice that VS.NET has added the following to the page class:
protected System.Web.UI.WebControls.Button vote;
The following has been added to the InitializeComponent method. Its purpose is to register the new event handler. If you remove this line, the vote_Click method will never be called:
this.vote.Click += new System.EventHandler(this.vote_Click);
And, of course, the template for the Server_Click method that is an event handler for the button:
private void vote_Click(object sender, System.EventArgs e)
{
}
In this event handler, create two variables: focus and IDE.You will use these variables to store the value of the users selections for focus and IDE, respectively:
string focus;
string IDE;
Test which RadioButton in the Focus poll was checked and assign a corresponding value to the focus variable:
//get developer focus if(focus_Desktop.Checked)
{
focus = "Desktop";
}
else if(focus_web.Checked)
{
focus = "Web";
}
else if(focus_mobile.Checked)
{
www.syngress.com

522 Chapter 10 • ASP.NET
focus = "Mobile";
}
else
{
focus = "not given";
}
Do the same for the variable IDE:
//get developer tool if(IDE_VSNET.Checked)
{
IDE = "VSNET";
}
else if(IDE_XMLSpy.Checked)
{
IDE = "XMLSpy";
}
else if(IDE_other.Checked)
{
IDE = "other";
}
else
{
IDE = "not given";
}
Now that you know what was checked, pass that data to a new method that will update your XML data source and display some statistics:
updateXPoll( focus, IDE );
This completes the code for the Vote_Click event. Ahead in this chapter, you will create the updateXPoll method, which will update your in-memory XML document.You will then send that data to another method you will create, called updateFile, which will overwrite the existing XML data file on the server with your new poll results.
www.syngress.com

ASP.NET • Chapter 10 |
523 |
Creating the updateXPoll Method
In the previous section, you handled the click event for the Vote button, which gave you the poll results for the current user. In this section, you are going to take the poll results and add them to your poll data. But, before you write the function updateXPoll, let’s view the format of the XML data source (see Figure 10.6).
Figure 10.6 Poll.xml
What you want to do in updateXPoll is append “data” nodes to the results node. A data node will look like the following:
<data>
<response question-id="1" selection="Mobile"/>
<response question-id="2" selection="VSNET"/>
</data>
First, you need to add support for XML to your page. In the top section to reference the namespaces containing the XML classes, add the following line:
using System.Xml;
In the updateXPoll method, create an instance of the XmlDocument object and load poll.xml:
XmlDocument xpoll = new XmlDocument();
xpoll.Load( Server.MapPath("poll.xml") );
www.syngress.com

524 Chapter 10 • ASP.NET
This creates an in-memory XML DOM instance named xpoll. Adding new XML nodes can be a little confusing at first. It is a bottom-up process where you work from the outermost leaf and append branches until they connect to a branch with an ancestor that connects to the main tree.This means that you will create the attributes of the response node first, then assign their values. Next, you will create the response node and append the new attributes to it (you will do the same for the second response node.) Following that, you will create a new data node, then append the new response nodes to it.You will then append the new data node to the appropriate branch node in xpoll, the results node.
Create a data element and two response elements with the attributes questionID and selection.This will create a new data node in the XML DOM:
XmlElement data = xpoll.CreateElement("data");
This will create a new response node in the XML DOM:
XmlElement response1 = xpoll.CreateElement("response");
This will create two new attribute nodes in the XML DOM:
XmlAttribute questionID = xpoll.CreateAttribute("question-id");
XmlAttribute selection = xpoll.CreateAttribute("selection");
Next, you want to assign the values of the attributes with your user data. For the first question, the values will be as follows:
questionID.Value="1";
selection.Value = focus;
Now you need to add the attributes to the response node:
response1.SetAttributeNode(questionID);
response1.SetAttributeNode(selection);
Then do the same for the second response node:
XmlElement response2 = xpoll.CreateElement("response");
questionID = xpoll.CreateAttribute("question-id");
selection = xpoll.CreateAttribute("selection");
questionID.Value="2";
selection.Value = IDE;
response2.SetAttributeNode(questionID);
response2.SetAttributeNode(selection);
www.syngress.com

ASP.NET • Chapter 10 |
525 |
Add them as children to the data element:
data.AppendChild( response1 );
data.AppendChild( response2 );
Now that you have the data node built, you need to add it as a child to the results node of xpoll:
xpoll.SelectSingleNode("//results").AppendChild(data );
You have successfully added your new poll data to the in-memory version of your xmlpoll. Now you need to ensure that you update the file (new data nodes are appended to the results node):
updateFile( "poll.xml", xpoll );
Creating the updateFile Method
This method will take your in-memory version of xpoll and overwrite the existing file. In order to write to a file, you need to add IO support to the page. In the top section, add the following to reference the IO namespace:
using System.IO;
In this function, you will be using the File.CreateText method of the StreamWriter object.This method will create a new file at the location and with the name specified. If a file already exists with the same name in that path, it will be overwritten:
StreamWriter sr = File.CreateText( Server.MapPath( "poll.xml" ) );
Note the use of Server.MapPath. The file path is an HTTP relative path. In order for the server to write to the file, it must have the actual path to the file (of the form C:\inetpub\wwwroot\XmlPollApp\poll.xml). Server.MapPath converts a relative or virtual path to a file path.
The OuterXml method of the XmlDocument class returns the contents of the XML document as an XML formatted text string.This is the equivalent of the MSXML parsers DOMdocument.xml property.The StreamWriter.Write method writes text to the file:
sr.Write( xpoll.OuterXml );
When it is done, close the file by calling the Close method of the
StreamWriter class:
sr.Close();
www.syngress.com

526 Chapter 10 • ASP.NET
Next time the file is accessed, it will contain the newly added poll data. Next, you will work on displaying the statistics of the current poll data on page load.
Displaying the Current Poll Statistics
You need to provide the user with some feedback, so you will create a statistics XSL/Transform that will calculate the response percentages and display the results on Page_load. So when the user is prompted for the poll, they will also see the current statistics. After submitting their responses, the statistics will be updated and the changes will be reflected to the user.
Let’s go back to XmlPoll.aspx and view it in the design mode:
1.From the toolbox under the Web Forms controls section, drag the XML control onto the page next to the Vote button.This will add the necessary references to the code-behind page.
2.Switch to HTML mode and scroll down to the end of the table.
3.Add a <br> tag between the Button control and the XML control. Also, rename the XML control stats:
<asp:Button id="vote" runat="server" Text="Vote"></asp:Button>
<br>
<asp:Xml id="stats" runat="server"></asp:Xml>
The XML control will apply an XSL/Transform to the XML data and display the resulting HTML at this position in the page.The XML control has several properties that you can use to set the XML data source and the XSLT source.
For this example, use the Document property, which accepts an XmlDocument object, and the TransformSource property, which accepts a relative path to a file as its input:
doc = new XmlDocument();
doc.Load( Server.MapPath("poll.xml") );
stats.Document = doc;
stats.TransformSource = "stats.xslt";
Recall that stats is the name of the XML control.You may be wondering why you didn’t use the DocumentSource property of the XML control, which works exactly like the TransformSource property.The reason for loading poll.xml into an XmlDocument object is because you also use it for updateXPoll.This way, you load
www.syngress.com

ASP.NET • Chapter 10 |
527 |
the file only once. Figure 10.7 shows the XSLT used for the transform.You can find this file, called stats.xslt, on the CD.
Figure 10.7 Stats.xslt
All you need to do is add a little CSS and your output will look like Figure 10.8.You can also find the CSS file, called xmlpoll.css, on the CD.
www.syngress.com
528 Chapter 10 • ASP.NET
Figure 10.8 XML Poll
Migrating…
ASP.NET Does Support Response and Request
If you’ve been going through ASP.NET samples on the Web and from books or magazine articles, you’ve probably noticed the prolific use of server controls and their PostBack functionality. And if you try to search for the ASP.NET intrinsic objects, you won’t find the list on MSDN. So what happened to Response and Request? For you ASP developers, I’m glad to say that these objects are still there and function similar to their ASP 3.0 counter parts. The functionality is built into all of the UI controls, but you can still write C# code that uses them directly.
To retrieve values from a form with method get, use the following:
Request.QueryString["name"] or
Request.QueryString[i]
Continued
www.syngress.com
ASP.NET • Chapter 10 |
529 |
To retrieve a value from a form with method post, use the following:
Request.Form["name"] or
Request.Form [i]
Notice the use of the square brackets when accessing an array or collection. Also, Response still works much the same:
Response.Write("some string")
Response.End()
A new way of writing to the screen in a predefined spot is to use the Label control. If you view the source after running the page, you will notice that the Label control is actually a handle to a span tag, which can contain a CSS class for font and layout settings (use the Literal control if you don’t need the span tag wrapper).
You can dynamically write HTML or even JavaScript to the client by assigning the string value to the text attribute of the control. Here, you don’t need the span tags so you can use the Literal control:
MyLiteral.Text = "<script language='javascript'>
window.alert(\"Got here\") </script>";
Working with ADO.NET
Up to this point in the chapter, you have built sample applications using Web Forms. In the upcoming applications, you will add data retrieval from an SQL database with ADO.NET. In the next two sample applications—the message board and shopping cart—you will take a close look at how ADO.NET and SQL interact.You will also get a closer look at the successor to the ADO
Recordset, the ADO.NET DataSet.
Building a Message Board with SQL
In this section, you are going to build a message board (see Figure 10.9).This application will display a list of all current message boards (Item [1] in Table 10.6). It will allow users to dynamically generate new message board groups (Item [2]) and monitor them (Item [3]). (Users will have the ability to delete messages from message board that they create [4].) Users will also have the ability to post new messages (Item [5]) or respond to any existing message (Item [6]) on any message board (Item [7]).This application will also contain a different interface for the site admin-
www.syngress.com
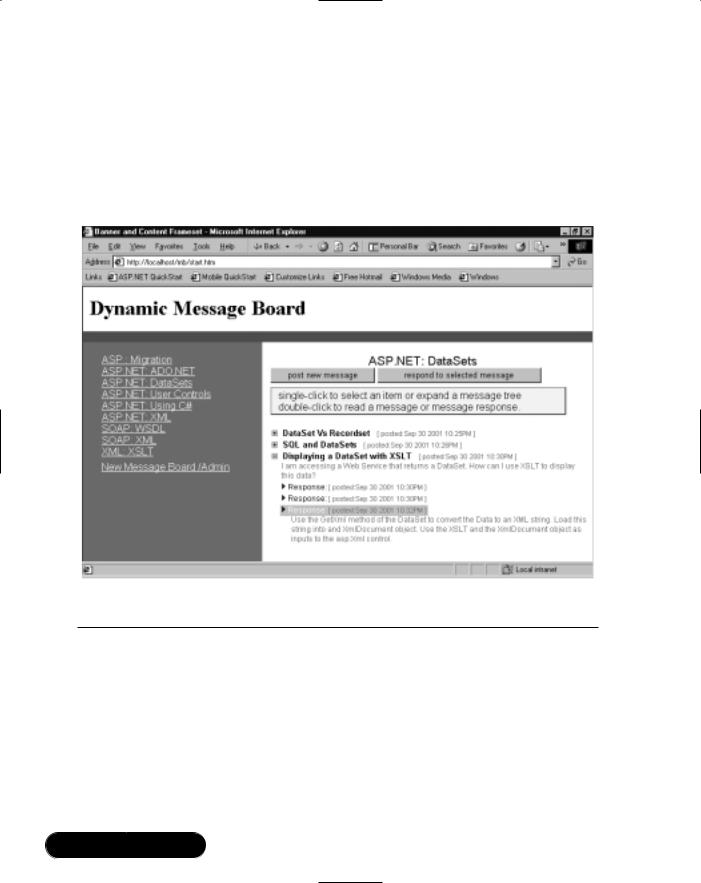
530 Chapter 10 • ASP.NET
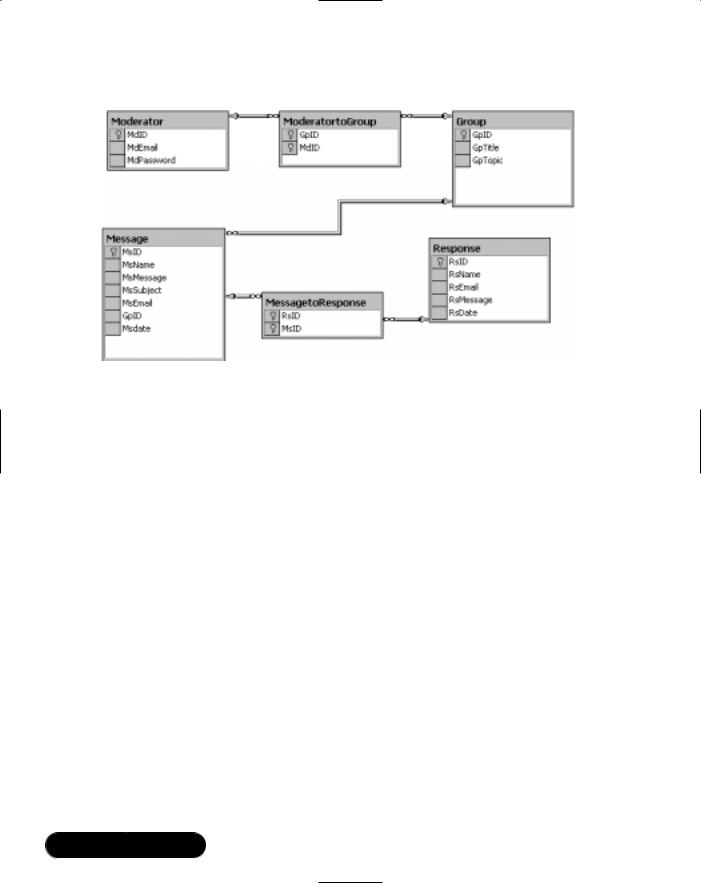
istrator (Item [8]) who will have the ability to delete any message or response (Item [9]) or even an entire message board (Item [10]).To enable this functionality, you will have to develop several stored procedures and methods.To see a mapping of these requirements to the corresponding pages and methods, see Table 10.6.You can find all the code for this project on the CD—see the page column of Table 10.6 for the filenames. See Figure 10.10 to view all the tables in the database.
Figure 10.9 Message Board Interface
Table 10.6 Message Board Processes Overview
Process |
Dependency |
Function |
Page |
|
|
|
|
|
|
Display List |
Stored Procedure |
Returns list of |
BoardList.aspx |
|
of Message |
(sproc): |
message boards [1] |
|
|
Boards |
getAllGroups |
|
|
|
|
XSLT for users |
Converts data to |
User_group_list.xslt |
|
|
|
HTML [1] |
|
|
|
XSLT for Admin |
Converts data to |
Admin_group_list.xslt |
|
|
|
HTML with delete |
|
|
|
|
enabled [8] |
|
|
|
|
|
|
|
|
|
|
Continued |
|
www.syngress.com

ASP.NET • Chapter 10 |
531 |
Table 10.6 Continued
Process |
Dependency |
Function |
Page |
|
|
|
|
Admin Login |
|
[8] |
BoardList.aspx |
Moderator |
Sproc: |
Returns the mod |
BoardList.aspx |
Login |
LoginModerator |
id of a valid |
|
|
|
moderator [4] |
|
Create New |
Sproc: |
Creates a new |
CreateMod.aspx |
Moderator |
NewModerator |
moderator and |
|
|
|
logs them in |
|
Create New |
Sproc: AddGroup |
Generates a new |
CreateBoard.aspx |
Group |
|
message board |
|
|
|
group [2] |
|
Delete a |
Sproc: delGroup |
Removes message |
DeleteBoard.aspx |
Group |
|
board group and |
|
|
|
all related messages |
|
|
|
and responses [10] |
|
Display |
Sproc: returnAllMess |
Returns all |
Board.aspx |
Selected |
|
messages and |
|
Board |
|
responses for the |
|
|
|
given group [5] [6] |
|
|
XSLT |
Convert data into |
Message_board_list |
|
|
collapsible tree |
.xslt |
Add New |
Sproc: AddMessage |
Add a message to |
Response2message |
Message |
|
given group [5] |
.aspx |
Add |
Sproc: AddResponse |
Add a response to |
Response2message |
Message |
|
a message [6] |
.aspx |
Response |
|
|
|
Delete |
Sproc: delMessage |
Removes a message Board.aspx |
|
Message |
|
from a group |
|
|
|
[4] [9] |
|
Delete |
Sproc: delResponse |
Removes a |
Board.aspx |
Response |
|
response from a |
|
|
|
message [4] [9] |
|
All data interaction between the pages and the SQL database will be handled via ADO.NET methods within a component file (mbdataaccess.cs).You will be using the SqlClient classes from the namespace System.Data.SqlClient.The SQL Managed Provider, which resides within the System.Data.SqlClient namespace, is optimized to work with MS SQL.
www.syngress.com
532 Chapter 10 • ASP.NET
Figure 10.10 Database Diagram
To really optimize the code, you can use stored procedures for all data access. Here is a list of stored procedures that you will need for this example:
■addGroup Adds a new message board group into the database.
■addMessage Adds a message into the database.
■addResponse Adds a response to the database.
■delGroup Deletes a message board group from the database.
■delMessage Deletes a message from the database and all responses to it.
■delResponse Deletes a response from the database.
■allGroups Returns all message board groups from the database.
■returnAllMess Returns all messages and their associated responses in an XML stream.
■loginModerator Logs in a moderator.
■newModerator Adds a new moderator:
1.Open up a new solution in VS.NET.
2.Add a new folder named components.
3.Right-click the new folder and add a new item.
4.Select C# class and name it mbdataaccess.cs.
www.syngress.com

ASP.NET • Chapter 10 |
533 |
First, you need a connection to the database.This code will connect to the local SQL Server database:
protected string connection = "initial catalog=MessageDb;persist security info=False;user id=[user];password=[password];Data Source=[server name]; packet size=4096";
public void addMessage(string MsName,string MsMessage, string MsSubject, string MsEmail, int GpID)
{
SqlConnection connAddMess = new SqlConnection(this.connection);
You can set the connection string on the outside of the class and access for all the functions within the component. Here you are writing the method addMessage. Make sure that you have the correct using directives:
using System;
using System.Data;
using System.Data.SqlClient;
You will be accessing the stored procedure addMessage, which takes five input parameters:
SqlCommand cmdAddMess = new SqlCommand("addMessage",connAddMess);
cmdAddMess.CommandType = CommandType.StoredProcedure;
First, create a new variable of type SqlCommand (cmdAddMess), pass the two parameters for SqlCommand, the name of the stored procedure, and the connection you are using for this command. Let’s look at the declaration of one of the parameters:
SqlParameter prmMsName = new SqlParameter("@MsName",
SqlDbType.NVarChar, 50);
prmMsName.Direction = ParameterDirection.Input;
cmdAddMess.Parameters.Add(prmMsName);
prmMsName.Value = MsName;
You declare a new variable of type SqlParameter; pass the name of the parameter used in the stored procedure, the data type, and size.You then set the direction to Input. Next, add it to the parameters collection of the SqlCommand.
Finally, pass the value you have locally to the stored procedure.You must do this for the rest of the input parameters.
www.syngress.com

534 Chapter 10 • ASP.NET
What you need to do now is open the connection, run the query using the ExecuteNonQuery method of the SqlCommand class, and then close the connection:
connAddMess.Open();
cmdAddMess.ExecuteNonQuery();
connAddMess.Close();
This will add a new record into the message table.You can view the SQL source file to see the stored procedure in any text editor:
CREATE |
PROCEDURE [addMessage] |
|
|
(@MsName |
[nvarchar](50), |
|
@MsMessage |
[text], |
|
@MsSubject |
[nvarchar](50), |
|
@MsEmail |
[nvarchar](50), |
|
@GpID |
[int] ) |
AS |
|
|
BEGIN |
TRANSACTION |
addMess |
DECLARE @MsDate [datetime]
SET @MsDate=GETDATE()
INSERT INTO [MessageDb].[dbo].[Message]
( [MsName],
[MsMessage],
[MsSubject],
[MsEmail],
[GpID],
[MsDate])
VALUES
( @MsName, @MsMessage, @MsSubject, @MsEmail, @GpID,
www.syngress.com

ASP.NET • Chapter 10 |
535 |
@MsDate) IF @@ERROR <> 0
BEGIN
ROLLBACK TRANSACTION addMess
RETURN
END
COMMIT TRANSACTION addMess
Most of the stored procedures (sprocs) are similar to the previous SQL script, however, the sprocs for removing messages and message board groups are a little more involved. Look for the MessageDB.sql file on the CD.To set up the database on your machine, run the SQL script in Query Analyzer.The file mbdataaccess.cs contains the following methods:
■addMessage
■addResponse
■addGroup
■delMessage
■delResponse
■delGroup
■getAllGroups
■addMod
■loginDbConn (for moderator login)
■getAllMess
The code for these methods is all very similar. Here is the AddMessage method:
public void addMessage(string MsName, string MsMessage, string MsSubject,
string MsEmail, int GpID)
{
SqlConnection connAddMess = new SqlConnection(this.connection); SqlCommand cmdAddMess = new SqlCommand("addMessage",connAddMess); cmdAddMess.CommandType = CommandType.StoredProcedure;
www.syngress.com

536Chapter 10 • ASP.NET
SqlParameter prmMsName = new SqlParameter("@MsName",
SqlDbType.NVarChar, 50);
prmMsName.Direction = ParameterDirection.Input; cmdAddMess.Parameters.Add(prmMsName); prmMsName.Value = MsName;
SqlParameter prmMsMessage = new SqlParameter("@MsMessage", SqlDbType.Text, 500);
prmMsMessage.Direction = ParameterDirection.Input; cmdAddMess.Parameters.Add(prmMsMessage); prmMsMessage.Value = MsMessage;
SqlParameter prmMsSubject = new SqlParameter("@MsSubject", SqlDbType.NVarChar, 50);
prmMsSubject.Direction = ParameterDirection.Input; cmdAddMess.Parameters.Add(prmMsSubject); prmMsSubject.Value = MsSubject;
SqlParameter prmMsEmail = new SqlParameter("@MsEmail", SqlDbType.NVarChar, 50);
prmMsEmail.Direction = ParameterDirection.Input; cmdAddMess.Parameters.Add(prmMsEmail); prmMsEmail.Value = MsEmail;
SqlParameter prmGpID = new SqlParameter("@GpID", SqlDbType.Int, 4); prmGpID.Direction = ParameterDirection.Input; cmdAddMess.Parameters.Add(prmGpID);
prmGpID.Value = GpID;
connAddMess.Open();
cmdAddMess.ExecuteNonQuery();
connAddMess.Close();
}
www.syngress.com
ASP.NET • Chapter 10 |
537 |
Now all the data connection code is contained in one file.To access the data, simply create an instance of the mbdataaccess component and call its methods.This is exactly like the ASP COM/COM+ scenario, where you create a VB or C++ COM/COM+ object to handle the data source interaction.To see this in action, see the overview of boardlist (see Table 10.7).
Table 10.7 The boardlist Overview
|
Web Form BoardList.aspx |
boardlist.aspx.cs |
|
|
|
|
|
|
|
|
<head> |
page_Load |
|
|
|
<Link to stylesheet.css/> |
{ |
|
|
|
<script=javascript |
Create |
and display list of Message Boards. |
|
|
src=clientfunctions.js/> |
} |
|
|
|
|
|
|
|
|
</head> |
|
|
|
|
<body> |
Server_event_handlers |
|
|
|
|
|
||
|
<form> |
{ |
|
|
|
|
|
|
|
|
<asp:Xml control/> |
process |
logic for login |
|
|
|
|
||
|
<user login UI /> |
} |
|
|
|
|
|
|
|
|
</form> |
|
|
|
|
</body> |
|
|
|
|
|
|
|
|
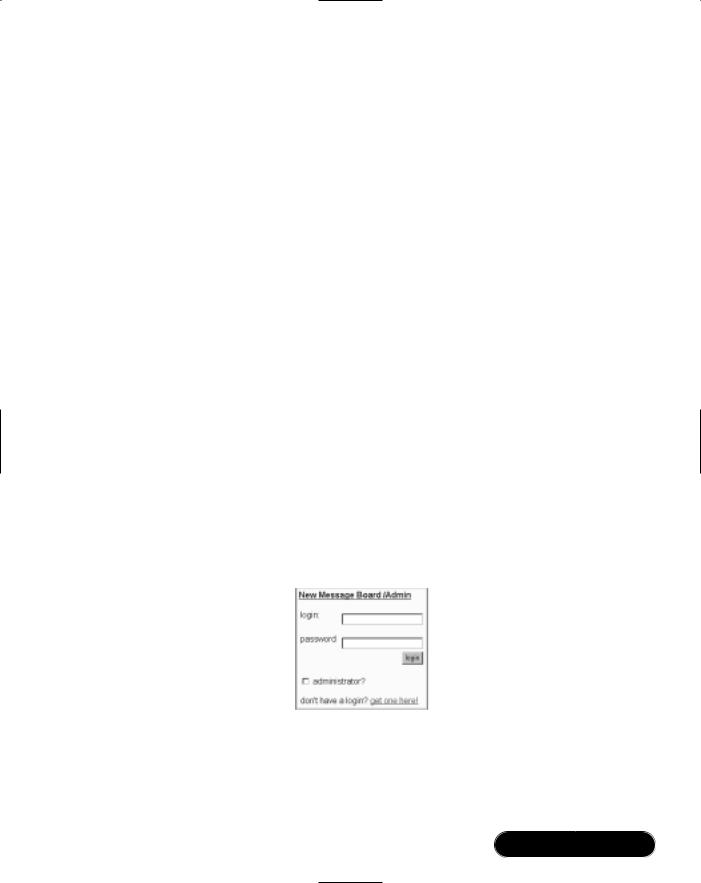
The form depicted in Figure 10.11 is part of boardList.aspx. It contains the following controls: Textbox, RequiredFieldValidator, RegularExpressionValidator, CheckBox, Label, and Button.
Figure 10.11 Login interface
The following is an example of using the RequiredFieldValidator:
<td align="right">
<asp:RequiredFieldValidator id="reqLogin"
www.syngress.com
538 Chapter 10 • ASP.NET
ControlToValidate="moderatorLogin"
runat="server" ErrorMessage="*"/>
<asp:TextBox id="moderatorLogin" runat="server"/>
</td>
This code uses the RequiredFieldValidator control to make the moderatorLogin textbox a required field in the form. Setting the RequiredFieldValidator’s ControlToValidate attribute to moderatorLogin does this. If the field is left blank, the text contained in the RequiredFieldValidator’s attribute ErrorMessage is displayed in red.
The login is required to be an e-mail address. In order to validate this field, you can use the RegularExpressionValidator.This control is placed where you want the error message to appear if the field does not match the regular expression. Here is an example of the RegularExpressionValidator control:
<asp:RegularExpressionValidator id="rexLogin"
ControlToValidate="moderatorLogin" runat="server"
ErrorMessage="invalid login"
ValidationExpression="^.*\@.*\..*$"/>
Notice the attribute ControlToValidate, which allows you to place the control anywhere on the page while validating the textbox moderatorLogin.The ErrorMessage attribute works exactly the same as its counterpart in the
RequiredFieldValidator.The interesting attribute is ValidationExpression.This field holds the regular expressions used to validate the contents of moderatorLogin.You can supply your own regular expression, or in VS.NET, you can choose from a list of common validation expressions (for more detail on this, see the E-mail sample application in the “Working with Web Forms” section earlier in this chapter).
Using VS.NET to Validate Form
Input with a Regular Expression
To validate form input with a regular expression using VS.NET, complete the following steps:
1.Open a Web Form in design mode.
2.From the Web Forms toolbox, drag a textbox control onto the page.
3.From the Web Forms toolbox, drag a RegularExpressionValidator control onto the page.
www.syngress.com
ASP.NET • Chapter 10 |
539 |
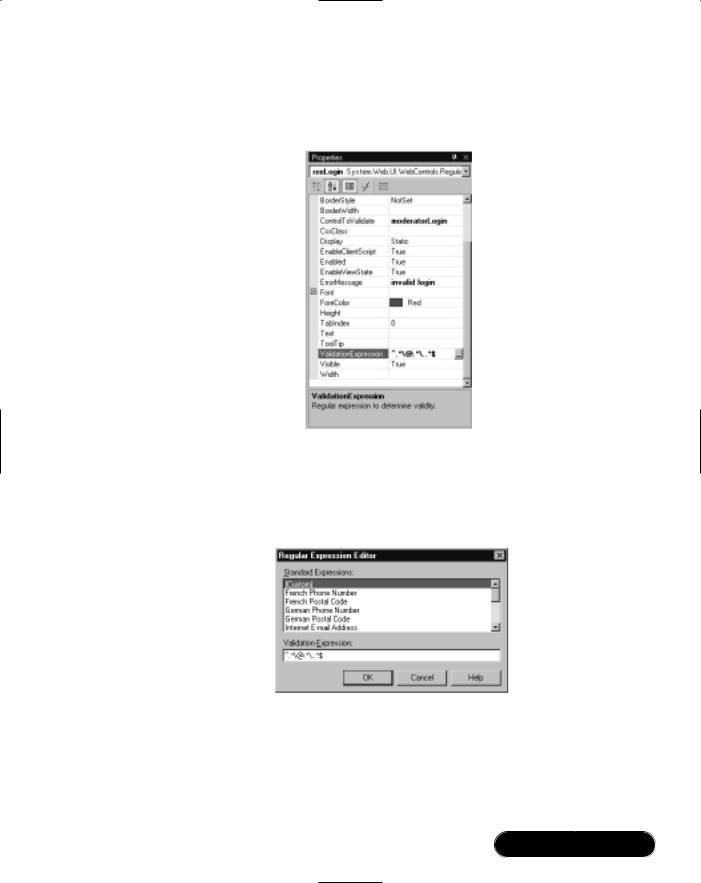
4.Right-click on the control and select Properties.The Properties window appears (see Figure 10.12).
Figure 10.12 The VS.NET Properties Window
5.Click in the field next to ValidationExpression, a little button with a ellipse on it will appear—click this button.You will be looking at the regular expression editor dialog (see Figure 10.13).
Figure 10.13 The Regular Expression Editor Dialog
6.Simply select from the list, enter your own, or edit one from the list and click OK.
Now, back to the login interface.The validation controls prevent the login submit from occurring until the validation rules are satisfied. Once the rules are met, login is enabled. Remember that the checkbox and textboxes are all server
www.syngress.com

540 Chapter 10 • ASP.NET
controls.This will give you access to their contents in the server click event of the button control login.
In VS.NET, the easiest way to generate the code necessary for a server click event is to double-click on the server button control while viewing it in design mode.This will generate the necessary references and a method template in the corresponding code-behind page.
This reference will be added to the page class. It enables you to access this control’s properties and methods in your code:
protected System.Web.UI.WebControls.Button login;
This will be added to the InitializeComponent method.This registers the event handler login_Click:
this.login.Click += new System.EventHandler(this.login_Click);
This event template will be added to the bottom of the page class:
private void login_Click(object sender, System.EventArgs e)
{
adminCheckBox is the check box control.You can check its value here, within the login_Click event handler (method):
if( adminCheckBox.Checked )
{
The site admin is logging in. For simplicity, let’s make the admin login static:
if((moderatorLogin.Text =="sa@site.admin") && (moderatorPassword.Text=="password"))
{
//login admin this.IsAdmin = true;
Session["IsAdmin"] = true; //re-initalize list initialize_MessageList();
adminLabel.Text ="administrator: logged in.";
}
else
{
adminLabel.Text = "<span style='color:red'>* invalid
www.syngress.com

ASP.NET • Chapter 10 |
541 |
admin login *</span>";
}
We cover Initialize_MessageList later.What we want to point out here is the Label control.This control allows us access to a span tag on the client.This means that you can pass text, or even HTML, to the page by including it in a string assigned to the Text property of the Label control.A useful property of this control is CSSclass.This enables you to assign a Cascading Style Sheet class to the Label.
To get a global instance of the dataaccess object, add the following code to the variable declaration section at the top of the page class.This is the section where all the controls are instantiated on the server:
protected mb.components.mbdataaccess grouplist;
This code segment declares a variable grouplist of type mb.components.mbdataaccess where mb is my project namespace (it is the name of my Webproject in VS.NET). Components is the folder containing the file mbdataaccess.cs and the namespace that contains the class mbdataaccess. Mbdataaccess is the class that contains all the data access methods in mbdataaccess.cs.
In the Page_Load method, add the following:
grouplist = new mb.components.mbdataaccess();
This creates an instance of the mb.components.mbdataaccess object.The object instance grouplist now has access to all the data access methods.You can use it to log in the moderator:
string moderatorID =
grouplist.loginDbConn( moderatorLogin.Text, moderatorPassword.Text );
if( moderatorID !="error")
{
Session["moderatorID"] = int.Parse(moderatorID);
adminLabel.Text = "<span style='color:red'>moderator
logged in</span>";
Now that the moderator is logged in, you can add a link so that the moderator can create new message board groups or message boards:
CreateNew.Text =
"<span style='width:20px'> </span>
<a style='color:white'
www.syngress.com

542 Chapter 10 • ASP.NET
href='createBoard.aspx?mod="
+ moderatorID + "' target='main'>
create new group</a>";
}
}
}
As moderators create new message boards (handled by a relatively simple page you can find on the CD: createBoard.aspx), a list of boards is stored in the database.You can simply retrieve that list on Page_load.There are many ASP controls that can display a list, but the one which gives you the most control over the HTML rendering is the XML control.This control has two primary attributes: xmlsource and xsltransform source.There are multiple properties for these two sources based on the source format: file, string, or DOM.You can set these properties in the method initialize_Messagelist.The reason this method is called in the Admin login section is because you will use a different XSLT for admins.The admin XSLT will enable deleting of groups. By using two different XSLTs, you can provide different interfaces with different functionality based on user level.
Because you are going to be using XML, you will need to add the following using directive at the top of the code-behind page to reference the namespace containing the XML classes:
using System.Xml;
Before you can call initialize_MessageList, you must first get the list from the database and convert it to XML. Do this in the Page_Load method:
listdoc = new XmlDocument();
Create a new instance of XmlDocument listdoc, which is a global variable declared in the same section as dataaccess:
listdoc.LoadXml( grouplist.getAllGroups().GetXml() );
Using the global dataaccess object grouplist, call the getAllGroups method, which returns a DataSet object.You can easily convert the DataSet object into an XMLformatted string by calling its GetXml method.This is then loaded into the
XmlDocument listdoc.
initialize_MessageList is a very simple method. Note that xList is the name of the XML control.This method will cause the data to be transformed and rendered in the HTML where the control is:
www.syngress.com
ASP.NET • Chapter 10 |
543 |
private void initialize_MessageList()
{
string xsltSource; if( this.IsAdmin )
{
xsltSource = "admin_group_list.xslt";
}
else
{
xsltSource = "user_group_list.xslt";
}
xList.Document = listdoc; xList.TransformSource = xsltSource ;
}
XML and XSLT
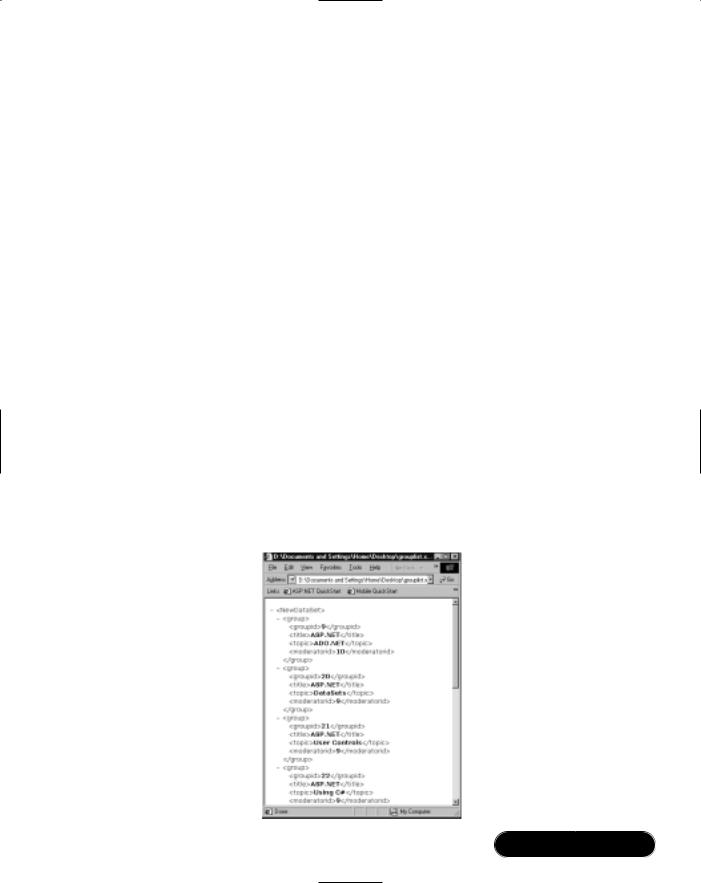
Although XSLT is not the primary focus of this book, XMLS and XSLT are very powerful tools to have in your developer’s toolbag of skills.This section gives a quick overview of the XML and XSLT file used from this application. Figure 10.14 shows the XML from getAllBoards, and Figure 10.15 shows the XSLT from user_group_list.xslt as rendered in IE6.
Figure 10.14 XML from getAllBoards, Rendered in IE6
www.syngress.com
544 Chapter 10 • ASP.NET
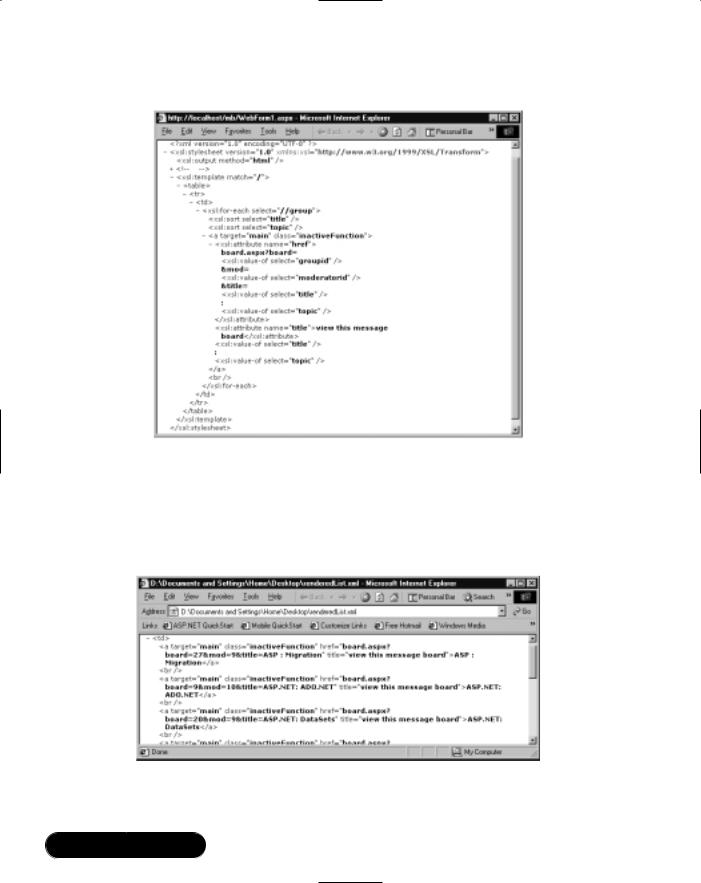
Figure 10.15 user_list.xslt
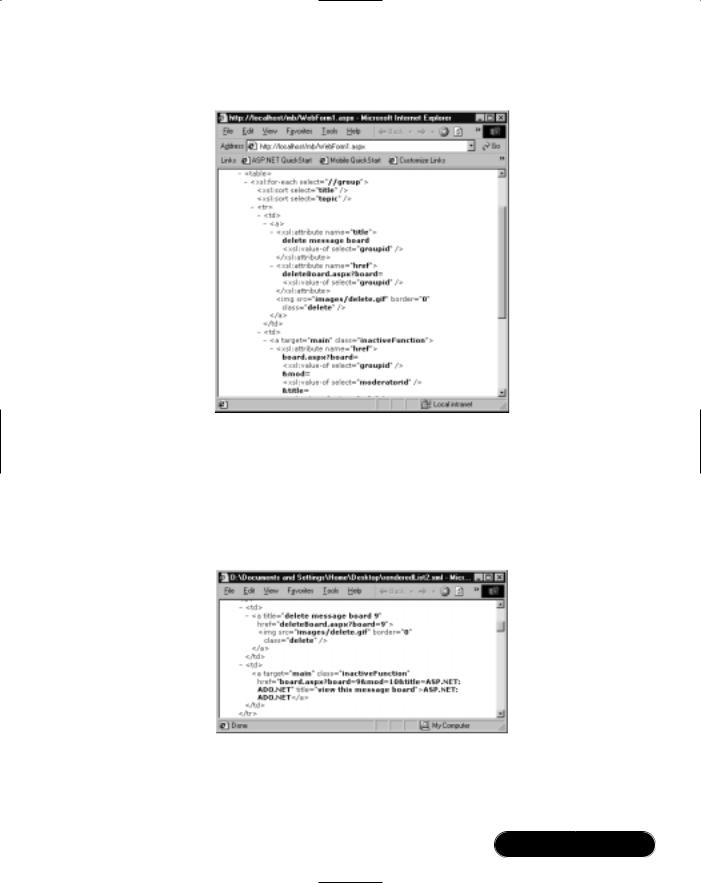
The generated HTML is a series of anchor tags with an embedded query string containing data used by board.aspx to retrieve the correct message board data. Figure 10.16 shows the HTML produced by the transform. Note that the attribute target=“main” is a reference to the frame in the frameset with ID=“main”.
Figure 10.16 XML XSL/Transform Results
Notice that admin_group_list.xslt (see Figure 10.17) is almost identical except for the extra table cell content in front of the original link.
www.syngress.com
ASP.NET • Chapter 10 |
545 |
Figure 10.17 admin_group_list.xslt
In Figure 10.18, you can see the generated HTML. In Figure 10.19, you can see an extra delete image next to the list items. Clicking on this image will pass the board ID to the delete page.The delete page has no UI, it simply verifies that the user is an admin by checking the Session[“IsAdmin”] value, then passes the board ID to the delete method of the dataaccess component.
Figure 10.18 XML XSL/Transform Results for Admin
You can use one parameterized XSLT for both user and admin, however, that approach would add complexity to both the XSLT and the code-behind page.
www.syngress.com
546 Chapter 10 • ASP.NET
The next page, board.aspx, will display the supplied board XML data based on the type of user.Table 10.8 is an overview of the structure of this page.
Figure 10.19 boadList.aspx Admin View
Table 10.8 Board Overview
|
Web Form board.aspx |
board.aspx.cs |
|
|
|
|
|
|
|
|
<head> |
|
page_Load |
|
|
<Link to stylesheet.css/> |
{ |
|
|
|
<script=javascript src= |
show delete button ? |
|
|
|
clientfunctions.js/> |
show respond to message button ? |
|
|
|
</head> |
|
show group title |
|
|
<body> |
|
store board ID in Session["boardID"] |
|
|
<form> |
|
get list of messages and responses |
|
|
<button new |
message/> |
} |
|
|
<button new |
response/> |
|
|
|
[<button detect selection/>] |
Server_event_handlers |
|
|
|
[Moderator |
| admin] |
{ |
|
|
<asp:Xml control/> |
if delete enabled. Delete responses |
|
|
|
</form> |
|
or messages |
|
|
</body> |
|
} |
|
|
|
|
|
|
Board receives the ID for the given message board in the query string:
int boardID = int.Parse( Request.QueryString["board"]);
This is used to load the corresponding messages and responses:
DataTable result = dbMethod.getAllMess( boardID );
www.syngress.com

ASP.NET • Chapter 10 |
547 |
When a user clicks on an item, its ID is stored in a hidden field using clientside JavaScript.The hidden fields in this page are HTML controls:
<input type="hidden" id="selection" runat="server" name="selection">
Just like the Web controls, the HTML controls have their own namespace.To access this control’s properties in your code-behind page, you need to add a variable to the page class that references a corresponding HTML control on the ASPX page:
protected System.Web.UI.HtmlControls.HtmlInputHidden selection;
Using the String Builder Class
String concatenation is one of the most expensive operations that you can do on the server. Personal experience has shown that almost 80 percent of the CPU can be used while building a large string in a for loop while reading through a Recordset—let’s just say that it’s not a best practice. For you ASP writers, if you are using JavaScript, use an array and dynamically add to the array, when you are done call array.join(‘’) or array.toString(). For you VBScript writers, the solution is less clear, but dynamic arrays are definitely a headache (best of luck.) So how do you do it with .NET? .NET has a class specifically designed for this:The StringBuilder class. In order to use the StringBuilder class, you must include a reference to System.Text.This is how it would look in our code-behind page:
Using System.Text;
.
.
StringBuilder Sb = new StringBuilder();
Sb.Append("stuff to concatenate ");
Sb.Append("more stuff to concatenate");
Response.Write( Sb.toString() );
The result would be this:
stuff to concatenate more stuff to concatenate
In board.aspx.cs, the message and response data is returned as one long XML formatted string split up over multiple rows in a DataTable.The following code loops through the columns and rows of the DataTable while concatenating one large string.The string is then loaded into an XmlDocument object for later processing:
www.syngress.com
548Chapter 10 • ASP.NET
#//create an instance of our dataaccess object dbMethod = new mb.components.mbdataaccess();
DataTable result = dbMethod.getAllMess( boardID ); #//create an instance of the string builder object
StringBuilder xstr = new StringBuilder();
xstr.Append("<messages>");
for( int i=0; i < result.Rows.Count; i++)
{
for(int j=0; j < result.Columns.Count; j++)
{
xstr.Append( result.Rows[i][j]);
}
}
xstr.Append("</messages>");
#//load the resulting string into the DOM messagedoc.LoadXml( xstr.ToString() );
The resulting XML should look something like Figure 10.20.
Figure 10.20 Sample XML Data Result
www.syngress.com

ASP.NET • Chapter 10 |
549 |
The XML data was created using the MS SQL FOR XML AUTO clause.The table column headers become attribute names within an XML element; in this case, the element name chosen by SQL was m. Notice also that all responses to any given message become a child element with the name r.You could have chosen to convert the attributes into actual elements themselves by using FOR XML AUTO, ELEMENTS instead, however, the structure is what matters, and what you have will work fine.
The XSLT for this XML data set is a little longer, but the level of complexity is about the same as those shown earlier in the chapter.The XSLT renders HTML that is tied to the classes in messageBoard.css, along with client-side JavaScripts that enable selection, as well as expand and collapse capabilities.You can find the XSLT, message_board_list.xslt, on the disk.You can find all the code necessary to build this project on the CD.
Building a Shopping Cart with SQL
In ASP 3.0, the Session and Application objects suffered from severe limitations, including data loss with server crashes and the inability to maintain state across servers in server gardens and server farms. Unfortunately, some of these limitations still exist in ASP.NET. However, Session no longer loses data with server crashes and can work effectively across servers in server gardens and farms (MSDN recommends that developers avoid storing large amounts of data in a single Session variable). Application is still limited to one process, so it can be a limiting factor when addressing scalability.
So what does it all mean? It means that you have to balance your server resources and make tradeoffs. Using an Application variable to store a large static dataset is efficient; from the data server view there is only one read, all subsequent requests for data would come from an in-process object rather than the database. This would also increase page performance for the same reason; however, this does use more IIS resources. On the other hand, the Application object does not work across multiple servers; to enable this scenario, you would increase database access, thus the load on the data server. MSDN also recommends using a database to store session information if the site wants to employ personalization or future data mining of persistent data gathered from tracking their users actions while on the site.
Each choice has limits and involves tradeoffs; for the sample application, you will be persisting the data in an Application-level variable, and you will be using Session variables to maintain state in some instances.You need to be aware, however,
www.syngress.com
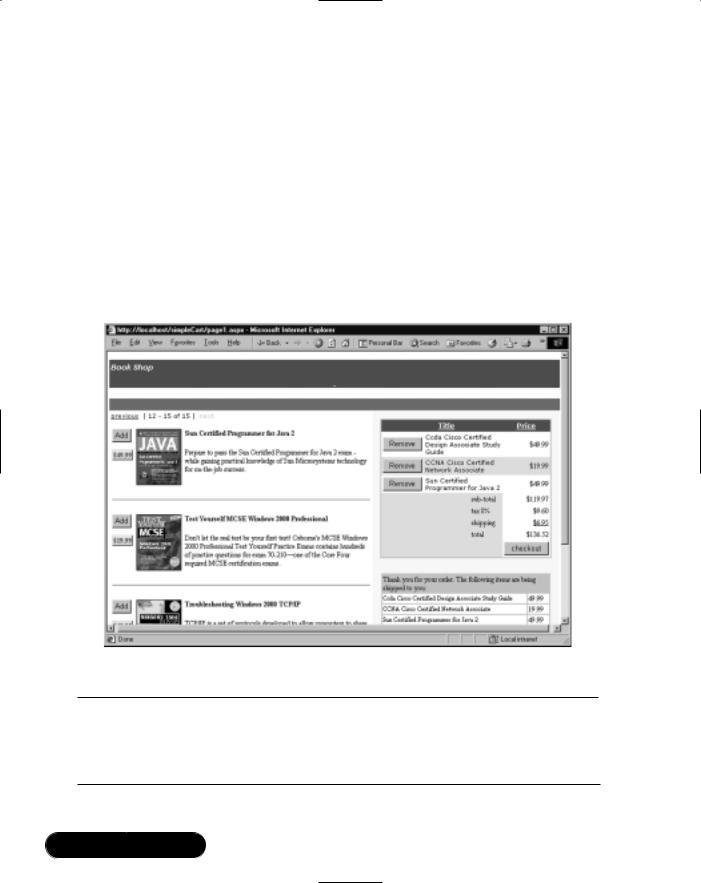
550 Chapter 10 • ASP.NET
that you can use other approaches to solve this problem, including solutions that do not use Application or Session.
In this section, you will build a shopping cart (see the UI in Figure 10.21). The SimpleCart application will contain a catalog of items that can be displayed five at a time (Item [1] in Table 10.9), the user will be able to move forward and back through the catalog (Item [2]). Users will have the ability to select items from the catalog and add it to their shopping carts (Item [3]). Users will also have the ability to view (Item [4]) the contents of their shopping carts, remove items, clear their carts, or check out.To see a mapping of these requirements to the corresponding pages and methods, see Table 10.9.You can find all the code for this project on the CD—see the page column of Table 10.9 for the filenames.
Figure 10.21 SimpleCart UI
Table 10.9 SimpleCart Processes Overview
Process |
Dependency |
Function |
Page |
|
|
|
|
Display Catalog |
Stored Procedure |
Returns list of |
Page1.aspx |
|
(sproc): |
all books [1] |
|
|
getAllBooks |
|
|
Continued
www.syngress.com
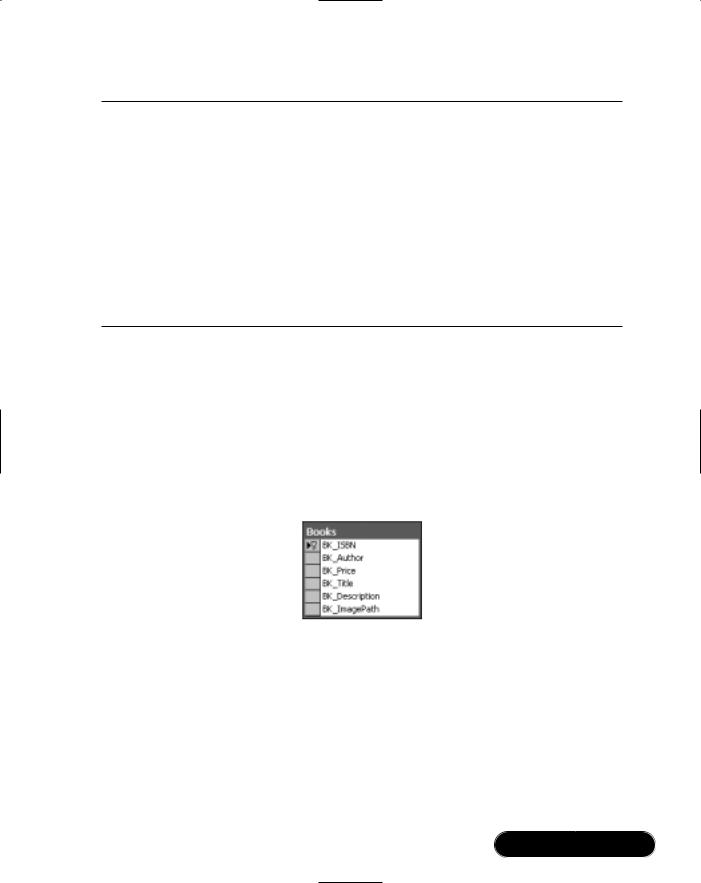
ASP.NET • Chapter 10 |
551 |
Table 10.9 Continued
Process |
Dependency |
Function |
Page |
|
|
|
|
|
Component class |
Handles data inter- |
Dataaccess.cs |
|
|
action with SQL [1] |
|
|
Component class |
Handles all catalog |
Catalog.cs |
|
|
interaction [1] [2] |
|
|
XSLT for catalog |
Converts data to |
Catalog.xslt |
|
data |
HTML [1] |
|
Display Cart |
Component class |
Handles all cart |
XmlShoppingCart.cs |
|
|
interaction [3] |
|
|
XSLT for cart data |
Converts data to |
Cart.xslt |
|
|
HTML [4] |
|
Notice the simple schema for this project (see Figure 10.22). It also has only one stored procedure that returns all books.You will examine the three components in the following sections:
■dataaccess.cs
■XmlShoppingCart.cs
■catalog.cs
Figure 10.22 Database Schema for SimpleCart
Creating dataaccess.cs
The dataaccess.cs file is a simple component that contains only one method— getAllBooks().This method contains all the logic necessary to call the stored procedure, retrieve all books, and return a DataSet. You can find this file in its entirety on the CD (see dataaccess.cs in the Components folder of the application):
using System;
using System.Collections;
using System.ComponentModel;
www.syngress.com

552 Chapter 10 • ASP.NET
using System.Diagnostics;
You will need to add these two namespaces to the file to provide data access functionality:
using System.Data;
using System.Data.SqlClient;
namespace simpleCart.components
{
public class dataaccess
{
Set the connection string to connect to the SQL data store:
private string connection = "Persist Security Info=False;
User ID=[user name]; password=[password];
Initial Catalog=shopDb;Data Source=[server name]";
Create the method getAllBooks; this method will connect to the database and call the stored procedure GetAllBooks:
public DataSet getAllBooks()
{
SqlConnection conn =
new SqlConnection ( this.connection ) ;
conn.Open ( ) ;
Create the command object to reference the stored procedure:
SqlCommand cmd =
new SqlCommand ( "GetAllBooks" , conn ) ;
cmd.CommandType = CommandType.StoredProcedure;
Here you will use the SQL data adapter so that you can retrieve the data returned by getAllBooks and store it in a DataSet:
SqlDataAdapter da = new SqlDataAdapter (cmd) ;
DataSet ds = new DataSet ( ) ;
da.Fill ( ds , "Books" ) ;
www.syngress.com

ASP.NET • Chapter 10 |
553 |
Next, close the connection to the database and return the resulting DataSet:
conn.Close();
return ds;
}
}
}
In this section, you created the component that you will use to retrieve the data from the database in a dataset. In the next section, you will create the component that will function as the shopping cart.
Creating XmlShoppingCart.cs
This component is a wrapper component for XML. It provides add, remove, view, and clear functionality.The only catch is that items added to the cart must be XmlNodes from Catalog or must adhere to the same document structure.You can find this file in its entirety on the CD (see XmlShoppingCart.cs in the components folder of the application):
using System;
Add support for XML by including the XML namespace:
using System.Xml;
namespace simpleCart.components
{
Define the shopping cart class:
public class xmlShoppingCart
{
private XmlDocument myCart;
private string elementType;
This initializes the cart. On page_ load, the cart can be initialized with an existing xmlCart string.This enables client caching of the cart:
public void initCart(string dataSource, string elementType)
{
this.elementType = elementType;
myCart = new XmlDocument();
www.syngress.com

554 Chapter 10 • ASP.NET
if( dataSource != null )
{
myCart.LoadXml(dataSource);
}
else
{
//load default cart root
myCart.LoadXml("<shopcart-items></shopcart-items>");
}
}
This method handles adding an item to the cart by importing the node from the catalog XML data:
public string addItem2Cart( XmlDocument item )
{
try
{
XmlNode newItem = myCart.ImportNode(item.DocumentElement.FirstChild, true); myCart.DocumentElement.AppendChild(newItem);
return "Success";
}
catch(Exception e)
{
return e.ToString();
}
}
This method removes an item from the cart based on its ID value using the removeChild method of the XML DOM object:
public string removeItemFromCart(string idvalue,
string attributename )
{
// example: XmlNode curnode = //myCart.SelectSingleNode("//Books[isbn='0012-456-789x']"); string XPathQuery = "//" + this.elementType + "[" +
www.syngress.com

ASP.NET • Chapter 10 |
555 |
attributename + "='" + idvalue + "']"; XmlNode curnode = myCart.SelectSingleNode(XPathQuery);
try
{
myCart.DocumentElement.RemoveChild( curnode ); return "Success";
}
catch(Exception e)
{
return e.ToString();
}
}
This method empties the cart by removing all the child nodes:
public void clearCart()
{
XmlElement root = myCart.DocumentElement; root.RemoveAll(); //removes all child nodes
}
This method returns the current contents of the cart as an XML DOM object:
public XmlDocument getCartDescription()
{
return myCart;
}
This method returns the current contents of the cart as an XML formatted string:
public string getCartDescriptionString()
{
return myCart.OuterXml;
}
}
}
www.syngress.com
556 Chapter 10 • ASP.NET
So far, you have built the component that gets the data from the database and the component that handles the cart operations. Next, you will create the object that handles displaying the catalog incrementally: catalog.cs.
Creating catalog.cs
This is the largest and most complex of the components. On initialize, it loads and stores a DataSet object. Catalog adds a new table to the DataSet, which contains metadata. Catalog is able to return the data as XmlDocuments by range.You can find this file in its entirety on the CD (see catalog.cs in the Components folder of the application).
This class makes extensive use of DataSet operations.You will look at creating
DataRows, DataTables, DataViews, and DataSets.You will also look at creating new
DataSets based on the results of filtering your primary dataset:
using System;
You will need to add the Data namespace in order to make use of the DataSet and its related object:
using System.Data;
namespace simpleCart.components
{
///<summary>
///bookCatalog acts as cached datasource.
///Enables retrieval of data in data ranges
///</summary>
Here you begin creating the catalog object:
public class bookCatalog
{
private DataSet dsAllBooks;
///<summary>
///Initalizes bookCatalog by reading in a dataset
///</summary>
///<param name="ds"></param>
www.syngress.com

ASP.NET • Chapter 10 |
557 |
First, load all the data returned by SQL into your Catalog object, this will enable you to filter the data and return the appropriate subset:
public void initCatalog(DataSet ds )
{
dsAllBooks = ds;
int recordCount = dsAllBooks.Tables[0].Rows.Count; try
{
dsAllBooks.Tables.Add(
createSummaryTable(0, recordCount-1, recordCount) );
}
catch(Exception e)
{
string temp = e.ToString();
//this fails when attempting to add the table twice
}
}
///<summary>
///Creates a table that is added to the DataSet.
///This table contains some metadata
///about the dataset returned.
///</summary>
///<param name="startPos"></param>
///<param name="range"></param>
///<param name="RecordCount"></param>
///<returns>Returns a DataTable containing Metadata</returns>
This method takes metadata about the entire dataset and adds it to a new DataTable: dtSummary.This DataTable is used by other methods of this object/class:
private DataTable createSummaryTable(int startPos, int range,
int RecordCount)
{
www.syngress.com
558 Chapter 10 • ASP.NET
Create the new table:
DataTable dtSummary = new DataTable("Summary");
DataRow drSummary;
Add new columns to the table:
dtSummary.Columns.Add(
new DataColumn("RecordCount", typeof(int)));
dtSummary.Columns.Add(
new DataColumn("FirstItemIndex", typeof(int)));
dtSummary.Columns.Add(
new DataColumn("LastItemIndex", typeof(int)));
Create a new row and add the data to its columns:
drSummary = dtSummary.NewRow();
drSummary["RecordCount"] |
= RecordCount; |
drSummary["FirstItemIndex"] = startPos;
drSummary["LastItemIndex"] = startPos + range;
Add the new row to the new table:
dtSummary.Rows.Add( drSummary );
Return the new table containing the supplied data:
return dtSummary;
}
///<summary>
///This Method returns the input DataSet
///</summary>
///<returns>DataSet containing: DataTable books</returns> public DataSet catalog()
{
return dsAllBooks;
}
///<summary>
///Specialized interface to catalogRangeByCategory.
www.syngress.com

ASP.NET • Chapter 10 |
559 |
///This Method returns all the data for only the given book
///</summary>
///<param name="book_isbn"></param>
///<returns>DataSet containing: DataTable books
///& DataTable "Summary"</returns>
public DataSet catalogItemDetails( string book_isbn )
{
return catalogRangeByCategory( -1, -1, book_isbn);
}
///<summary>
///Specialized interface to catalogRangeByCategory.
///This Method returns all the books within the given range
///</summary>
///<param name="startPos"></param>
///<param name="range"></param>
///<returns></returns>
public DataSet catalogRange(int startPos, int range)
{
return catalogRangeByCategory( startPos, range, null);
}
This function filters the data by creating a new DataView. The resulting data is added to a new table; these new tables along with a new summary table are added to a new DataSet.This new DataSet is returned to the caller:
protected DataSet catalogRangeByCategory(int startPos, int range, string book_isbn)
{
DataSet |
dsBookRange; |
DataTable |
dtBooks; |
DataTable |
dtTemp; |
string |
strExpr; |
string |
strSort; |
DataRow[] |
foundRows; |
int |
endPos; |
www.syngress.com

560 Chapter 10 • ASP.NET
int |
RecordCount; |
DataViewRowState recState;
Create a local copy of the table Books:
dtTemp = dsAllBooks.Tables["Books"];
Copy the table structure of table Books into a new DataTable object:
dtBooks |
= dtTemp.Clone();//create Empty Books Table |
Create the appropriate data filter:
if( book_isbn != null)
{
//return a single item
strExpr = "isbn='" + book_isbn + "'";
}
else
{
strExpr = "";
}
strSort ="title";
recState = DataViewRowState.CurrentRows;
Filter the data storing the results in an array:
foundRows = dtTemp.Select(strExpr, strSort, recState);
Grab the appropriate range of the selected data:
RecordCount = foundRows.Length;
if( (startPos == -1) && (range == -1))
{
startPos = 0;
range = RecordCount;
}
if( (startPos + range) > RecordCount)
{
endPos = RecordCount;
}
www.syngress.com

ASP.NET • Chapter 10 |
561 |
else
{
endPos = startPos + range;
}
Fill the new DataTable with the selected data subset:
for(int i = startPos; i < endPos; i ++)
{
dtBooks.ImportRow( (DataRow)foundRows[i] );
}
Create a new DataSet and add the newly filled DataTable:
dsBookRange = new DataSet(); dsBookRange.Tables.Add(dtBooks );
Add a summary table to the new DataSet:
// add a summary table to the dataset dsBookRange.Tables.Add(
createSummaryTable( startPos, range, RecordCount) );
Return the newly created DataSet:
return dsBookRange;
}
}
}
If you look closely at the method catalogRangeByCategory, you will get a glimmer of how powerful DataSets are.The DataSet is the successor to the ADO 2.6 Recordset object; it can actually store the entire structure of a multitable relational database and all its data.You can perform query and filter operations on it almost like a real relational database. It is also one of a few data types that can be sent to and from Web Services.
When the data source doesn’t change often and is used primarily as readonly, it makes sense to cache the data in a DataSet at the application level.What does that mean? The Application_Start method within the Global.asax file is executed when the first user accesses the site; the application does not end until roughly 20 minutes after no user accesses the site.This scenario is depicted in
www.syngress.com
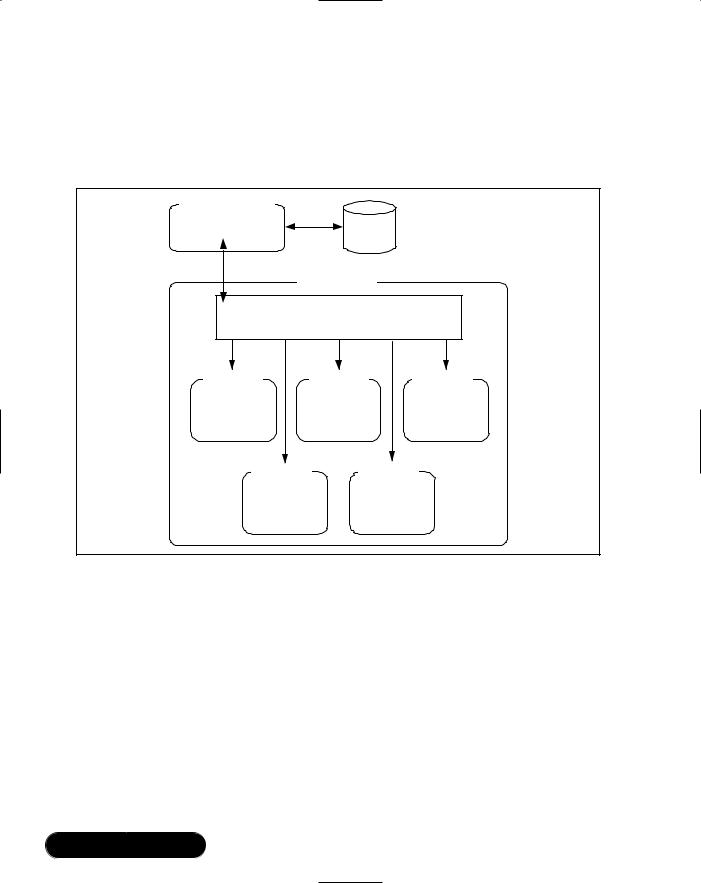
562 Chapter 10 • ASP.NET
Figure 10.23.The data source is accessed once during the application lifetime. The result is cached as a DataSet, and all instances of simpleCart that live during the application retrieve their data from the application variable DataSet,
Application[“catalog”].
Figure 10.23 Application Level Data Caching
DataAccess Component |
|
|
getAllBooks |
Data |
|
|
Application Scope |
|
onStart |
|
|
Application["catalog"] = (DataSet)getAllBooks |
|
|
Session Scope |
Session Scope |
Session Scope |
Instance of |
Instance of |
Instance of |
simpleCart |
simpleCart |
simpleCart |
Session Scope |
Session Scope |
|
Instance of |
Instance of |
|
simpleCart |
simpleCart |
|
You can set this up in the Global.asax file in the Application_start method:
protected void Application_Start(Object sender, EventArgs e)
{
simpleCart.components.dataaccess dbMethod; dbMethod = new simpleCart.components.dataaccess(); Application["catalog"] = dbMethod.getAllBooks();
}
Next, you will create the page that will host the controls: page1.aspx.To see an overview of what is accomplished on this page see Table 10.10.You can find the code for this page on the CD (Page1.aspx and Page1.aspx.cs).
www.syngress.com

ASP.NET • Chapter 10 |
563 |
Table 10.10 Page1 Overview
Web Form Page1.aspx |
Page1.aspx.cs |
|
|
|
|
|
|
|
|
<head> |
|
page_Load( ) |
|
|
<client-script |
functions/> |
{ |
|
|
</head> |
|
create instance |
of dataaccess, |
|
<body> |
|
catalog, and cart |
||
<form> |
|
show catalog |
|
|
<asp:Xml Catalog/> |
show cart |
|
|
|
<asp:Xml Cart/> |
case: add |
|
|
|
<asp:Label feedback/> |
update |
cart |
||
<hidden text |
server controls/> |
show |
cart |
|
</form> |
|
case: remove |
|
|
</body> |
|
update |
cart |
|
|
|
show |
cart |
|
|
|
case: checkout |
|
|
|
|
update |
cart |
|
|
|
show |
cart |
|
|
|
} |
|
|
show catalog( ) show cart ( )
In Page_Load, you create instances of catalog and cart:
dbMethod = new simpleCart.components.dataaccess(); BookList = new simpleCart.components.bookCatalog(); BookCart = new simpleCart.components.xmlShoppingCart();
showCatalog(); |
//initialize catalog |
showCart(); |
|
In Page1.aspx, you have a collection of hidden controls:
<div style="VISIBILITY: hidden">
<asp:textbox id="addItem" runat="server" AutoPostBack="True" />
<asp:TextBox id="removeItem" runat="server" AutoPostBack="True"/>
www.syngress.com

564 Chapter 10 • ASP.NET
<asp:textbox id="firstRecord" runat="server" AutoPostBack="True"/> <asp:textbox id="lastRecord" runat="server" AutoPostBack="True"/> <asp:textbox id="direction" runat="server" AutoPostBack="True" /> <asp:textbox id="recordCount" runat="server" AutoPostBack="True"/> <asp:TextBox id="Ready4Checkout" runat="server"
AutoPostBack="True"/>
</div>
OnLoad (in the browser), firstRecord, lastRecord, and recordCount TextBox values are populated by client-side JavaScript. As the user makes selections, the other fields are also populated by client-side JavaScript.Table 10.11 shows the relation of user actions on the values of these hidden fields.
Table 10.11 Effect of Client Events on Hidden Field Values
User Action |
Result |
Click Add AddItem.value is set to the books ID.
RemoveItem.value is cleared.
Form is submitted.
Click Next Direction.value is set to “next”.
Form is submitted.
Click Previous Direction.value is set to “previous”.
Form is submitted.
In showCatalog method, you check the values of these hidden fields to determine what range of data needs to be returned from the catalog object.This data is used as the document source in the XML control—catalog:
string prevNext = direction.Text; // "previous" or "next"
int totalRecords = int.Parse(recordCount.Text);
//number of records from previous load int prevFirst = int.Parse(firstRecord.Text);
//first record # from previous load
int prevLast = int.Parse(lastRecord.Text); // last record # from previous load
int range = prevLast - prevFirst;
www.syngress.com

ASP.NET • Chapter 10 |
565 |
switch(prevNext)
{
case "previous":
{
if(prevFirst <= range)
{
xstrBooklist = BookList.catalogRange(0,range).GetXml();
}
else
{
if( range != defaultRange ) range = defaultRange; xstrBooklist = BookList.catalogRange(
(prevFirst-range-1), range).GetXml();
}
}break;
case "next":
{
if( (prevLast + range) >= totalRecords)
{
int nextRange = totalRecords-prevLast-1; xstrBooklist = BookList.catalogRange(
prevLast+1, nextRange).GetXml();
}
else
{
if( range != defaultRange ) range = defaultRange; xstrBooklist = BookList.catalogRange(
prevLast+1, range).GetXml();
}
}break;
default: xstrBooklist = BookList.catalogRange(0,this.defaultRange).GetXml();
break;
}
www.syngress.com

566 Chapter 10 • ASP.NET
Load the result into an XmlDocument object; load the XSL/Transform file; set the properties of the asp:Xml control for rendering:
catalogContent.LoadXml( xstrBooklist ); catalogDisplay.Load( Server.MapPath("catalog.xslt") );
catalog.Document = catalogContent; catalog.Transform = catalogDisplay;
Figure 10.24 depicts an example of the XML source returned by BookList.
Figure 10.24 BookList Sample Data
You can find the XSLT used to transform the data on the CD (look for catalog.xslt) Figures 10.25 and Figure 10.26 show the HTML produced by catalog.xslt.
Figure 10.27 shows a cart containing three books. Note that the structure of the XML is almost identical to that shown in Figure 10.24.This is because Cart.addItem2Cart simply copies the node from the XML data source (catalog).
The XSLT for displaying the cart data is a bit more complex than some of the other XSLT shown; it displays the cart data in a table and performs math operations.The filename is cart.xslt—you can find it on the CD.
www.syngress.com

ASP.NET • Chapter 10 |
567 |
Figure 10.25 HTML Produced by catalog.xslt
Figure 10.26 HTML Produced by catalog.xslt and Rendered in IE6
Figure 10.27 Sample Cart Containing Three Books
www.syngress.com
568 Chapter 10 • ASP.NET
So how does cart work? Recall that you store the selected operation in hidden controls on the page. In ShowCart, you initialize the cart to the value of Session[“cart”].The first time the page loads, this Session variable is null.When you perform any operations, such as Add, Remove, or Clear, you update this Session variable so that the cart’s state is current:
private void Page_Load(object sender, System.EventArgs e)
{
BookList = new simpleCart.components.bookCatalog();
BookCart = new simpleCart.components.xmlShoppingCart();
showCatalog(); |
//initialize catalog |
showCart(); |
//initialize cart |
if( addItem.Text != null && addItem.Text !="" )
{
//add item isbn to cart
XmlDocument newBook = new XmlDocument(); newBook.LoadXml(
BookList.catalogItemDetails( (string)addItem.Text ).GetXml() );
BookCart.addItem2Cart(newBook);
//update Session variable that holds cart state Session["myShoppingCart"] = BookCart.getCartDescriptionString(); //rewrite cart to page
showCart();
}
if( removeItem.Text != null && removeItem.Text != "" )
{
//remove item isbn from cart BookCart.removeItemFromCart( removeItem.Text, "isbn" ); //update Session variable that holds cart state
Session["myShoppingCart"] = BookCart.getCartDescriptionString(); //rewrite cart to page
www.syngress.com

ASP.NET • Chapter 10 |
569 |
showCart();
}
if( Ready4Checkout.Text == "true")
{
//(1) code to login customer could go here //(2) code to process order could go here //(3) build the feedback table
XmlDocument myOrder = BookCart.getCartDescription();
StringBuilder feedback = new StringBuilder(); feedback.Append("<table border='1' cellspacing='0'
bordercolor='silver' width='300px' bgcolor='#ffffff' style='margin:3px'>" );
feedback.Append("<tr><td colspan=2 bgcolor='silver'>
Thank you for your order. The following items are being shipped to you:</td></tr>");
XmlNodeList Books = myOrder.SelectNodes("//Books"); for( int i=0; i < Books.Count; i++)
{
string title = Books.Item(i).SelectSingleNode("title").InnerText;
string price = Books.Item(i).SelectSingleNode("price").InnerText;
feedback.Append("<tr><td style='font-size:8pt'>"); feedback.Append(title); feedback.Append("</td><td>"); feedback.Append(price); feedback.Append("</td></tr>");
}
feedback.Append("</table>");
lblFeedBack.Text = feedback.ToString();
www.syngress.com

570 |
Chapter 10 • ASP.NET |
|
|
//(4) clear |
the cart |
|
BookCart.clearCart(); // empty virtual cart |
|
|
showCart(); |
// reinitialize the cart |
Session["myShoppingCart"] =
BookCart.getCartDescription().OuterXml;
// update server variable to prevent refilling of cart Ready4Checkout.Text = "false";
}
}
www.syngress.com

ASP.NET • Chapter 10 |
571 |
Summary
In this chapter, you have worked with the ASP.NET architecture,Web Forms, DataSets, and DataConnections with ADO.NET.You have worked with many of the ASP.NET UI controls, including: Button, TextBox, CheckBox, RadioButton, Label, and Xml.You have worked through examples using the ASP.NET validation controls, including the asp:RegularExpressionValidator and the asp:RequiredFieldValidator.You have also worked with numerous ASP.NET Server classes, including the following:
■System.Data Namespace ADO.NET DataSets and DataTables,
SqlCommand, SqlDataAdapter
■System.Web.Mail namespace SmtpMail
■System.Xml namespace XmlDocument, XmlAtrribute, XmlNode
■System.Text namespace StringBuilder
■System.IO namespace StreamWriter
By examining real-world examples, you can see the potential of ASP.NET and the .NET Framework as viable solutions architecture. ASP.NET will take Web development and Web applications programming to a new level, providing a robust and scalable multideveloper platform.
Solutions Fast Track
Introducing the ASP.NET Architecture
;ASP.NET architecture enables rapid prototyping of cross-platform scalable applications.
;A Web client requests a Web Form (ASPX) resource that is delivered through IIS combining all additional resources, which may include a database,Web Service, COM component, or a component class. All of these are delivered through a compiled assembly (DLL) from the Web application.
;Each of the page types (ASPX, ASCX, ASMX, and ASAX) can have a code-behind page where program logic can be stored.
www.syngress.com

572Chapter 10 • ASP.NET
;You can set sessionand application-level variables within the Global.asax page, in the Application_Start and Session_Start methods.You can run the Global.asax file across a Web farm of servers.
Working with Web Forms
;Web Forms (ASPX pages) are the replacement for ASP pages in ASP.NET.
;All controls and UI functionality will be placed within Web Forms.
;Web Forms inherit all the methods and properties of the Page class, which belongs to the System.Web.UI namespace.
;You can add three main sets of controls to your Web Form: HTML server controls,Web server controls, and validation controls.
Working with ADO.NET
;ADO.NET is a worthy successor to ADO 2.6; it contains all the features of its predecessor but with built-in support for XML.
;ADO.NET DataSets can cache an entire SQL database structure, including relations and constraints along with data.You can store DataSets at session or application level, reducing the load from the database server.
;ADO.NET DataSets are one of the few complex objects that you can pass to and from Web Services because they can be represented as an XML file with an embedded XSD schema.
www.syngress.com
ASP.NET • Chapter 10 |
573 |
Frequently Asked Questions
The following Frequently Asked Questions, answered by the authors of this book, are designed to both measure your understanding of the concepts presented in this chapter and to assist you with real-life implementation of these concepts. To have your questions about this chapter answered by the author, browse to www.syngress.com/solutions and click on the “Ask the Author” form.
Q: How do I set up my project to load only Flow Layout instead of Grid?
A:In your Solution Explorer, select the menu option Properties; when the solution is highlighted, select Environment and then choose Flow Layout.
Q: Can I set up VS.NET to display in Netscape?
A:Yes, in the same Properties window for the solution, select Script for Netscape 3.0.
Q:When I deploy my ASP.NET project, I do not see any of the .cs code-behind pages, why is that?
A:They are compiled into the DLL and stored in the bin directory of the Web root.
Q: I want to turn off word complete in my text editor, is that possible?
A:Yes—choose Tools | Options | Text editors | HTML; you will be able to uncheck that option in the dialog box.
Q:Why must I use the SQLClient class when working with SQL as opposed to using the OLEDB class?
A:The SQL class has been optimized to work with SQL Server to provide performance gains over the OLE DB.
www.syngress.com