Chapter 5
Network
Programming:
Using TCP and UDP
Protocols
Solutions in this chapter:
■Introducing Networking and Sockets
■Example TCP Command Transmission and Processing
■Example UDP Command Transmission and Processing
■Creating a News Ticker Using UDP Multicasting
■Creating a UDP Client Server Chat Application
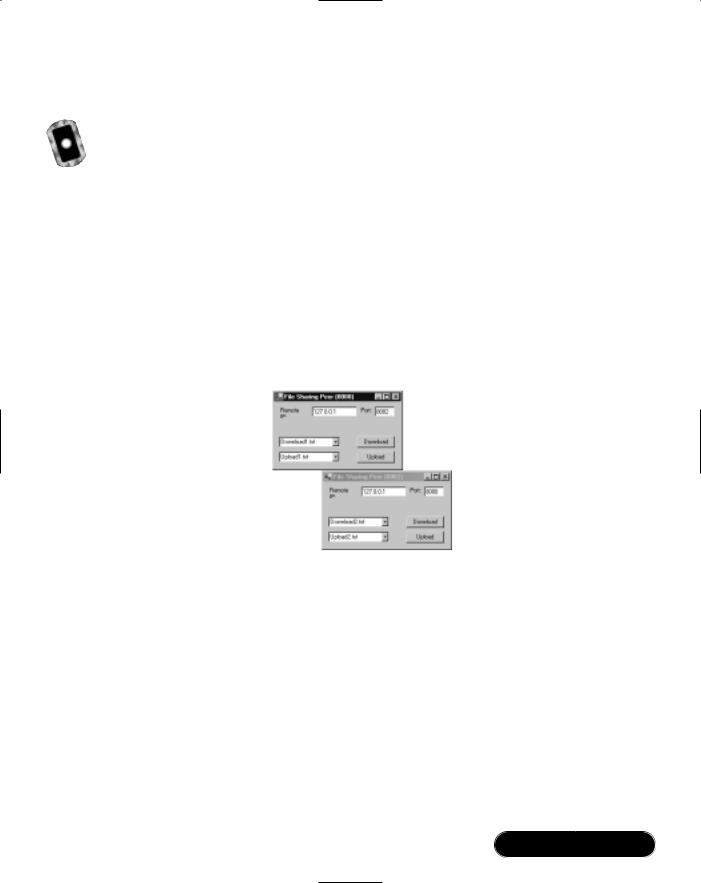
■Creating a TCP P2P File Sharing Application
■Access to Web-Resources
;Summary
;Solutions Fast Track
;Frequently Asked Questions
203

204 Chapter 5 • Network Programming: Using TCP and UDP Protocols
Introduction
Networking can be defined, in a general sense, as inter-process communication.Two or more processes (such as applications) communicate with each other.The processes can run on the same or different computers or other physical devices. Connections between the network nodes are made mostly by a wire (such as local area network [LAN], wide area network [WAN], and Internet); by wireless via radio frequencies (such as cell phone, wireless appliances, wireless LAN, Internet, and Bluetooth); or by infrared (IR) light (such as a cell phone to a laptop).
In this chapter, we cover the basics of networking and how it is accomplished with C#.We start out with some theory, covering a little bit about the history of networking and the Internet and sockets; then we discuss commonly used protocols such as the Transmission Control Protocol (TCP) and User Datagram Protocol (UDP). Subsequently, we have a look at ports and their uses.The last point of theory is to get to know the .NET classes we use.
Keeping theory in mind, we then go into practice. First, we develop some very simple communication examples using TCP and UDP.Then we develop a multicast news ticker.We have a look at a chat server and client, where we combine the learned techniques. After all the client/server-applications, we develop a P2P file sharing system, and finally, we show how you can use special .NET classes that encapsulate the networking.
Introducing Networking and Sockets
In the sixties, researchers of the Advanced Research Projects Agency (ARPA) in the U.S. were requested by the Department of Defense (DoD) to develop a system for saving information military important in case of a war.The result of their work was an electronic network—the ARPAnet. Military information was stored on all computers that were part of the network.The computers were installed in different places far away from each other and information was exchanged in several different ways. New or updated data on the computers was to be synchronized in a very short time so that in case of the destruction of one or more computers, no data would be lost.
In the 1970s, the DoD allowed nonmilitary research institutes to access the ARPAnet.The researchers were more interested in the connected computers than in synchronizing data.They used it for exchanging information, and students at these institutes used a part of the network as a blackboard for communicating with each other—this was the beginning of Usenet.
www.syngress.com

Network Programming: Using TCP and UDP Protocols • Chapter 5 |
205 |
In the 1980s, the military and civil parts of the ARPAnet were divided. In other countries, similar activities led to national networks.At the end of the 1980s, most of the national networks became connected to each other.The Internet was born.
It was necessary to have a standardized way to communicate over different types of networks and with different kinds of computers. So TCP/Internet Protocol (TCP/IP), which was developed by ARPA, became a worldwide standard.
TCP/IP is a “protocol family” that allows connected computers to communicate and share resources across a network. (TCP and IP are only two of the protocols in this family, but they are the most widely recognized. Other protocols in this set include UDP.) For all protocols provided by .NET, have a look at the
.NET reference documentation (class System.Net.Sockets.Socket).
To access IP-based networks from an application, we need sockets. A socket is a programming interface and communication endpoint that can be used for connecting to other computers, sending and receiving data from them. Sockets were introduced in Berkeley Unix, which is why sockets are often called Berkeley Sockets. Figure 5.1 shows the general architecture of IP-based communication.
Figure 5.1 General Communication Architecture
Computer |
Application |
Socket |
Computer |
Application |
Socket |
Generally, three types of sockets exist:
■Raw sockets This type is implemented on the network layer (see Figure 5.2). An example for a protocol on this layer is IP.
■Datagram sockets Datagrams are packets of data.This type of sockets is implemented on the transport layer (see Figure 5.2). However, the assignment to a layer is not strict, because, for instance, IP is also data- gram-oriented.We go more in detail on this type of sockets later in this section.
■ Stream sockets In contrast to datagram sockets, these sockets provide a stream of data.We go into more detail on this type of sockets later in this section.
www.syngress.com
206 Chapter 5 • Network Programming: Using TCP and UDP Protocols
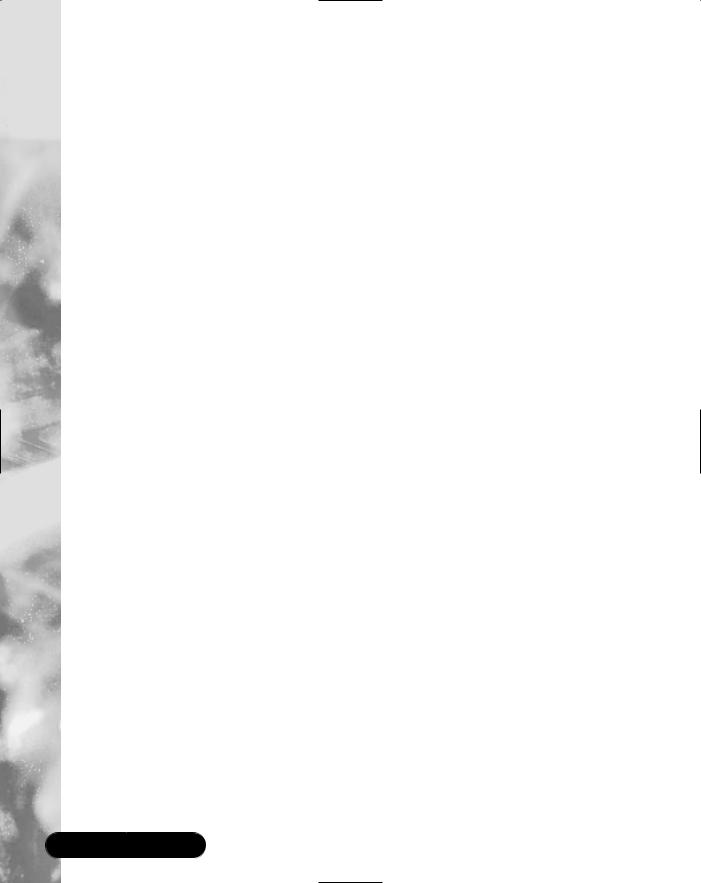
Figure 5.2 Communication Protocol Stack
Application Layer
(HTTP, FTP, ...)
Transport Layer
(TCP, UDP, ...)
Network Layer
(IP, ...)
Physical Layer
(Ethernet, ...)
Modern communication architectures use a stack of different protocol layers where data is given to the top layer. Each layer is adding layer-specific protocol information to the data and then it is given to the next layer.The lowest layer is sending the data to another process running on another computer (or maybe the same computer) where the data goes up in the same stack of layers. Each layer removes the protocol-specific information until the application layer is reached. Figure 5.2 shows such a stack.
The application layer can be divided into sublayers.You may think of an application using the XML-based Simple Object Access Protocol (SOAP) using the Hypertext Transfer Protocol (HTTP) for sending SOAP commands in XML. This is called HTTP tunneling and is used especially with firewalls, so that the firewalls do not have to be reconfigured for passing through SOAP.
Introduction to TCP
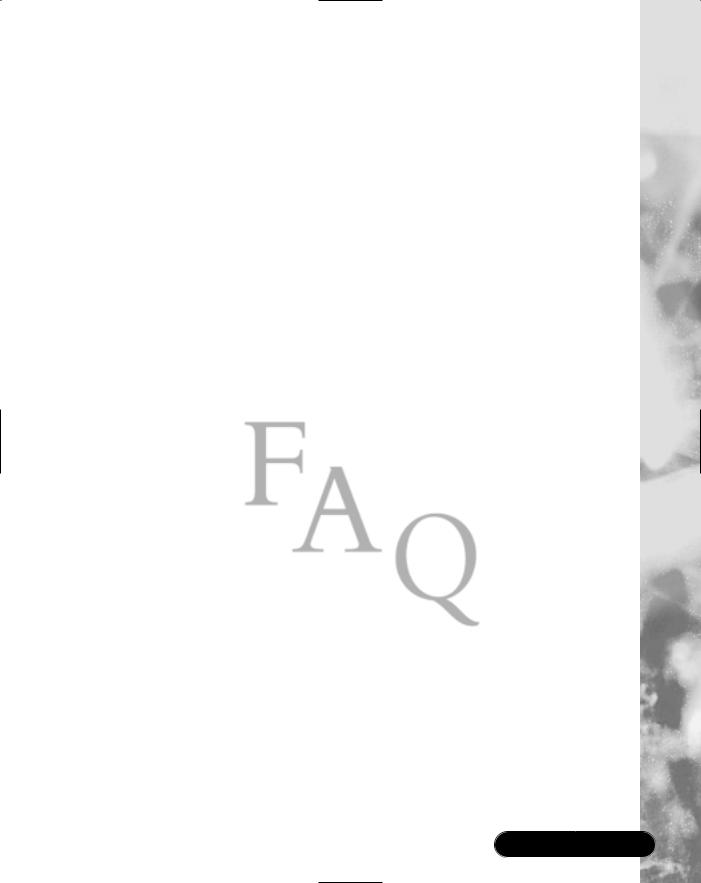
The Transmission Control Protocol is a connectionand stream-oriented, reliable point-to-point protocol.TCP communication is analogous to a phone call.You (the client) may want to talk with your aunt (the server).You establish a connection by dialing the number of your aunt’s phone (point-to-point).This is shown in Figure 5.3.
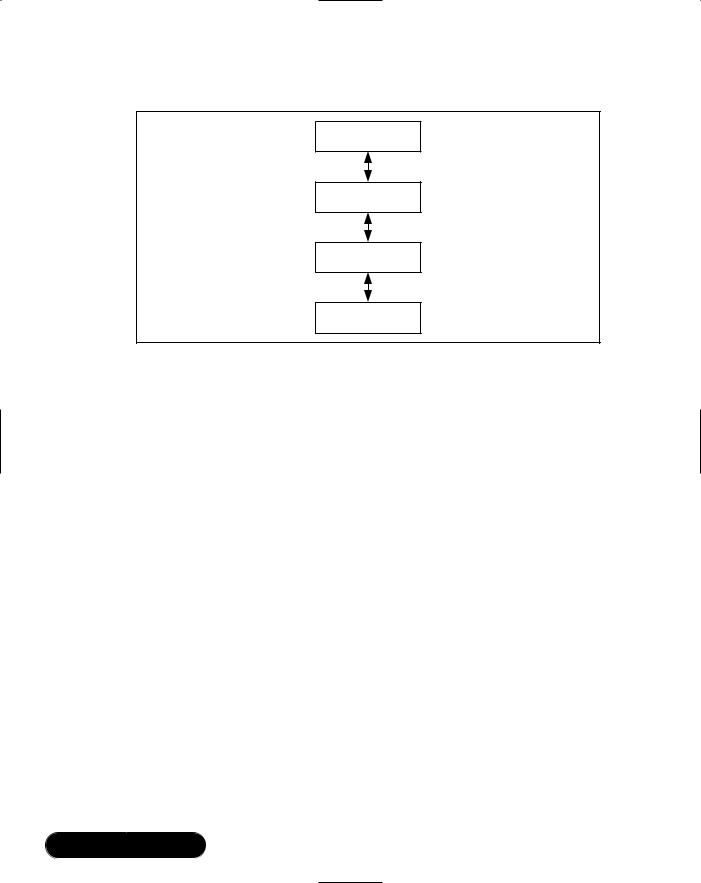
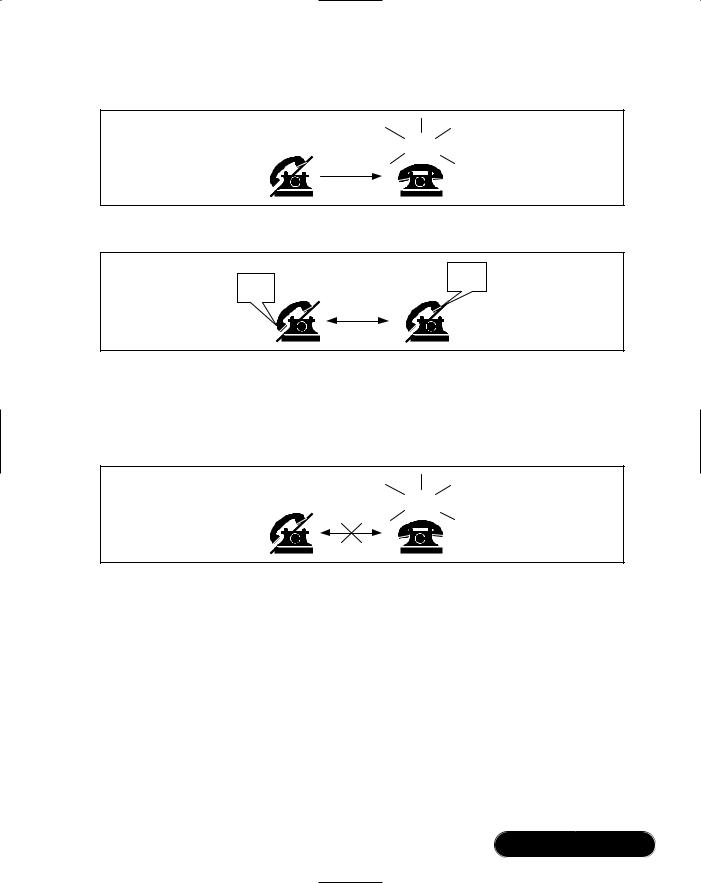
If your aunt is at home, she will pick up her phone and talk to you (see Figure 5.4).The phone company guarantees that the words you and your aunt are speaking are sent to the other end and in the same order (reliability). As long as you are on the phone, you can speak continuously (stream-oriented).
www.syngress.com
Network Programming: Using TCP and UDP Protocols • Chapter 5 |
207 |
Figure 5.3 Calling Your Aunt (Point-to-Point Connection)
RING
RING
Figure 5.4 Talking to Your Aunt (Reliability and Stream-Orientation)
"Hello "Hello Aunt!" Aunt!"
The connection will be established until you and your aunt are finished with your conversation (connection-oriented). See Figure 5.5 for an example of disconnecting.
Figure 5.5 Aunt Hangs Up (Connection-Orientation)
CLICK
TCP uses IP as its network protocol. IP is datagram-oriented and a best-effort protocol.As mentioned before, datagrams are packets of data. Best-effort means that datagrams are sent without the guarantee of delivery and correct order.
As we have seen,TCP is stream-oriented.TCP must simulate the streaming of data.Therefore, it is necessary that TCP controls the order and correct occurrence of the datagrams. If a datagram is corrupt or lost, it must be resent. If this does not function, an error is reported.TCP also implements a number of protocol timers to ensure synchronized communication.These timers also can be used to produce timeouts, if needed.
The advantage of TCP is its reliability—TCP is the base of most reliable protocols such as HTTP, File Transfer Protocol (FTP), or Telnet.Those protocols are needed if delivery and order of packets is important. For instance, if you send an
www.syngress.com
208 Chapter 5 • Network Programming: Using TCP and UDP Protocols
e-mail to your aunt starting with “Hello, Aunt,” first it must be delivered, and second, it should not be delivered as “Hlnt Aeluo.”The disadvantage to TCP is the loss of performance due to the administration overhead for handling the reliability. Figure 5.6 shows a sample stack of communication layers with HTTP.
Figure 5.6 HTTP Communication Layers Stack
|
Client |
|
|
|
|
|
|
|
|
|
|
|
|
|
|
|
|
|
Server |
|
|||
Application |
|
|
|
|
|
|
|
|
|
|
|
|
|
|
|
|
|
|
|
|
|
|
|
HTTP |
|
|
|
|
|
|
|
|
|
|
|
|
|
|
|
|
|
HTTP |
|
||||
Layer |
|
|
|
|
|
|
|
|
|
|
|
|
|
|
|
|
|
|
|||||
|
|
|
|
|
|
|
|
|
|
|
|
|
|
|
|
|
|
||||||
|
|
|
|
|
|
|
|
|
|
|
|
|
|
|
|
|
|
|
|
|
|
|
|
|
|
|
|
|
|
|
|
|
|
|
|
|
|
|
|
|
|
|
|
|
|
|
|
Transport |
|
|
|
|
|
Reliable |
|
|
|
||||||||||||||
|
|
|
|
||||||||||||||||||||
|
|
|
|
|
|
|
|
|
|
|
|
|
|
|
|
|
|
|
|
|
|
|
|
TCP |
|
|
|
|
|
|
|
|
|
|
|
|
|
|
|
|
|
TCP |
|
||||
Layer |
|
|
|
|
|
|
|
|
|
|
|
|
|
|
|
|
|
|
|||||
|
|
|
|
|
|
|
|
|
|
|
|
|
|
|
|
|
|
||||||
|
|
|
|
|
|
|
|
|
|
|
|
|
|
|
|
|
|
|
|
|
|
|
|
Network |
|
|
|
|
|
|
|
|
|
|
|
|
|
|
|
|
|
|
|
|
|
|
|
|
|
|
|
|
|
|
|
|
|
|
|
|
|
|
|
|
|
|
|
|
|
|
|
|
|
|
|
|
|
|
|
|
|
|
|
|
|
|
|
|
|
|
|
|
|
|
|
|
|
|
|
|
|
|
|
|
|
|
|
|
|
|
|
|
|
|
|
|
|
|
|
IP |
|
|
|
|
|
|
|
|
|
|
|
|
|
|
|
|
|
IP |
|
||||
Layer |
|
|
|
|
|
|
|
|
|
|
|
|
|
|
|
|
|
|
|||||
|
|
|
|
|
|
|
|
|
|
|
|
|
|
|
|
|
|
||||||
|
|
|
|
|
|
|
|
|
|
|
|
|
|
|
|
|
|
|
|
|
|
|
|
|
|
|
|
|
|
|
|
|
|
|
|
|
|
|
|
|
|
|
|
|
|
|
|
Physical |
|
|
|
|
Best Effort |
|
|
|
|||||||||||||||
|
|
|
|
||||||||||||||||||||
|
|
|
|
|
|
|
|
|
|
|
|
|
|
|
|
|
|
|
|
|
|
|
|
Ethernet |
|
|
|
|
|
|
|
|
|
|
|
|
|
|
|
|
|
Ethernet |
|
||||
Layer |
|
|
|
|
|
|
|
|
|
|
|
|
|
|
|
|
|
|
|||||
|
|
|
|
|
|
|
|
|
|
|
|
|
|
|
|
|
|
||||||
|
|
|
|
|
|
|
|
|
|
|
|
|
|
|
|
|
|
|
|
|
|
|
|
|
|
|
|
|
|
|
|
|
|
|
|
|
|
|
|
|
|
|
|
|
|
|
|
|
|
|
|
|
|
|
|
|
|
|
|
|
|
|
|
|
|
|
|
|
|
|
|
|
|
|
|
|
|
|
|
|
|
|
|
|
|
|
|
|
|
|
|
|
|
|
|
If reliability is not needed, you can choose the protocol UDP.We discuss this protocol in the next section.
Introduction to UDP
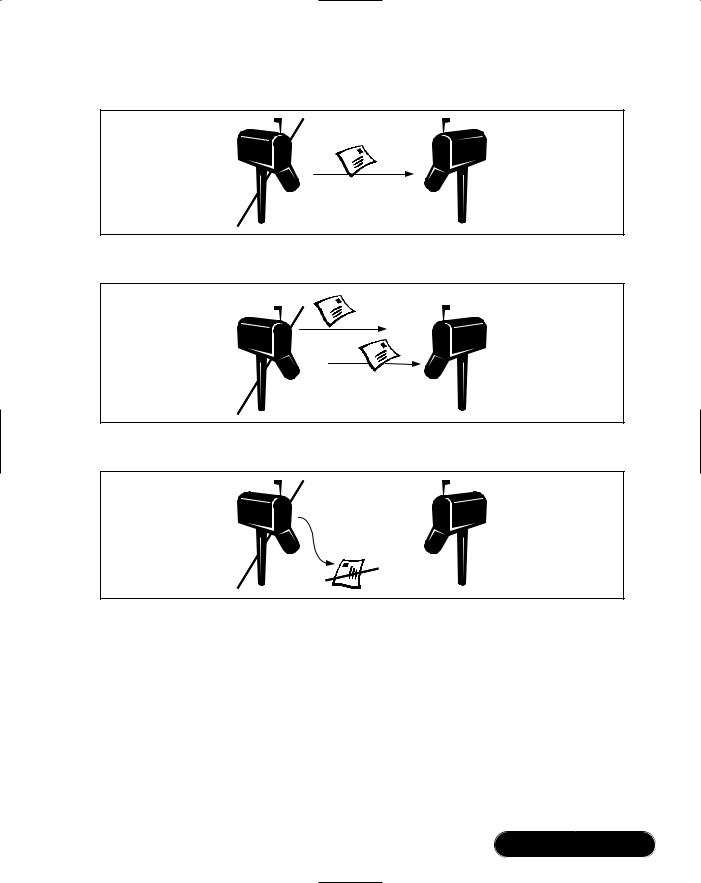
The User Datagram Protocol is a connection-less and datagram-oriented besteffort protocol. A UDP-communication is analogous to sending a letter.You (a peer) may want to send a letter to your aunt (another peer).You don’t have to hand-deliver the letter to your aunt—the post office delivers the letter (a datagram), and it delivers it as a whole entity, rather than delivering page by page (see Figure 5.7).
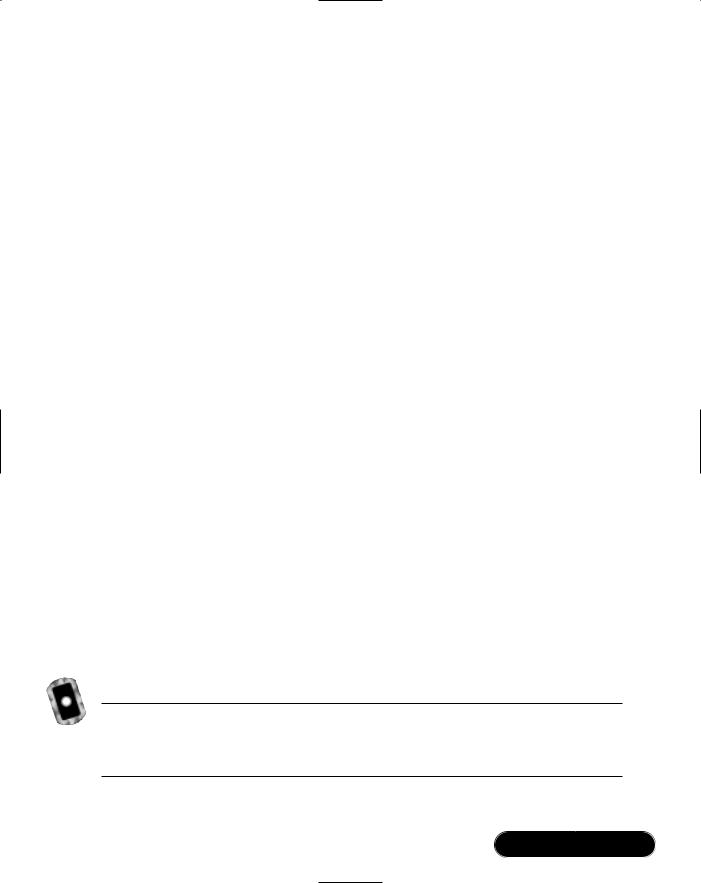
Sending a letter is mostly, but not always, reliable.The post office offers a best-effort service.They don’t guarantee an order in sending letters. If you send letter 1 today and send letter 2 tomorrow, your aunt may receive letter 2 before letter 1 arrives (see Figure 5.8).
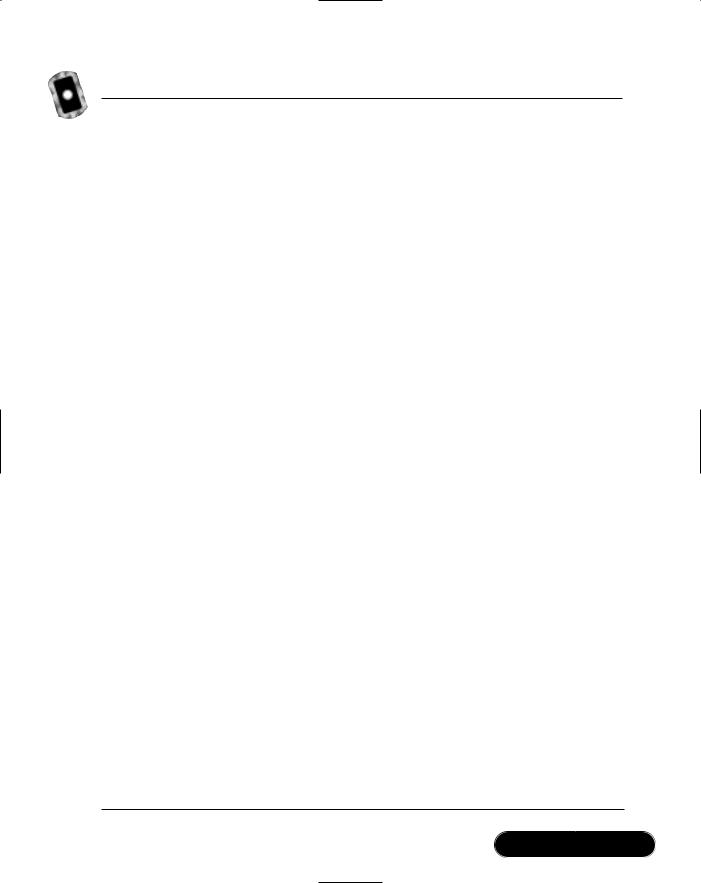
On the other hand, one of your letters may get lost.The post office doesn’t guarantee that a letter will be delivered (see Figure 5.9).
www.syngress.com
Network Programming: Using TCP and UDP Protocols • Chapter 5 |
209 |
Figure 5.7 Sending a Letter to Your Aunt (Whole Communication Delivery)
Figure 5.8 No Delivery Order Guaranteed
1
2
Figure 5.9 Loss of a Communication Is Possible
So why should you use such a protocol? For the following reasons:
■Performance UDP is faster than TCP because there is no administrative overhead to bring data in order or for resending lost packets. So it can be used for time-critical applications such as videoor audiostreaming.
■If your application doesn’t care about a lost packet. Consider a time server: If the server sends a packet and the packet is lost, it doesn’t make sense to resend it.The packet will be incorrect if the client receives it on the second try.
www.syngress.com

210Chapter 5 • Network Programming: Using TCP and UDP Protocols
■UDP causes less network traffic. UDP needs 8 bytes for protocol header information, whereas TCP needs 20 bytes. In times where we speak of gigabyte hard drives, 16 bytes doesn’t seem like it should be a problem, but think of the sum of all packets sent in global communica- tion—then 16 bytes becomes a very heavy weight.
■If your application needs a best-effort protocol for analyzing the network. For instance, the ping command is used to test communication between two computers or processes. It needs to know about lost or corrupt packets to determine the quality of the connection. It doesn’t make sense to use a reliable protocol for applications such as ping.
UDP is typically used for Domain Name System (DNS), Simple Network Management Protocol (SNMP), Internet telephony, or streaming multimedia.
Another advantage of UDP is in multicasting, which means that a number of processes can be grouped together by a special IP address (see Figure 5.10).The IP address must be in the range 224.0.0.1 to 239.255.255.255, inclusive. Every process contained in the group can send packets to all other processes of the group.
Figure 5.10 UDP Multicasting
Process 2
Process 1 |
Group |
Process |
3 |
|
IP |
||||
|
|
|
Process 4
No process of the group knows how many other processes the group contains. If one application wants to send data to the others, it has to send the data to the IP address of the group. On the protocol layer, no process is a specialized server.Your job is to define clients and servers if needed. For more details, see the section “Creating a News Ticker Using UDP Multicasting” later in this chapter.
The next section introduces ports. Ports are important for identifying applications running on a computer.
www.syngress.com

Network Programming: Using TCP and UDP Protocols • Chapter 5 |
211 |
NOTE
Many firewalls are configured not to allow UDP. Firewalls are used to permit unauthorized access from outside the firewall. Using UDP, the firewall cannot determine if a packet comes from inside or outside because no connection is made explicitly. Remember that TCP is connec- tion-oriented, as in a direction from the client to the server.
Introduction to Ports
Generally, a computer has a single connection to the network. If all data arrives through one connection, how can it be determined which application running on the computer receives the data? The answer is through the use of ports.
A port is a 16-bit number in the range or 0 to 65535.The port numbers 0 to 1023 are reserved for special services such as HTTP (port 80), Mail (port 25), and Telnet (port 23).
A connected application must be bound to at least one port. Binding means that a port is assigned to a socket used by an application.The application is registered with the system.All incoming packets that contain the port number of the application in the packet header are given to the application socket (see Figure 5.11).
Figure 5.11 Ports
Application 
 Port
Port
TCP
Application  Port or
  Port# Data
  Client
UDP
Datagram
Application 
 Port
Port
Please note that Figure 5.11 for TCP does not mean that only one socket can be bound to one port. If a socket is waiting on a port for an incoming connection, normally the port is blocked for other applications (“normally” means that this feature can be switched off—for more details, please have a look at the .NET reference documentation System.Net.Sockets.Socket.SetSocketOption() method). Let’s call a socket waiting on a connection to a server socket. If a connection is accepted by a server socket, it creates a new socket representing the connection.
www.syngress.com

212 Chapter 5 • Network Programming: Using TCP and UDP Protocols
Then, the server socket can wait for a new connection request. So, multiple clients can communicate concurrently over the same port.
An example for an application using this feature is a Web server. For instance, while a Web page you requested is loaded by the browser, you can use a second browser to request another page from the same server.The next sections introduce the most important .NET classes we use for our examples.
NOTE
In this book, we focus more on real-life examples than on theory. Because classes like the .NET Socket class are complex in use, we show
.NET classes that simplify the developing rather than the core networking classes.
System.Net Namespace
Whereas the namespace System.Net.Sockets provide classes for more basic networking functionality, the System.Net namespace contains classes that encapsulate these basics for easier access.The classes of System.Net are a simple programming interface for some protocols used for networking.
At the core of this namespace are the classes WebRequest and WebResponse. These abstract classes are the base for protocol implementations.Two protocols are pre-implemented: HTTP with HttpWebRequest (with corresponding HttpWebResponse) and file system access (request-URIs starting with file://”) with FileWebRequest (with corresponding FileWebResponse).The other classes are mostly helper-classes, such as IP addresses, authorization and permission classes, exceptions, and certificates.Table 5.1 shows the classes we use for our examples.
Table 5.1 System.Net Classes
Class Description
IPAddress Represents an IP address.
IPEndPoint Identifies a network endpoint. A network endpoint is an IP address and a port.
WebRequest Makes a request to a Uniform Resource Identifier (URI). This class is abstract and must be extended for the destination protocol.
Continued
www.syngress.com

Network Programming: Using TCP and UDP Protocols • Chapter 5 |
213 |
Table 5.1 Continued
Class Description
WebResponse Represents a response to a URI. This class is abstract and must be extended for the destination protocol.
WebProxy Identifies an HTTP proxy. It contains all proxy settings used by WebRequest.
System.Net.Sockets Namespace
As mentioned earlier in the chapter, the System.Net.Sockets namespace contains classes that provide basic networking functionality.The central class is Socket. As mentioned, a socket is the most basic programming interface for networking.We use most of the classes of this namespace for our example.Table 5.2 shows the class we use.
Table 5.2 System.Net.Sockets Classes
Class |
Description |
|
|
Socket |
Implements the Berkeley sockets programming interface. |
NetworkStream |
Allows easy access to data of stream sockets. |
TcpClient |
Provides a TCP client that can connect to a server socket. |
TcpListener |
Implements a TCP server socket listening for incoming |
|
connection-requests. |
UdpClient |
Provides a UDP peer with the possibility of multicasting. |
Enough theory—let’s go into practice.The next section describes a simple command transmission and processing using TCP.
NOTE
For simplifying the code, all examples presented in this chapter do
not contain any exception handling. (Refer to Chapter 2 for more information on exception handling.) Please have a look at the .NET class reference for each method which exceptions must be handled.
www.syngress.com

214 Chapter 5 • Network Programming: Using TCP and UDP Protocols
Example TCP Command
Transmission and Processing
The example in this section has a strict separation between the presentation layer and the functional layer.The presentation layer is the user interface (UI). In this example, you use a console application because you should focus first on communication and then concentrate on creating a good-looking UI.The functional layer is the part of the application that does all the work—for example, a business object for calculating something. Figure 5.12 shows the simplified architecture of the first example.
Figure 5.12 Example Architecture
Presentation Layer
1. Request |
2. Response |
|
Functional Layer
For the presentation layer, where the functionality is executed is unimportant. You can implement the functional layer within the same application, in another process on the same computer, or on another computer anywhere in a LAN or on the Internet.To make this architecture more flexible, you will add a command processor between the presentation and functional layers.The command processor is a standardized interface for the functional layer.The presentation layer is giving its requests in the form of commands to the processor.The processor is executing methods of the functional layer based on the commands. Finally, the command processor will take the results and give it back to the presentation layer. Figure 5.13 shows the extended architecture.
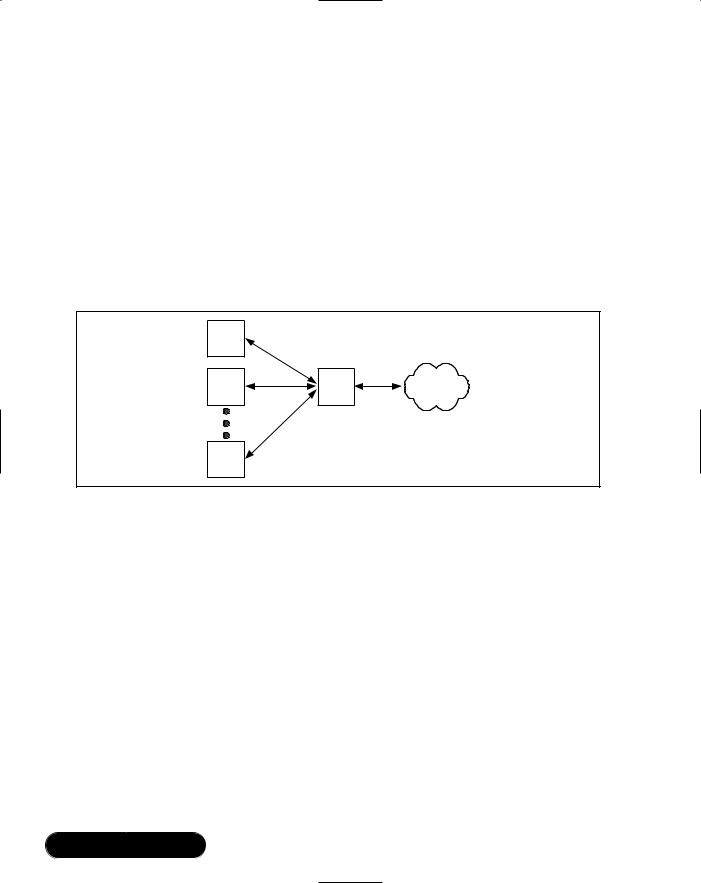
The command processor makes it simple to access the functional layer in various ways—either within the same application or via network communication on another computer. Figure 5.14 shows an example with a remote functional layer. The advantage of this model is that the presentation layer does not have to know where the functional layer is running. It just gives commands to the command processor and receives the result.
A typical example of such an architecture is a Web-browser-to-Web-server communication.You are typing in an URL in the address field of your browser.
www.syngress.com

Network Programming: Using TCP and UDP Protocols • Chapter 5 |
215 |
The browser is converting the URL to a GET request for a Web server and is sending the request to the Web server.The Web server analyzes the request and returns an HTML page to the browser.
Figure 5.13 Example Architecture with Command Processor
Presentation Layer
1. Request |
4. Response |
|
Command |
|
Processor |
2. Request |
3. Response |
Functional Layer
Figure 5.14 Example Architecture with Communication
|
|
|
|
|
|
|
|
|
|
|
|
|
|
|
|
|
Presentation Layer |
|
|
|
|
|
|
|
|||||
|
|
|
|
|
|
|
|
|
||||||
|
|
|
|
|
|
|
|
|
|
|
|
|
|
|
|
|
|
|
|
|
|
|
|
|
|
|
|||
|
1. Request |
10. Response |
|
|
|
|
|
|
||||||
|
|
|
|
|
|
|
|
|
|
|
|
|
|
|
|
|
|
|
|
|
|
|
|
|
|
|
|
|
|
|
|
|
Command |
|
|
|
|
|
|
|
|
|
||
|
|
|
|
|
|
|
|
Client |
|
|
||||
|
|
|
Processor |
|
|
|
|
|
|
|
||||
|
|
|
|
|
|
|
|
|
|
|
|
|||
|
|
|
|
|
|
|
|
|
|
|
|
|||
|
|
|
|
|
|
|
|
|
|
|
||||
|
2. Request |
9. |
Response |
|
|
|
|
|
|
|||||
|
|
|
|
|
|
|
|
|
|
|
|
|
|
|
|
|
|
|
|
|
|
|
|
|
|
|
|
|
|
|
|
|
Communication |
|
|
|
|
|
|
|
||||
|
|
|
|
|
Layer |
|
|
|
|
|
|
|
|
|
|
|
|
|
|
|
|
|
|
|
|
|
|
||
|
3. Request |
|
8. |
Response |
|
Network |
|
|||||||
|
|
|
|
|
|
|
|
|
|
|
|
|
|
|
|
|
|
|
|
|
|
|
|
|
|
|
|
|
|
|
|
|
Communication |
|
|
|
|
|
|
|
||||
|
|
|
|
|
Layer |
|
|
|
|
|
|
|
|
|
|
|
|
|
|
|
|
|
|
|
|
||||
|
4. Request |
7. |
Response |
|
|
|
|
|
|
|||||
|
|
|
|
|
|
|
|
|
|
|
|
|
|
|
|
|
|
|
|
|
|
|
|
|
|
|
|
||
|
|
|
Command |
|
|
|
|
|
|
|
|
|
||
|
|
|
|
|
|
|
|
Server |
|
|
||||
|
|
|
Processor |
|
|
|
|
|
|
|
||||
|
|
|
|
|
|
|
|
|
|
|
|
|||
|
|
|
|
|
|
|
|
|
|
|
|
|||
|
|
|
|
|
|
|
|
|
|
|
|
|
|
|
|
5. Request |
6. |
Response |
|
|
|
|
|
|
|||||
|
|
|
|
|
|
|
|
|
|
|
|
|
|
|
|
|
|
|
|
|
|
|
|
|
|
|
|||
|
|
|
Functional Layer |
|
|
|
|
|
|
|
||||
|
|
|
|
|
|
|
|
|
|
|||||
|
|
|
|
|
|
|
|
|
|
|
|
|
|
|
|
|
|
|
|
|
|
|
|
|
|
|
|
|
|
www.syngress.com

216 Chapter 5 • Network Programming: Using TCP and UDP Protocols
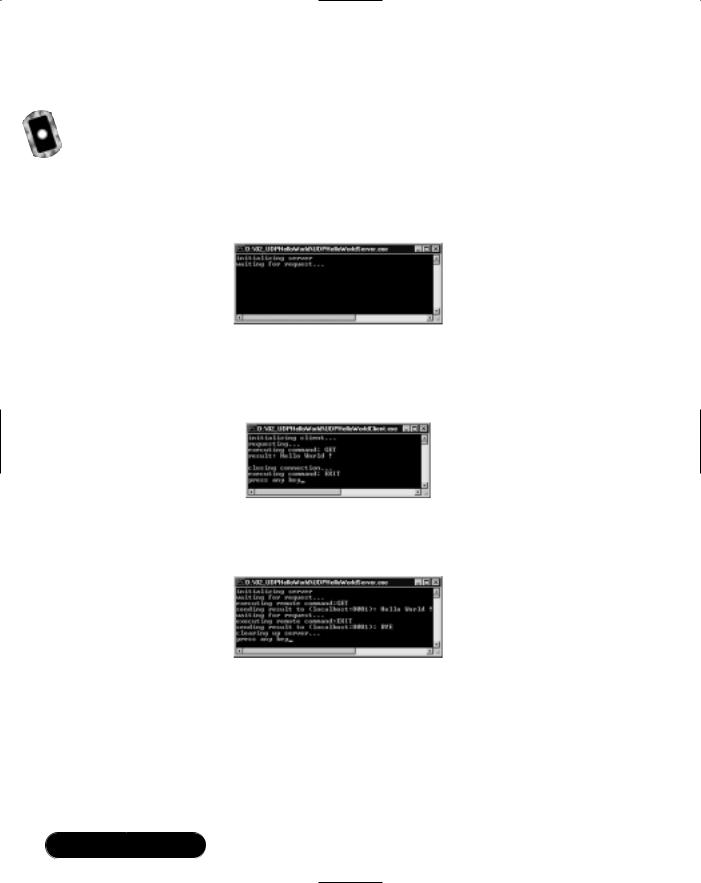
This example performs the same action in a very simplified form. A console client is sending a request to a server and the server returns “Hello World !” to the client.This example implements a simple communication protocol with two commands: GET and EXIT. A sample communication looks like this:
c: (establish tcp connection to the server) s: (accept connection)
c: GET<CRLF>
s: "Hello World !"<CRLF> c: EXIT<CRLF>
s: BYE<CRLF>
c: (close connection)
s:(close connection)
c:indicates the client and s: the server. <CRLF> means a carriage return followed by a line feed to indicate that the line is finished.This is commonly used with communication protocols such as HTTP or SMTP.
General Usage of Needed .NET Classes
You need two main network classes for this example. On the client side, you use System.Net.Sockets.TcpClient and on the server side it is System.Net.Sockets
.TcpListener.
Generally, on the client side a TcpClient connects to the server.Then you work with a stream given by the client on the connection. After all the work is done, you close the client:
//connect client to the server 127.0.0.1:8080 TcpClient client = new TcpClient ( "127.0.0.1", 8080 );
//get the network stream for reading and writing something
//to the network
NetworkStream ns = client.GetStream ();
//read/write something from/to the stream
//disconnect from server
client.Close ();
www.syngress.com
Network Programming: Using TCP and UDP Protocols • Chapter 5 |
217 |
The server side involves one more step, but generally the code looks like the client code.You bind a TcpListener on a local port.Then, if a client connects to the listener, you get a socket.With this socket, you create a stream. From this point on, the code is the same as on the client side:
//create a listener for incoming TCP connections on port 8080 TcpListener listener = new TcpListener ( 8080 ); listener.Start ();
//wait for and accept an incoming connection
Socket server = listener.AcceptSocket ();
//create a network stream for easier use NetworkStream ns = new NetworkStream ( server );
//read/write something from/to the stream
//disconnect from client
server.Close ();
After having a look at the general use of the networking classes, let’s go further in our first example.
The Server
Let’s start with the server.The class is called TCPHelloWorldServer.The source code of Figures 5.15 to 5.18 is included on the CD in a file named TCPHelloWorldServer.cs. For simplification, only the client has a command processor component. Later, we show examples where the server also has a processor. For the server (see Figures 5.15 to 5.18), you need the following namespaces; again, for simplification, the class has a Main() method only.
Figure 5.15 Needed Namespaces in TCPHelloWorldServer.cs
using System;
using System.IO;
using System.Net.Sockets;
www.syngress.com
218 Chapter 5 • Network Programming: Using TCP and UDP Protocols
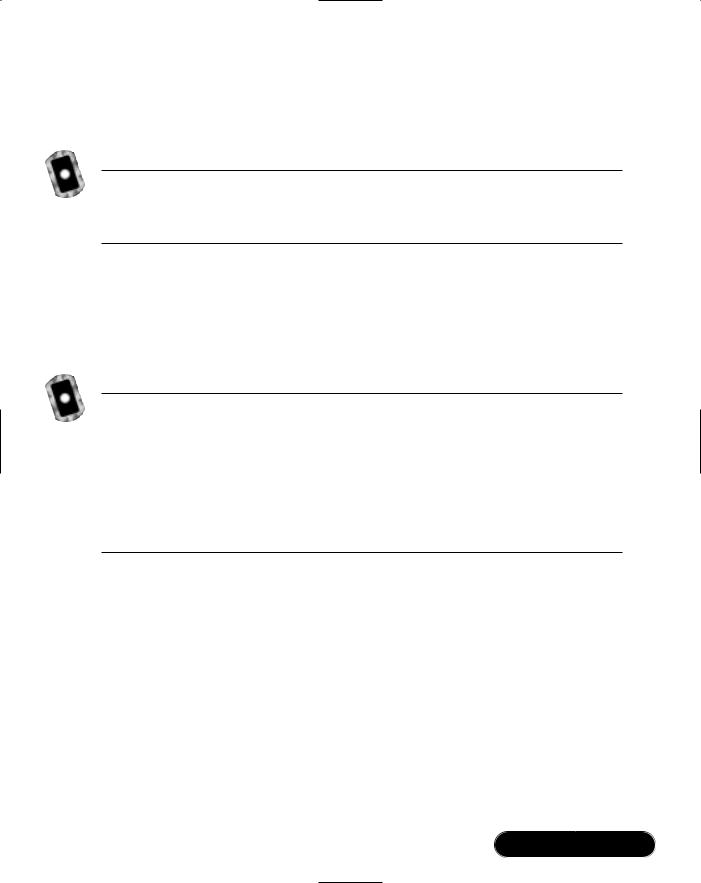
The code in Figure 5.16 is a snippet of the Main() method in TCPHelloWorldServer. It shows the server initialization. For waiting for incoming connections on port 8080, use a TcpListener instance.
Figure 5.16 Server Initialization in TCPHelloWorldServer.cs
Console.WriteLine ( "initializing server..." );
TcpListener listener = new TcpListener ( 8080 ); listener.Start ();
Console.WriteLine ( "server initialized, waiting for " + "incoming connections..." );
Socket s = listener.AcceptSocket ();
//create a NetworkStream for easier access NetworkStream ns = new NetworkStream ( s );
//use a stream reader because of ReadLine() method StreamReader r = new StreamReader ( ns );
The listener listens on port 8080 for incoming connections.The AcceptSocket() method returns a socket representing the connection to the client.This method blocks the program until a client opens a connection to the listener.
After a connection is established, the socket returned by AcceptSocket() is used for exchanging data with the connected client.The easiest way to do this is the use of a NetworkStream.This class is located in the namespace System.Net.Sockets. NetworkStream encapsulates the methods for reading and writing data with a socket. So, you can use this stream with code working only on streams.
The next step is creating a StreamReader.This class is part of the System.IO namespace.This class simplifies the access to a stream. Here, you use it because of its ReadLine() method.This method reads a single line of characters.The .NET reference documentation defines a line as follows:“A line is defined as a sequence of characters followed by a carriage return (“\r”), a line feed (“\n”), or a carriage return immediately followed by a line feed.”
After the client establishes a connection, it sends a command to the connected server. Now the incoming commands must be parsed and executed by the server.The code is shown in Figure 5.17.
www.syngress.com
Network Programming: Using TCP and UDP Protocols • Chapter 5 |
219 |
Figure 5.17 Command Processing in TCPHelloWorldServer.cs
bool loop = true; while ( loop )
{
// read a line until CRLF string command = r.ReadLine (); string result;
Console.WriteLine ( "executing remote command: " + command );
switch ( command )
{
case "GET":
result = "Hello World !"; break;
//finish communication case "EXIT":
result = "BYE"; loop = false; break;
//invalid command default:
result = "ERROR"; break;
}
if ( result != null )
{
Console.WriteLine ( "sending result: " + result );
Continued
www.syngress.com
220 Chapter 5 • Network Programming: Using TCP and UDP Protocols
Figure 5.17 Continued
//add a CRLF to the result result += "\r\n";
//convert data string to byte array
Byte[] res = System.Text.Encoding.ASCII.GetBytes ( result.ToCharArray () );
// send result to the client s.Send ( res, res.Length, 0 );
}
}
If the GET command is received, the server returns the string “Hello World !”, and the loop continues.The loop also continues if an unknown command arrives. In that case, the string “ERROR” is returned. On the EXIT command, the server stops the loop. After that, the connection must be closed (see Figure 5.18).You can do this by simply calling the Close() method of the socket. Finally, the server waits for the pressing of the Return key.
Figure 5.18 Server Shutdown in TCPHelloWorldServer.cs
Console.WriteLine ( "clearing up server..." ); s.Close ();
Console.Write ( "press return to exit" );
Console.ReadLine ();
That’s all for the server. Let’s move on to the client.
The Client
The client is a bit more complex than the server. It has two parts: the UI (a simple console application), and the command processor, which contains the communication components.
Let’s have a look at the command processor, named TCPRemoteCommandProcessor.The source code for Figures 5.19 to 5.25 is
www.syngress.com
Network Programming: Using TCP and UDP Protocols • Chapter 5 |
221 |
included on the CD in a file named Base.cs.This file is compiled to a library named Base.dll that is also contained on the CD. For the command processor, the needed namespaces are as shown in Figure 5.19.
Figure 5.19 Used Namespaces in Base.cs
using System;
using System.IO;
using System.Net.Sockets;
First, you will write an interface.This interface gives you the flexibility to implement more than one type of command processor with different underlying network protocols, so a client gets only an object that implements the interface. This makes the client independent from the used network protocol (see Figure 5.20).
Figure 5.20 CommandProcessor Interface in Base.cs
public interface CommandProcessor
{
//execute a command and return the result
//if the return value is false the command processing loop
//should stop
bool Execute ( string command, ref string result );
}
Now, create the TCPRemoteCommandProcessor class that implements the CommandProcessor interface.The class has three methods: a constructor, a Close() method, and the implementation of the Execute() method.The command processor has two different running modes. In the Hold Connection mode, the constructor establishes the connection to the server directly from the constructor. Disconnecting will be done at the moment the Close() method is called. In the Release Connection mode, every time the processor is requested to send a command to the server, the connection is established. After retrieving the result, the connection is closed.The first mode is for short-term or high-performance communication.The second mode is for long-term communication and can be used for saving money on the Internet or reducing use of network resources.
Let’s start with the class fields. Figure 5.21 shows all the information and objects needed for running the communication process.
www.syngress.com

222 Chapter 5 • Network Programming: Using TCP and UDP Protocols
Figure 5.21 Class Fields of TCPRemoteCommandProcessor in Base.cs
// remote host
private string host = null; // remote port
private int port = -1; // connection mode
private bool releaseConnection = false;
//communication interface private TcpClient client = null;
//outgoing data stream
private NetworkStream outStream = null; // ingoing data stream
private StreamReader inStream = null;
Now for the constructor (see Figure 5.22). It has three parameters: the name and port of the host to connect with and a Boolean flag determining the mode. If the flag is true, the command processor works in Release Connection mode. Otherwise, the Hold Connection mode is active. If the processor runs in the last mentioned mode, the constructor connects immediately to the server specified by the host name and port. Finally, it initializes the stream input and output stream fields.
Figure 5.22 Constructor of TCPRemoteCommandProcessor in Base.cs
public TCPRemoteCommandProcessor ( string host, int port, bool releaseConnection )
{
// add parameter checking here
this.host = host; this.port = port;
this.releaseConnection = releaseConnection;
if ( !this.releaseConnection )
{
Console.WriteLine ( "connecting to " + this.host + ":" +
Continued
www.syngress.com
Network Programming: Using TCP and UDP Protocols • Chapter 5 |
223 |
Figure 5.22 Continued
this.port + "..." );
this.client = new TcpClient ( this.host, this.port ); this.outStream = this.client.GetStream (); this.inStream = new StreamReader ( this.outStream );
Console.WriteLine ( "connected to " + this.host + ":" + this.port );
}
}
The Close() method is quite simple. It closes only the connection (see Figure 5.23).This will be done only in Release Connection mode. If the command processor is in Hold Connection mode, this method does nothing because the client field will be null.
Figure 5.23 Close() Method of TCPRemoteCommandProcessor in Base.cs
public void Close ()
{
if ( this.client != null )
{
this.client.Close ();
Console.WriteLine ( "connection closed: " + this.host + ":" + this.port );
}
}
NOTE
You do not have to flush the streams by using the Flush() methods of NetworkStream because these are not buffered streams. But if you develop classes that work only on streams without knowing which kind of streams it uses, you should always consider flushing them.
www.syngress.com

224 Chapter 5 • Network Programming: Using TCP and UDP Protocols
Execute() is more complex. If the command processor is in the Release Connection mode, it first must connect to the server and finally close the connection after sending the command (see Figure 5.24). For sending, the command is concatenated with a trailing carriage return and line feed. After that, it is converted to a byte array.This array is given to the output stream.Then the processor reads the response from the input stream. Finally, it checks if the response in the string is “BYE”. If so, false is returned; true otherwise.
Figure 5.24 Execute() Method of TCPRemoteCommandProcessor in Base.cs
public bool Execute ( string command, ref string result )
{
// add parameter checking here
bool ret = true;
if ( this.releaseConnection )
{
Console.WriteLine ( "connecting to " + this.host + ":" + this.port + "..." );
// open connection to the server
this.client = new TcpClient ( this.host, this.port ); this.outStream = this.client.GetStream (); this.inStream = new StreamReader ( this.outStream );
Console.WriteLine ( "connected to " + this.host + ":" + this.port );
}
//add a CRLF to command to indicate end command += "\r\n";
//convert command string to byte array
Byte[] cmd = System.Text.Encoding.ASCII.GetBytes ( command.ToCharArray () );
Continued
www.syngress.com
Network Programming: Using TCP and UDP Protocols • Chapter 5 |
225 |
Figure 5.24 Continued
// send request
this.outStream.Write ( cmd, 0, cmd.Length );
// get response
result = this.inStream.ReadLine ();
if ( this.releaseConnection )
{
// close connection this.client.Close ();
Console.WriteLine ( "connection closed: " + host + ":" + port );
}
ret = !result.Equals ( "BYE" );
return ret;
}
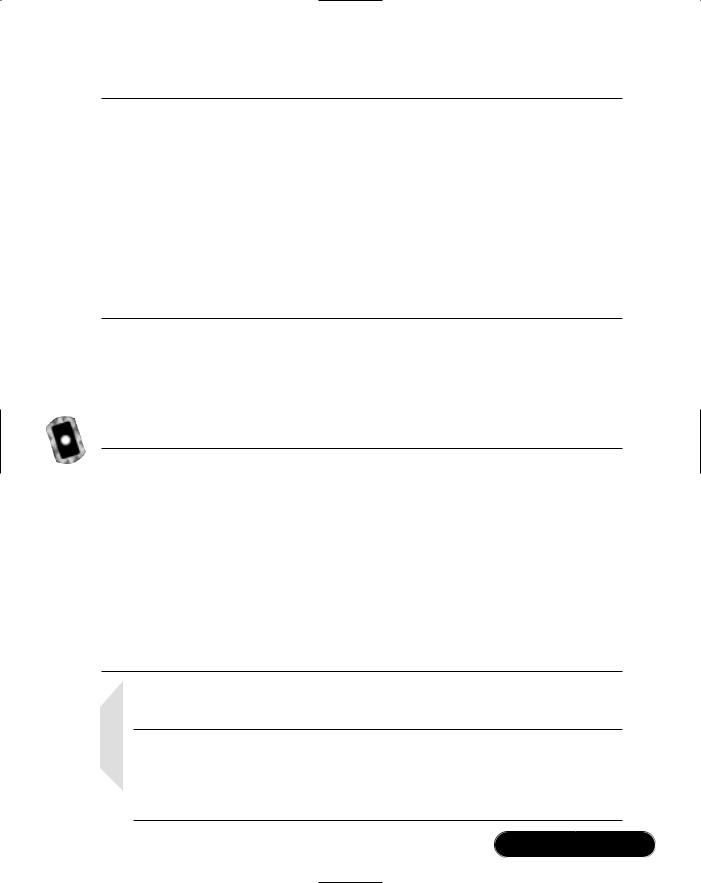
Finally, you need a client using the command processor. Call it TCPHelloWorldClient.The source code for Figure 5.25 is included on the CD in the file TCPHelloWorldClient.cs. It creates a TCPCommandProcessor instance for communicating with the server.Then, it sends the GET command and displays the result on the console. After that, it sends the EXIT command and closes the connection.
Figure 5.25 TCPHelloWorldClient Listing in TCPHelloWorldClient.cs
using System; using System.IO;
using System.Net.Sockets;
public class TCPHelloWorldClient
Continued
www.syngress.com

226 Chapter 5 • Network Programming: Using TCP and UDP Protocols
Figure 5.25 Continued
{
public static void Main ()
{
Console.WriteLine ( "initializing client..." );
TCPRemoteCommandProcessor proc = new TCPRemoteCommandProcessor ( "127.0.0.1", 8080, false );
string result;
Console.WriteLine ( "requesting..." ); proc.Execute ( "GET", ref result ); Console.WriteLine ( "result: " + result );
Console.WriteLine ( "closing connection..." ); proc.Execute ( "EXIT", ref result );
proc.Close ();
Console.Write ( "press return to exit" );
Console.ReadLine ();
}
}
Now you can compile and run the example.
Compiling and Running the Example
Go to the directory where you can find the files TCPHelloWorldServer.cs and TCPHelloWorldClient.cs. For compiling, batch file exists called compile.bat. Because we are using TCP for this example, you must start the server before the client is running.
Now you can start the client by double-clicking on TCPHelloWorldServer
.exe.A Console window like the one shown in Figure 5.26 will appear.
Now you can start the client by double-clicking on TCPHelloWorldClient
.exe. Another Console window like Figure 5.27 will appear.
www.syngress.com
Network Programming: Using TCP and UDP Protocols • Chapter 5 |
227 |
Figure 5.26 Server Waiting for Client Connection
Figure 5.27 Running Client
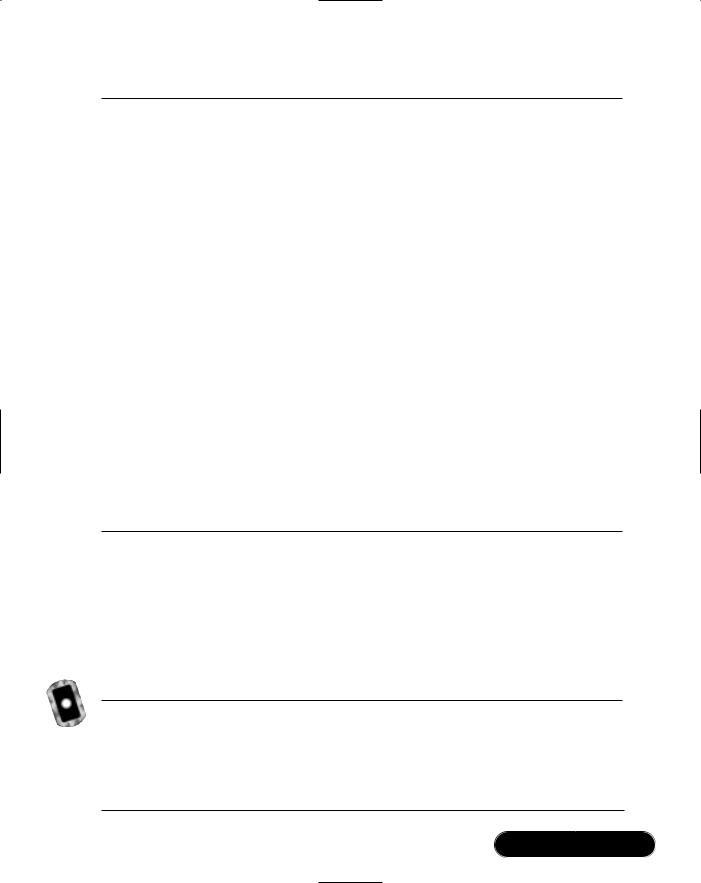
The server window now looks like Figure 5.28. Now you can stop both applications by pressing any key.The next section uses the same example using UDP as underlying transport protocol.
Figure 5.28 Server after Doing Its Work
NOTE
Because you are using TCP, you must always start the server before the client begins trying to connect to the server.
Example UDP Command
Transmission and Processing
In this section, you rewrite the example from the section “Example TCP Command Transmission and Processing” for using UDP as the transport protocol.
www.syngress.com
228 Chapter 5 • Network Programming: Using TCP and UDP Protocols
Refer back to that section for the introduction to the architecture and the implemented communication protocol.
NOTE
As mentioned earlier, UDP is normally not used for request/response protocols like client/server command processing. This example is used for showing the differences in using UDP and TCP.
General Usage of Needed .NET Classes
In contrast to TCP, in using UDP only one main network class is needed for this example.This is because the handling is like peer-to-peer (P2P). On both sides (client and server), we use System.Net.Sockets.UdpClient.
As a matter of principle, we can say a UDP client binds to a local port from which it receives data. Data is sent directly to another UDP client without connecting explicitly.That is what is meant by connection-less communication.
Generally, the code on both sides looks the same. A UdpClient is bound to a local port. Now it is ready to send and receive data. Because you bind the client to a local port only, you must use one Send() method that needs the remote host connection information.This information is used for sending the data to another UDP client. Because you bind the UdpClient to a local port, you receive data from this port, and you do not have to specify a receive point for the Receive() method.That is the reason why we use the dummy variable that is set to null.
//bind client to local port where it receives data UdpClient client = new UdpClient ( 8081 );
//create a byte array containing the characters of
//the string "a request"
Byte[] request = System.Text.Encoding.ASCII.GetBytes ( "a request".ToCharArray () );
// send request to the server
client.Send ( request, request.Length, "127.0.0.1", 8080 );
www.syngress.com
Network Programming: Using TCP and UDP Protocols • Chapter 5 |
229 |
//create a dummy endpoint IPEndPoint dummy = null;
//receive something from the server
byte[] response = client.Receive ( ref dummy );
//do something with the response
//unbind the client
client.Close ();
After having a look at the general use of the networking classes, let’s move on to the second example.
The Server
First, let’s have a look at the server.The class is called UDPHelloWorldServer and is included on the CD in the file UDPHelloWorldServer.cs.The code does not differ very much from the code of the TCPHelloWorldServer class (see the section “Example TCP Command Transmission and Processing”).
For simplification, the class also has a Main() method only.The initialization of the server is very simple.You just have to bind a UdpClient to a local port.The code of Figure 5.29 appears at the beginning of the Main() method.
Figure 5.29 Server Initialization in UDPHelloWorldServer.cs
Console.WriteLine ( "initializing server" );
UdpClient server = new UdpClient ( 8080 );
Because UDP is a connection-less protocol, you cannot send back a response directly without the knowledge of where a request comes from.The header of a UDP datagram, among other things, contains the port where the sending socket is bound to (source port). On the IP layer, you can say the UDP datagram is embedded in an IP datagram.The header of the IP datagram contains the sender’s IP address. But with C#, you cannot access this information with the simple API you use (at least with the Beta 2 of the .NET Framework). So the simplest way is to add the sender’s information to a datagram if you want a receiver returning data. The syntax of command that will be sent to the server is as follows:
www.syngress.com

230 Chapter 5 • Network Programming: Using TCP and UDP Protocols
IP ADDRESS ":" PORT ":" COMMAND
where IP ADDRESS and PORT are the IP address and port of the sender. COMMAND is the command to execute.The server code for receiving a command is shown in Figure 5.30. After receiving the command string, it will be split into the parts described earlier.
Figure 5.30 Receiving a Command in UDPHelloWorldServer.cs
//an endpoint is not needed the data will be sent
//to the port where the server is bound to IPEndPoint dummy = null;
bool loop = true; while ( loop )
{
Console.WriteLine ( "waiting for request..." );
byte[] tmp = server.Receive ( ref dummy );
//split request string into parts, part1=client IP
//address or DNS name, part2=client port, part3=command string dg =
new System.Text.ASCIIEncoding ().GetString ( datagram );
string[] cmd = dg.Split ( new Char[] {':'} ); string remoteClientHost = cmd[0];
int remoteClientPort = Int32.Parse ( cmd[1] ); string command = cmd[2];
string result = null;
//command execution
The command execution code is the same as in the TCPHelloWorldServer class. Also the result-sending code is similar to the code of the mentioned class (see Figure 5.31).
www.syngress.com
Network Programming: Using TCP and UDP Protocols • Chapter 5 |
231 |
Figure 5.31 Result Sending in UDPHelloWorldServer.cs
// convert data string to byte array
Byte[] d = System.Text.Encoding.ASCII.GetBytes (
result.ToCharArray () );
// send result to the client
server.Send ( d, d.Length, remoteClientHost, remoteClientPort );
The shutdown code is also the same as the code you knew from TCPHelloWorldServer. Now let’s have a look at the client.
The Client
The client is called UDPHelloWorldClient and is included on the CD in the file UDPHelloWorldClient.cs. It is modified code from TCPHelloWorldClient with only one difference: the command processor and its instantiation.The command processor is called UDPCommandProcessor, and you can find it on the CD in the file Base.cs. Figure 5.32 shows the only different line of the code.
Figure 5.32 Instantiation of the Command Processor in
UDPHelloWorldClient.cs
UDPRemoteCommandProcessor proc = new
UDPRemoteCommandProcessor ( 8081, "127.0.0.1", 8080 );
The parameter 8081 is the local port where the command processor is bound.The other two parameters of the constructor are the remote IP address and port of the server to which the command processor connects.
Now comes the command processor, called UDPCommandProcessor. Just like TCPCommandProcessor, this class has three methods: a constructor, a Close() method, and an Execute() method. First, let’s have a look at the class fields (see Figure 5.33).
Figure 5.33 Class Fields of UDPCommandProcessor in Base.cs
// the local port where the processor is bound to
private int localPort = -1;
Continued
www.syngress.com

232 Chapter 5 • Network Programming: Using TCP and UDP Protocols
Figure 5.33 Continued
// the remote host
private string remoteHost = null; // the remote port
private int remotePort = -1; // communication interface
private UdpClient client = null;
The next stop is the constructor. It sets all class fields and binds the UDP client to a local port (see Figure 5.34).
Figure 5.34 Constructor of UDPRemoteCommandProcessor in Base.cs
public UDPRemoteCommandProcessor ( int localPort, string remoteHost, int remotePort )
{
// add parameter checking here
this.localPort = localPort; this.remoteHost = remoteHost; this.remotePort = remotePort;
this.client = new UdpClient ( localPort );
}
The Close() method is very simple. It calls the Close() method of the UDP client (see Figure 5.35).
Figure 5.35 Close() Method of UDPRemoteCommandProcessor in Base.cs
public void Close ()
{
this.client.Close ();
}
The Execute() method is very similar to the same named method of TCPCommandProcessor.You have a different handling in communication because
www.syngress.com

Network Programming: Using TCP and UDP Protocols • Chapter 5 |
233 |
of UDP.You need code for adding the local IP address and port to the command. Also, the sending and receiving of data is different. See Figure 5.36 for the UDP code.
Figure 5.36 Execute() Method of UDPRemoteCommandProcessor in Base.cs
public bool Execute ( string command, ref string result )
{
//add parameter checking here
bool ret = true;
Console.WriteLine ( "executing command: " + command );
//build the request string
string request = "127.0.0.1:" + this.localPort.ToString () + ":" + command;
Byte[] req = System.Text.Encoding.ASCII.GetBytes ( request.ToCharArray () );
client.Send ( req, req.Length, this.remoteHost, this.remotePort );
//we don't need an endpoint IPEndPoint dummy = null;
//receive datagram from server
byte[] res = client.Receive ( ref dummy );
result = System.Text.Encoding.ASCII.GetString ( res );
ret = !result.Equals ( "BYE" );
return ret;
}
www.syngress.com
234 Chapter 5 • Network Programming: Using TCP and UDP Protocols
Compiling and Running the Example
Go to the directory where you can find the files UDPHelloWorldServer.cs and UDPHelloWorldClient.cs and start the compile.bat batch file.
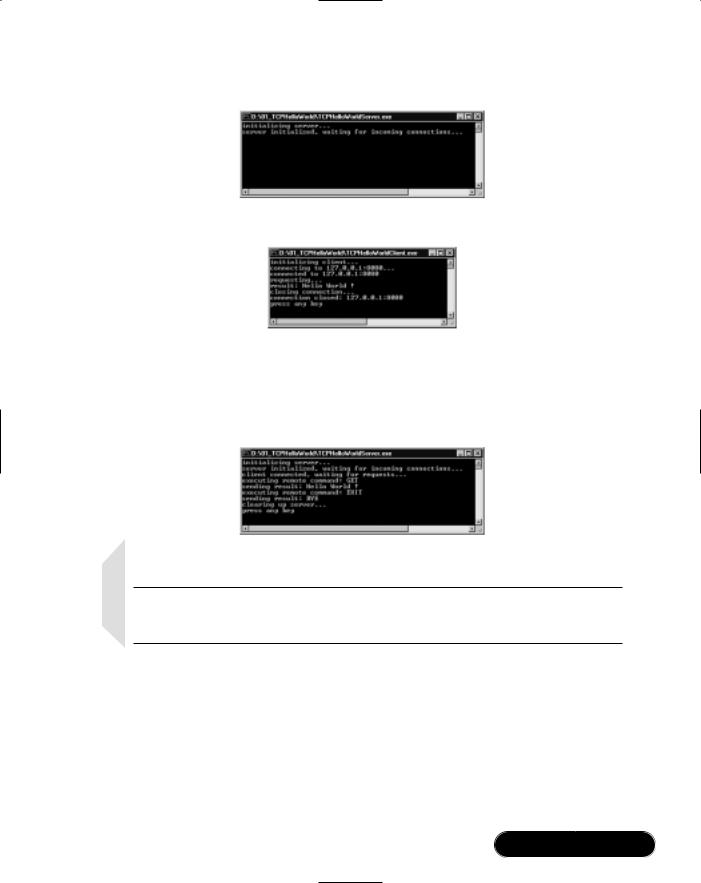
Now, after successfully compiling all files, you are ready to run the example. Start the server by double-clicking on UDPHelloWorldServer.exe in Windows Explorer. A console window like the one shown in Figure 5.37 will appear.
Figure 5.37 Server Waiting for Client Connection
Start the client by double-clicking on UDPHelloWorldClient.exe. Another console window like Figure 5.38 will appear.
Figure 5.38 Running Client
The server window now looks like Figure 5.39.
Figure 5.39 Server after Doing its Work
Now you can stop both applications by pressing any key.The next section discusses how to write a UDP multicasting application.
www.syngress.com
Network Programming: Using TCP and UDP Protocols • Chapter 5 |
235 |
Creating a News Ticker
Using UDP Multicasting
A news ticker is an application where a news server sends messages to a number of clients. A client subscribes to the news server. From the moment of subscription, the client is allowed to receive new messages from the server.
You can implement implement such an architecture in several ways, but the easiest is using UDP multicasting. As described in the section “Introduction to UDP,” with UDP, you can group applications (peers) together. An IP address together with a port is the alias for the group; that means a peer sends data to that IP address and port and all peers of that group will receive the data.
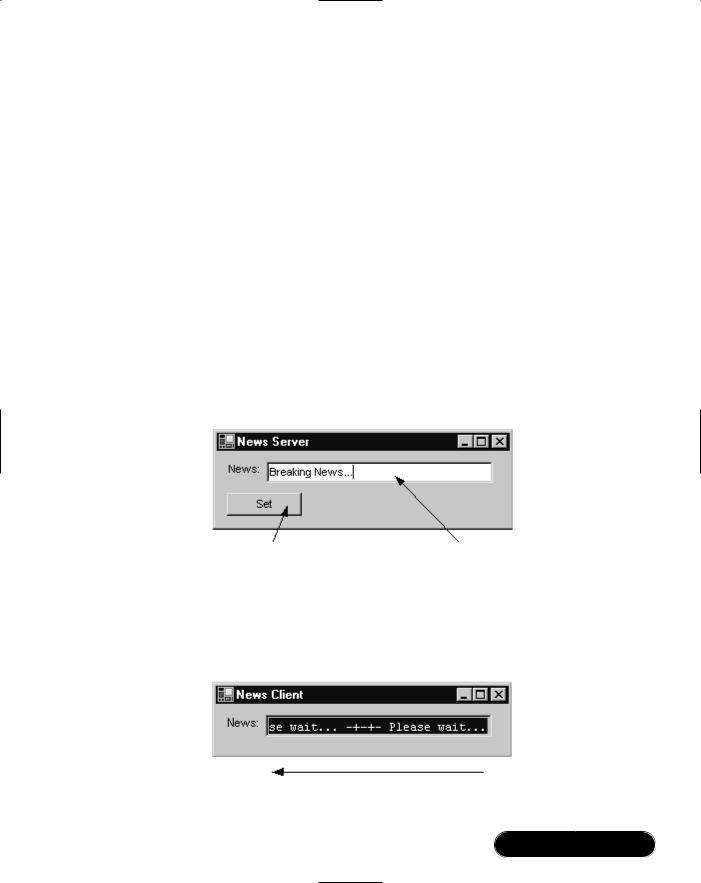
In this section, you will see how to develop a simple news ticker server and client.The server is a simple Windows Forms application with a text box and a button.The user types in the news in the text box. By clicking on the button, the server sends the news to the group (see Figure 5.40).The server must send news continuously so that a client can be started at any time for receiving the news.
Figure 5.40 UDP Multicast News Server
Click to Send News |
New Text Box |
The client also is a simple Windows Forms application with only one text box. If news arrives, it will be displayed in the text box by shifting the text from the right to the left like a marquee (see Figure 5.41).
Figure 5.41 UDP Multicast News Client
Shifting Characters
www.syngress.com

236 Chapter 5 • Network Programming: Using TCP and UDP Protocols
General Usage of Needed .NET Classes
As you have seen with UDP, you need only one class: System.Net.Sockets.UdpClient. In addition to the methods discussed in the section “Example UDP Command Transmission and Processing,” you can use the UdpClient.JoinMulticastGroup() method.This method registers a UDP peer to a multicast group.
The initialization of the news server and client is done by the same code. First, you bind a UdpClient to a local port.Then you register this client to a multicast group by calling its method JoinMulticastGroup().This method gets the IP address of the group. Finally, you create an IPEndPoint to receive data from. As mentioned in the introduction, an IPEndPoint is the combination of an IP address and a port:
//create a peer bound to a local port UdpClient peer = new UdpClient ( LOCAL_PORT );
//create the group IP address
IPAddress groupAddress = IPAddress.Parse ( GROUP_IP );
//add the peer to the group peer.JoinMulticastGroup ( groupAddress );
//create an end point for sending data to the group IPEndPoint groupEP = new IPEndPoint ( groupAddress,
GROUP_PORT );
The code for sending and receiving is similar to the code in the section “Example UDP Command Transmission and Processing”:
//send data to the group, d is a byte array peer.Send ( d, d.Length, groupEP );
//receiving data from the group
IPEndPoint dummy = null;
byte[] d = peer.Receive ( ref dummy );
After having a look at the general use of the needed classes, let’s go further into the news ticker example. Let’s first have a look at a class that is used by the news
www.syngress.com
Network Programming: Using TCP and UDP Protocols • Chapter 5 |
237 |
client and news server.This class is called UDPPeer, and it is included on the CD in the file Base.cs. It represents a simplified interface to the UdpClient class.
The server can be driven in unicast or multicast mode. If the class is instantiated with the local port, only the unicast mode is active. If it is instantiated with an additional UDP multicast group IP address and port, multicast mode is used. The Close() method shuts down the server and the Receive() and Send() methods are used for receiving and sending data, respectively.
Let’s now go more in detail and start with the class fields (see Figure 5.42).
Figure 5.42 Class Fields of UDPPeer in Base.cs
// udp peer
private UdpClient server = null; // multicast group IP address
private IPAddress groupAddress = null;
// multicast group endpoint (IP address and port) private IPEndPoint group = null;
The server field is needed as a communication interface for unicasting and multicasting.The groupAddress and group fields are only needed in case of multicasting.The groupAddress field is the IP address of the UDP multicast group and group is the end point where the data is sent to.
The next is the unicast constructor (see Figure 5.43). It is very simple; it just binds the UDP peer to a local port.
Figure 5.43 Unicast Constructor of UDPPeer in Base.cs
public UDPPeer ( int localPort )
{
// add parameter checking here
Console.WriteLine ( "initializing UDP server, port=" + localPort + "..." );
this.server = new UdpClient ( localPort );
Console.WriteLine ( "UDP server initialized" );
}
www.syngress.com
238 Chapter 5 • Network Programming: Using TCP and UDP Protocols
The multicast constructor calls the unicast constructor for binding the UDP peer to a local port and additionally registers the peer with the multicast group (see Figure 5.44). For registering an instance of IPAddress initialized with the group IP address is needed.This address is represented by the field groupAddress.The field group is an instance of the IPEndPoint class and is needed later for receiving data.
Figure 5.44 Multicast Constructor of UDPPeer in Base.cs
public UDPPeer ( int localPort, string groupIP, int groupPort ) : this ( localPort )
{
// add parameter checking here
Console.WriteLine ( "adding UDP server to multicast " + "group, IP=" + groupIP + ", port=" + groupPort + "...");
this.groupAddress = IPAddress.Parse ( groupIP ); this.group = new IPEndPoint ( this.groupAddress,
groupPort );
this.server.JoinMulticastGroup ( this.groupAddress );
Console.WriteLine ( "UDP server added to group" );
}
The Close() method is very simple. In case of multicasting, it deletes the peer from the multicast group. Finally, it calls the Close() method of UdpClient (see Figure 5.45).
Figure 5.45 Close() Method of UDPPeer in Base.cs
public void Close ()
{
if ( this.groupAddress != null ) this.server.DropMulticastGroup ( this.groupAddress );
this.server.Close ();
}
www.syngress.com

Network Programming: Using TCP and UDP Protocols • Chapter 5 |
239 |
The Receive() method is a simple method that encapsulates the byte-array handling (see Figure 5.46).The received byte array is converted to a string, and it is returned to the caller of this method.
Figure 5.46 Receive() Method of UDPPeer in Base.cs
public String Receive ()
{
IPEndPoint dummy = null;
// receive datagram
byte[] data = this.peer.Receive ( ref dummy );
return new System.Text.ASCIIEncoding ().GetString ( data );
}
The Send() method is also simple. After converting the given string to a byte array, it calls the Send() method of the UDP peer (see Figure 5.47).
Figure 5.47 Send() Method of UDPPeer in Base.cs
public void Send ( string message )
{
// add parameter checking here
Console.WriteLine ( "sending " + message + "..." );
// convert news string to a byte array
Byte[] d = System.Text.Encoding.ASCII.GetBytes (
message.ToCharArray () );
this.server.Send ( d, d.Length, this.group );
Console.WriteLine ( "message sent" );
}
www.syngress.com
240 Chapter 5 • Network Programming: Using TCP and UDP Protocols
The next section discusses the UI of the news server.
The Server
The UDPPeer class now makes it very easy to develop a simple user interface class for the news server.The class is named UDPNewsServer and is included on the CD in the file UDPNewsServer.cs.
The class has one constructor and three methods: an event handler for a window-closed event, an event handler for a button contained in the UI, and a method that is used by a thread for sending news continuously.
The news server class is derived from System.Windows.Forms.Form. Let’s first have a look at the class fields, in Figure 5.48.
Figure 5.48 Class fields of UDPNewsServer in UDPNewsServer.cs
//local port where the UDP server is bound to private const int LOCAL_PORT = 8080;
//multicast group IP address
private const string GROUP_IP = "225.0.0.1"; // multicast group port
private const int GROUP_PORT = 8081; // UDP server
private UDPPeer server = null;
//a thread for sending new continuously private Thread serverThread = null;
//a data field for typing in a new message private TextBox text = null;
//a button for setting the new message private Button setButton = null;
//the news message
private string news = "";
Figure 5.49 shows the constructor code whereby the initialization of the UI components is not shown. If the Send button is clicked, the news server should update the news to be sent to the multicast group. In order to get notified by the button, register the OnSet() method with the button as a click event handler.The OnClosed() method is registered with the window for the Closed event. Finally,
www.syngress.com

Network Programming: Using TCP and UDP Protocols • Chapter 5 |
241 |
start a thread with the Run() method that continuously sends the news typed in the text field.
Figure 5.49 Constructor of UDPNewsServer in UDPNewsServer.cs
public UDPNewsServer ()
{
//UI components initialization
//add an event listener for click-event this.setButton.Click += new System.EventHandler ( OnSet );
//add an event listener for close-event
this.Closed += new System.EventHandler ( OnClosed );
// create communication components
this.server = new UDPPeer ( LOCAL_PORT, GROUP_IP, GROUP_PORT );
// start communication thread this.serverThread = new Thread (
new ThreadStart ( Run ) ); this.serverThread.Start ();
Console.WriteLine ( "initialization complete" );
}
The thread is needed because the server must send the news continuously. Let’s now have a look at the thread (see Figure 5.50). Every second it sends the content of the class field news to the multicast group and writes a message to the console that it is sending data. After sending, this method puts the thread to sleep for one second by calling the static method Sleep() of the Thread class.The value 1000 means one-thousand milliseconds—that is, one second.This call causes the current thread to sleep for the specified time.
www.syngress.com

242 Chapter 5 • Network Programming: Using TCP and UDP Protocols
Figure 5.50 Sending Thread of UDPNewsServer in UDPNewsServer.cs
// sending thread public void Run ()
{
while ( true )
{
if ( !this.news.Equals ( "" ) )
{
Console.WriteLine ( "sending " + this.news ); this.server.Send ( this.news );
}
// wait one second Thread.Sleep ( 1000 );
}
}
The news field is set by the event handler that is registered for the click event of the Set button (see Figure 5.51).
Figure 5.51 Button Event Handler of UDPNewsHandler in
UDPNewsHandler.cs
// button click event handler
public void OnSet ( Object sender, EventArgs e )
{
this.news = this.text.Text;
}
Finally, let’s look at the shutdown code. It is placed in an event handler that is called if the form receives the Closed event.The method requests the sending thread to stop by calling its Abort() method and waits until it is dead.This is done with the call to the Join() method of the thread. After that, it calls the Close() method of the UDPPeer object.The code is shown in Figure 5.52.
www.syngress.com

Network Programming: Using TCP and UDP Protocols • Chapter 5 |
243 |
Figure 5.52 OnClosed() Method of UDPNewsHandler in UDPNewsHandler.cs
public void OnClosed ( Object sender, EventArgs e )
{
Console.WriteLine ( "server shut down..." );
//stop thread this.serverThread.Abort ();
//wait until it's stopped this.serverThread.Join ();
this.server.Close ();
Application.Exit ();
}
The Client
The client is also divided into two parts: a UDP multicast client class and a user interface. First, let’s have a look at the client class. It is called UDPMulticastClient and is included on the CD in the file Base.cs.
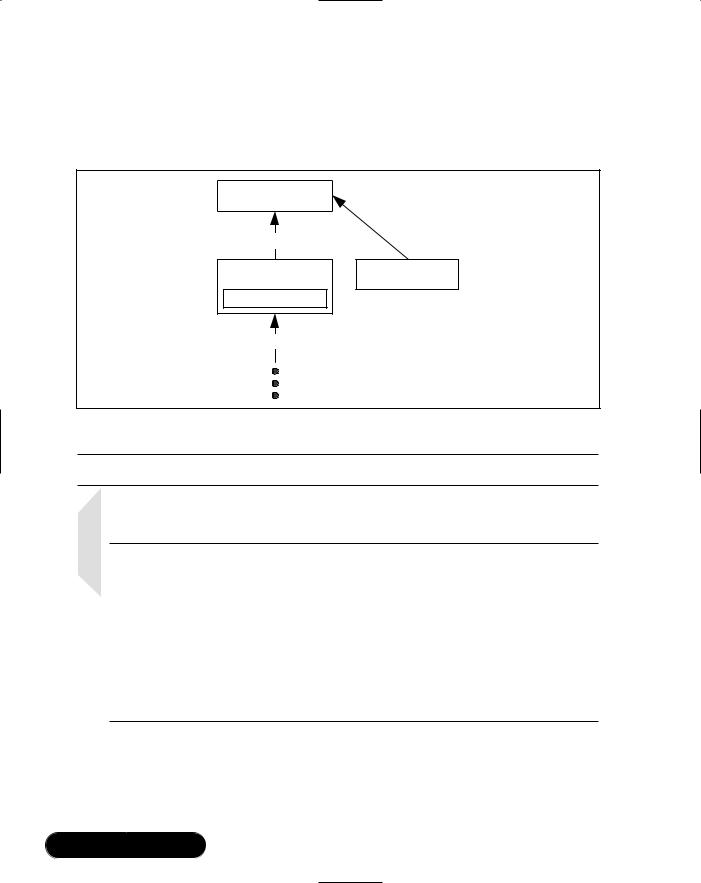
In this example, you develop an asynchronous communication. An example for asynchronous communication is talking with a friend via e-mail or chat.You send a message to a friend and then you can do something else while you wait for the response. After a while, you receive your friend’s answer and you are notified. Here in this example, asynchronous means that the client UI can be used while a thread in the background is waiting for incoming data. But the UI must be notified by the receiving thread if a message arrives.This is done by the thread calling a delegate that is implemented by the UI form. Figure 5.53 shows the architecture of the client.
The client is built of three main components; the UI, the ticker thread, and the receiving thread.The UI is a simple form with a text box.The ticker thread shifts the characters of the text box content by one position to left.
The receiving thread is implemented in UDPMulticastClient and is listening permanently for incoming messages. If a message arrives, it calls a Notify() delegate that is implemented as the SetNews() method in the UI.The Notify() delegate
www.syngress.com
244 Chapter 5 • Network Programming: Using TCP and UDP Protocols
is shown in Figure 5.54. It is included on the CD in the file Base.cs. It acts a little bit like an event handler. If the thread receives a new message, it calls the delegate by passing the message to it.You will see this in the UDPMulticastClient class.
Figure 5.53 Architecture of the News Client
UI |
|
3. SetNews (Message) |
|
Receiving |
Ticker Thread |
Thread |
(Shifting Characters) |
2. Notify (Message) |
|
1. Message |
|
Figure 5.54 The Notify() Delegate in Base.cs
public delegate void Notify ( string text );
NOTE
The System.Net.Sockets.Socket class implements an interface to the Windows sockets DLL. That means that not only the default Berkeley sockets are supported. You also find methods for asynchronous communication in this DLL and in the Socket class. For all methods like Accept() or Receive(), you’ll find asynchronous methods like BeginAccept()/ EndAccept() or BeginReceive()/EndReceive(). For instance, BeginAccept() initiates the asynchronous wait for an incoming connection. Among others, this function takes a so-called AsyncCallback, which is a delegate that is called if a connection is accepted.
Now comes the UDPMulticastClient code. It has one constructor and two methods.The constructor initializes the UDP client that receives messages from the news server.The Run() method is used by a thread to listen for news, and the
www.syngress.com

Network Programming: Using TCP and UDP Protocols • Chapter 5 |
245 |
Close() method shuts down the news client.We need at least three class fields: the notification delegate, the communication components, and a thread for asynchronous receiving of data (see Figure 5.55).
Figure 5.55 Class Fields of UDPMulticastClient in Base.cs
//notification delegate private Notify notify = null;
//communication interface private UDPPeer peer = null;
//receiving thread
private Thread clientThread = null;
The constructor stores the notification delegate and initializes the UDP peer with the given group IP address and port. Finally, it starts the news receiving thread (see Figure 5.56).
Figure 5.56 Constructor of UDPMulticastClient in Base.cs
public UDPMulticastClient ( string groupIP, int groupPort, Notify notify )
{
// add parameter validation here
Console.WriteLine ( "initializing UDP multicast " + "client, group=" + groupIP + ", port=" + groupPort + "..." );
this.notify = notify;
// create communication components
this.client = new UDPPeer ( groupPort, groupIP, groupPort );
// start listener thread this.clientThread = new Thread (
new ThreadStart ( Run ) );
Continued
www.syngress.com

246 Chapter 5 • Network Programming: Using TCP and UDP Protocols
Figure 5.56 Continued
this.clientThread.Start ();
Console.WriteLine ( "UDP multicast client initialized" );
}
The receiving thread is implemented by the Run() method. It is an endless loop that receives available data and gives it directly to the notification delegate (see Figure 5.57).
Figure 5.57 Receiving Thread of UDPMulticastClient in Base.cs
public void Run ()
{
while ( true )
this.notify ( this.peer.Receive () );
}
The Close() method shuts down the client. It stops the receiving thread and calls the Close() method of its UDP peer (see Figure 5.58).
Figure 5.58 Close() Method of UDPMulticastClient in Base.cs
public void Close ()
{
this.clientThread.Abort (); this.clientThread.Join ();
this.peer.Close ();
}
That’s all there is to the UDP multicast client. Now let’s look at the news client UI.The UI is a class derived from System.Windows.Forms.Form. It is called UDPNewsClient and contained on the CD in the file UDPNewsClient.cs. It simply contains a TextBox.The class also has one constructor and four methods. The constructor initializes the client application. Furthermore, it includes an event handler method called OnClosed() registered for the Closed event. Finally, there are the methods RunTicker() for shifting the characters in the text field and
www.syngress.com

Network Programming: Using TCP and UDP Protocols • Chapter 5 |
247 |
the SetNews() method. SetNews() implements the Notify() delegate and is used by the listener thread of UDPMulticastClient to update the news text field. First, consider the class fields shown in Figure 5.59.
Figure 5.59 Class Fields of UDPNewsClient in UDPNewsClient.cs
// multicast group IP address
private const string GROUP_IP = "225.0.0.1"; // multicast group port
private const int GROUP_PORT = 8081; // communication interface
private UDPMulticastClient client = null; // ticker thread
private Thread tickerThread = null; // new messages
private TextBox text = null;
// default news displayed at the beginning private string news = "Please wait...";
The constructor initializes the TextBox, event handler, UDP peer, and ticker thread. Figure 5.60 shows the constructor without TextBox initialization.
Figure 5.60 Constructor of UDPNewsClient in UDPNewsClient.cs
public UDPNewsClient ()
{
//initialize UI
//add an event listener for close-event this.Closed += new System.EventHandler ( OnClosed );
//start communication thread
this.client = new UDPMulticastClient ( GROUP_IP, GROUP_PORT, new Notify ( SetNews ) );
// start ticker thread
Continued
www.syngress.com
248 Chapter 5 • Network Programming: Using TCP and UDP Protocols
Figure 5.60 Continued
this.tickerThread = new Thread ( new ThreadStart ( RunTicker ) );
this.tickerThread.Start ();
Console.WriteLine ( "initialization complete" );
}
The news client shutdown method called by the Closed event is shown in Figure 5.61. It closes the client and stops the ticker thread.
Figure 5.61 Event Handler for Closed Event in UDPNewsClient.cs
public void OnClosed ( Object sender, EventArgs e )
{
Console.WriteLine ( "client shut down" );
this.client.Close ();
this.tickerThread.Abort (); this.tickerThread.Join ();
Application.Exit ();
}
The ticker thread shifts—every 500 milliseconds—one character of the news string into the text box on the right and deletes one on the left.The implementation is not very smart, but for a simulation it is enough. Figure 5.62 also shows the notification method. It simply sets the message received by the multicast client to the news variable.
Figure 5.62 Ticker Thread and Notification Method in UDPNewsClient.cs
public void RunTicker ()
{
// initialze the textbox with the default text
this.text.Text = " -+-+- " + this.news + " -+-+- " +
Continued
www.syngress.com

Network Programming: Using TCP and UDP Protocols • Chapter 5 |
249 |
Figure 5.62 Continued
this.news + " -+-+- ";
while ( true )
{
string data = this.news + " -+-+- ";
// repeat as long as there are characters in the data string while ( !data.Equals ( "" ) )
{
//wait 500 milliseconds Thread.Sleep ( 500 );
//remove the first character from the text field and add the
//first character of the data string
this.text.Text = this.text.Text.Substring ( 1 ) + data[0];
// remove the first character from the data string data = data.Substring ( 1 );
}
}
}
// notification method, used by multicast client public void SetNews ( string news )
{
this.news = news;
}
You now have everything you need to compile and run the example.
www.syngress.com

250 Chapter 5 • Network Programming: Using TCP and UDP Protocols
Compiling and Running the Example
Go to the directory where you can find the files UDPNewsClient.cs and UDPNewsClient.cs. Start the compile.bat batch file. After successful compiling, double-click UDPNewsClient.exe. A form like Figure 5.63 appears.
Note that the server must not be started first.This is because UDP is connec- tion-less, that is, the client does not have to connect to the server. If the server sends data to the UDP multicast group, the clients simply receive the data.
Figure 5.63 UDP News Client Form
To start the server, open a new console and type in UDPNewsServer or double-click on UDPNewsServer.exe. After typing in some news, the server form may looks like Figure 5.64.
Figure 5.64 UDP New Server Form
Now, click Set, and after a short period, your client looks like Figure 5.65.
Figure 5.65 UDP News Client Receiving News
In the next section, you will develop a client/server chat application combining TCP and UDP technologies.
Creating a UDP Client
Server Chat Application
For users, a chat application seems to be a classic P2P application.You send a message to the chat room, and all users that take part at the chat receive the message. So far, you have learned something about the client/server protocol TCP, about the P2P (unicasting), and also peer-to-group (multicasting) protocol UDP.
www.syngress.com

Network Programming: Using TCP and UDP Protocols • Chapter 5 |
251 |
So for a chat application, the UDP multicasting seems to be the best choice (okay, it is the simplest!).You can develop a UDP multicast peer, send this to your friends, and give them a common IP address to connect.You can send messages to this address and all friends that are connected receive these messages—a very simple but effective chat application.
Let’s do something a little different to show a technique of other applications like Web servers.The result will be an application that guarantees a reliable delivery of the messages from a chat client to a chat server.The server will be a TCP server.You will see how the server can handle more than one client at the same time on the same port.This is like a Web server that responds to many requests at the same time on the standard HTTP port 80.Then, the server sends the messages via UDP to all connected chat clients.
Figure 5.66 shows the three phases from the client’s connect request to client/ server communication:
■Connect The client connects to the server via TCP.
■Create thread The server creates a server thread for the client.
■Communication/listen for new connection The client communicates with the server thread. At the same time, the server listens for new connections.
Figure 5.66 The Three Phases from Connection Request to Communication
3. Listen for New Connection
Client |
1. Connect |
Server |
2. Create Thread
3. Communication
Communication
Thread
More interesting than listening for new connections while communicating is that the server can communicate with more than one client at the same time. This can happen at the same port. So a server is not restricted to “only” 65,536 connections.Theoretically the number of concurrent connections is unlimited. In reality, the number of concurrent connections depends on various conditions— for simplicity, this example focuses on the technique that builds the base for handling concurrent connections.
www.syngress.com

252 Chapter 5 • Network Programming: Using TCP and UDP Protocols
You will reuse most of the classes you developed until now. On the client side, you use TCPCommandProcessor for communicating with the chat server and UDPMulticastClient for receiving messages from the server that were sent by other clients. On the server side, you use UDPPeer for sending chat messages received from the clients.
For handling multiple client connections, you will develop two new classes. The TCPServer class will be the class that listens for incoming client connections. If a connection is accepted, TCPServer creates an instance of TCPServerSession that handles the communication with the client.This instance will be driven by a thread. TCPServerSession will receive the chat protocol commands from the TCPCommandProcessor on the client side.The commands will be given to a command processor object that implements the interface CommandProcessor; correspondingly, they are given to a method of this object that implements the delegate ExecuteCommand.This method interprets the commands and sends the containing message to the chat members. Figure 5.67 shows a UML-like sequence diagram that describes this behavior.
Figure 5.67 UML-Like Sequence Diagram of the Chat Client/Server Behavior
|
Client |
|
Server |
|
UMC |
TCP |
TS |
TSS |
CP |
|
|
Connect |
Create |
|
|
|
|
|
Command
Command 
Message
UMC: UDPMulticastClient
TCP: TCPCommandProcessor
TS: TCPServer
TSS: TCPServerSession
CP: CommandProcessor
All mentioned classes, including the new ones, are contained on the CD in the file Base.cs. Let’s start with the delegate ExecuteCommand() (see Figure 5.68). It has the same signature as the Execute() method of the interface CommandProcessor and is used to access this method of CommandProcessor implementing instances.
www.syngress.com

Network Programming: Using TCP and UDP Protocols • Chapter 5 |
253 |
Figure 5.68 The Delegate ExecuteCommand()
public delegate bool ExecuteCommand ( string command,
ref string result );
The TCPServerSession Class
This class has a constructor for initializing the server session and two methods. The Close() method shuts down the session and Run() listens for incoming commands. Let’s start with the class fields of TCPServerSession (see Figure 5.69).
Figure 5.69 Class Fields of TCPServerSession in Base.cs
// command processor
private ExecuteCommand executeCommand = null;
//communication interface private Socket socket = null;
//open flag
private bool open = false;
The constructor gets a socket for listening for and responding to requests. It also gets an ExecuteCommand() delegate for executing incoming commands.
public TCPServerSession ( Socket socket, ExecuteCommand executeCommand )
{
this.socket = socket; this.executeCommand = executeCommand; this.open = true;
}
public void Close ()
{
// session closing
...
}
www.syngress.com

254 Chapter 5 • Network Programming: Using TCP and UDP Protocols
public void Run ()
{
// command execution
...
}
}
The constructor gets the socket and an ExecuteCommand delegate.The socket represents the connection to the client. Behind the delegate is a command processor that executes the incoming commands.
Figure 5.70 shows the Run() method. It reads—in a loop—a command from the client.The command is given to the ExecuteCommand delegate that returns a result.The result is returned to the client.These steps are repeated as long as the delegate returns false or the Close() method was called.
Figure 5.70 Run() Method of TCPServerSession in Base.cs
public void Run ()
{
NetworkStream ns = new NetworkStream ( this.socket );
StreamReader reader = new StreamReader ( ns );
bool loop = this.open; while ( loop )
{
if ( ns.DataAvailable )
{
//read command from client string cmd = reader.ReadLine (); string result = "";
//execute command
loop = this.executeCommand ( cmd, ref result );
Console.WriteLine ( "sending result, result=" + result );
result += "\r\n";
Continued
www.syngress.com

Network Programming: Using TCP and UDP Protocols • Chapter 5 |
255 |
Figure 5.70 Continued
Byte[] res = System.Text.Encoding.ASCII.GetBytes ( result.ToCharArray () );
// return result to client this.socket.Send ( res );
Console.WriteLine ( "result sent" );
}
//repeat until executeCommand() returns false or
//server session is closed
loop = loop && this.open;
}
Close ();
}
The Close() method clears the open flag and closes the connection to the client (see Figure 5.71). If the thread is still running, the cleared open flag causes the Run() method to terminate.
Figure 5.71 Close() Method of TCPServerSession in Base.cs
public void Close ()
{
if ( this.open )
{
Console.WriteLine ( "TCP session is closing..." );
this.open = false;
this.socket.Close ();
Continued
www.syngress.com

256 Chapter 5 • Network Programming: Using TCP and UDP Protocols
Figure 5.71 Continued
Console.WriteLine ( "TCP session closed" );
}
}
The TCPServer Class
The next class is TCPServer. As the name implies, it implements a simple TCP server. It can handle multiple clients by using a session for each client.The sessions are instances of TCPServerSession. TCPServer contains a constructor and two methods.The constructor initializes the server.The Close() method shuts down the server and Run() listens for incoming connection requests. Furthermore, Run() starts a session for each connected client. First, Figure 5.72 shows the class fields of TCPServer.
Figure 5.72 Class Fields of TCPServer in Base.cs
// sessions list
private ArrayList sessions = null; // session threads list
private ArrayList sessionThreads = null; // command processor
private ExecuteCommand executeCommand = null; // connection listener
private TcpListener listener = null; // server thread
private Thread server = null; // open flag
private bool open = false;
Figure 5.73 shows the constructor.
Figure 5.73 Constructor of TCPServer in Base.cs
public TCPServer ( int port, ExecuteCommand executeCommand )
{
Continued
www.syngress.com

Network Programming: Using TCP and UDP Protocols • Chapter 5 |
257 |
Figure 5.73 Continued
this.sessions = new ArrayList (); this.sessionThreads = new ArrayList ();
this.executeCommand = executeCommand;
Console.WriteLine ( "initializing TCP server..." );
Console.WriteLine ( "creating listener..." ); this.listener = new TcpListener ( port );
Console.WriteLine ( "starting listener..." ); this.listener.Start ();
this.open = true;
this.server = new Thread ( new ThreadStart ( Run ) ); this.server.Start ();
Console.WriteLine ( "TCP server initialization complete, port=" + port );
}
First, it creates two instances of ArrayList.The first is the class field sessions that contains all sessions.The second one is a list of the session threads and is represented by the class field sessionThreads.This list is needed for shutting down the session threads.This will be done by the Close() method. Furthermore, the constructor creates a listener that listens on the given port for incoming client connection requests.The other parameter is a delegate that implements a command processor.This delegate instance will be given to each started session for command execution. Finally, the constructor starts a thread for listening on incoming connections and starting a session for each connection.The thread runs the Run() method (see Figure 5.74).
www.syngress.com
258 Chapter 5 • Network Programming: Using TCP and UDP Protocols
Figure 5.74 Run() Method of TCPServer in Base.cs
public void Run ()
{
while ( this.open )
{
Console.WriteLine ( "listening for incomming connections..." );
// wait for incoming client connection requests Socket s = this.listener.AcceptSocket ();
if ( s.Connected )
{
Console.WriteLine ( "client connected, starting client " + "session..." );
// create a client session
TCPServerSession session = new TCPServerSession ( s, this.executeCommand );
//add it to the session list this.sessions.Add ( session );
//create a thread for the session
Thread th = new Thread ( new ThreadStart ( session.Run ) );
//start it th.Start ();
//add it to the session thread list this.sessionThreads.Add ( th );
}
}
}
The Run() method listens for incoming connections. If the method receives a connection request, a session is started with the accepted socket and the command processor delegate.This is repeated as long as the open flag is set. If the open flag is cleared by the Close() method, the loop terminates (see Figure 5.75).
www.syngress.com

Network Programming: Using TCP and UDP Protocols • Chapter 5 |
259 |
Figure 5.75 Close() Method of TCPServer in Base.cs
public void Close ()
{
Console.WriteLine ( "TCP server is closing..." );
if ( this.open )
{
this.open = false;
//stop listner this.listener.Stop ();
//stop server thread this.server.Abort (); this.server.Join ();
//stop all session threads and close the sessions while ( this.sessions.Count > 0 )
{
//stop session thread
Thread th = (Thread)this.sessionThreads[0]; th.Abort ();
th.Join (); this.sessionThreads.Remove ( th );
// close session
TCPServerSession s = (TCPServerSession)this.sessions[0]; s.Close ();
this.sessions.Remove ( s );
}
}
Console.WriteLine ( "TCP server closed" );
}
www.syngress.com

260 Chapter 5 • Network Programming: Using TCP and UDP Protocols
The Close() method stops the listener and the server thread that listens for incoming connections.Then, each session thread is stopped, and the suitable session is closed.
The Chat Protocol
Here, you will implement three commands: HELLO, SAY, and BYE.The general syntax of a command line is as follows:
user_name ":" command [ ":" message ] CRLF
That syntax means a line contains the username that sends the command line followed by the actual command. An optional message may follow the command. The message is part of the command line if the command is SAY. A carriage return/linefeed terminates the line.The following is a sample communication between a client c and a server s:
c: <user_name>:HELLO<CRLF> s: HELLO<CRLF>
(sends via UDP multicast "<user_name> has joined the chat room") c: <user_name>:SAY:<message><CRLF>
s: OK<CRLF>
(sends via UDP multicast "<user_name>: <message>") c: <user_name>:BYE<CRLF>
s: BYE<CRLF>
(sends via UDP multicast "<user_name> has left the chat room")
You now can describe the chat server class and client class. Let’s start with the chat server.
The ChatServer Class
This class is contained on the CD in the file ChatServer.cs. For simplification, the chat command processor is contained in the user interfaces classes. User interface is not a correct name; it is a simple console application without any user interaction. Because all functionality is contained in the classes described earlier, the server is very simple. It implements the CommandProcessor interface and has only three methods: a constructor, a Close(), and an Execute() method. Figure 5.76 shows the class fields of the ChatServer class.
www.syngress.com

Network Programming: Using TCP and UDP Protocols • Chapter 5 |
261 |
Figure 5.76 Class Fields of the ChatServer Class in ChatServer.cs
//listening port for incoming connection requests private const int TCP_PORT = 8080;
//local port for the UDP peer for sending new messages private const int UDP_LOCAL_PORT = 8081;
//multicast group IP address
private const string UDP_GROUP_IP = "224.0.0.1"; // multicast group port
private const int UDP_GROUP_PORT = 8082;
//TCP server for incoming connection requests private TCPServer tcpServer = null;
//UDP peer for sending new messages
private UDPPeer udpPeer = null;
// list of currently connected users private ArrayList users = null;
Now let’s have a look at the constructor (see Figure 5.77). First, it creates the currently connected users list.Then the constructor starts the TCP server and the UDP peer.
Figure 5.77 Constructor of ChatServer in ChatServer.cs
public ChatServer ()
{
this.users = new ArrayList ();
this.tcpServer = new TCPServer ( TCP_PORT, new ExecuteCommand ( Execute ) );
this.udpPeer = new UDPPeer ( UDP_LOCAL_PORT, UDP_GROUP_IP, UDP_GROUP_PORT );
}
The next method is the Close() method (see Figure 5.78). It simply shuts down the UDP peer and TCP server by calling their Close() methods.
www.syngress.com

262 Chapter 5 • Network Programming: Using TCP and UDP Protocols
Figure 5.78 Close() method of ChatServer in ChatServer.cs
public void Close ()
{
this.udpPeer.Close (); this.tcpServer.Close ();
}
The command execution is determined by the chat protocol. A user can send messages to others only if the HELLO command was sent before. If the server receives that command, the username is added to the connected users list. Now if the server receives the SAY command from that user, it sends the message to the UDP multicast group. If a user wants to leave the chat room, it simply sends the BYE command.The server now removes the user form the user list and suppresses all possible SAY commands from that user. Figure 5.79 shows the Execute() method.
Figure 5.79 Execute() Method of ChatServer in ChatServer.cs
public bool Execute ( string command, ref string result )
{
bool ret = true;
Console.WriteLine ( "executing command: " + command );
// split the command into parts
string[] cmd = command.Split ( new Char[] {':'} ); string user = cmd[0];
string operation = cmd[1]; string message = null;
//if the command string contains more than two ':' concatenate the
//splitted rest, this may happen if the message contains ':'
if ( cmd.Length > 2 )
{
message = cmd[2];
for ( int i = 3; i < cmd.Length; i++ )
Continued
www.syngress.com

Network Programming: Using TCP and UDP Protocols • Chapter 5 |
263 |
Figure 5.79 Continued
message += cmd[i];
}
// execute the command switch ( operation )
{
// user enters the chat room case "HELLO":
if ( !this.users.Contains ( user ) )
{
result = "HELLO";
//add user to currently connected users list this.users.Add ( user );
//send message to all users
this.udpPeer.Send ( user + " has joined the chat room" );
}
break;
// user sent message to the chat room case "SAY":
// execute only if user is currently connected
if ( this.users.Contains ( user ) && ( message != null ) )
{
result = "OK";
// send message to all users this.udpPeer.Send ( user + ": " + message );
}
break;
// user disconnects from chat room
Continued
www.syngress.com

264 Chapter 5 • Network Programming: Using TCP and UDP Protocols
Figure 5.79 Continued
case "BYE":
// execute only if user is currently connected if ( this.users.Contains ( user ) )
{
result = "BYE";
//remove user from currently connected users list this.users.Remove ( user );
//send message to all users
this.udpPeer.Send ( user + " has left the chat room" );
}
break;
// unknown command, return an error default:
result = "ERROR"; break;
}
return ret;
}
SECURITY ALERT
A client can track all chat room messages if it knows the group IP address and port. It doesn’t have to be connected with the HELLO command. The server’s user administration takes care that unconnected users do not send messages to the chat room.
www.syngress.com
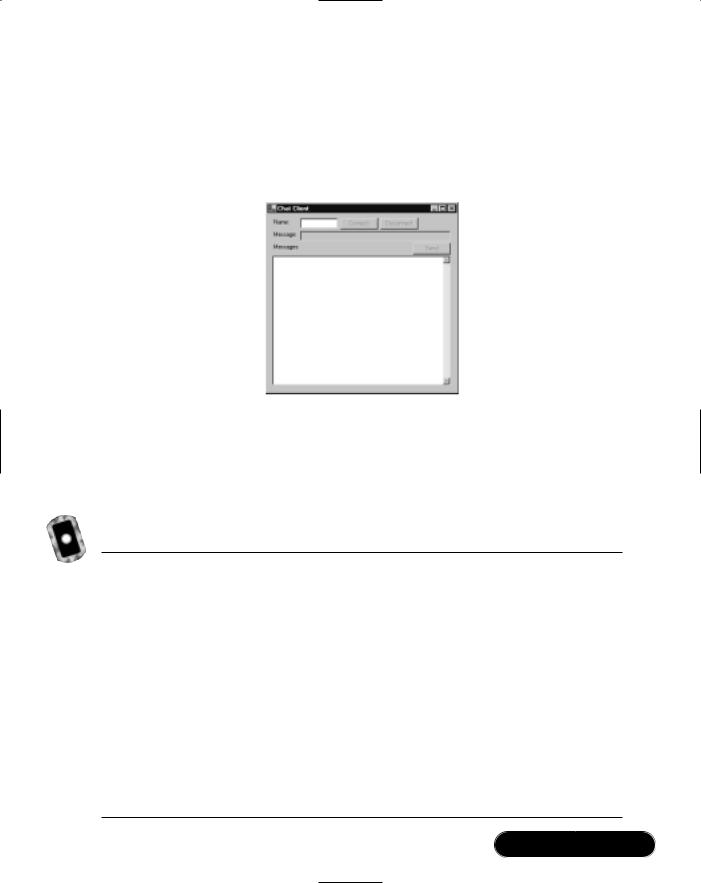
Network Programming: Using TCP and UDP Protocols • Chapter 5 |
265 |
The ChatClient Class
This class is contained on the CD in the file ChatClient.cs. For simplification, the client chat functionality is contained in the user interfaces classes. Here we have a Windows Forms application (see Figure 5.80).
Figure 5.80 The Chat Client Form
Let’s go through a small chat session. Assume that the chat server and client are still running.Type in a name to the Name data field. After clicking Connect, the code of its click event handler is executed (see Figure 5.81).This event handler is the OnConnect() method.
Figure 5.81 OnConnect() Event Handler of the ChatClient Class in
ChatClient.cs
public void OnConnect ( Object sender, EventArgs e )
{
this.proc = new TCPRemoteCommandProcessor ( "127.0.0.1", TCP_PORT, true );
string result = null;
this.proc.Execute ( this.name.Text + ":HELLO", ref result );
this.connected = result.Equals ( "HELLO" );
// enable or disable controls on connection status
}
www.syngress.com

266 Chapter 5 • Network Programming: Using TCP and UDP Protocols
The class field proc is the command processor that sends commands to the chat server. After creating an instance of TCPCommandProcessor, the HELLO command is sent to the server. If the result of the command is HELLO, the connected flag is set. Now you can type a message into the Message data field. After clicking Send, the OnSend() method is called.This method is the click event handler of the Send button (see Figure 5.82).
Figure 5.82 OnSend() Event Handler of the ChatClient Class in ChatClient.cs
public void OnSend ( Object sender, EventArgs e )
{
string result = null;
this.proc.Execute ( this.name.Text + ":SAY:" + this.message.Text, ref result );
}
The message is sent within a SAY command to the server. Before you get a look at the message-receiving code, let’s discuss the disconnect code.The OnDisconnect() method is the click event handler of the Disconnect button (see Figure 5.83).
Figure 5.83 OnDisconnect() Event Handler of the ChatClient Class in
ChatClient.cs
public void OnDisconnect ( Object sender, EventArgs e )
{
if ( this.connected )
{
string result = null;
this.proc.Execute ( this.name.Text + ":BYE", ref result );
this.proc.Close ();
this.connected = false;
// enable or disable controls on connection status
}
}
www.syngress.com

Network Programming: Using TCP and UDP Protocols • Chapter 5 |
267 |
For disconnecting, first the BYE command is sent. After that, the command processor will be closed and the connected flag will be cleared.
For receiving messages from the chat server, you use an instance of the UDPMulticastClient class. As you have seen in the section “Creating a News Ticker Using UDP Multicasting,” the constructor of UDPMulticastClient needs a Notify delegate.This delegate will be initialized with the SetMessage() method of ChatClient.The instantiation of the multicast client is done by the constructor of the ChatClient class. (see Figure 5.84). A closed event handler for the form is registered here also.
Figure 5.84 Constructor of ChatClient in ChatClient.cs
public ChatClient ()
{
//create controls
//add an event listener for close-event this.Closed += new EventHandler ( OnClosed );
//create communication components
this.group = new UDPMulticastClient ( UDP_GROUP_IP, UDP_GROUP_PORT, new Notify ( SetMessage ) );
}
As a result of receiving a message from the chat server, the SetMessage() method is called by the multicast client instance.The method simply concatenates the given string to the text in the multiline data field that shows the messages (see Figure 5.85).
Figure 5.85 SetMessage() Method of ChatClient in ChatClient.cs
public void SetMessage ( string text )
{
if ( !this.messages.Text.Equals ( "" ) ) this.messages.Text += "\r\n";
this.messages.Text += text;
}
www.syngress.com
268 Chapter 5 • Network Programming: Using TCP and UDP Protocols
Finally, we have a look at the OnClosed() method of the form.This method is registered to the form as a closed event handler. If the window is closed, the code is executed (see Figure 5.86).
Figure 5.86 OnClosed() Method of ChatClient in ChatClient.cs
public void OnClosed ( Object sender, EventArgs e )
{
OnDisconnect ( null, null );
this.group.Close ();
}
First, the OnDisconnect() method is called for disconnecting the command processor if the Disconnect button wasn’t clicked before.Then the multicast client is closed. Now you can compile and run your example.
Compiling and Running the Example
Please go to the directory on the CD where you can find the files ChatServer.cs and ChatClient.cs. Start the batch file compile.bat to compile the example. After successful compiling, start the batch file run.bat. A server and a client is started.
Now you can start a chat session as described in this section. Figure 5.87 shows the chat client after finishing a very short chat session. Figure 5.88 shows the chat server after the mentioned session.
Figure 5.87 Chat Client after a Short Chat Session
www.syngress.com
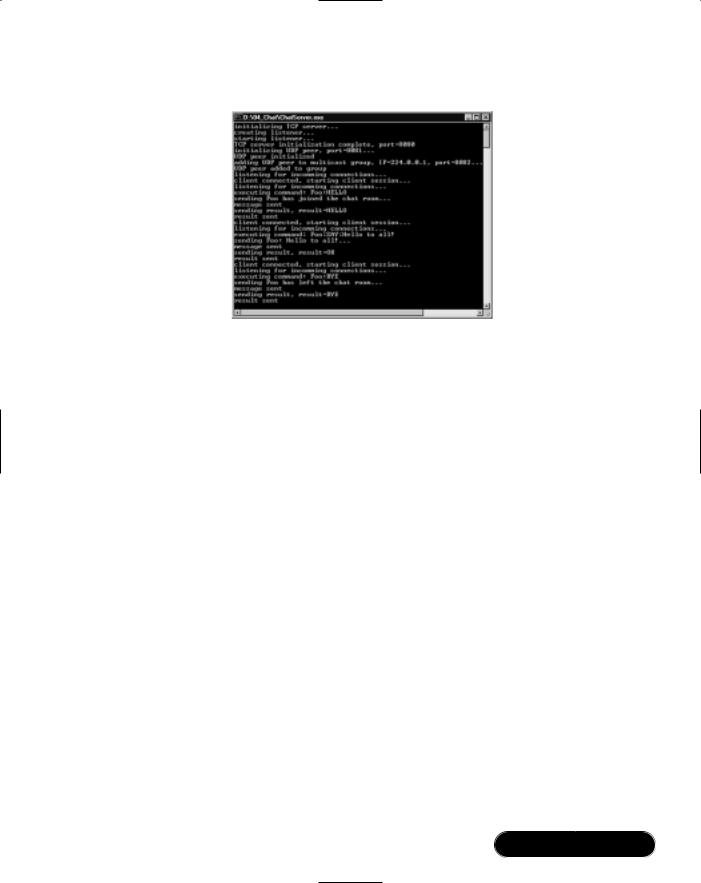
Network Programming: Using TCP and UDP Protocols • Chapter 5 |
269 |
Figure 5.88 Chat Server after a Short Chat Session
The next section shows one way you can implement a file sharing peer with .NET.
Creating a TCP P2P File
Sharing Application
The concept of peer-to-peer (P2P) is becoming more and more important in networks, and P2P Internet applications such as Napster and Gnutella are widely popular. But what exactly is a peer-to-peer application?
Well, first consider client/server applications, the most common model for communication today. A client requests or posts data to or from a server.The client knows how to request or post data and the server knows how to respond. For instance, a Web server listens for incoming connections until a browser requests a page.The Web server reacts only to browsers; it cannot arbitrarily contact a browser. Any communication is initiated by a client.
In P2P communication, on the other hand, all applications act as clients and servers at the same time.When peer A requests data from peer B, A acts like a client and B as a server. However, B can also request data from A, so B acts as a client and A as a server. Every peer adds a bigger amount of value to network. Furthermore, no centralized server is needed, which decreases the effort needed in administrating the data. Another advantage is that if a peer is down, only a small portion of data is unavailable.
This model does require additional functionality from the peer application. First, a peer must be able to find other peers.This is called discovery.There are
www.syngress.com

270 Chapter 5 • Network Programming: Using TCP and UDP Protocols
different strategies for discovery. So-called pure P2P applications can discover other peers directly. Another approach is to have discovery servers where peers are registering if they are online. A peer searching for another peer requests the connection information from the discovery server.
Another key functionality of P2P networks is the so-called content lookup.A peer must be able to find data contained in the network.A pure P2P application can directly query the network for data.A second approach is the existence of a lookup server. Peers send information about their data to the lookup server. For instance, for file sharing peers, this information can be filename, length, type, and descriptions about file content.Another possible server is a content server. Peers upload their files to this server.Then a peer can download the files from this server.
In this section, you create a simplified P2P file sharing application with reduced functionality.The peer can upload or download files from another peer only. No discovery or lookup functionality is contained in this peer.
You may think that UDP is the best way to implement such a peer. Indeed this is how some remote file access systems are implemented. As mentioned, the advantage of UDP is the performance. However, you would have to implement a method that guarantees the correct order of the datagrams sent between the peers, so you’ll use another way to implement the peer.
For the remote functionality, you develop a remote file stream that works in principle like CORBA, remoting, or RMI—because we’re discussing .NET, we use the term remoting.
Generally speaking, all remote object architectures work in the same way. A remote object is divided into two parts. On the client side is a proxy object.The actual object functionality is implemented on the server side. For communication between the proxy and the server object, SOAP is used. Figure 5.89 shows this very simplified remoting architecture.
Figure 5.89 Very Simplified Remoting Architecture
Client |
|
Server |
|
Proxy |
SOAP |
Server |
|
Object |
|||
|
|
A proxy object acts like a normal object.The application using that object doesn’t notice anything about the remote activity (except maybe a lower performance while executing object methods). Every method call to the proxy object
www.syngress.com