


Chapter 3
Visual Studio.NET
IDE
Solutions in this chapter:
■Introducing Visual Studio.NET
■Components of VS.NET
■Features of VS.NET
■Customizing the IDE
■Creating a Project
;Summary
;Solutions Fast Track
;Frequently Asked Questions
109

110 Chapter 3 • Visual Studio.NET IDE
Introduction
In addition to the powerful .NET platform, Microsoft has introduced a new version of its Visual Studio Suite, called Visual Studio.NET (VS.NET). Even in its Beta stages,VS.NET provides the developer with powerful visual tools for developing all kinds of applications on the .NET platform.
VS.NET helps in the speedy creation and deployment of applications coded in any of the managed languages, including C#.This chapter gets you familiar with the new features of VS.NET and teaches you to customize it according to your needs.We cover the many new features of VS.NET, including the .NET Framework,Web Services, XML support, and the Integrated Development Environment (IDE).
Also, we cover the XML editor, which has tag completion for Extensible Stylesheet Language Transformations (XSLTs).We go over the IntelliSense feature and how it is used in the different windows. Finally, we cover how to customize your settings within the IDE.
VS.NET is a complete development environment.The components stay the same regardless of language, making it very easy to switch projects and languages and have the same features in the same place. Also, with the expanded IntelliSense with tag completion, routine code writing is faster.
Introducing Visual Studio.NET
The Start pages deliver a great many resources for the development environment. The Start page is the default home page for the browser inside of the IDE.You can tap all aspects of the IDE from these pages.We go over the three most useful Start pages, starting out with the “What’s New” page and the “My Profile” page, and ending with the “Get Started” page.We show you what is new with VS.NET, set up your profile, and get started using the tool.
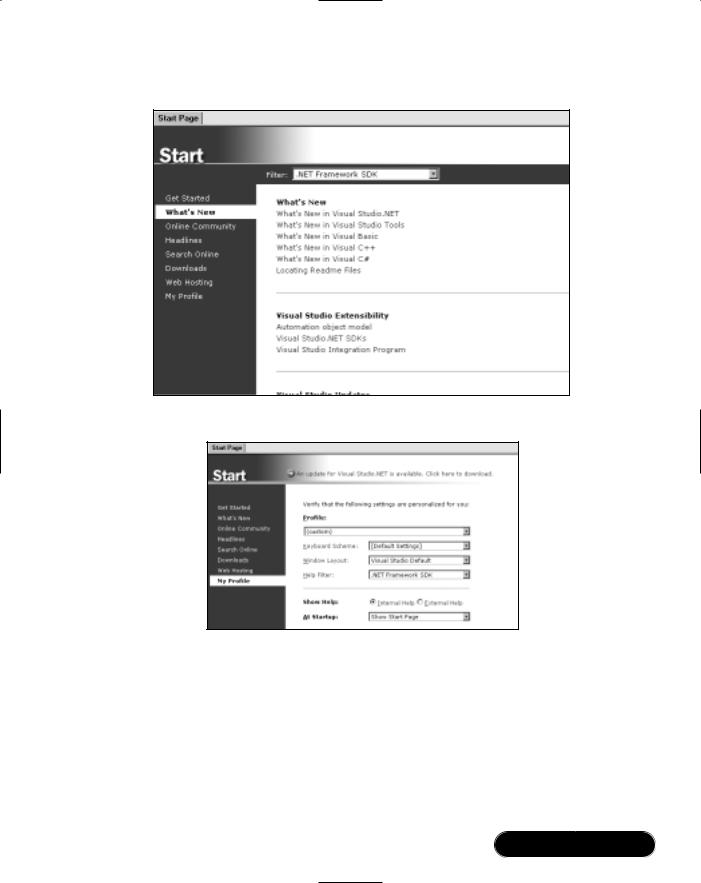
Let’s open up VS.NET and take a look at the first of the Start pages (see Figure 3.1).
You can filter the “What’s New” Start page to whatever topic you are interested in—we have chosen to filter by .NET Framework. All content in the “What’s New” Start page will be rendered based on the filter, so you can save some time by not looking up new features for VB, for example.You can also select Check availability of Visual Studio.NET service packs from this Start page and check to see if you need the latest download for VS.NET. Let’s look at the “My Profile” page next, shown in Figure 3.2.
www.syngress.com
Visual Studio.NET IDE • Chapter 3 |
111 |
Figure 3.1 VS.NET Start Page: What’s New
Figure 3.2 VS.NET Start Page: My Profile
The “My Profile” section of the Start page lets you create your own (custom) profile or select from any of the options listed. If you happen to come from a VB background, using the VB profile would be beneficial so that you could be familiar with the tools from VS 6. Likewise, a C++ or Interdev user from VS 6 will benefit from the same environment.This will help you to learn the tool by showing a familiar layout.You can also select to have only external help, which will open the Help documentation in a new window outside of the IDE.You can filter the Help topics; in our case, we’ve selected .NET Framework SDK in
www.syngress.com
112 Chapter 3 • Visual Studio.NET IDE
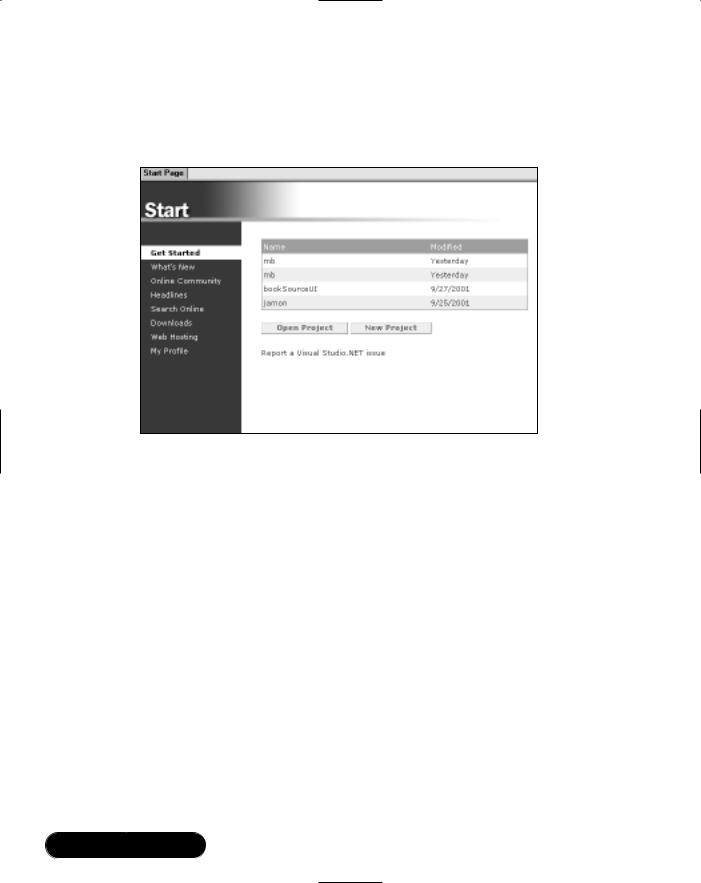
the What’s New section Start page.You can also select the window layout that you want to use.You then can select the Get Started Start page, shown in Figure 3.3.
Figure 3.3 VS.NET Start Page: Get Started
Here you can select projects you worked on previously, and you can also see where they are located on the machine by dragging the mouse over the name of the file.This is a nice feature that you can use where you have two projects named the same but at different locations.
The Start page is the default page for the Web browser window in VS.NET, so if you close it and want to get it back, simply hit the home icon on the Web toolbar and the page will load in the design window.
Components of VS.NET
The Visual Studio.NET IDE is made up of many components that interact with one another.You can use each of them separately or at the same time.This feature lets the user decide which set of components he wishes to use. All of the components together create an intuitive graphical user interface (GUI).
Design Window
The design window is used when you are graphically creating an application using the Toolbox to drag and drop objects onto the window. Much like the code
www.syngress.com
Visual Studio.NET IDE • Chapter 3 |
113 |
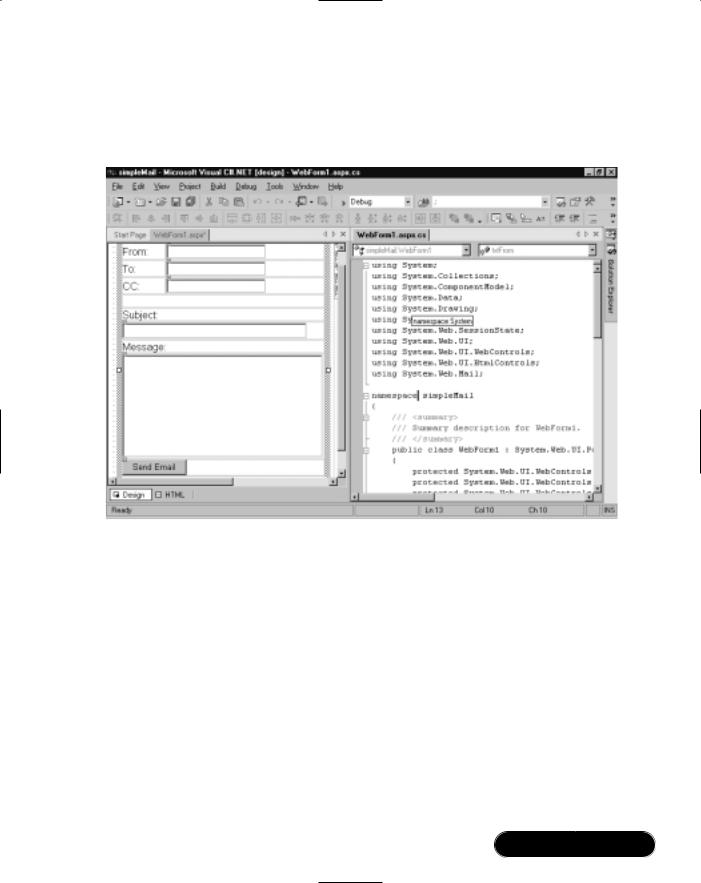
window and browser, the design window cannot be docked or set to Auto Hide. You can split the design view or have tab groups added to it. Splitting the window helps when you need to compare code from two separate files (see Figure 3.4).
Figure 3.4 Split Window View
Here you can see windows for both design and code.This is a C# Web application, but the functionality is the same for any project.
Code Window
As we mentioned, the code window is much like the design window.There is no toolbox functionality within the code view, however—you cannot drag and drop objects from the toolbox into the code view. If you create objects in the code view and then switch back to the design view, the objects that you added would persist in design view. Again you cannot dock this window nor allow it to float. You can, however, split it and add new tab groups to the display. Figure 3.5 shows the code window split and a tab vertical tab order added.
If you look at Figure 3.5 a little more closely, you can see a collapsible menu tree on the left-hand side.This is created every time you create a class or function, enabling you to collapse each section independently to save space for viewing
www.syngress.com

114 Chapter 3 • Visual Studio.NET IDE
other code present within the window. Note that you must have the default option Outlining Mode checked for this to work. If you want to have line numbers show for your code, you will have to choose Tools | Options. In the Options dialog box, select Text/Editors. Select C# and then choose the option to have line numbers added.
Figure 3.5 Code View
You may also define your own regions of code that may be collapsed.To do this simply add the following code to your class or function you want to make into a region:
#region
///Comments and code
#endregion
Server Explorer
The Server Explorer is by far one of the best features in VS.NET. From this window you can connect to a server on the network and have full access to that server or servers.You can also link to any database servers on the network. Let’s see how to do that. Click the Connect to Database icon in the title bar of the window (see Figure 3.6).You will be prompted to give all information required for a Universal Data Link (UDL).
Fill out the UDL Wizard and test the connection. After this is done, you can access everything within that database that the user has rights to. Let’s take a look at that in Figure 3.7.
www.syngress.com

Visual Studio.NET IDE • Chapter 3 |
115 |
Figure 3.6 Add Database to Server Explorer
Figure 3.7 Expanded Database View
www.syngress.com

116 Chapter 3 • Visual Studio.NET IDE
You can now click on any object within the Server Explorer and edit it within VS.NET.This is a timesaver from having to have both the Query Analyzer and VS.NET open at the same time and going back and forth between the two just to switch a data type of one stored procedure input parameter.
Toolbox
The Toolbox, shown in Figure 3.8, includes Data, Components,Web Forms, and Window Forms tabs. As stated earlier in the chapter, you can use the Toolbox with the Design View window.You can drag and drop each component or control onto the design window. Also, you may customize the Toolbox by adding in your own code fragments and renaming them to something meaningful.
Figure 3.8 The Toolbox Window
To do this, simply right-click on the Toolbox and select Add Tab. Give it a name that is different than the existing tabs, and you are ready to add your own tools.To add a new tool, highlight a block of code that you want to make into a tool and drag it onto the Toolbox label you just created.
The Clipboard Ring stores all the items that you have copied in code view automatically.You can then double-click these and add them to the source code.
www.syngress.com
Visual Studio.NET IDE • Chapter 3 |
117 |
Docking Windows
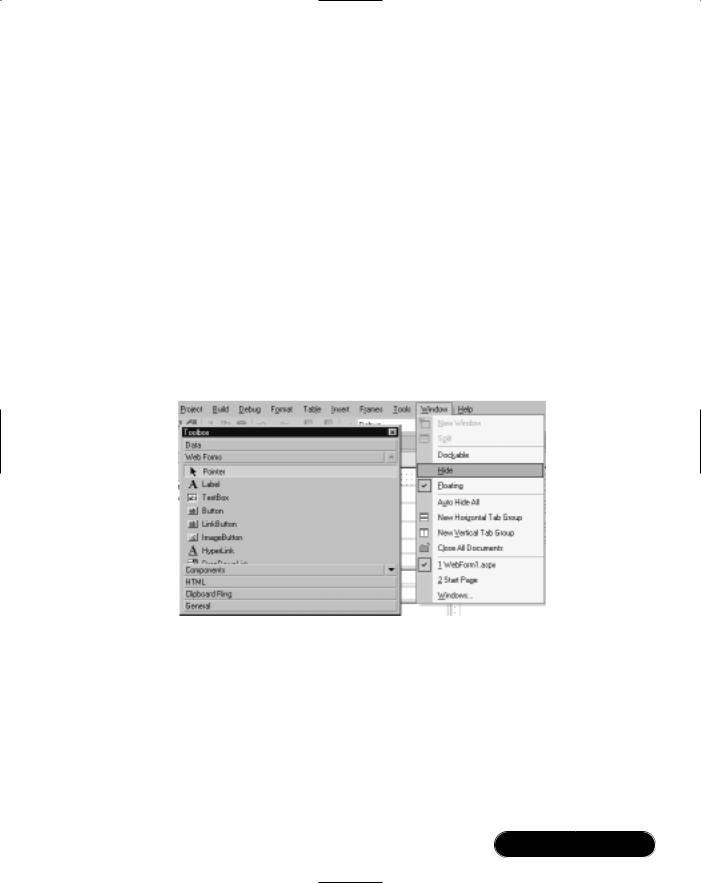
One of the new features for VS.NET is that you can dock or expand or collapse all the windows within the IDE.To add windows to your IDE, navigate to the standard toolbar and select View; here you can select all the windows that you want to have immediately available in your environment. One drawback to this is that you will not have much room left to work in if you select a lot of windows to show, but the Auto Hide feature of each window makes them slide off the screen and embed in the side when not needed.This enables you to have maximum code view but still have all windows present.To see a window that has Auto Hide enabled, simply position your mouse over the window icon on either side of the IDE.You can dock each window into place by clicking on the pin or by navigating to the standard toolbar and choosing the Window menu option. Once a window is docked, it is there permanently; you can, however, make the window float by selecting Window | Floating (see Figure 3.9).
Figure 3.9 Floating Window
Properties Explorer
The Properties Explorer is much as it was in VS 6 and the Visual Basic IDE and Visual Interdev IDE. Select an object from the design window, and in the Properties Explorer, you will see available attributes for that object listed, as shown in Figure 3.10.The right-hand column lists the property names, and the left-hand column stores the attribute’s value.The Properties window enables Rapid Application Development (RAD) by allowing you to quickly create a graphical representation of the application you are building without doing any
www.syngress.com
118 Chapter 3 • Visual Studio.NET IDE
coding whatsoever. Some options are available in the Properties Explorer.You can select from the drop-down list the actual object you want to view.You can also select the Events option and have the event available to that object displayed.You can organize the Properties Explorer either by categories or alphabetically.
Figure 3.10 Properties Explorer
Any changes made in this window will be propagated to the design view and code view windows, respectively.
Solution Explorer
The Solution Explorer is the same as it was in VS 6.The Solution Explorer is a look at all the files in your solution. In the title menu bar, you have four options: Refresh, Copy Web, Show All Files, and Properties.The Properties option lets you set all of your solutions’ properties, including debug parameters options.The
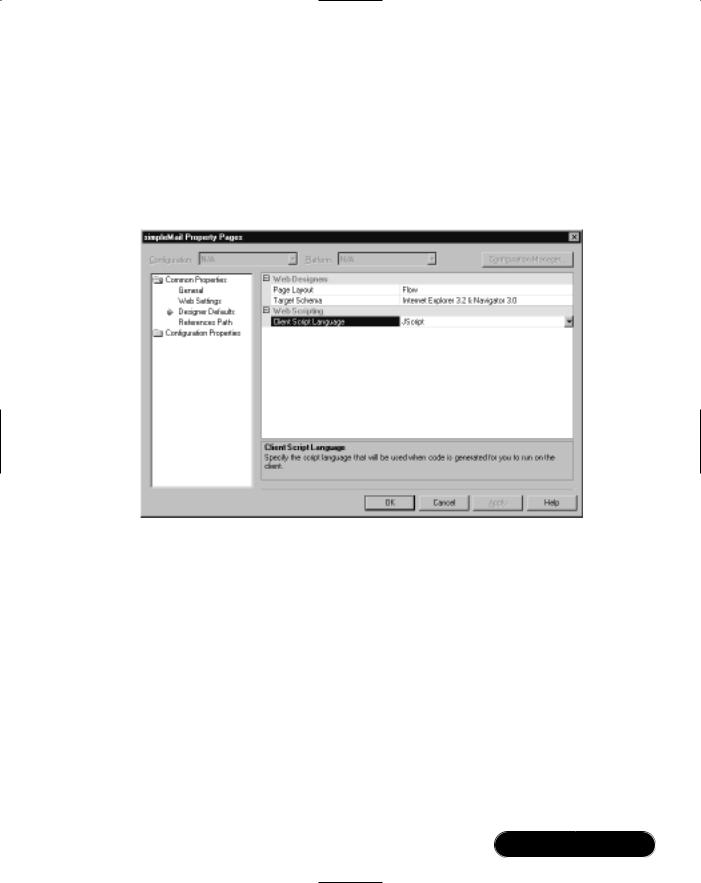
.NET IDE has two different types of containers available for holding items: solutions and projects.The main difference between the two is that you can have multiple projects within a solution, whereas the project container keeps only files and items within files.To view a project’s properties, right-click the project and select Properties. Let’s look at project properties in more detail in Figure 3.11.
Here, you need to make two changes. Set the target schema to Internet Explorer 3.2 & Navigator 3.0. Also, change the page layout from Grid to
www.syngress.com
Visual Studio.NET IDE • Chapter 3 |
119 |
Flow.These two changes will make all the JavaScript comply with the selected browsers.This will enable you to code without having to check to make sure if your scripts will work in older browsers. By making the change to “flow layout,” you prevent your code from using absolute positioning within span tags so that it will be safe for Netscape users.These two changes are useful for any ASP.NET development you may do inside of the VS.NET IDE.
Figure 3.11 Project Properties
Object Browser
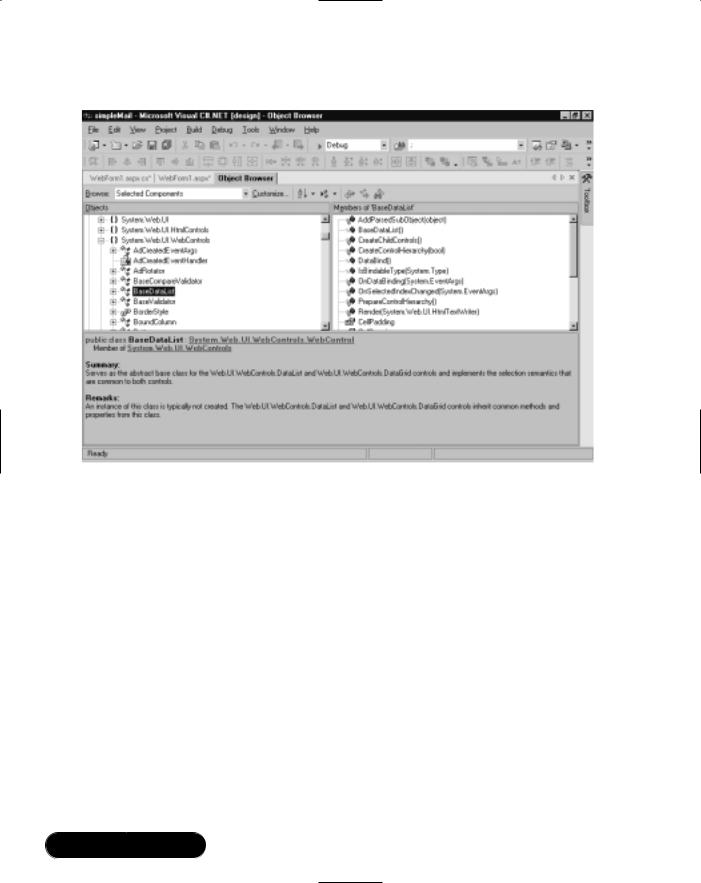
The Object browser will give you a complete list of all classes’ methods and properties in your solution. Everything is listed, and it is quite in depth. If you want to, you can look up parents of classes that you are using and list out the methods and properties you might need. By double-clicking on an external class in your solution, the Object browser will load and have all parent and child nodes of the class listed with each of their methods and properties included.This comes in handy when you are in need of finding a suitable substitute class to handle some part of your application. Like in Java, .NET has an incredible quantity of built-in classes that can accomplish just about everything you may need—the trouble is finding their location and how to access their methods and properties. Using the Object Browser enables you to achieve this in a timely fashion (see Figure 3.12).
www.syngress.com
120 Chapter 3 • Visual Studio.NET IDE
Figure 3.12 Object Browser
From this window, you can quickly drill through a class that is not your own and see what methods and properties it has; you also will get a summary of what it does and how it is instantiated.
Dynamic Help
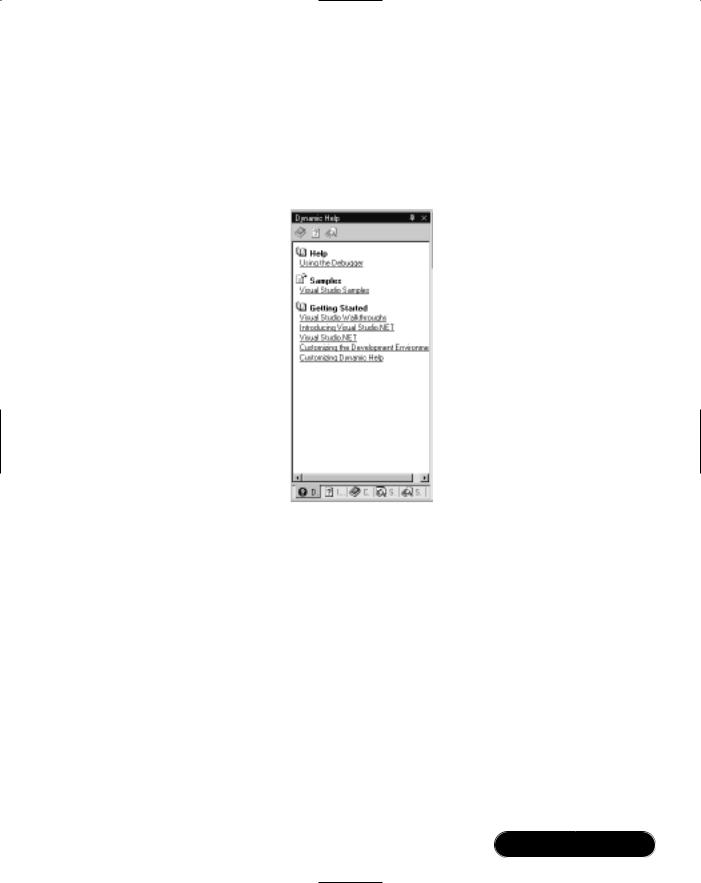
Dynamic Help is a dockable window just like the previous windows we have discussed.To get Dynamic Help to appear, simply choose Help | Dynamic Help. You can then make the window float or Auto Hide. One thing to note is that each part of Help (Index, Contents, Search, Index Results, and Search Results), are all separate windows, so if you undock them and make them all float you will have quite a few windows appearing on the screen. One thing you may do is load all the Help windows into themselves and a bottom tab order will appear inside the main Help window; you can then access all parts of Help from the same window (see Figure 3.13).
To customize the Dynamic Help window, choose Tools | Options. In the Options dialog box, select Environment and then select Dynamic Help.
www.syngress.com
Visual Studio.NET IDE • Chapter 3 |
121 |
Here you can specify what topics you want to have available and in what order. You may also specify how many links are displayed per topic.You may also create a custom Help file on your own for your project, by following the XML schema named vsdh.xsd. Create your XML file based off of that schema list and place the file where you want your Help topics to be displayed.
Figure 3.13 Docked Help Windows
Tabbing through the many different Help options and getting to the information you need is now easy. If you have the hard drive space, loading all the MSDN Help files from the disks that come with VS.NET would be beneficial.To do this, simply check the option on the installation sequence that will run from the computer and not the CD.This will prevent you from constantly having to load another disk every time you want to look up a particular topic.This gets quite annoying when you need one disk to open the tree view and another to access the topic within.
Task List Explorer
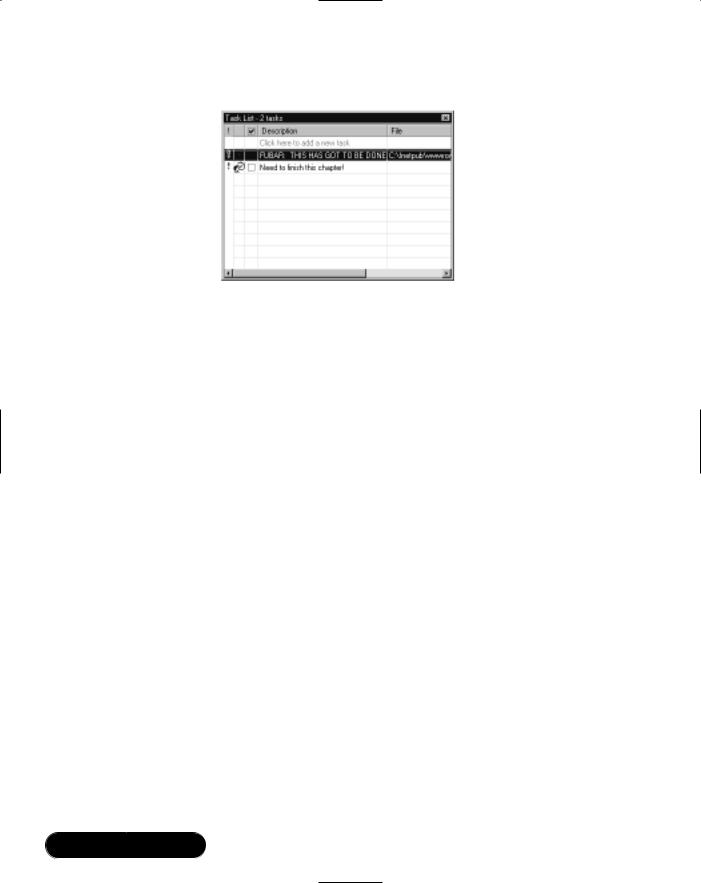
The Task List (see Figure 3.14) enables you to add tasks that need to be done and organize them in a number of different ways and with priority. It is very simple to use. If you are using Source Safe, a group of developers can quickly see what needs to be done and what has been done by viewing the Task List for each file in the project.
www.syngress.com
122 Chapter 3 • Visual Studio.NET IDE
Figure 3.14 Task List
Another feature of the Task List is that it will create tasks on the fly as you debug your application by marking down any errors.You can then go back and fix each task and have it removed.You can organize the task list on Build errors. Also you can create your own custom token, which is a unique key that tells the Task List that a comment needs to be added to the list, to appear in your Task List from your code.You can map out your function or method or whatever you are coding with your own custom tokens and have them appear in the Task List.
To create your own custom token to add to the default tokens available (HACK,TODO, UNDONE), choose Tools | Options | Task List. Give the token name and priority.To use the token, simply add something like the following in your code window (use the comment tag “//” and then the token name followed by the instruction for the task):
// FUBAR what I want in the task list to appear.
Features of VS.NET
VS.NET has a combination of new and old features built into the IDE.We discuss the additions to IntelliSense, the new features of XML support, and the many different ways you can now customize the IDE. Let’s begin with IntelliSense.
IntelliSense
IntelliSense is a form of code completion that has been part of most Microsoft developer tools for many years now. Code completion technology assists when you start to type a tag, attribute, or property by providing the resulting ending so that you will not have to write out the whole item.You will notice this right away.
www.syngress.com
Visual Studio.NET IDE • Chapter 3 |
123 |
VS.NET has IntelliSense support for all of the primary programming languages:VB.NET, C#, and C++. IntelliSense even exists for Cascading Style Sheets and HTML. Unfortunately,VS.NET doesn’t include IntelliSense for XSLT in the Beta2 version—we may have to wait for the release version. Currently ActiveState does make an XSLT plug-in for VS.NET that provides this functionality; you can obtain a free trial version at http://aspn.activestate.com/ASPN/ Downloads/VisualXSLT.
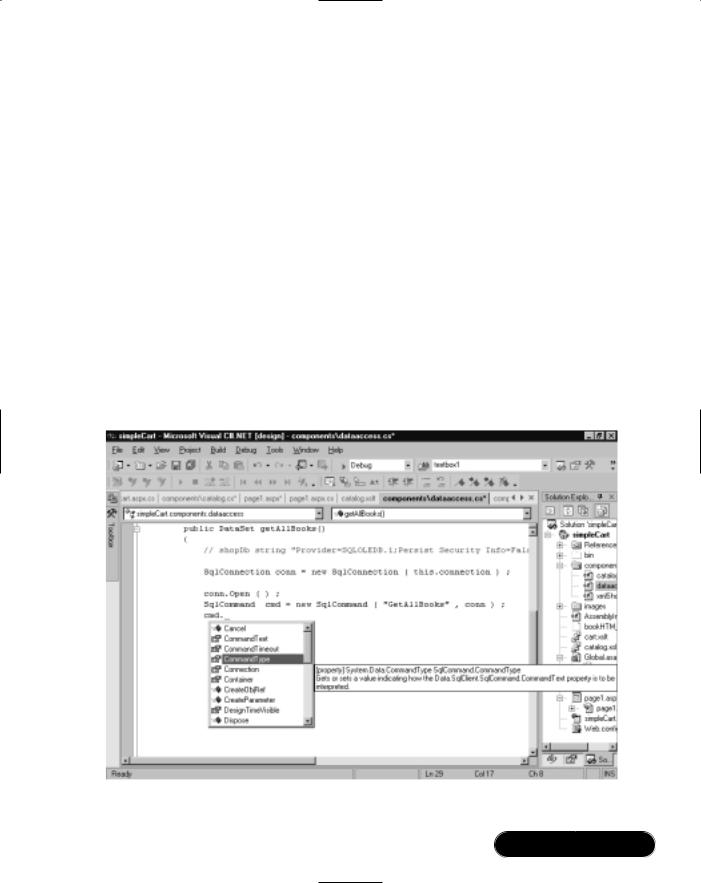
While developing, you will notice that IntelliSense provides information about active classes only, meaning those that you have created in your project or those referenced in your page with the using Directive (for code-behind pages: pagename.aspx.cs). If you are trying to use an object or method, and no IntelliSense appears for it, you may have forgotten to include the reference.
For example, if you attempt to do data operations using the SqlCommand object, no IntelliSense will appear until you reference the appropriate data class (see Figure 3.15):
using System.Data.SqlClient;
Figure 3.15 Using IntelliSense
www.syngress.com
124 Chapter 3 • Visual Studio.NET IDE
For C#, IntelliSense is available only in the code-behind page and not in the ASPX page itself.This may change in the release version.To disable IntelliSense, choose Tools | Options | Text/Editor and select the editor you are using, which should be C#. In the Statement Completion section, uncheck all the options, which will disable IntelliSense for the editor.
XML Editor
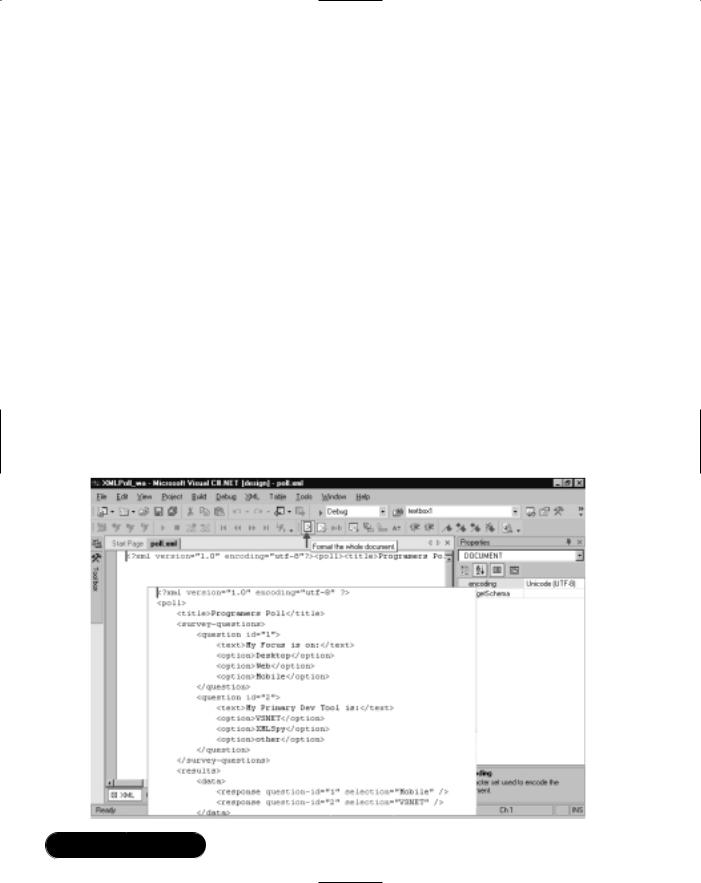
When working with XML,VS.NET has some interesting features. If you create a well-formed XML document of your own, you can easily generate a corresponding XSD schema that conforms to the 2001 W3C XML schema. Once this is done, your XML document will have code completion based on this new schema.To test creating a schema, let’s open poll.xml and generate a schema for it:
■Choose File | Open. Navigate to your CD-ROM drive and locate the file poll.xml.
■Click Open.This should load the page into the IDE.
■If the XML is one continuous line, simply click the Format the Whole Document icon (see Figure 3.16).
Figure 3.16 Formatting an XML Document
www.syngress.com
Visual Studio.NET IDE • Chapter 3 |
125 |
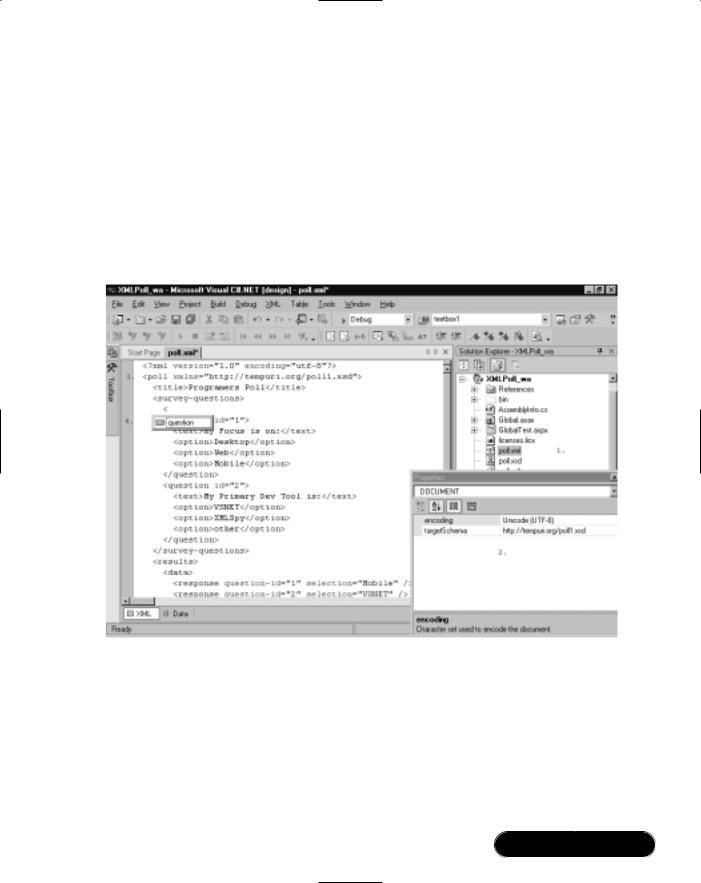
Now, let’s create a schema for this file. Right-click anywhere in the text editor and select Create Schema.You can see these resulting changes in Figure 3.17:
■A new file called poll.xsd was auto-generated by VS.NET.
■In the Properties window, the new schema is set as the file’s target schema.
■An XML namespace attribute is added.
■IntelliSense based on the schema is now available for this document.
Figure 3.17 Generating a Schema for a Well-Formed XML Document
You can also select a different schema to base the XML file on by selecting a new schema from the targetSchema drop-down (see Figure 3.18).This would then provide IntelliSense based on the schema selected.
You can also view XML documents from the Data mode.This presents the document in a hierarchical structure. From this view, you can also add new nodes and data to the document (see Figure 3.19).
www.syngress.com

126 Chapter 3 • Visual Studio.NET IDE
Figure 3.18 Selecting a Target Schema
Figure 3.19 Viewing an XML Document in Data Mode
www.syngress.com
Visual Studio.NET IDE • Chapter 3 |
127 |
Documentation Generation
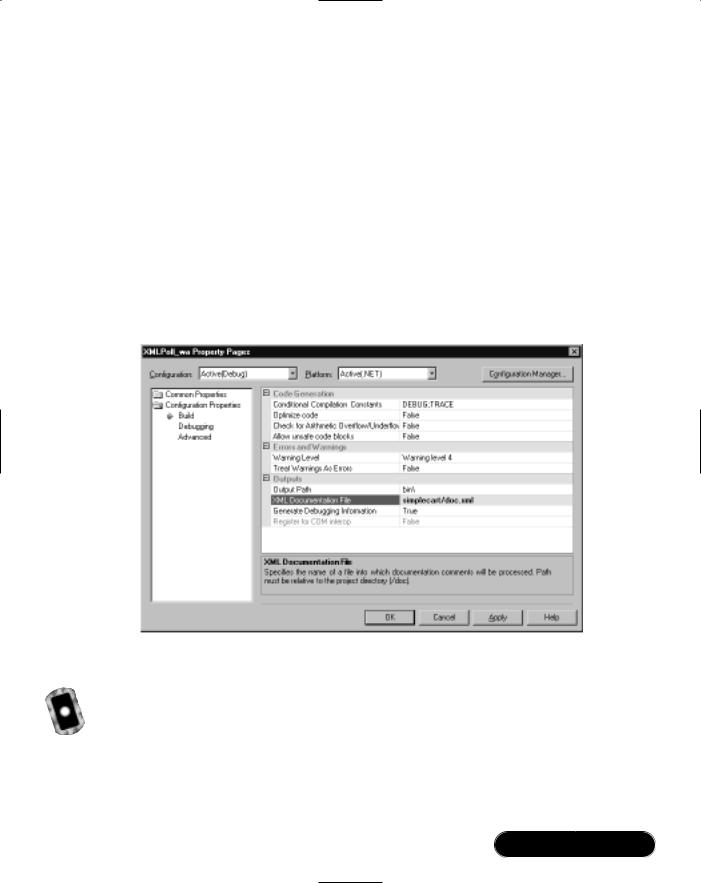
(XML Embedded Commenting)
This feature enables you to comment your code with an embedded XML tagging structure.When XML documentation is enabled, an XML documentation file will be created during the build process. In the Solutions Explorer, right-click on the project name, then select Properties.The Project Properties dialog appears. Click the Configuration Properties folder and select Build.
Find the item called XML Documentation File in the textbox next to this, provide a relative path to the file location you would like the Documentation written to, and click Apply (see Figure 3.20).
Figure 3.20 Setting the XML Documentation File Source in the Project Properties Dialog
Now let’s look at how to add XML comments to the code.
Adding XML Document Comments to C# Pages
The file used in this example is from a sample application built in Chapter 10 and is on the CD (See catalog.cs in the components folder.) To add XML documentation comments to your code, simply type three slashes above any class, method, or variable.
www.syngress.com
128Chapter 3 • Visual Studio.NET IDE
public DataSet catalogItemDetails( string book_isbn )
{
return catalogRangeByCategory( -1, -1, book_isbn);
}
An XML representation of its inputs and outputs will be generated:
///<summary>
///</summary>
///<param name="book_isbn"></param>
///<returns></returns>
public DataSet catalogItemDetails( string book_isbn )
{
return catalogRangeByCategory( -1, -1, book_isbn);
}
Simply add appropriate notes and build the project:
///<summary>
///Specialized interface to catalogRangeByCategory.
///This Method returns all the data for only the given book
///</summary>
///<param name="book_isbn">string</param>
///<returns>DataSet</returns>
public DataSet catalogItemDetails( string book_isbn )
{
return catalogRangeByCategory( -1, -1, book_isbn);
}
When you build the project, you will receive a list of warnings corresponding to every Public variable, property, method, and class that is not commented. Figure 3.21 shows what happens when you tell it to create comments; this is how it tells you what variable isn’t commented.This will not prevent program execution, nor the writing of the documentation file. Figure 3.22 contains the XML generated on build.
www.syngress.com

Visual Studio.NET IDE • Chapter 3 |
129 |
Figure 3.21 Warning for Uncommented Public Variables, Properties, Methods, and Classes
Figure 3.22 Generated XML Documentation
Customizing the IDE
The VS.NET IDE is fully customizable. All windows can be set to dockable, hide, auto hide, and floating.You can display different toolbars for each different type of file, and you can create customizable toolbars.You can set font, tab, and text layout properties for each type of file.You can set the default Start page to open the last project, or even set it to a user-created page. If you mess up the layout, you can easily set it back to several predefined layouts.
www.syngress.com

130 Chapter 3 • Visual Studio.NET IDE
Creating a Project
Now that we have covered all the different aspects of the IDE, let’s create a test project.We cover the different type of projects available, show how to add a Web reference to the project, and briefly go over some of the debugging tools available to the IDE.This should give a well-rounded tour of the complete IDE. Now let’s go over the projects available.
Projects
We cover the projects available to C# development:
■Windows application
■Class Library
■Windows Control Library
■ASP.NET Web application
■ASP.NET Web service
■Web Control Library
■Console application
■Windows Service
■Empty project
■Empty Web project
■New project in existing folder
Most of these are self-explanatory. Users new to .NET will see that three Web projects are added into the project listing for all languages.These are the ASP. NET, Application,Web Service, and Control Library.The other projects will be familiar to all VS 6 users (see Figure 3.23).
Creating a Project
For this example, we will build an ASP.NET Web application (see Figure 3.23). You may keep the name as the default or select a new name.The location should be localhost if you are developing on the same box as the IIS server; if not, you will have to place the location of the server in that text box, either through IP or the name of server.The next option is to either close any open solutions and open this new, or add it to the existing solution.We recommend that you choose
www.syngress.com

Visual Studio.NET IDE • Chapter 3 |
131 |
to have it close all open solutions and open new, so as not to task your machine with having multiple solutions in the same IDE. Click OK, and VS.NET will create the project for you.
Figure 3.23 Project Listing in the IDE
Add Reference
One of the great benefits of working within the IDE of VS.NET is that you can add references to your project with ease.Try it out: In this project, select the project name in the Solutions Explorer. Right-click and select Add Web Reference. Now you will have to have a location to a WSDL file from which to locate and add in the Web Service to the project.This is covered later in the book.
You may also add a reference to a DLL to your project.This will be done much the same way as the Web Reference. Instead of selecting Add Web Reference as we just did, select Add Reference, then choose from all the available references on your machine.
Build the Project
To build a project, simply press F5 or click the Start icon on the main window menu bar.The project will be compiled.You must also set a Start page before this takes place.To do that, right-click on the file you want to have be the Start page or window and set it to Start page.This will launch this page first after the project has been compiled and run (see Figure 3.24).
www.syngress.com

132 Chapter 3 • Visual Studio.NET IDE
Figure 3.24 Compiling a Project
Debugging a Project
While building the project, any errors will bring up a dialog box, which will ask you to continue with the errors in place, or to strop debugging and correct any errors displayed.These errors will show in the Task window.You may doubleclick on any error in the Task window, and the IDE will take you to that location in the code. As you fix the bugs present in the task list, they will be removed.You can also set breakpoints and step over and step into options.
www.syngress.com

Visual Studio.NET IDE • Chapter 3 |
133 |
Summary
In this chapter, we’ve taken a tour of the VS.NET IDE.We’ve seen an overview of the interface, some of its component windows and some of its built-in features.The design window and the code window are graphical tools used in creating an application.You can split the windows or have tab groups added to them; you can use the Toolbox (which includes Data, Components,Web Forms, and Window Forms) to drag and drop objects onto the design window.The Server Explorer window allows you to connect to a server on the network and have full access to that server, and to link to any database servers on the network.
One of the new features for VS.NET is that you can dock all the windows, or expand and collapse them within the view of the IDE.The Auto Hide feature of each window makes them slide off the screen and embed in the side when not needed; this enables you to have maximum code view but still have all windows present.
The Properties Explorer (similar to the one in VS 6 and the Visual Basic IDE and Visual Interdev IDE) allows you to select an object from the design window to see available attributes for that object listed. Any changes made in this window will be propagated to the design view and code view windows respectively.
The Solution Explorer (the same as in VS 6) is a look at all the files in your solution via the four options: Refresh, Copy Web, Show All Files, and Properties. The VS.NET IDE has two different types of containers available for holding items, solutions and projects (you can have multiple projects within a solution, whereas the project container keeps only files and items within files).The Object browser will give you a complete list of all classes’ methods and properties in your solution.
Other windows include Dynamic Help and the Task List. Dynamic Help is a dockable window that you can fully customize to make it easy to tab to whatever information you are interested in.You can use the Task List for collaborative projects and in debugging; it lets you add and prioritize tasks.
IntelliSense, the code-completion technology Microsoft uses, is supported in VS.NET for VB.NET, C#, and C++, but not yet for XSLT. IntelliSense provides information about active classes. For C#, IntelliSense is available only in the code-behind page and not in the ASPX page itself.
Another important feature is XML Documentation.This feature enables you to comment your code with an embedded XML tagging structure.When XML documentation is enabled, an XML documentation file will be created during the build process.
www.syngress.com

134 Chapter 3 • Visual Studio.NET IDE
We’ve looked at some issues like the customizable, dockable, hide, auto hide, and float settings for many of the component windows along with the profile setting on the Start page.VS.NET is a collection of integrated developer tools that you should definitely familiarize yourself with.
Solutions Fast Track
Introducing Visual Studio.NET
;Visual Studio.NET (VS.NET) provides a consistent interface across the primary development languages.
;VS.NET provides easy to use tools for Windows and WebForms rapid prototyping across languages (including C# and Managed C++).
Components of VS.NET
;Enhanced window manipulation for user preferences within the Integrated Development Environment (IDE) gives the developer the ability to dock, auto hide, hide, or float all component windows.
;Task List has the ability to create custom tokens to map out and prioritize your code via the Task List.
;Server Explorer allows the developer to quickly connect and access any database server on the network, enabling direct access to all database objects, including stored procedures, functions, and user settings.
Features of VS.NET
;IntelliSense is one of the best tools at your disposal when learning a new language or technology.VS.NET has built IntelliSense into almost every aspect of the development process.
;Dynamically generated XML Documentation provides a fast and easy way to comment your code and generate a separate XML formatted documentation file.This tool makes code more self-documenting, and it should save developers time and ensure that some documentation is provided.
www.syngress.com

Visual Studio.NET IDE • Chapter 3 |
135 |
;Generating XML schemas from well-formed XML is now a breeze with
.NET.You can also create new XML documents that conform to popular standards by selecting a targetSchema and using the IntelliSense feature to create valid XML documents.
Customizing the IDE
;The VS.NET IDE is fully customizable. All windows can be set to dockable, hide, auto hide, and floating.You can display different toolbars for each different type of file and create customizable toolbars.You can set font, tabbing, and text layout properties for each type of file.
;You can set the default Start page to open the last project, or even set it to a user-created page.
;The IDE also includes several common default settings in case you mess up while customizing your interface, settings like the default VB 6 interface or Visual InterDev.
Creating a Project
;One of the great benefits of working within the IDE of VS.NET is that you can add references to your project with ease.
;To build a project, simply press F5 or click the Start icon on the main window menu bar.
;While building the project, any errors will bring up a dialog box, which will ask you to continue with the errors in place, or to strop debugging and correct any errors displayed.
www.syngress.com

136 Chapter 3 • Visual Studio.NET IDE
Frequently Asked Questions
The following Frequently Asked Questions, answered by the authors of this book, are designed to both measure your understanding of the concepts presented in this chapter and to assist you with real-life implementation of these concepts. To have your questions about this chapter answered by the author, browse to www.syngress.com/solutions and click on the “Ask the Author” form.
Q:How can I look up a parent class method or property of any System-level object?
A:Use the Class View window, accessed from the standard toolbar by clicking
View | Class View.
Q: Does VS.NET support line numbering in its text editor?
A:Yes, from the standard toolbar select Tools | Options.This will open the Options dialog; select the Text Editor folder, pick the language, and click on the check box for line numbering under the display section.
Q: Is there a way to set the tab size in the text editor?
A:Yes, from the standard tool bar select Tools | Options.This will open the Options dialog; select the Text Editor folder, choose a language folder, select Tabs, and set them to your desired setting.
www.syngress.com