

Expert Service-Oriented Architecture In CSharp 2005 (2006) [eng]
.pdf116 C H A P T E R 6 ■ S E C U R E W E B S E R V I C E S W I T H W S - S E C U R I T Y
Listing 6-3 shows a simplified policy file that defines that SOAP messages should be secured using Kerberos. The name of the class that implements the assertion is shown in bold.
Listing 6-3. Policy File Showing an Empty Kerberos Assertion
<policies xmlns="http://schemas.microsoft.com/wse/2005/06/policy"> <extensions>
<extension name="kerberosSecurity" type="Microsoft.Web.Services3.Design.KerberosAssertion, Microsoft.Web.Services3, Version=3.0.0.0, Culture=neutral, PublicKeyToken=31bf3856ad364e35" />
</extensions>
<policy name="MyKerberosPolicy"> <kerberosSecurity />
</policy>
</policies>
You can assign a policy to a Web service by using the Policy attribute, as shown in the following example:
[Policy("MyKerberosPolicy")]
public class Service : System.Web.Services.WebService
{
public Service () {} [WebMethod]
public string HelloWorld() { return "Hello World";
}
}
You can do the same at the client side by applying the Policy attribute to the proxy class autogenerated by WSE 3.0. When you use WSE 3.0, your proxy file will contain a couple of classes that you can use to communicate with the service. One of them inherits from
SoapHttpClientProtocol and it doesn’t provide the extended capabilities offered by WSE. The second one inherits from WebServicesClientProtocol and this is the class that allows you to benefit from the features of the WSE framework. You could apply the Policy attribute to the second class, but this file is autogenerated and you would lose your changes if you update the Web reference.
For this reason, the best way to apply a policy at the client side is using the SetPolicy method of the WSE-enabled proxy class.
MyService.ServiceWse myService = new MyService.ServiceWse(); myService.SetPolicy("MyKerberosPolicy");
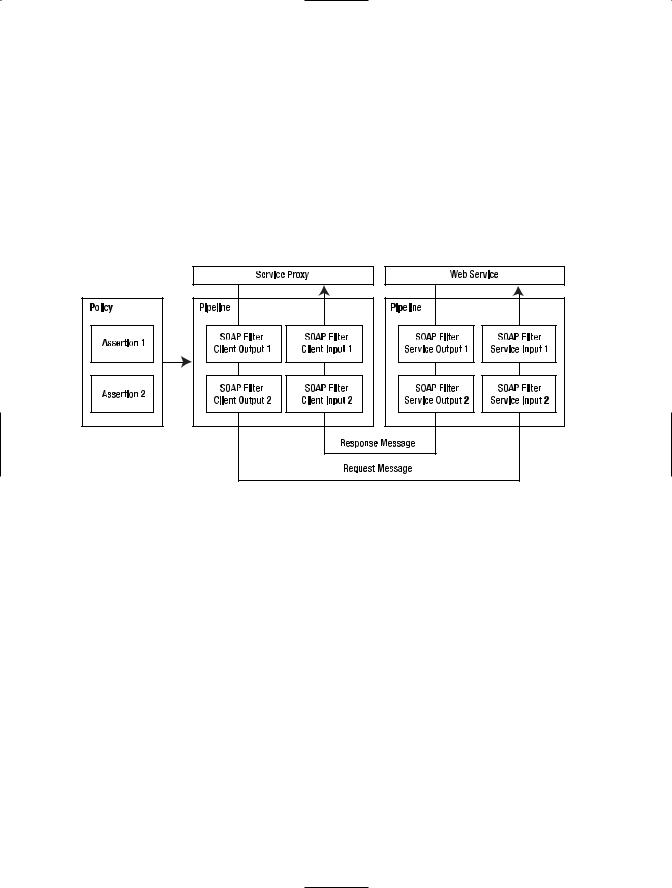
You can think of policies and their assertions as a pipeline where the assertions are executed in the order in which they are listed. Each policy assertion generates SOAP filters that are responsible for inspecting and modifying the SOAP messages. The methods that apply these filters are defined as abstract methods in the PolicyAssertion class and they are overridden by each policy assertion implementation.
C H A P T E R 6 ■ S E C U R E W E B S E R V I C E S W I T H W S - S E C U R I T Y |
117 |
public abstract SoapFilter CreateClientInputFilter(FilterCreationContext context); public abstract SoapFilter CreateClientOutputFilter(FilterCreationContext context); public abstract SoapFilter CreateServiceInputFilter(FilterCreationContext context); public abstract SoapFilter CreateServiceOutputFilter(FilterCreationContext context);
Not all the assertions will implement all the methods; for example, a replay detection policy would need to process incoming messages only. These methods process the SOAP message and then return a SoapFilterResult instance that determines if the execution must continue or if it needs to be terminated.
Figure 6-5 represents how policy filters are applied to incoming and outgoing messages that flow between a service and a client.
Figure 6-5. Policies applied in the order in which they are defined
This overview of the policy framework will now allow us to discuss the six turnkey security assertions provided by WSE 3.0. These six assertions are nothing else but predefined policies that cover the most frequent deployment scenarios that Microsoft has identified in existing Web service implementations.
Turnkey Security Assertions
The turnkey security assertions are a set of core strategies that allow software developers to easily secure a Web service. We present a brief definition of each one of them; most of them will be covered in detail later in this chapter and also in Chapter 7.
UsernameOverTransportSecurity: This strategy can be used when there is an existing secure channel, such as the one provided by SSL. The Web service client will send a Username Token to the server as a way to prove its identity. The server will be responsible for the validation of the token information, which contains the username and password. Upon successful validation of the credentials, the server might check whether the user is authorized to access the requested resources. In this scenario the client and the server trust each other enough to share a secret that will be used for authentication. This shared secret is the user’s password that is received by the server and validated against a local database, a legacy application, LDAP, or Active Directory.

118 C H A P T E R 6 ■ S E C U R E W E B S E R V I C E S W I T H W S - S E C U R I T Y
UsernameForCertificateSecurity: This assertion also uses a username and password to identify the Web service consumer, but it encrypts the content of the message using an X.509 certificate at the message level and not at the transport level. The main difference between these first two assertions is that in the first one, there must be an existing secure channel, such as HTTPS. In the second one, the client uses the public portion of the server’s certificate to encrypt the message before sending it through the wire. In this case, the message might be sent via HTTP, but it is still protected because a hacker who could intercept the message won’t be able to read it because the message was previously encrypted by the client.
AnonymousForCertificateSecurity: In this scenario, the server does not need to determine the identity of the Web service consumer. Any client application that has access to the certificate’s public key will be able to communicate with the server. If needed, the identity of the caller could be determined by sending their credentials as part of the data contained in the message (not as part of a secure token).
MutualCertificate10 and MutualCertificate11: In these two assertions, the client and the server use certificates to prove their identity and to secure the messages. They provide similar implementations, except that one of them adheres to the WS-Security 1.0 standard and the other one follows the WS-Security 1.1 specification. There are other assertions that also use X.509 certificates to encrypt messages, but in these assertions in particular, the certificates are not only used for data encryption, they are also used to identify the other party by accessing the signature portion of the message. This signature is encrypted by the client using its private key, and decrypted by the server using the client key. The same applies when the server provides its credentials back to the client. The server signs the message using its private key and the client uses the server public key to decrypt it. This is why these patterns are named mutual certificate, because both the client and the server must prove its identity.
KerberosSecurity: This strategy is best suited for intranets where the messages flow between one or more Windows domains that use Active Directory. One of the biggest advantages of using this assertion is that it provides single sign-on features and better performance than X.509 certificates. This assertion provides tight integration with the Windows security model. This means that you will be able to use features such as impersonation and delegation when making a remote service call. In this scenario the management of user identities is greatly simplified because you can leverage the tools provided by Windows security.
WSE 3.0 is not limited to these six security assertions. Developers can create custom assertions that better meet their needs; however, in the majority of the cases, your deployment configuration will fall within one of these predefined categories.
Securing the StockTrader Application Using WSE 3.0
The turnkey assertions described in the previous section should help as a guide to choosing the best security mechanisms to protect your SOAP messages. We would like to emphasize that these decisions should be made based on the characteristics of the environment where your application will run, as opposed to the particular features provided by the service. This is
C H A P T E R 6 ■ S E C U R E W E B S E R V I C E S W I T H W S - S E C U R I T Y |
119 |
what allows for great flexibility in your systems, where you can have a base set of features and multiple policy files that get used depending on the deployment scenarios.
We will now take a look at the first sample implementation of the turnkey security assertions.
Getting Started with the Sample Solution
The sample solution that is presented here shows you how to secure an application using the UsernameForCertificate assertion.
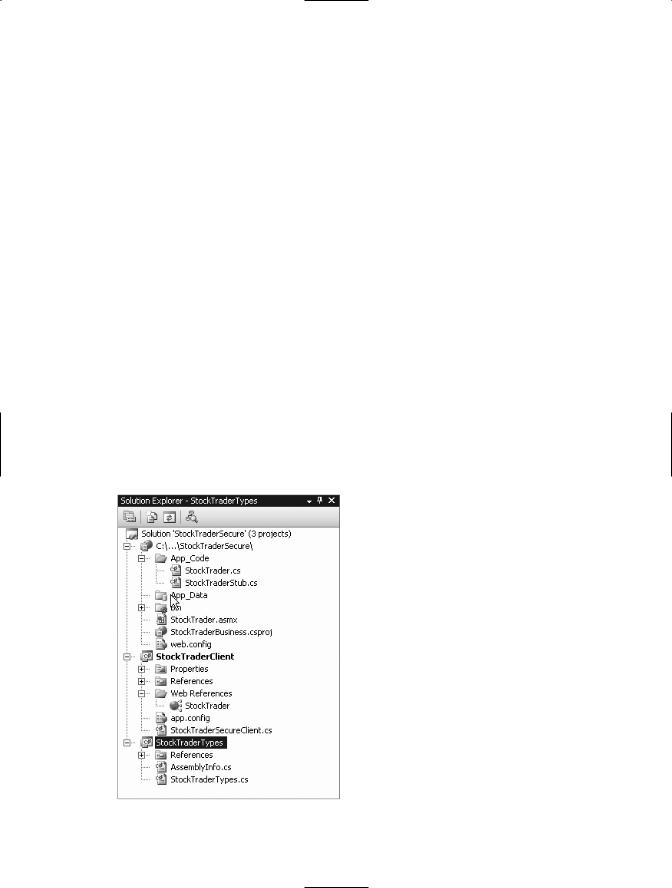
Figure 6-6 shows the Solution Explorer window for the Visual Studio .NET solution that we will use in this chapter. It is based on the StockTrader application presented in Chapters 3 and 4 and includes the following:
•A Web service called StockTraderSecure, which provides methods for requesting stock quotes and executing trades.
•A client console application called StockTraderClient, which invokes the StockTrader Web service via a proxy class.
•A reference assembly called StockTraderTypes, which provides code definitions for the custom types that are used by the StockTrader Web service. (The source project is included in this chapter’s solution for clarity. However, future chapter projects will simply reference the compiled StockTraderTypes assembly instead.) The type definitions are contained in a separate assembly in order to be accessible to any application that wants to interact with the StockTrader Web service. (Recall that these custom types are based on the StockTrader XSD schema, which is presented in Chapter 3.)
Figure 6-6. The StockTraderSecure .NET solution, containing three projects

120 C H A P T E R 6 ■ S E C U R E W E B S E R V I C E S W I T H W S - S E C U R I T Y
■Note There will be some cases where a client application and a service application will not be able to share the assembly that contains the data type definitions. For example, you will not be able to reference the StockTraderTypes assembly directly if you build your client application using Java. For these cases, you can rely on the data types exposed by the autogenerated proxy class. As you will see later, we will be using the Quote object exposed by the proxy class and not the one provided by the StockTraderTypes assembly. This approach has an important benefit, which is that you do not need to redistribute the data types DLL to your client applications. Keep in mind that using this approach does not mean that the developers building the Web service are free to change the data type definitions at any time. If they do this, they will generate compatibility issues between the client and the service. Having this flexibility doesn’t exempt a developer from carefully managing changes to the definition of a Web service.
The StockTraderSecure Web service is a copy of the StockTrader Web service presented in Chapter 3 with additional code for processing SOAP request messages that have been digitally signed and encrypted. To get started with building the solution, you need to perform the following steps:
1.Install and configure the WSE toolkit (refer to Chapter 5 for detailed instructions).
2.Install and configure the X.509 test certificates (refer to Chapter 5 for detailed instructions).
3.Create a new ASP.NET Web service by clicking the File New Web Site menu option in Visual Studio 2005. Choose the File System Location option to create the project in a new folder named StockTraderSecure.
4.Delete the Service1.asmx and Service1.cs files from the project.
5.Copy the existing files StockTrader.asmx, StockTrader.cs, and StockTraderStub.cs from the original StockTrader project over to the new StockTraderSecure project. Add these files to the new project by right-clicking the App_Code folder and selecting the Add Existing Item menu option. (You do not need to modify namespace information in the newly added files.)
6.Add the StockTraderTypes reference assembly or project to the solution. Again, you can obtain this reference project from the Chapter 3 sample files. Alternatively, you can just copy the StockTraderTypes.dll compiled assembly over to the \bin directory of the StockTraderSecure Web service project. Use the Project Add Reference menu option to set a reference to the StockTraderTypes assembly or project from the StockTraderSecure Web service project.
Create the Web Service Client
So far the StockTraderSecure solution only contains a Web service; and you have not yet modified the Web service code to handle digitally signed SOAP messages. First you will write a Web service client that generates SOAP request messages. The steps are as follows:
C H A P T E R 6 ■ S E C U R E W E B S E R V I C E S W I T H W S - S E C U R I T Y |
121 |
1.Add a new Console Application project to the solution called StockTraderClient.csproj.
2.Rename the default C# class file to StockTraderSecureClient.cs.
3.Add a Web reference to the StockTraderSecure Web service from the console application project using the Project Add Web Reference menu option. Give this reference the name StockTraderProxy. This will autogenerate a proxy class file called Reference.cs under the Web References\[Reference Name]\Reference.map subproject folder. (If you do not see this file you can use the Project Show All Files menu option to expand
all files.)
■Note In Chapter 4 we showed you how to build the StockTraderConsole client by adding a reference to the StockTraderTypes DLL. In many cases it won’t be possible to share the data type definition files between the Web service and the Web service consumer. For example, there will be cases where the service is built using .NET, and the consumer is built using Java. In this type of scenario, the Web service consumer would need to rely on the information provided by the WSDL in order to create classes that would store the values returned by the Web service calls.
4. Create a method in the default class that contains the code shown in Listing 6-4.
Listing 6-4. Basic Unsecured Code Listing for the Web Service Client
// Create an instance of the Web service proxy
StockTraderProxy.StockTrader serviceProxy = new StockTraderProxy.StockTrader();
// Call the service
Console.WriteLine("Calling {0}", serviceProxy.Url); string Symbol = "MSFT";
StockTraderProxy.Quote q = serviceProxy.RequestQuote(Symbol);
// Show the results
Console.WriteLine("Web service Response:"); Console.WriteLine("");
Console.WriteLine( "\tSymbol:\t\t" + q.Symbol ); Console.WriteLine( "\tCompany:\t" + q.Company ); Console.WriteLine( "\tLast Price:\t" + q.Last ); Console.WriteLine( "\tPrevious Close:\t" + q.Previous_Close );
Compile and run the project to make sure that everything is working correctly. At this point you are calling the Web service using a proxy that derives from the System.Web.Services. Protocols.SoapHttpClientProtocol class.
122 C H A P T E R 6 ■ S E C U R E W E B S E R V I C E S W I T H W S - S E C U R I T Y
Secure the StockTrader Web Service
Enable the Web service project for WSE 3.0 by following the next steps:
1.Right-click the StockTraderSecure project and select the WSE Settings Tool. On the General tab, check the Enable This Project for Web Services Enhancements box and the Enable Microsoft Web Service Enhancements Soap Protocol Factory box.
■Note The Soap Protocol Factory is only needed when accessing ASP.NET Web services that run under IIS.
2.Click the Security tab and check the Allow Test Roots box. The certificates used in this sample are not created by a certification authority and they will be rejected if you do not check this box. You should be careful not to allow test roots in the configuration of a production application.
3.Click the Diagnostics tab and check Enable Message Trace. This will allow you to examine SOAP messages like the ones in Listings 6-1 and 6-2.
4.Click OK to accept the changes and close the dialog. All the changes made by the WSE Settings Tool are saved in the web.config file, as shown in Listing 6-5.
Listing 6-5. Changes Made by the WSE Configuration Tool
<configuration>
<configSections>
<section name="microsoft.web.services3" type="Microsoft.Web.Services3.Configuration.WebServicesConfiguration,
Microsoft.Web.Services3, Version=3.0.0.0, Culture=neutral, PublicKeyToken=31bf3856ad364e35" />
</configSections>
<system.web>
<webServices>
<soapExtensionImporterTypes> <add
type="Microsoft.Web.Services3.Description.WseExtensionImporter, Microsoft.Web.Services3, Version=3.0.0.0,
Culture=neutral,
PublicKeyToken=31bf3856ad364e35" /> </soapExtensionImporterTypes> <soapServerProtocolFactory
type="Microsoft.Web.Services3.WseProtocolFactory, Microsoft.Web.Services3, Version=3.0.0.0, Culture=neutral, PublicKeyToken=31bf3856ad364e35" />

C H A P T E R 6 ■ S E C U R E W E B S E R V I C E S W I T H W S - S E C U R I T Y |
123 |
</webServices> <compilation debug="true">
<assemblies>
<add
assembly="Microsoft.Web.Services3, Version=3.0.0.0, Culture=neutral, PublicKeyToken=31BF3856AD364E35" />
</assemblies>
</compilation>
</system.web>
<microsoft.web.services3>
<diagnostics>
<trace
enabled="true"
input="InputTrace.webinfo" output="OutputTrace.webinfo" />
</diagnostics>
<security>
<x509 allowTestRoot="true" /> </security>
</microsoft.web.services3>
</configuration>
Create a Security Policy
Now, implement the UsernameForCertificate assertion by making the following changes to StockTraderSecure and StockTraderClient:
1.Enable the Web service project for WSE 3.0, either manually or with the WSE Settings Tool.
2.On the WSE Settings Tool, click the Security tab and check the Allow Test Roots box. This should only be done in a development or test environment. If you enable this feature you will be able to use test X.509 certificates as if they were valid certificates.
3.Click on the Diagnostics tab and check the Enable Message Trace box. This feature will generate a couple of files where incoming and outgoing messages will be logged as they get processed by the WSE 3.0 pipeline.
4.Go to the Policy tab, click Add, and provide a name for this new policy. Enter the name UsernamePolicy and click OK. This will bring up the WSE Security Settings Wizard. This wizard will guide you through the process of defining a security policy for your service or client. The result of this wizard will be a configuration file that will be stored in the root folder of your application. This XML-based policy file can be easily modified after the wizard has been completed.

124C H A P T E R 6 ■ S E C U R E W E B S E R V I C E S W I T H W S - S E C U R I T Y
5.Click Next in the wizard’s welcome screen. The first decision is to choose whether you want to secure a client or a service application. In this case, you are securing a service application. The second question prompts you to choose a client authentication method. In this example, you want to secure your service using a username and password. As you can see, there are other options available that resemble the different security turnkey assertions described previously. For the current example, choose the Username radio button and click Next.
6.Leave the Perform Authorization box unchecked and click Next. We will discuss authorization in the “Authorization” section later in this chapter. In this first example you will not perform authorization checks. This means that you will not make an additional security check to verify if a user is authorized to execute a particular task. You will assume that once a user is authenticated they can access the operations provided by the service.
7.The username and password will help the service authenticate the user, but we still need to define a way to encrypt the information that will be sent in the message. The current step in the wizard allows you to choose the level of protection by providing the following options:
•None: This option relies on transport level protection; for example, this can be used if the communication channel will be secured using SSL.
•Sign: This option signs the message. In other words, a hash is created that can be used to determine whether the message was tampered with while in transit.
•Sign and Encrypt: This option signs the message and its contents are encrypted. Even if a nonauthorized user has access to the message, they won’t be able to read its contents.
•Sign, Encrypt, and Encrypt Signature: This option signs the message and both the signature and the message itself are encrypted. This is the most secure option, but it also incurs additional overhead.
For this sample, choose Sign and Encrypt. Also, uncheck the Secure Session box, a feature that is discussed in Chapter 7.
8.The wizard will now show a screen where you can choose the X.509 certificate for encryption and signing. Select the WSE2QuickStartServer certificate and click Next.
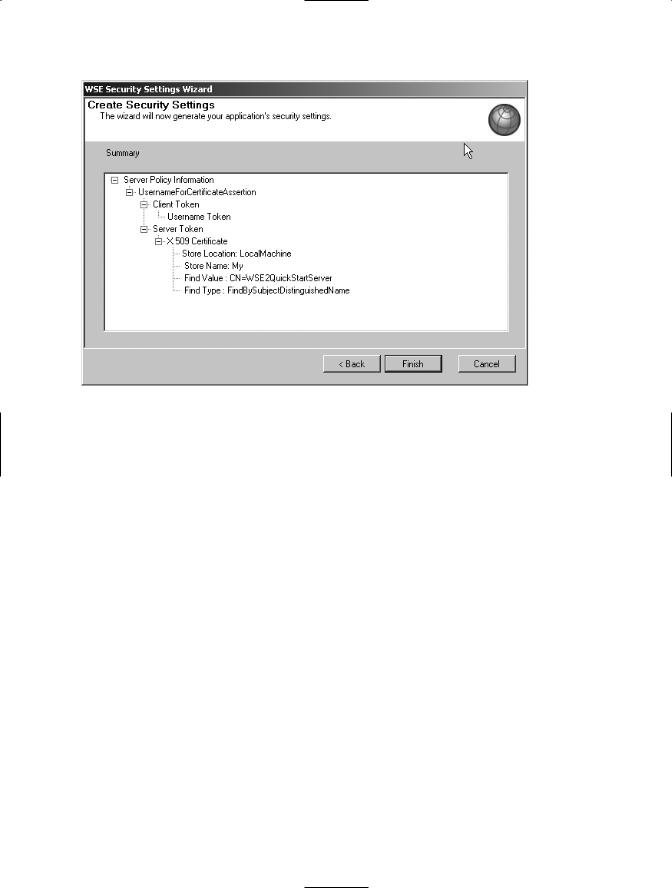
9.The last step of the wizard shows you a summary of the decisions that you made. The name of the assertion is located in the second row of the summary pane. The questions asked by this security wizard will vary significantly, depending on the approach that you want to follow to secure your messages. However, at the end of the wizard you will notice that your decisions can be summarized as one of the six turnkey scenarios defined by Microsoft, as shown in Figure 6-7.
C H A P T E R 6 ■ S E C U R E W E B S E R V I C E S W I T H W S - S E C U R I T Y |
125 |
Figure 6-7. Summary of the policy defined using the WSE Security Settings Wizard
The wizard will generate a new file in the root directory of your project. The name of the file is wse3policyCache.config and it contains the definition of the policy that you just created. Listing 6-6 shows the policy file generated based on the options you chose in the WSE Security Settings Wizard.
Listing 6-6. Policy File Generated by the WSE Security Settings Wizard
<policies xmlns="http://schemas.microsoft.com/wse/2005/06/policy"> <extensions>
<extension name="usernameForCertificateSecurity" type="Microsoft.Web.Services3.Design.UsernameForCertificateAssertion, Microsoft.Web.Services3, Version=3.0.0.0, Culture=neutral, PublicKeyToken=31bf3856ad364e35" />
<extension name="x509" type="Microsoft.Web.Services3.Design.X509TokenProvider, Microsoft.Web.Services3, Version=3.0.0.0, Culture=neutral, PublicKeyToken=31bf3856ad364e35" />
<extension name="requireActionHeader" type="Microsoft.Web.Services3.Design.RequireActionHeaderAssertion, Microsoft.Web.Services3, Version=3.0.0.0, Culture=neutral, PublicKeyToken=31bf3856ad364e35" />
</extensions>