

Expert Service-Oriented Architecture In CSharp 2005 (2006) [eng]
.pdf146 C H A P T E R 7 ■ E X T E N D E D W E B S E R V I C E S S E C U R I T Y W I T H W S - S E C U R I T Y A N D W S - S E C U R E C O N V E R S AT I O N
Brokered Authentication Using Kerberos
Now we are going to take a look at another form of brokered authentication. Kerberos is the security protocol that Microsoft chose to implement distributed security in its Windows 2000 and 2003 domains. Prior to Windows 2000, Microsoft relied on NTLM, which stands for Windows NT LAN Manager. NTLM is a proprietary security protocol, as opposed to Kerberos, which is an open standard created by the Massachusetts Institute of Technology (MIT) and published by the Internet Engineering Task Force (IETF) as RFC 1510 and later deprecated by RFC 4120. NTLM is still supported in order to provide backward compatibility, and it is also used to authenticate a user that logs into a computer using a local account.
Let’s review a few basic concepts of the Kerberos protocol. This is an extensive topic and we are only going to cover the areas that will help you understand how WSE 3.0 and Kerberos can help you secure your Web services.
The Kerberos Protocol
The fact that Kerberos is based on open standards and that Microsoft has chosen it to be its default network authentication protocol makes it an essential topic of discussion in this book. The benefits provided by this protocol make it an ideal candidate for Web service security in scenarios where you want to take full advantage of the features provided by Windows implementation of the Kerberos protocol.
These are some of the terms that will help you understand the description of the Kerberos protocol:
Security principal: This is an entity in a Windows domain that can be uniquely identified. It can be a user, services, or a machine.
Active Directory: This is an LDAP implementation that is used to store information about the security principals and their relationships.
Long-term keys: These are cryptographic keys that are persisted in the identity store. Each key is associated with a security principal.
Authenticator: This contains information about the client, such as IP address, username, message time stamp, and Kerberos protocol version.
Session keys: These are keys associated to security principals and they only last a few minutes or hours. They are used to encrypt the authenticators.
Service principal names: These are unique identifiers that can be used to obtain a security token without having to use the name of the account that is running the service.
KDC: This is the Kerberos Key Distribution Center. It is composed of the Authentication Service and the Ticket Granting Service.
■Note Some of these terms are specific to the Microsoft implementation of the Kerberos protocol.
C H A P T E R 7 ■ E X T E N D E D W E B S E R V I C E S S E C U R I T Y W I T H W S - S E C U R I T Y A N D W S - S E C U R E C O N V E R S AT I O N |
147 |
How Kerberos Works
Kerberos uses shared secrets as an authentication mechanism. A user defines a password when his account is created in the identity store, which in this case is Active Directory. These passwords can’t be stored or transmitted in clear text, because this would make them vulnerable to attacks. For this reason, a symmetric key is used to encrypt these passwords. After they have been encrypted they can be referred to as a long-term key. Not only users have associated long-term keys; these are also created for services and computers that join a Windows domain.
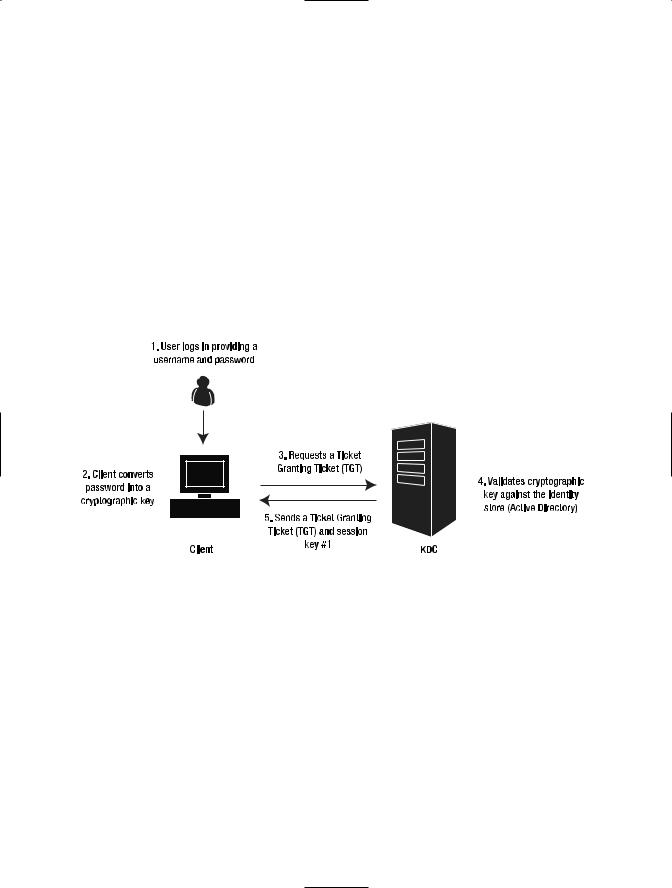
When a user logs in, the client encrypts the password using a symmetric key and sends a request to the KDC for a Ticket Granting Ticket (TGT). If the key matches the value stored in Active Directory the KDC returns the TGT and a session key. This session key is encrypted by the KDC using the user’s long-term key; we will refer to it as session key #1. The TGT is encrypted using the KDC secret key. The client computer stores this information in memory and it is used to request service tickets. Figure 7-7 shows the process that takes place when the user logs into the domain.
Figure 7-7. The TGT request process
The next step takes place when the client attempts to access a service. The client will send a request to the KDC. The request is composed by the TGT and an authenticator. The authenticator includes client information such as the username, a machine IP address, and a time stamp. The authenticator is encrypted with session key #1.
The KDC receives this request, decrypts the TGT with its long-term key, and decrypts the authenticator using the session key that it sent to the client at login. If all the information is valid, the KDC creates another session key (session key #2) and a service ticket. The KDC will encrypt the service ticket using the server’s long-term key. It will also encrypt the session key using session key #1.
148 C H A P T E R 7 ■ E X T E N D E D W E B S E R V I C E S S E C U R I T Y W I T H W S - S E C U R I T Y A N D W S - S E C U R E C O N V E R S AT I O N
■Note The KDC doesn’t send the service ticket to the server because it is not guaranteed that the service ticket will get to the server faster than the client request. There are also other implications, such as the need to maintain a state for each service ticket in order to allow the server to be ready for the time when the client request arrives.
When the client receives the service ticket and session key #2 from the KDC, it decrypts session key #2 using session key #1. The client then creates a new authenticator with a time stamp and information about the client, such as the IP address and username. This authenticator is encrypted using session key #2 and it is sent to the server along with the service ticket.
The server receives the request that has the Kerberos security token attached to it. This token contains the authenticator and the service ticket. The service uses its long-term key to decrypt the service ticket. The service ticket has session key #2 in it. The server will use this session key to decrypt the authenticator.
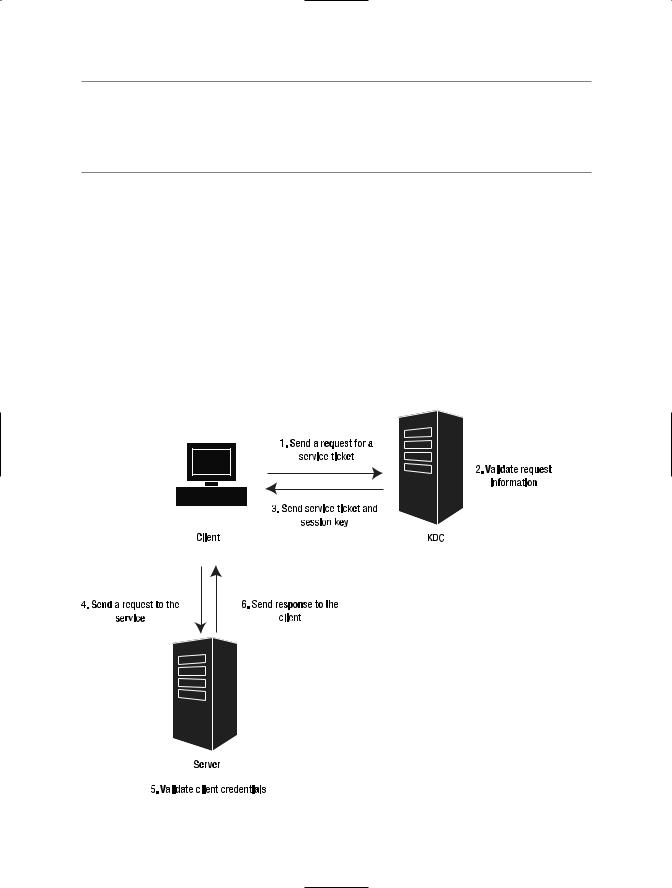
After the client is successfully validated, the service can provide mutual authentication by encrypting the time stamp found in the authenticator and sending it back to the client. This time stamp is encrypted using session key #2. Figure 7-8 shows the steps executed after the client obtains the TGT from the KDC.
Figure 7-8. Steps for obtaining the TGT from the KDC

C H A P T E R 7 ■ E X T E N D E D W E B S E R V I C E S S E C U R I T Y W I T H W S - S E C U R I T Y A N D W S - S E C U R E C O N V E R S AT I O N |
149 |
Advantages and Disadvantages of Using Kerberos
Using the Kerberos protocol offers several advantages and disadvantages. The advantages include the following:
Mutual authentication: Kerberos provides a simple mechanism for mutual authentication. As you saw in the previous pages, the server just needs to encrypt the time stamp included in the client authenticator and send it back as a proof of its identity. When the client receives the message and decrypts it with the session key, it can easily validate whether the service is who it claims to be.
Improved performance: The identity of the client only needs to be verified once during the duration of the session. After the TGT is generated, the client no longer needs to access the authentication service.
Integration with Windows: If your organization already relies on Active Directory you can benefit from this existing infrastructure and implement a protocol that benefits from the impersonation, delegation, authorization, and audit capabilities provided by Windows.
Interoperability: Kerberos is a protocol that has been adopted by other important players in the IT industry, so you don’t have to worry about being limited using it within a Windows domain.
SSO: The fact that Kerberos is based on security tokens makes it an ideal candidate for SSO scenarios. The user only needs to provide its credentials once at the beginning of a session, and a TGT can be used to provide multiple session tickets to access different network resources.
The main disadvantages of using the Kerberos protocol include the following:
Requires additional infrastructure: If your organization does not use Active Directory, you will need to incur the additional expense of setting it up. You will also need to consider the investment for maintaining an Active Directory implementation.
Requires online access: The client needs to have online access to the KDC; otherwise it won’t be able to retrieve the service ticket and make a call to the server.
Limited to a domain or trusted domains: This authentication mechanism does not work outside the boundaries of the domain or the trusted domains.
Now let’s modify our sample application to use Kerberos authentication. You can continue the same solution that you used to implement mutual certificates and the Username Token assertions. You will see how easy it is to switch between one security model and another when using WSE 3.0.

150 C H A P T E R 7 ■ E X T E N D E D W E B S E R V I C E S S E C U R I T Y W I T H W S - S E C U R I T Y A N D W S - S E C U R E C O N V E R S AT I O N
Set Up the Environment
Follow these steps to make sure that your computer is configured correctly in order to secure the sample application using the Kerberos security turnkey assertion:
1.Log on to a Windows domain. You will need to log in to your computer using a domain account.
2.Use IIS instead of the ASP.NET Development Server. If you are using Windows XP and have been running your samples using the ASP.NET Development Server you will need to create a virtual directory in IIS that points to the StockTraderSecure folder. You don’t need to make any changes in Visual Studio 2005. You can continue to work using the ASP.NET development server. You will access the Web service via IIS at runtime only.
3.Map a domain account. If you are using Windows XP, you will need to use a domain account to run the ASP.NET process. In order to do this, you need to open the machine.config file and modify the following line:
<processModel autoConfig="true" userName="domain\username" password="userpassword" />
You will need to make sure that the username and password attributes match with those of a domain account. By default, the ASP.NET process runs under the local ASPNET account. A local computer account cannot be validated against Active Directory and this would not allow you to implement brokered authentication.
If you are using Windows 2003 you don’t need to make any changes to the machine.config file. This is because the ASP.NET process runs under a service account that can be validated against Active Directory.
4.Configure the SPN. SPNs can be used to uniquely identify a service. Each SPN is linked to an Active Directory account. When a client requests a Kerberos token using an SPN, Active Directory obtains the information about the associated Windows account, which allows the authentication process to be executed.
SPNs can be managed using a utility named setspn.exe. This utility is available on Windows 2003 servers and it can be downloaded from the Microsoft site if you are using Windows 2000 or Windows XP.
In the following sample, we are going to create new SPNs and link them to the domain account that you are using to run the ASP.NET process. The syntax to create the new SPNs is the following:
Setspn.exe –a stocktrader/host1 domain\username Setspn.exe –a stocktrader/host1.domain.com domain\username
Verify whether the SPNs were added successfully by running the following line:
Setspn.exe –l domain\username
The utility will return the names of the two SPNs that you just added. The result should look like the following:
stocktrader/host1.domain.com
stocktrader/host1
C H A P T E R 7 ■ E X T E N D E D W E B S E R V I C E S S E C U R I T Y W I T H W S - S E C U R I T Y A N D W S - S E C U R E C O N V E R S AT I O N |
151 |
Secure the Web Service
Now that you have configured your environment, you are ready to modify the StockTrader application. You are going to begin by securing the service, just like we did in the previous samples.
1.In the StockTraderSecure project, open the WSE 3.0 Settings Tool.
2.In the Policy tab, click the Add button. Name this policy KerberosPolicy and click OK.
3.Click Next in the welcome screen.
4.In the Authentication Settings step, choose to secure a service application using Windows as the authentication method. Click Next to continue.
5.Add the user or users that will be authorized to access this service. Make sure that you add the domain account you used to log on to your computer. Click Next when you finish adding the authorized accounts.
6.In the Message Protection step, choose to Sign and Encrypt the message and uncheck the Establish Secure Session box. Click Next to continue.
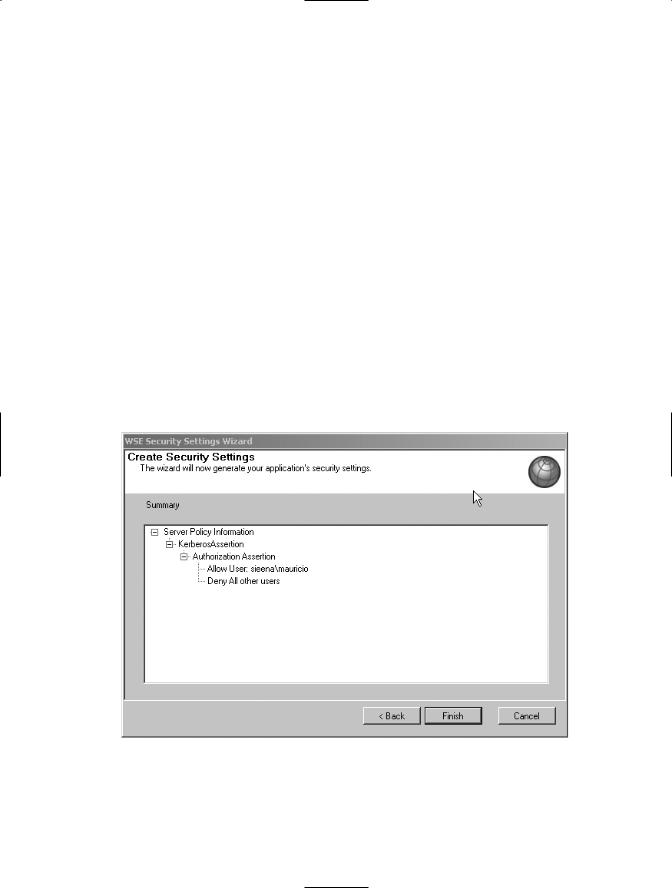
7.Review the summary information of the new security policy, shown in Figure 7-9, and click Finish.
Figure 7-9. A summary of the Kerberos server policy

152 C H A P T E R 7 ■ E X T E N D E D W E B S E R V I C E S S E C U R I T Y W I T H W S - S E C U R I T Y A N D W S - S E C U R E C O N V E R S AT I O N
The new policy is added to the configuration file. As you can see in Listing 7-3, this policy does not make any particular reference to the KDC or the Active Directory that will be involved in the brokered authentication process. This information is obtained directly from the machine environment. This simplifies the deployment of Kerberos-based policies,
because there aren’t parameters to specify in the policy and you don’t need to install a certificate as in the case of the MutualCertificatePolicy.
Listing 7-3. Changes to the Service Policy File
<policy name="KerberosPolicy"> <authorization>
<allow user="sieena\mauricio" /> <deny user="*" />
</authorization>
<kerberosSecurity
establishSecurityContext="false"
renewExpiredSecurityContext="true"
requireSignatureConfirmation="false"
messageProtectionOrder="SignBeforeEncrypt" requireDerivedKeys="true" ttlInSeconds="300"> <protection>
<request signatureOptions="IncludeAddressing, IncludeTimestamp, IncludeSoapBody" encryptBody="true" />
<response signatureOptions="IncludeAddressing, IncludeTimestamp, IncludeSoapBody" encryptBody="true" />
<fault signatureOptions="IncludeAddressing, IncludeTimestamp, IncludeSoapBody" encryptBody="false" />
</protection>
</kerberosSecurity> <requireActionHeader />
</policy>
The next step is to apply this policy to the service. You can do this by finding the place in the StockTrader class where you applied the MutualCertificate Policy and modify the policy name to KerberosPolicy. After this change, the class definition should look like the following:
[Policy("KerberosPolicy")]
public class StockTrader : StockTraderStub
Finally, before moving to the client project, you will need to add the following line in the web.config file, right under the <system.web> tag. This line will allow you to use Integrated Windows Authentication.
<authentication mode="Windows" />
C H A P T E R 7 ■ E X T E N D E D W E B S E R V I C E S S E C U R I T Y W I T H W S - S E C U R I T Y A N D W S - S E C U R E C O N V E R S AT I O N |
153 |
Secure the Client Application
The followings steps show you how to secure a client application using the Kerberos security assertion:
1.Open the WSE 3.0 Settings Tool, go to the Policy tab, and click the Add button.
2.Name this policy KerberosPolicy and click OK.
3.Click Next in the welcome screen.
4.In the Authentication Settings step, choose to secure a client application using Windows as the authentication method. Click Next to continue.
5.The Kerberos Token step prompts you to enter the Service Principal Name. Type in wse/host1, where host1 is the name of your computer. Choose Impersonation in the drop-down box and click Next.
6.In the Message Protection step, choose to Sign and Encrypt the message, and uncheck the Establish Secure Session box. Click Next to continue.
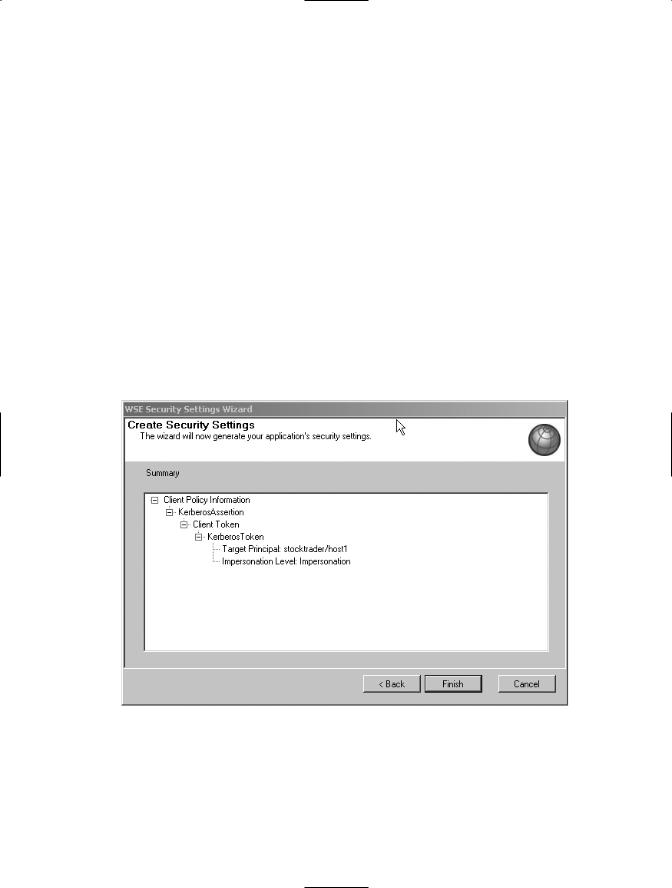
7.Review the policy summary, shown in Figure 7-10, and click Finish.
Figure 7-10. A summary of the Kerberos client policy

154 C H A P T E R 7 ■ E X T E N D E D W E B S E R V I C E S S E C U R I T Y W I T H W S - S E C U R I T Y A N D W S - S E C U R E C O N V E R S AT I O N
Listing 7-4 shows the configuration of the new policy. Pay special attention to the <token> element, where the target principal and the impersonation level are defined.
Listing 7-4. Configuration of the KerberosPolicy
<policy name="KerberosPolicy"> <kerberosSecurity
establishSecurityContext="false"
renewExpiredSecurityContext="true"
requireSignatureConfirmation="false"
messageProtectionOrder="SignBeforeEncrypt" requireDerivedKeys="true" ttlInSeconds="300">
<token>
<kerberos targetPrincipal="stocktrader/host1" impersonationLevel="Impersonation" />
</token>
<protection>
<request
signatureOptions="IncludeAddressing, IncludeTimestamp, IncludeSoapBody"
encryptBody="true" /> <response
signatureOptions="IncludeAddressing, IncludeTimestamp, IncludeSoapBody"
encryptBody="true" /> <fault
signatureOptions="IncludeAddressing, IncludeTimestamp, IncludeSoapBody"
encryptBody="false" /> </protection>
</kerberosSecurity> <requireActionHeader />
</policy>
The last step is to modify the StockTraderConsole.cs class. The Run() method should look like the following:
public void Run()
{
//Create an instance of the Web service proxy StockTraderProxy.StockTraderWse serviceProxy = new StockTraderProxy.StockTraderWse();
//Use the logged in user identity as the identity of the current thread.
//You will need to add a using clause for the
System.Security.Principal namespace AppDomain.CurrentDomain.SetPrincipalPolicy(PrincipalPolicy.WindowsPrincipal);

C H A P T E R 7 ■ E X T E N D E D W E B S E R V I C E S S E C U R I T Y W I T H W S - S E C U R I T Y A N D W S - S E C U R E C O N V E R S AT I O N |
155 |
// Access the IIS based service
serviceProxy.Url = "http://host1/StockTraderSecure/StockTrader.asmx" ;
//Use the credentials of the current security context serviceProxy.UseDefaultCredentials = true;
//Set the client policy serviceProxy.SetPolicy("KerberosPolicy");
//Call the service
Console.WriteLine("Calling {0}", serviceProxy.Url); string Symbol = "MSFT";
StockTraderProxy.Quote q = serviceProxy.RequestQuote(Symbol);
// Show the results
Console.WriteLine("Web Service Response:"); Console.WriteLine("");
Console.WriteLine( "\tSymbol:\t\t" + q.Symbol ); Console.WriteLine( "\tCompany:\t" + q.Company ); Console.WriteLine( "\tLast Price:\t" + q.Last ); Console.WriteLine( "\tPrevious Close:\t" + q.Previous_Close );
}
protected static void Error(Exception ex)
{
Console.WriteLine("EXCEPTION!" + ex.Message + "\n" + ex.StackTrace);
}
The SetPrincipalPolicy method will assign the identity of the logged-on user to the current thread and the UseDefaultCredentials property will indicate the proxy to attach those credentials to the outgoing message.
Replace the host1 name of the server for the name of your local computer and run the application. If you get any security exceptions, review the instructions to set up the environment. It is important that you use a domain account and that you use the SPN name correctly. Kerberos authentication is an effective mechanism but you need to carefully configure the deployment environment in order to have a successful communication between the service and the client.
Impersonation
Let’s take a look at how to impersonate the client user at the server by obtaining his identity from the Kerberos token. We are going to create a file in the server hard drive that only the client logged-in user has permission to access:
1.Create a new file under the C:\temp folder named Impersonation.txt.
2.Right-click the Impersonation.txt file and choose Properties.
3.Select the Security tab and click the Advanced button.