Expert Service-Oriented Architecture In CSharp 2005 (2006) [eng]
.pdf
136 C H A P T E R 7 ■ E X T E N D E D W E B S E R V I C E S S E C U R I T Y W I T H W S - S E C U R I T Y A N D W S - S E C U R E C O N V E R S AT I O N
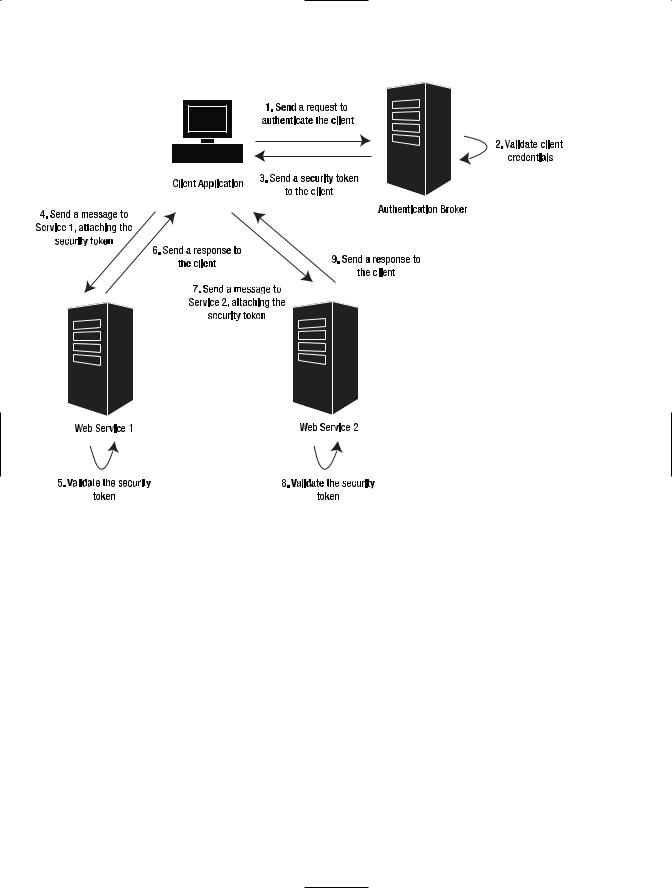
Figure 7-2. A brokered authentication model
Advantages and Disadvantages of Brokered Authentication
The main advantages of brokered authentication are as follows:
Centralized authentication: Having a single source for authentication simplifies the management of the identity information. The services won’t need to create and manage their own set of users; they can rely upon the centralized identity broker to perform these tasks.
Single sign-on (SSO) capabilities: This model allows clients to authenticate once and then use the same token for different services within the organization.
Stronger security: Brokered authentication relies on robust authentication mechanisms such as X.509 certificates and Kerberos. The storage of passwords and the protection mechanisms are more reliable than those that could be implemented by a developer that follows a direct authentication pattern.
Direct trust: In this scenario the client and the service don’t need to trust each other directly. This means that the services can rely on somebody else to add, remove, and update the identity information from their client base.

C H A P T E R 7 ■ E X T E N D E D W E B S E R V I C E S S E C U R I T Y W I T H W S - S E C U R I T Y A N D W S - S E C U R E C O N V E R S AT I O N |
137 |
The main disadvantages of brokered authentication are as follows:
Single point of failure: If for any reason the authentication broker is not available or its security is compromised there could be a negative effect on the clients and services that rely upon it for identity management. This means that while the broker is not available, all the services that depend on it for authentication will not be accessible to process secure messages. This risk can be mitigated by having a backup server. If the security of the broker is compromised, the client or the service could be tricked to believe that it is communicating with an authorized entity.
Existing infrastructure: Using brokered authentication requires existing infrastructure such as Active Directory or a PKI. If an organization does not have access to these resources it will need to obtain it before the implementation of this security model.
Implementation Options for Brokered Authentication
WSE 3.0 provides three brokered authentication options:
Kerberos: This option is ideal for organizations that manage their network security using Windows domains and Active Directory. This protocol allows you to take full advantage of the security features provided by Windows, such as impersonation and delegation.
X.509 certificates: Certificates provide a robust solution for inter-organization communication and securing messages that go across multiple platforms.
Custom security token: This option requires the implementation of a Security Token Service (STS). The STS authenticates a client and it then issues a custom token, such as an XML-based Security Assertion Markup Language (SAML) token. This is a good pattern for inter-organization communication where all parties can agree on a standard implementation of the STS.
Implementing Brokered Authentication
Let’s take a look at a couple of examples that implement the brokered authentication pattern.
Brokered Authentication Using Mutual Certificates
Here we are going to use the client’s X.509 certificate to provide the credentials needed by the server to authenticate the caller. As we discussed previously, usernames and passwords are not the strongest form of security, and X.509 certificates provide an alternate authentication mechanism.
We are going to use the solution created in Chapter 6. This solution shows the implementation of the UsernameForCertificateSecurity assertion.

138 C H A P T E R 7 ■ E X T E N D E D W E B S E R V I C E S S E C U R I T Y W I T H W S - S E C U R I T Y A N D W S - S E C U R E C O N V E R S AT I O N
How Mutual Certificate Authentication Works
Let’s walk through the list of steps that need to take place in order to establish a secure communication between a Web service and a client that follow the MutualCertificate10 or MutualCertificate11 patterns.
Infrastructure Prerequisites
As we discussed earlier, the brokered authentication model requires infrastructure that might or might not be in place in your organization, or in the organizations that you are doing business with. In the case of the mutual certificate model, both the service and the client need
to have a valid X.509 certificate. These certificates can be generated by any of these three approaches:
•Use the Makecert tool that is available as part of the WSE 3.0 toolkit. This is only a valid option if you are in a development or test environment.
•Use Windows 2003 Certificate Services.
•Use a certificate authority, such as VeriSign and Digicert.
■Note Windows 2003 has the capability to act as a certificate authority. This gives you the ability to generate your own certificates and maintain your own PKI. New features, such as autoenrollment for users, give you the ability to automatically deploy a certificate with no user intervention.
Here we are using the WSE2QuickStartClient and the WSE2QuickStartServer. You need to make sure that these certificates are properly installed in your computer. In order to do this, you can open the Certificates tool provided by the WSE 3.0 toolkit, or you can use the Certificates snap-in within the Microsoft Management Console.
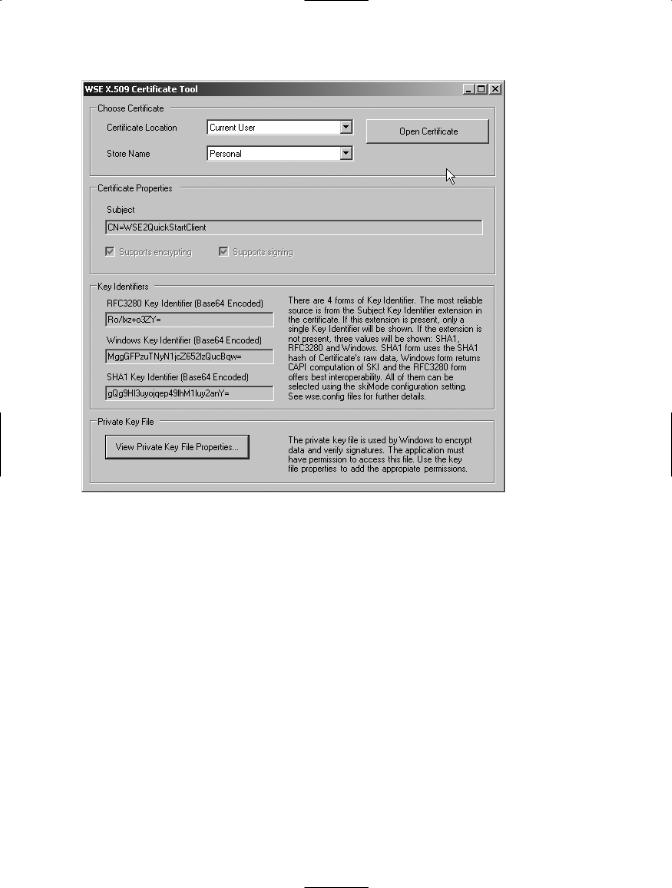
Let’s use the Certificates tool in this exercise. As you already know, this tool is available via the Programs menu, under the Microsoft WSE 3.0 group. After you open the tool you can select the Current User location and Personal for the store name to find the WSE2QuickStartClient certificate. After you choose this certificate from your personal store, the tool will display the screen shown in Figure 7-3.

C H A P T E R 7 ■ E X T E N D E D W E B S E R V I C E S S E C U R I T Y W I T H W S - S E C U R I T Y A N D W S - S E C U R E C O N V E R S AT I O N |
139 |
Figure 7-3. The properties of the WSE2QuickStartClient certificate
Now choose the Local Computer certificate location and the Personal store to find the WSE2QuickStartServer certificate. If both certificates are there it means that you either installed them automatically through a setup file, or manually, following the instructions in Chapter 5. The certificates must be installed correctly in order to run this sample. If you get any exceptions during the execution of this sample, you should go back to Chapter 5 and review the installation instructions to make sure you didn’t miss any important steps. Another option is to run the setup.bat file that is located under the Sample directory of the %Program Files%\Microsoft WSE\v3.0 directory.

140C H A P T E R 7 ■ E X T E N D E D W E B S E R V I C E S S E C U R I T Y W I T H W S - S E C U R I T Y A N D W S - S E C U R E C O N V E R S AT I O N
Message Flow
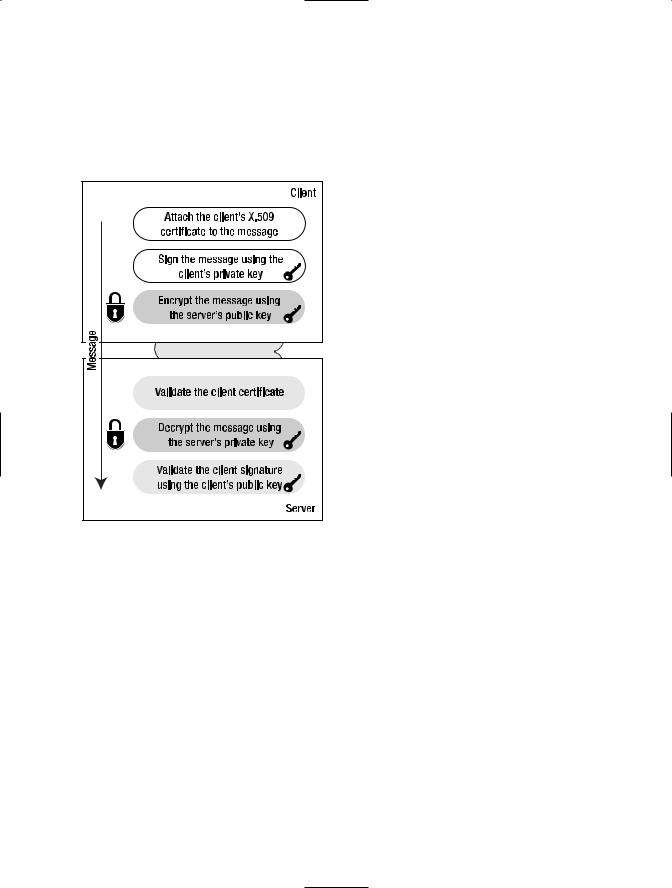
Before the communication takes place, the client must have access to its own certificate, plus the public portion of the server’s certificate. The server only needs to have access to its own certificate, because the client will attach the public portion of the client certificate to the request. The diagram in Figure 7-4 shows a simplified representation of the steps.
Figure 7-4. Mutual certificate assertion message flow
The following steps occur when the client makes a call to the service using the mutual certificates pattern:
1.Attach X.509 certificate: The client assumes that the server does not have access to its certificate in a local store. It attaches the certificate information to the outgoing message.
2.Sign the message: The client uses its private key to sign the message. This signature will allow the server to validate the message origin and its integrity.
3.Encrypt the message: The client uses the server public key to encrypt the message. This will prevent nonauthorized users from accessing the content of the message while it is in transit.

C H A P T E R 7 ■ E X T E N D E D W E B S E R V I C E S S E C U R I T Y W I T H W S - S E C U R I T Y A N D W S - S E C U R E C O N V E R S AT I O N |
141 |
4.Validate client certificate: The server checks that the certificate has not expired, that it has not been tampered with, and that it is issued by a certificate authority that is
trusted by the server. It also checks the certificate revocation list (CRL) to see if the certificate is included in the list. The check can be performed online or against a local CRL. The default mode is to check online and this can be modified in the Security tab of the WSE 3.0 Settings Tool.
5.Decrypt the message: After the certificate is validated, the server proceeds to decrypt the message using its private key.
6.Validate the signature: The last step is to validate the client signature using the client public key. This helps the service validate whether the message is coming from the right client and has not been altered while in transit.
Secure the Web Service
The following steps show you how to secure a Web service using X.509 certificates:
1.In the StockTraderSecure project, open the WSE 3.0 Settings Tool.
2.In the Policy tab, click the Add button. You should see the UsernamePolicy in the list of existing Application Policies.
3.Name this policy MutualCertificatePolicy and click OK.
4.Click Next in the welcome screen and choose to secure a service in the Authentication Settings step. Select Certificate as the authentication method and click Next.
5.The Authorized Clients step allows you to choose one or many certificates that are allowed to access the service. In this example we are going to uncheck this box, and we will configure Authorization later, making changes directly to the configuration files.
6.This step prompts you to select the message protection level, just as you have already seen in Chapter 6. Leave the WS-Security 1.1 Extensions box checked. You would uncheck this box if you need to interact with clients that do not support WS-Security 1.1. Choose Sign and Encrypt, uncheck the Secure Session box, and click Next.
7.Click the Select Certificate button and choose the WSE2QuickStartServer from the list. Click Next to continue.
■Note The client will also have access to the WSE2QuickStartServer certificate and it will use its public key to encrypt the message. When the service receives the message, it will use this certificate’s private key to decrypt it. If the service sends a response to the client, it will use the certificate’s private key to sign the message.

142C H A P T E R 7 ■ E X T E N D E D W E B S E R V I C E S S E C U R I T Y W I T H W S - S E C U R I T Y A N D W S - S E C U R E C O N V E R S AT I O N
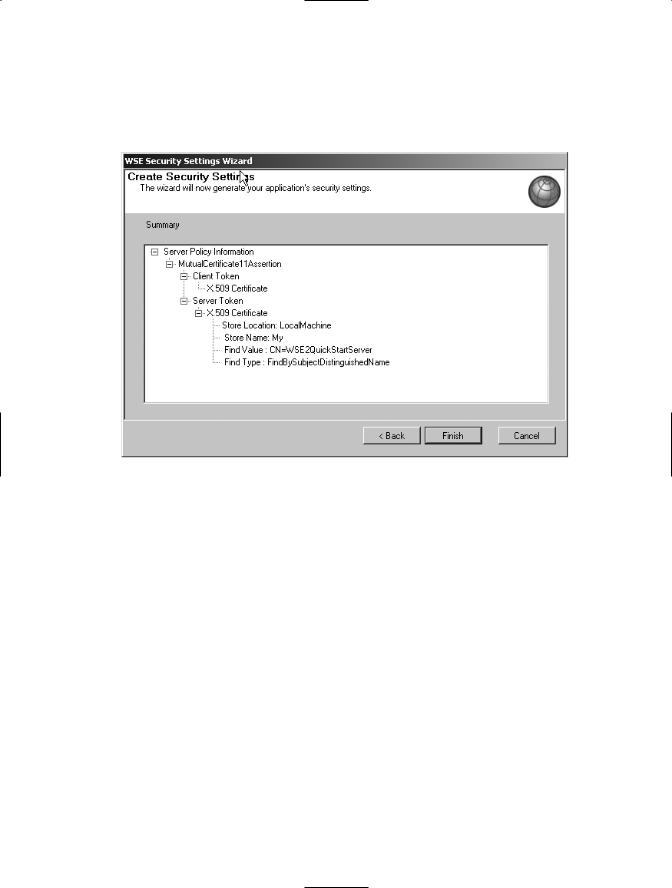
8.Review the settings of the MutalCertificatePolicy to make sure that you selected the right options during this process. The summary should look like the screen shown in Figure 7-5.
Figure 7-5. A summary of the mutual certificate server policy
9.Click Finish to complete the process and open the wse3policyCache.config policy file to see the new settings.
The wizard adds the following elements to the existing policy file. You can see that the definition UsernamePolicy is still in there, which means that you can select to use it or the MutualCertificatePolicy in your project. Listing 7-1 shows the changes to the policy file after adding the MutualCertificatePolicy.
Listing 7-1. The Policy File After Adding the MutualCertificatePolicy
<policy name="MutualCertificatePolicy"> <mutualCertificate11Security
establishSecurityContext="false"
renewExpiredSecurityContext="true" requireSignatureConfirmation="true" messageProtectionOrder="SignBeforeEncrypt" requireDerivedKeys="true" ttlInSeconds="300">
<serviceToken>
<x509 storeLocation="LocalMachine" storeName="My" findValue="CN=WSE2QuickStartServer" findType="FindBySubjectDistinguishedName" />
</serviceToken>

C H A P T E R 7 ■ E X T E N D E D W E B S E R V I C E S S E C U R I T Y W I T H W S - S E C U R I T Y A N D W S - S E C U R E C O N V E R S AT I O N |
143 |
<protection>
<request signatureOptions="IncludeAddressing, IncludeTimestamp, IncludeSoapBody" encryptBody="true" />
<response signatureOptions="IncludeAddressing, IncludeTimestamp, IncludeSoapBody" encryptBody="true" />
<fault
signatureOptions="IncludeAddressing, IncludeTimestamp, IncludeSoapBody"
encryptBody="false" /> </protection>
</mutualCertificate11Security> <requireActionHeader />
</policy>
In this policy file you can see that the WSE 3.0 security wizard identifies our scenario as falling within the MutualCertificate11Security assertion. If you look closer at these elements you will see that each one of your decisions is reflected here and you can make changes manually if required.
To demonstrate how easy it is to make changes, we are going to add an authorization section to this policy. The authorization rules will only grant access to those clients that are authenticated using the WSE2QuickStartClient certificate. Copy these lines of code under the start of the Policy tag in the policy file:
<authorization>
<allow user="CN=WSE2QuickStartClient"/> <deny user="*"/>
</authorization>
The last step before we move to the client project is to apply this policy to the service. You can do this by finding the place in the StockTrader class where you applied the UsernamePolicy and modify the policy name to say MutualCertificatePolicy. After this change, the class definition should look like the following:
[Policy("MutualCertificatePolicy")] public class StockTrader : StockTraderStub
Secure the Client Application
In order to secure the StockTraderClient application you will follow similar steps to the ones you executed in Chapter 6. The fact that these steps are similar is one of the main benefits of using WSE 3.0. It gives you the ability to concentrate more on decisions to secure your application than on putting the security implementation in place.
We are going to abbreviate some of the instructions, given that you have been through this wizard a couple of times already:
1.Open the WSE 3.0 Settings Tool, go to the Policy tab, and click the Add button.
2.Name this policy MutualCertificatePolicy and click OK.

144C H A P T E R 7 ■ E X T E N D E D W E B S E R V I C E S S E C U R I T Y W I T H W S - S E C U R I T Y A N D W S - S E C U R E C O N V E R S AT I O N
3.In the Authentication Settings step, choose Secure a Client Application and choose Certificate and click Next.
4.In the Client Certificate step, choose the X.509 certificate named WSE2QuickStartClient from the CurrentUser store and click Next. This is the certificate that will be used to sign the message using the certificate private key. The service will use this certificate public key to validate the integrity of the message.
5.The Message Protection screen gives you the options that you are already familiar with. Since you selected to use WS-Security 1.1 in the service, you will need to do the same in the client. The protection order for the message should also match the service protection order requisites, which are Sign and Encrypt. Remember to uncheck the Secure Session box. We will talk about the benefits provided by this feature in the section “Establish Trusted Communication with WS-Secure Conversation” later in this chapter. Click Next once you have provided all the answers required in this step.
6.In this screen you are asked to select one more certificate. Select the LocalMachine store, click Select Certificate, and choose the WSE2QuickStartServer certificate from the list. This is the server certificate that will be used to encrypt the message. The client application must have access to this certificate before you make this first call. In a production scenario, you can achieve this by including the public portion of the certificate as part of the installation package. Click Next and review the policy summary. It should look like the one shown in Figure 7-6. Click Finish to complete the process.
Figure 7-6. A summary of the mutual certificate client policy

C H A P T E R 7 ■ E X T E N D E D W E B S E R V I C E S S E C U R I T Y W I T H W S - S E C U R I T Y A N D W S - S E C U R E C O N V E R S AT I O N |
145 |
Let’s take a look at Listing 7-2 to review the changes made to the wse3policyCache.config file. The MutualCertificatePolicy has been added and you can see that it references both the client token and the server token.
Listing 7-2. Changes to the Client Policy File After Adding the MutualCertificatePolicy
<policy name="MutualCertificatePolicy"> <mutualCertificate11Security establishSecurityContext="false"
renewExpiredSecurityContext="true" requireSignatureConfirmation="true" messageProtectionOrder="SignBeforeEncrypt" requireDerivedKeys="true" ttlInSeconds="300">
<clientToken>
<x509 storeLocation="CurrentUser" storeName="My" findValue="CN=WSE2QuickStartClient" findType="FindBySubjectDistinguishedName" />
</clientToken>
<serviceToken>
<x509 storeLocation="LocalMachine" storeName="My" findValue="CN=WSE2QuickStartServer" findType="FindBySubjectDistinguishedName" />
</serviceToken>
<protection>
<request signatureOptions="IncludeAddressing, IncludeTimestamp, IncludeSoapBody" encryptBody="true" />
<response signatureOptions="IncludeAddressing, IncludeTimestamp, IncludeSoapBody" encryptBody="true" />
<fault signatureOptions="IncludeAddressing, IncludeTimestamp, IncludeSoapBody" encryptBody="false" />
</protection>
</mutualCertificate11Security> <requireActionHeader />
</policy>
The final change to the sample solution is to modify the code in the StockTraderConsole.cs class. You need to remove the lines that create the Username Token and append it to the proxy class. You also need to change the name of the policy from UsernamePolicy to MutualCertificatePolicy.
Running the Sample Solution
Now you can run the sample solution to test the implementation of the mutual certificate pattern. Try to access the client certificate at the service by using the following property:
RequestSoapContext.Current.Credentials.UltimateReceiver.
GetClientToken<X509SecurityToken>().Certificate
You can use this property to obtain the identity of the caller and log every incoming call for audit purposes.
