

Expert Service-Oriented Architecture In CSharp 2005 (2006) [eng]
.pdf126 C H A P T E R 6 ■ S E C U R E W E B S E R V I C E S W I T H W S - S E C U R I T Y
<policy name="UsernamePolicy">
<usernameForCertificateSecurity establishSecurityContext="false" renewExpiredSecurityContext="true" requireSignatureConfirmation="false" messageProtectionOrder="SignBeforeEncrypt" requireDerivedKeys="true" ttlInSeconds="300">
<serviceToken>
<x509 storeLocation="LocalMachine" storeName="My" findValue="CN=WSE2QuickStartServer" findType="FindBySubjectDistinguishedName" />
</serviceToken>
<protection>
<request signatureOptions="IncludeAddressing, IncludeTimestamp, IncludeSoapBody"
encryptBody="true" />
<response signatureOptions="IncludeAddressing, IncludeTimestamp, IncludeSoapBody"
encryptBody="true" />
<fault
signatureOptions="IncludeAddressing, IncludeTimestamp, IncludeSoapBody" encryptBody="false" />
</protection>
</usernameForCertificateSecurity> <requireActionHeader />
</policy>
</policies>
The web.config file is also modified by the wizard by the addition of one line that references the new policy file. That line is under the <Microsoft.web.services3> section:
<policy fileName="wse3policyCache.config" />
Reference the Security Policy from Code
Open the StockTrader.cs file and make the following changes:
1.Add a using directive for the Microsoft.Web.Services3 namespace.
2.Add the following reflection attribute to the definition of the StockTrader class: [Policy("UsernamePolicy")].
Implement a Custom Username Token Manager
The default behavior of the UsernameTokenManager class is to authenticate the user against an Active Directory or a local Windows account. In this example, we are going to override the default behavior of this class by creating a custom username token manager. To accomplish this, you will need to create a new class file named UsernameTokenManager.cs, and type in the code shown in Listing 6-7.

C H A P T E R 6 ■ S E C U R E W E B S E R V I C E S W I T H W S - S E C U R I T Y |
127 |
Listing 6-7. A Custom Username Token Manager
using System; using System.Xml;
using Microsoft.Web.Services3.Security;
using Microsoft.Web.Services3.Security.Tokens;
namespace StockTraderSecure
{
public class CustomUsernameTokenManager : UsernameTokenManager
{
public CustomUsernameTokenManager()
{
}
public CustomUsernameTokenManager(XmlNodeList nodes) : base(nodes)
{
}
protected override string AuthenticateToken(UsernameToken token)
{
//return the password, in this sample, the password is the same value
//as the user name, but in upper case
//In a production application, the password would be retrieved
//from an external storage, such as a SQL Server database or
//an LDAP directory.
return token.Username.ToUpper();
}
}
}
The previous code uses a straightforward algorithm to obtain the user’s password. It simply converts the username to uppercase. If you want the user to be authenticated successfully, you will need to build a client application that passes the same value as a username and password, with the second one containing only uppercase characters.
The last step is to modify the web.config file to specify the name of the user-defined class that will handle user authentication. The <securityTokenManager> section must be located under the <security> tag of the <microsoft.web.services3> section. Listing 6-8 shows a fragment of the web.config file that enables the service to use a custom security token manager.

128C H A P T E R 6 ■ S E C U R E W E B S E R V I C E S W I T H W S - S E C U R I T Y
Listing 6-8. Fragment of the web.config File
<securityTokenManager>
<add
type="StockTraderSecure.CustomUsernameTokenManager" namespace="http://docs.oasis-open.org/wss/2004/01/oasis-
200401-wss-wssecurity-secext-1.0.xsd" localName="UsernameToken" xmlns=""/>
</securityTokenManager>
Secure the Client Application
The client application will also be secured using the WSE Security Settings Wizard. The following steps will help you define a client security policy that will comply with the rules defined by the service policy.
1.Enable the StockTraderClient project for WSE 3.0 using the WSE Settings Tool. Enable Message Tracing in the Diagnostics tab, just like you did for the StockTraderSecure project.
2.In the WSE Settings Tool, choose the Policy tab, and select the Enable Policy check box.
3.Click Add and enter the name UsernamePolicy and click OK.
4.Click Next in the WSE Security Settings Wizard welcome screen.
5.Choose the option to secure a client application, select the Username radio button, and click Next.
6.Choose to specify the username and password in code. It is not recommended to store these credentials in a configuration file.
7.Choose the option to Sign and Encrypt the messages, just like you did when you defined the policy for the service. If you choose a different encryption level, the client will not be compliant with the policy defined by the service and you will get a SOAP exception during the service call. Uncheck the Secure Session box and click Next.
8.The wizard will now show a screen where you can choose the X.509 certificate that will be used for encryption and signing. Select the WSE2QuickStartServer certificate and click Next.
9.The last step of the wizard, shown in Figure 6-8, displays the summary of the security policy that you have created for the client application. Notice that these decisions can be grouped under the same turnkey scenario as the service application.

C H A P T E R 6 ■ S E C U R E W E B S E R V I C E S W I T H W S - S E C U R I T Y |
129 |
Figure 6-8. Summary of the security policy
Use the Proxy Class Generated by WSE
The next step is to regenerate the StockTraderProxy Web reference. Right-click it in the Solution Explorer and select the Update Web Reference command.
Open the Reference.cs autogenerated file, which is located under the StockTradeProxy/ Reference.map folder. Find the definition of the StockTraderWse class and you will see that it inherits from the Microsoft.Web.Services3.WebServicesClientProtocol class. The Microsoft. Web.Services3 namespace contains the core classes that are used by the WSE toolkit.
Now open the StockTraderConsole.cs class and modify it as follows:
1.Add a using directive for the Microsoft.Web.Services3.Security.Tokens namespace.
2.Modify the line that creates an instance of the Web service proxy by replacing the StockTrader class with the StockTraderWse class.
3.Create a Username Token. For sample purposes, the password value is the username in uppercase letters. The password is included as plain text in the token, which is encrypted using the X.509 certificate.
4.Append the token to the proxy.
5.Set the client policy.

130 C H A P T E R 6 ■ S E C U R E W E B S E R V I C E S W I T H W S - S E C U R I T Y
Listing 6-9 shows the code after the previously described changes have been made.
Listing 6-9. Secured Code Listing for the Web Service Client
//Create an instance of the Web service proxy StockTraderProxy.StockTraderWse serviceProxy = new
StockTraderProxy.StockTraderWse();
//Create user name token
UsernameToken token = new
UsernameToken("admin", "ADMIN", PasswordOption.SendPlainText);
//Append token to the proxy serviceProxy.SetClientCredential<UsernameToken>(token);
//Set the client policy serviceProxy.SetPolicy("UsernamePolicy");
//Call the service
Console.WriteLine("Calling {0}", serviceProxy.Url); string Symbol = "MSFT";
StockTraderProxy.Quote q = serviceProxy.RequestQuote(Symbol);
// Show the results
Console.WriteLine("Web service Response:"); Console.WriteLine("");
Console.WriteLine( "\tSymbol:\t\t" + q.Symbol ); Console.WriteLine( "\tCompany:\t" + q.Company ); Console.WriteLine( "\tLast Price:\t" + q.Last ); Console.WriteLine( "\tPrevious Close:\t" + q.Previous_Close );
You can now run the application and use the trace files generated by WSE to examine the messages that are being sent and received by the service and the client applications. The trace file shows the messages at different steps of the SOAP filtering pipeline.
You can create new policies or modify the existing one and use this trace utility to see the effect that they have in the generated SOAP messages. For example, you can create a new policy where the content of the message is only signed but not encrypted. In this case you will be able to read the values of messages sent by looking at the unprocessed messages in the trace files. In the sample that you just created you won’t be able to see the values passed between the client and the service due to the encryption mode that was set in the policy file.
Authorization
WSE 3.0 provides a framework to authorize users and roles. Similar to other security configuration features in WSE 3.0, you can do this using either a policy file or code.
C H A P T E R 6 ■ S E C U R E W E B S E R V I C E S W I T H W S - S E C U R I T Y |
131 |
Declarative Authorization
The StockTrader.asmx Web service authenticates users through a custom username token manager, but no further security checks are performed after the user is successfully identified.
You will now configure this Web service to validate whether the user is authorized to access the services provided by the StockTrader service. The simplest way to do this is through a policy file, as shown in the following steps:
1.In the wse3policyCache.config file, add the following elements under the <policy> section:
<authorization>
<allow user="admin" /> <deny user="*" />
</authorization>
2.In the same file, under the <extensions> section, add the following line:
<extension name="authorization" type="Microsoft.Web.Services3.Design.AuthorizationAssertion, Microsoft.Web.Services3,
Version=3.0.0.0, Culture=neutral, PublicKeyToken=31bf3856ad364e35" />
The <authorization> tag allows you to grant or deny access to the service based on the user’s name or role. You can test this by modifying the code in the console application to use a different username, such as “guest.” If you run the application, it will throw an exception that displays the message “Microsoft.Web.Services3.Security.SecurityFault: User ‘guest’ is not authorized to access the service.”
■Note In this sample we chose to implement a very simple custom username token manager. If we had used the default username token manager or a Kerberos token, we could have used Windows roles to allow or deny access to the service. In these two models, a successfully authenticated user is mapped to a Windows account using the Principal property of the current token.
Code-Based Authorization
There might be some cases where policy-based authorization is not what you need because it gets applied equally to all the methods available in the service. The following example shows you how to authorize a user at the method level:

132C H A P T E R 6 ■ S E C U R E W E B S E R V I C E S W I T H W S - S E C U R I T Y
1.Add a using directive for the Systems.Xml namespace and one for the Microsoft.Web.Services3.Security.Tokens namespace.
2.Add a private method in the StockTrader.cs file.
private void authorize()
{
string username = RequestSoapContext.Current.Credentials.UltimateReceiver. GetClientToken<UsernameToken>().Username;
if (username == "admin")
{
return;
}
else
{
throw new SoapException("Access denied.", new XmlQualifiedName("Authorization"));
}
}
3. Add the following lines to the beginning of the RequestQuote method:
// Check if the user is authorized to access this method authorize();
The previous changes reflect a scenario where only the “admin” user is authorized to access the RequestQuote operation. The authorize method will throw an exception if the user is not authorized, and the execution of the call will be aborted.
Summary
In this chapter we explained some important security concepts and we gave you an overview about why WS-Security and WSE 3.0 play such an important role when building .NET-based Web services or Web service consumers.
You learned about the common security scenarios that Microsoft has identified based on feedback from developers who implemented Web services using WSE 1.0 and WSE 2.0. Then you reviewed the six turnkey assertions that Microsoft built into the WSE Security Settings Wizard.
The second part of this chapter guided you through a simple example that secures the StockTrader application. We implemented the UsernameForCertificate assertion using the WSE Security Settings Wizard and we showed you how to create a custom username token manager. Finally, we showed you how to authorize a user using either code or a policy file.
You are now ready to jump into Chapter 7, where you will take a look at other turnkey assertions and review topics such as stateful sessions and replay attacks.
C H A P T E R 7
Extended Web Services Security with WS-Security and WS-Secure Conversation
In Chapter 6 you learned about the UsernameForCertificateSecurity assertion. In this assertion the client provides a username and a password as a means to prove its identity, and the content of the messages is encrypted using an X.509 certificate. In this scenario, the client and the service trust each other enough to establish direct communication without relying on a third party that proves their identities. This model is known as direct authentication, and it is the most basic authentication approach that can be used to establish a trust relationship. We begin this chapter by reviewing this authentication model as well as delving into the concept of brokered authentication.
Authentication Models
The characteristics of your deployment scenarios will give you the option to choose between different types of authentication mechanisms. Your decision will depend upon several factors, such as existing security infrastructure, interoperability requirements, and organizational boundaries. Let’s review direct authentication and discuss brokered authentication, describing the main advantages and disadvantages of each.
Direct Authentication
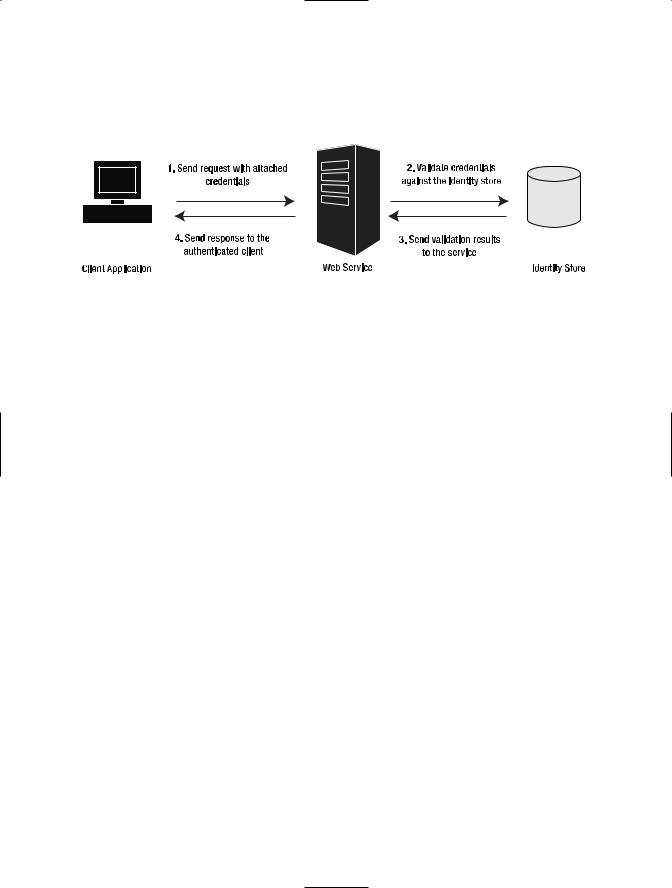
In this model, the client provides its credentials and the service is responsible for the validation of the credentials against an identity store, such as LDAP or a SQL Server database. In the majority of cases, these credentials will be passed as a username and password and both the service and the client have the responsibility to maintain these credentials as confidential. If the client and the service do not manage these credentials appropriately the security of the information is compromised. For example, relying on a service to manage its own passwords using a SQL Server database leaves the door open for possible mistakes. The developer implementing the solution could choose to store the passwords in plain text format and someone who gains access to the database could read those credentials.
133
134 C H A P T E R 7 ■ E X T E N D E D W E B S E R V I C E S S E C U R I T Y W I T H W S - S E C U R I T Y A N D W S - S E C U R E C O N V E R S AT I O N
This model is most frequently used when there is no security infrastructure that can be used by both parties during the authentication process. The diagram in Figure 7-1 shows how the client, service, and identity store interact in order to validate a client request.
Figure 7-1. A graphical representation of the direct authentication model
Advantages and Disadvantages of Direct Authentication
The direct authentication model has several advantages and disadvantages. The advantages are as follows:
Simplicity: You don’t need to rely on a public key infrastructure (PKI) or Active Directory in order to implement a secure Web service.
Flexibility: You can use almost any identity store to provide the authentication mechanism. For example, you can call a legacy system already used in the organization that can validate user credentials on your behalf.
The disadvantages are as follows:
Management overhead: Giving each service the ability to manage its own identity store could create a management nightmare when the number of Web services in the organization grows to support more business scenarios.
Shared-secret-based: Sharing a secret, such as a username and password, and using it to provide authentication is not the strongest form of security available in the industry. There are stronger security mechanisms such as X.509 or Kerberos. The reason shared secrets are not strong is because users tend to select passwords that are easy to guess. If a user selects a strong password he might write it down in a note and leave it next to his computer. This is a security risk not only for the system that is being attacked by a hacker but also for any other applications where the user has used the same login name and password.
Process-intensive: The client must authenticate itself every time it calls the service. This is a process-intensive operation due to the encryption and decryption steps executed both at the client and the service.

C H A P T E R 7 ■ E X T E N D E D W E B S E R V I C E S S E C U R I T Y W I T H W S - S E C U R I T Y A N D W S - S E C U R E C O N V E R S AT I O N |
135 |
Implementation Options for Direct Authentication
If you wish to implement this security model you can rely upon two of the turnkey security assertions provided by WSE 3.0.
UsernameForCertificateSecurity: In this assertion, the message confidentiality is provided at the message level by encrypting the content of the message using an X.509 certificate.
UsernameOverTransportSecurity: This assertion relies on an existing secure channel that will prevent the message from being accessed by an unauthorized entity.
Brokered Authentication
In this model, the client and the service do not attempt to authenticate each other directly. They use an intermediary that validates the client’s identity and then provides a security token as proof of successful authentication. The client attaches this token to the request and the service uses this token to authenticate the client. In the real world this is equivalent to a passport or a driver’s license, which is tamperproof and secure enough to be trusted. There are government agencies responsible for the validation of the person’s identity and, in the case of the driver’s license, validation of the person’s driving skills. These agencies require different documentation to validate the person’s identity. Once the license or passport is issued, the person can use it to identify himself at places such as banking institutions.
Similar to this analogy, authentication brokers, such as VeriSign or Windows Active Directory, require the entity to provide enough information to validate its identity. In the case of VeriSign, it requires documentation to validate whether the organization is registered and legitimate and still active.
Security tokens have a duration period; some of them, such as X.509 certificates, can last years, and some others, such as Kerberos tickets, can last only minutes or hours.
The duration of an X.509 certificate depends on the criteria used by the certificate authority when it extends the certificate. In the case of VeriSign, it extends for a limited number of years, because with every renewal it wants to reverify whether your corporation is in good standing. An Active Directory Kerberos ticket has a default duration of ten hours; this value can be modified using the Group Policy Object Editor at the domain level.
The diagram in Figure 7-2 shows a client that requests a security token and then uses it to communicate with two services. You can notice that the client only needs to request the token once during this session, which helps reduce the transaction time. Another important aspect of the diagram is that two services are using the same authentication broker. This is one of the main advantages of this model, because it provides a centralized authentication authority and it allows for easier management of the identity store.