

Professional Visual Studio 2005 (2006) [eng]
.pdfChapter 15
Code-Based Security
Code-based security, also known as code-access security, allows you to create applications that limit their functionality based on the code itself, relying on the access required by each statement for data and the system itself to control how the application can be executed.
You may want to look into code-based security because of two common computing environment scenarios. The first is the situation where a user is a member of the Administrators group in their particular Windows system. This is common for home users or small business owners, who tend to be the only user on their system and often need access to functionality that is otherwise locked down in the corporate environment. When they belong to a powerful user role such as this, role-based security can be next to useless, as they can perform almost any kind of activity, including some you may have implemented that destroy important data on the system.
The other situation is almost the complete opposite. Because of the rampant abuse of computer systems in larger companies, which can result in malicious code such as worms and viruses infecting massive networks, some systems are locked down so tightly that the end-user has very little access to the system. This can result in your application malfunctioning when it expects to have access to a particular feature to which the user is locked out.
This is compounded when you consider the variety of ways in which your application can be executed. Because Windows, in conjunction with the .NET CLR, doesn’t allow programs executed from outside the local system (such as programs running from a web site or intranet site) to have full access to the system itself, you can again face difficulties when your application requires specific functionality to perform correctly.
The .NET Framework 2.0 includes code-access security functionality built directly into the system. Every function is signed with a specific set of access that it requires, which allows you to determine what each application and module will need to run successfully. For instance, if you know that your application can function successfully without access to the Windows registry or file system, you can specify that the application code access should exclude the requirement associated with that kind of security.
Having the ability to specify the kind of access your code will expect allows your users to understand what functionality will be performed. As a result, if your application were somehow infected with a virus that tried to access some feature that falls outside the code access points you’ve defined, then the attempt will fail completely before it can cause any damage.
As a side effect, code-based security can aid you as well, because it can block inadvertent functionality in your code that tries to perform functions outside the scope of the code access you have defined for it.
When an application is deployed with an accurate code-access model, system administrators can configure a corresponding security policy for end-users, allowing them to execute the application with the required security access without exposing their system to other applications that also try to use the same security features, or even protect them from your own code trying to run functionality that extends beyond the security settings you’ve indicated.
In addition, when you use code-access security, you can handle permission exceptions gracefully. Whenever your application is about to perform a function that you know requires a specific security access, you can wrap it in a Try-Catch block to intercept situations where the application has not received sufficient security access.
196

Security Concepts
In Chapter 47, you’ll see how the ClickOnce functionality of Visual Studio 2005 uses code-access security to define what features your application requires for successful execution. You’ll also learn how you can easily toggle specific code-access features on and off and then build this into the deployment model.
Role-Based Security
Role-based security, conversely, is all about the user accessing the application, or even individual parts of the application’s functionality. It is based on the roles to which the user belongs. For instance, your application may need to provide full access to a database on sales tenders to only employees who are either managers or lead sales people. However, the supporting employees involved in a tender may need access to a subset of the information, which you want to be able to provide from within the same application.
Role-based security enables you to do this by explicitly specifying different levels of approval within the application functionality itself. You can even use this methodology to give different user roles access to the same functionality but with different behavior. For instance, managers may be able to approve all tenders, while lead sales people can only approve tenders under a certain amount.
You can implement role-based security in your application by retrieving information Windows provides about the current user. As mentioned previously, this isn’t necessarily the user who is currently logged onto the system, because Windows allows an individual to execute different applications and services via different user accounts as long as they provide the correct credentials. This means that when your application asks for user information, Windows returns the details relating to the specific user account being used for your application process.
Visual Studio 2005 applications use the .NET Framework 2.0, which gives them access to the identity of a particular user account through a Principal object. This object contains the access privileges associated with the particular identity, consisting of the roles to which the identity belongs.
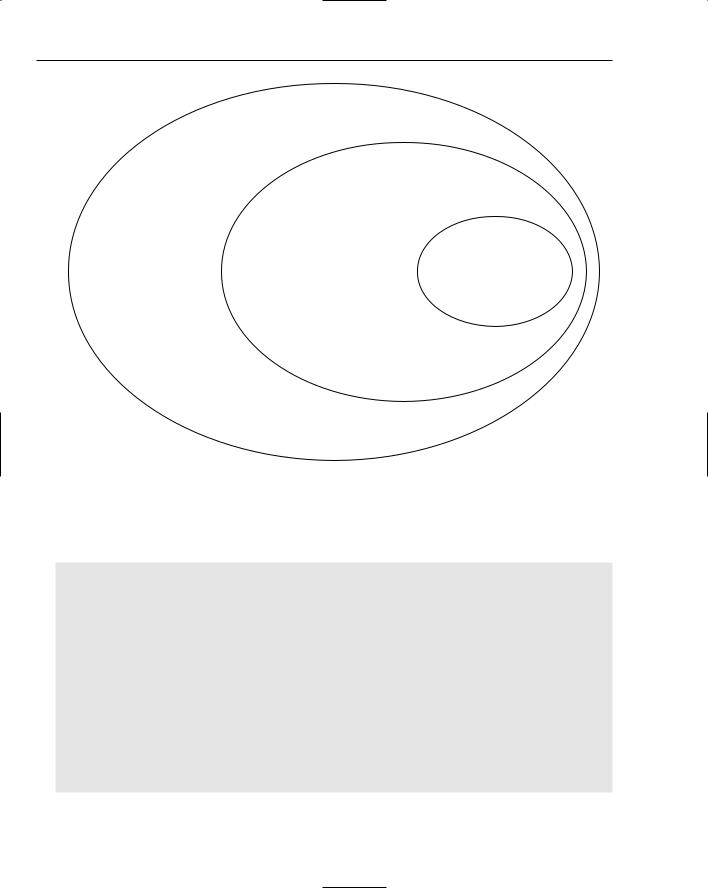
Every role in the system consists of a group of access privileges. When an identity is created, a set of roles is associated with it, which in turn define the total set of access privileges the identity has. For instance, you might have roles of ViewTenders, AuthorizeTenders, and RestrictTenderAmount in the example scenario used in this section. All employees associated with the sales process could be assigned the role of ViewTenders, while management and lead sales people have the AuthorizeTenders roles as well. Finally, lead sales people have a third role of RestrictTenderAmount, which your code can use later to determine whether they can authorize the particular tender being processed. Figure 15-1 shows how this could be represented visually.
The easiest way to implement the role-based security functionality in your application is to use the My.User object. You can use the IsAuthenticated property to determine whether there is a valid user context under which your application is executing. If there isn’t, your role-based security code will not work, so you should use this property to handle that situation gracefully.
If you’re using this code in a C# application, you’ll need to add the references to the My namespace, as explained in Chapter 24.
197
Chapter 15
View Tenders
Supporting Sales Person
AuthorizeTenders
Manager |
RestrictTenderAmount |
|
Lead Sales Person
Figure 15-1
Once you’ve established that a proper user context is in use, use the IsInRole method to determine the methods to which the current user identity belongs. A simple implementation of the previous sample for a basic form is shown in the following code listing:
Private Sub Form1_Load(ByVal sender As System.Object, _
ByVal e As System.EventArgs) Handles MyBase.Load
With My.User
If .IsAuthenticated Then
txtTenderInfo.Visible = .IsInRole(“ViewTenders”) If .IsInRole(“AuthorizeTenders”) Then
btnAuthorize.Enabled = True
If .IsInRole(“RestrictTenderAmount”) And _ CInt(txtTenderAmount.Text) > 10000 Then btnAuthorize.Enabled = False
End If End If
End If End With
End Sub
198

Security Concepts
The result of a lead salesperson with properly defined roles running this code is shown in Figure 15-2.
Figure 15-2
In addition to using your own defined roles, you can also use the built-in roles that Windows creates.
This brief introduction to the differences between these two approaches to security is limited to a general discussion on how they are represented within the .NET Framework and how you might approach your particular project from either perspective. However, if you need more advanced coverage of program security, take a look at the Visual Basic .NET Code Security Handbook by Eric Lippert (Wrox Press, 2002). While this book is aimed at Visual Basic programmers and is now a couple of years old, it still serves as an excellent resource, offering great detail about how the different security practices can work in the
.NET world.
Summar y
Securing both your program code and your data is essential in today’s computing environment. You need to inform the end-users of your applications what kind of access it requires to execute without encountering security issues. Once you understand the different types of security you can implement, you can use them to encrypt your data to protect your applications from unwanted use. Using a combination of roleand code-based security methodologies, you can ensure that the application only runs under the required permissions and that unauthorized usage will be blocked.
In the next chapter, you’ll learn how to enhance the use of these concepts in a practical way by using the cryptography features of the .NET Framework to protect your data.
199

Cr yptography
Security is an ongoing concern that all developers need to address, in particular when data is being stored or transmitted. This chapter covers the principles and practices of cryptography. The
.NET Framework includes support for several of the standard algorithms. These algorithms can be combined to securely transfer data between two parties or securely store data.
General Principles
Cryptography focuses on four general principles to secure information that will be transferred between two parties. A secure application must apply a combination of these principles to protect any sensitive data:
Authentication: Before information received from a foreign party can be trusted, the source of that information must be authenticated to prove the legitimacy of the foreign party’s identity.
Non-Repudiation: In addition to proving the identity of the information sender, there needs to be a mechanism to ensure that the sender did in fact send the information.
Data Integrity: Once the authentication of the sender and the legitimacy of the correspondence have been confirmed, the data needs to be verified to ensure that it has not been modified.
Confidentiality: Protecting the information from anyone who may intercept the transmission is the last principle of cryptography.

Chapter 16
Techniques
Cryptographic techniques fall into four broad categories. In each of these categories, a number of algorithms are implemented in the .NET Framework using an inherited provider model. For each category there is typically an abstract class that provides common functionality. The specific providers implement the details of the algorithm.
Hashing
To achieve the goal of data integrity, a hashing algorithm can be applied to the data being transferred. This will generate a byte sequence that has a fixed length, referred to as the hash value. To ensure data integrity, the hash value has to be unique, and the algorithm should always produce the same hash value for a specific piece of data.
For example, if a piece of information is being sent from Susan to David, then the integrity of the information can be checked by comparing the hash value generated by Susan, from the original information, with the hash value generated by David, from the information he received. If the hash values match, the goal of data integrity has been achieved. Because the hash value cannot be converted back into the original information, both the information and hash value have to be sent. This is clearly a risk, as the information can easily be read. In addition, the information cannot be guaranteed to come from Susan because someone else could have used the same hashing algorithm prior to sending information to David.
The hashing algorithms included in the .NET Framework are as follows:
HMACSHA1
MACTripleDES
MD5CryptoServiceProvider
SHA1Managed
SHA256Managed
SHA384Managed
SHA512Managed
Symmetric (Secret) Keys
To protect the confidentiality of the information being transferred, it can be encrypted by the sender and decrypted by the recipient. Both parties can use the same key to encrypt and decrypt the data using a symmetric encryption algorithm. The difficulty is that the key needs to be securely sent between the parties, as anyone with the key can access the information being transmitted.
A piece of information being sent from Susan to David, who both have access to the same encryption key, can be encrypted by Susan. Upon receiving the encrypted information, David can use the same algorithm to decrypt the information, thus preserving the confidentiality of the information. Due to the risk of the key being intercepted during transmission, the authentication of the sender, and hence the integrity of the data, may be at risk.
202

Cryptography
The following symmetric algorithms included in the .NET Framework all inherit from the
SymmetricAlgorithm abstract class:
DESCryptoServiceProvider
RC2CryptoServiceProvider
RijndaelManaged
TripleDESCryptoServiceProvider
Asymmetric (Public/Private) Keys
Public-key, or asymmetric, cryptography algorithms can be used to overcome the difficulties associated with securely distributing a symmetric key. Instead of the same key being used to encrypt and decrypt data, an asymmetric algorithm has two keys: one public and one private. The public key can be distributed freely to anyone, whereas the private key should be closely guarded. In a typical scenario, the public key is used to encrypt some information. The only way that this information can be decrypted is with the private key.
Suppose Susan wants to ensure that only David can read the information she is transmitting. Using David’s public key, which he has previously e-mailed her, she encrypts the information. Upon receiving the encrypted information, David uses his private key to decrypt the information. This guarantees data confidentiality. However, because David’s public key can be easily intercepted, the authentication of the sender can’t be confirmed.
The following asymmetric algorithms included in the .NET Framework all inherit from the
AsymmetricAlgorithm abstract class:
DSACryptoServiceProvider
RSACryptoServiceProvider
Signing
The biggest problem with using an asymmetric key to encrypt information being transmitted is that the authentication of the sender can’t be guaranteed. Using the asymmetric algorithm in reverse, the private key is used to encrypt data and the public key is used to decrypt the data, which guarantees authentication of the information sender. Of course, the confidentiality of the data is at risk, as anyone can decrypt the data. This process is known as signing information.
For example, prior to sending information to David, Susan can generate a hash value from the information and encrypt it using her private key to generate a signature. When David receives the information he can decrypt the signature using Susan’s public key to get the hash value. Applying the hashing algorithm to the information and comparing the generated hash value with the value from the decrypted signature will guarantee the authentication of the sender and the integrity of the data. Because Susan must have sent the data, the goal of non-repudiation is achieved.
Signing information uses the same asymmetric algorithms that are used to encrypt data, and hence is supported in the .NET Framework with the same classes.
203

Chapter 16
Summary of Goals
Individually, none of these four techniques achieves all the goals of cryptography. To be able to securely transmit data between two parties, you need to use a combination. A commonly used scheme is for each party to generate an asymmetric key pair and to share the public keys. The parties can then generate a symmetric key that can be encrypted (using the public key of the receiving party) and signed (using the private key of the sending party). The receiving party needs to validate the signature (using the public key of the sending party) and decrypt the symmetric key (using the private key). Once the parties agree upon the symmetric key, it can be used to secure other information being transmitted.
Applying Cr yptography
So far, you have seen the principles of cryptography and how they are achieved using hashing, encryption, and signing algorithms. In this section you’ll walk through a sample that applies these algorithms and illustrates how the .NET Framework can be used to securely pass data between two parties.
Creating Asymmetric Key Pairs
Begin with a new Windows application and divide the form into two vertical columns. This can be achieved using a TableLayoutPanel with docked Panel controls. Into each of the two vertical columns place a button, which will be used to generate the asymmetric key, and two textboxes, which will be used to display the private and public keys. The result should be something similar to Figure 16-1. For reference, add a name label to each of the vertical panels.
Figure 16-1
Double-clicking each of the buttons will create event handlers into which you need to add code to generate an asymmetric key pair. In this case, use the RSACryptoServiceProvider class, which is the default implementation of the RSA algorithm. Creating a new instance of this class automatically generates a new key pair that can be exported using the ToXmlString method, as shown in the following code. This method takes a Boolean parameter that determines whether the private key information should be exported:
Imports System
Imports System.IO
Imports System.Security.Cryptography
Imports System.Net.Sockets
Imports System.Text
Public Class Form1
204

Cryptography
#Region “Step 1 - Creating Asymmetric Keys”
Private Sub BtnCreateAsmmetricKeys_Click(ByVal sender As System.Object, _
ByVal e As System.EventArgs) _
Handles BtnCreateAsmmetricKeys.Click
CreateAsymmetricKey(Me.TxtPrivateKey1, Me.TxtPublicKey1)
End Sub
Private Sub BtnCreateAsmmetricKeys2_Click(ByVal sender As System.Object, _ ByVal e As System.EventArgs) _ Handles BtnCreateAsmmetricKeys2.Click
CreateAsymmetricKey(Me.TxtPrivateKey2, Me.TxtPublicKey2) End Sub
Private Sub CreateAsymmetricKey(ByVal txtPrivate As TextBox, _ ByVal txtPublic As TextBox)
Dim RSA As New RSACryptoServiceProvider() txtPrivate.Text = RSA.ToXmlString(True) txtPublic.Text = RSA.ToXmlString(False)
End Sub #End Region End Class
In the preceding example, note that a number of namespaces have been imported, which makes working with the cryptography classes much easier. When this application is run and the buttons are invoked, two new key pairs are created and displayed in the appropriate textboxes. Examining the text from one of the private key textboxes, you can see that it is an XML block that is broken up into a number of sections that represent the different components required by the RSA algorithm:
<RSAKeyValue>
<Modulus>uUWTj5Ub+x+LN5xE63y8zLQf4JXNU0WAADsShaBK+jF/cDGdXc9VFcuDvRIX0oKLdUslpH
cRcFh3VLi7djU+oRKAZUfs+75mMCCnoybPEHWWCsRHoIk8s4BAZuJ7KCQO+Jb9DxYQbeeCI9bYm2yYWtHRv
q7PJha5sbMvxkLOI1M=</Modulus>
<Exponent>AQAB</Exponent>
<P>79tcNXbc02ZVowH9qOuv3vrj6F009BSLdfSBtX6y8sosIAsLUfVqH+UEPKQbZO/gLDAyf3U65Qkj
5QZE03CFeQ==</P>
<Q>xb28iwn6BPHqCaDPhxtea6p/OnYNTtJ8f/3Y/zHEl0Mc0aBjtY3Ci1ggnkUGvM4j/+BRTBwUOPKG
NP9DUE94Kw==</Q>
<DP>0IkkYytjlLyNSfsKIho/vxrcmYKn7moKUlRxjW2JgcM6l+ViQzCewvonM93uH1TazzBcRyqSON0
4gv9vSXGz6Q==</DP>
<DQ>j3bFICsw1f2dyzZ82o0kyAB/Ji8YIKPd6A6ILT4yX3w1oHE5ZjNffjGGGM4DwV/eBnr9ALcuhNK
QREsez1mY2Q==</DQ>
<InverseQ>hS1ygkBiiYWyE7DjFgO1eOFhFQxOaL1vPoqlAxw0YepbSQADBGmP8IB1ygzJjP3dmMEvQ
Zhwsbs6MAfPIe/gYQ==</InverseQ>
<D>r4WC7pxNDfQsaFrb0F00YJqlOJezFhjZ014jhgT+A1mxahEXDTDHYwaToCPr/bs/c7flyZIkK1Mk
elcpAiwfT8ssNgx2H97zhcHkcvCBO8yCgc0r+cSYlRNKLa+UPwsoXcc5NXGT0SHQG+GCVl7bywrtrWRryaW
OIpSwuHmjZYE=</D>
</RSAKeyValue>
In actual fact, this block shows both the public and private key components, which you can see if you look at the corresponding public key textbox:
<RSAKeyValue>
<Modulus>uUWTj5Ub+x+LN5xE63y8zLQf4JXNU0WAADsShaBK+jF/cDGdXc9VFcuDvRIX0oKLdUslpH
cRcFh3VLi7djU+oRKAZUfs+75mMCCnoybPEHWWCsRHoIk8s4BAZuJ7KCQO+Jb9DxYQbeeCI9bYm2yYWtHRv
q7PJha5sbMvxkLOI1M=</Modulus>
205